This tutorial shows you how to:
- Create a Jenkins continuous integration system to run your builds using on-demand Jenkins agents in Compute Engine.
- Store your build artifacts in Cloud Storage.
- Apply a lifecycle policy to move older build artifacts in Cloud Storage to less expensive storage options.
Architecture
The following diagram outlines the tutorial architecture.

In the diagram, a service account is added to Jenkins for it to be able to create agent instances and push artifacts to Cloud Storage for long-term storage. Jenkins provisions the instances on the fly as it runs builds. As the build artifacts get older, they move through various storage classes to limit their retention cost.
Objectives
- Create a base image with Packer for running your Jenkins builds.
- Provision Jenkins using Cloud Marketplace.
- Configure Jenkins to deploy ephemeral build agents.
- Upload build artifacts to Cloud Storage.
- Configure lifecycle policies to optimize your Cloud Storage costs.
Costs
In this document, you use the following billable components of Google Cloud:
- Compute Engine
- Cloud Storage
To generate a cost estimate based on your projected usage,
use the pricing calculator.
Use the Pricing Calculator to generate a cost estimate based on your projected usage.
Before you begin
- Sign in to your Google Cloud account. If you're new to Google Cloud, create an account to evaluate how our products perform in real-world scenarios. New customers also get $300 in free credits to run, test, and deploy workloads.
-
In the Google Cloud console, on the project selector page, select or create a Google Cloud project.
-
Make sure that billing is enabled for your Google Cloud project.
-
Enable the Compute Engine API.
-
In the Google Cloud console, on the project selector page, select or create a Google Cloud project.
-
Make sure that billing is enabled for your Google Cloud project.
-
Enable the Compute Engine API.
Setting up your environment
In this section, you configure the infrastructure and identities required to complete the tutorial. You execute the rest of the tutorial from inside Cloud Shell.
Configure IAM
Create an Identity and Access Management (IAM) service account to delegate permissions to Jenkins. This account enables Jenkins to store data in Cloud Storage and launch instances in Compute Engine. Jenkins runs your builds in ephemeral instances and stores build artifacts in Cloud Storage.
Create a service account
Create the service account itself:
gcloud iam service-accounts create jenkins --display-name jenkins
Store the service account email address and your current Google Cloud project ID in environment variables for use in later commands:
export SA_EMAIL=$(gcloud iam service-accounts list \
    --filter="displayName:jenkins" --format='value(email)')
export PROJECT=$(gcloud info --format='value(config.project)')
Bind the following roles to your service account:
gcloud projects add-iam-policy-binding $PROJECT \
    --role roles/storage.admin --member serviceAccount:$SA_EMAIL
gcloud projects add-iam-policy-binding $PROJECT --role roles/compute.instanceAdmin.v1 \
    --member serviceAccount:$SA_EMAIL
gcloud projects add-iam-policy-binding $PROJECT --role roles/compute.networkAdmin \
    --member serviceAccount:$SA_EMAIL
gcloud projects add-iam-policy-binding $PROJECT --role roles/compute.securityAdmin \
    --member serviceAccount:$SA_EMAIL
gcloud projects add-iam-policy-binding $PROJECT --role roles/iam.serviceAccountActor \
    --member serviceAccount:$SA_EMAIL
Download the service account key
Now that you've granted the service account the appropriate permissions, you need to create and download its key. Keep the key in a safe place. You'll use it later step when you configure the JClouds plugin to authenticate with the Compute Engine API.
Create the key file:
gcloud iam service-accounts keys create jenkins-sa.json --iam-account $SA_EMAIL
In Cloud Shell, click More more_vert, and then click Download file.
Type
jenkins-sa.json.Click Download to save the file locally.
Create a Jenkins agent image
Next, you create a reusable Compute Engine image that contains the software and tools needed to run as a Jenkins executor.
Create an SSH key for Cloud Shell
Later in this tutorial, you use
Packer
to build your images, which requires the ssh command to communicate with your
build instances. To enable SSH access, create and upload an SSH key in Cloud Shell:
Create a SSH key pair. If one already exists, this command uses that key pair; otherwise, it creates a new one:
ls ~/.ssh/id_rsa.pub || ssh-keygen -N ""
Add the Cloud Shell public SSH key to your project's metadata:
gcloud compute project-info describe \
    --format=json | jq -r '.commonInstanceMetadata.items[] | select(.key == "ssh-keys") | .value' > sshKeys.pub
echo "$USER:$(cat ~/.ssh/id_rsa.pub)" >> sshKeys.pub
gcloud compute project-info add-metadata --metadata-from-file ssh-keys=sshKeys.pub
Create the baseline image
The next step is to use
Packer
to create a baseline virtual machine (VM) image for your build agents, which act
as ephemeral build executors in Jenkins. The most basic Jenkins agent only
requires Java to be installed. You can customize your image by adding shell
commands in the provisioners section of the Packer configuration or by adding
other
Packer provisioners.
In Cloud Shell, download and unpack the most recent release of Packer. The following example uses Packer 1.7.10. You can check the Hashicorp website to see if there's a more recent version:
wget https://releases.hashicorp.com/packer/1.7.10/packer_1.7.10_linux_amd64.zip
unzip packer_1.7.10_linux_amd64.zip
Create the configuration file for your Packer image builds:
export PROJECT=$(gcloud info --format='value(config.project)')
cat > jenkins-agent.json <<EOF
{
  "builders": [
    {
      "type": "googlecompute",
      "project_id": "$PROJECT",
      "source_image_family": "ubuntu-2004-lts",
      "source_image_project_id": "ubuntu-os-cloud",
      "zone": "us-central1-a",
      "disk_size": "50",
      "image_name": "jenkins-agent-{{timestamp}}",
      "image_family": "jenkins-agent",
      "ssh_username": "ubuntu"
    }
  ],
  "provisioners": [
    {
      "type": "shell",
      "inline": ["sudo apt-get update && sudo apt-get install -y default-jdk"]
    }
  ]
}
EOF
Build the image by running Packer:
./packer build jenkins-agent.json
When the build completes, the name of the disk image is displayed with the format
jenkins-agent-[TIMESTAMP], where[TIMESTAMP]is the epoch time when the build started.==> Builds finished. The artifacts of successful builds are: --> googlecompute: A disk image was created: jenkins-agent-1612997575
Installing Jenkins
In this section, you use Cloud Marketplace to provision a Jenkins instance. You customize this instance to use the agent image you created in the previous section.
Go to the Cloud Marketplace solution for Jenkins.
Click Launch.
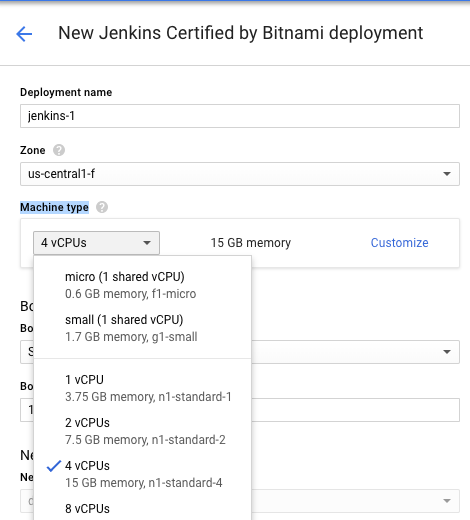
Change the Machine Type field to 4 vCPUs 15 GB Memory, n1-standard-4.
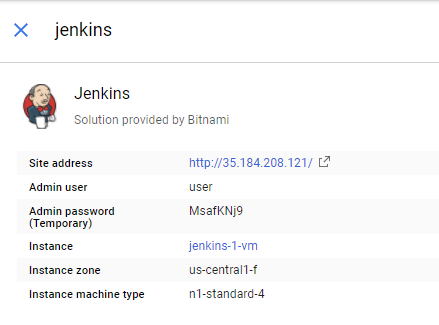
Click Deploy and wait for your Jenkins instance to finish being provisioned. When it is finished, you will see:

Open your Jenkins instance in the browser by clicking the Site Address link.
Log in to Jenkins using the Admin user and Admin password displayed in the details pane.
Your Jenkins instance is now ready to use.
Configuring Jenkins plugins
Jenkins requires plugins to create on-demand agents in Compute Engine and to store artifacts in Cloud Storage. You need to install and configure these plugins.
Install plugins
- In the Jenkins UI, select Manage Jenkins.
- Click Manage Plugins.
- Click the Available tab.
Use the Filter bar to find the following plugins and select the boxes next to them:
- Compute Engine plugin
- Cloud Storage plugin
The following image shows the Cloud Storage plugin selected:
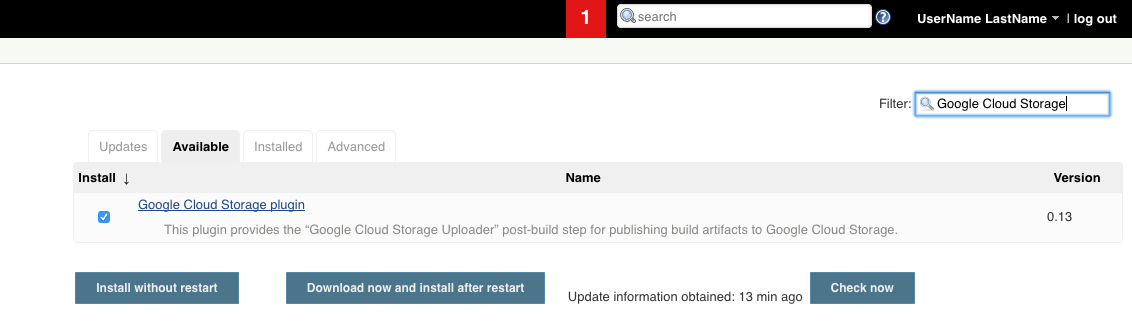
Click Download now and install after restart.
Click the Restart Jenkins when installation is complete and no jobs are running checkbox. Jenkins restarts and completes the plugin installations.
Create plugin credentials
You need to create Google Credentials for your new plugins:
- Log in to Jenkins again, and click Manage Jenkins.
- Click Credentials.
- Click Jenkins under Store.
- In the main pane of the UI, click Global credentials (unrestricted).
Create the Google credentials:
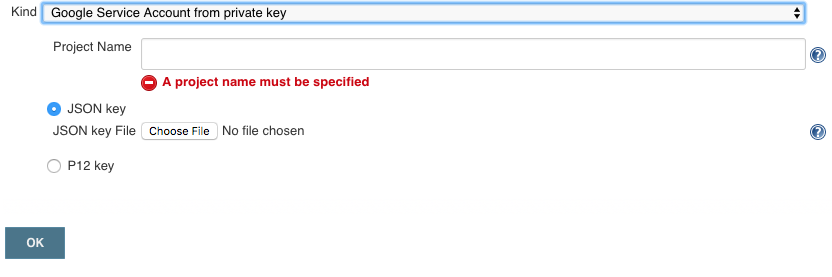
- Click Add Credentials.
- Set Kind to Google Service Account from private key.
- In the Project Name field, enter your Google Cloud project ID.
- Click Choose file.
- Select the
jenkins-sa.jsonfile that you previously downloaded from Cloud Shell. Click OK.
Click Jenkins.
Configure the Compute Engine plugin
Configure the Compute Engine plugin with the credentials it uses to provision your agent instances.
- Click Manage Jenkins.
- Click Manage Nodes and Clouds.
- Click Configure Clouds.
- Click Add a new Cloud.
- Click Compute Engine.
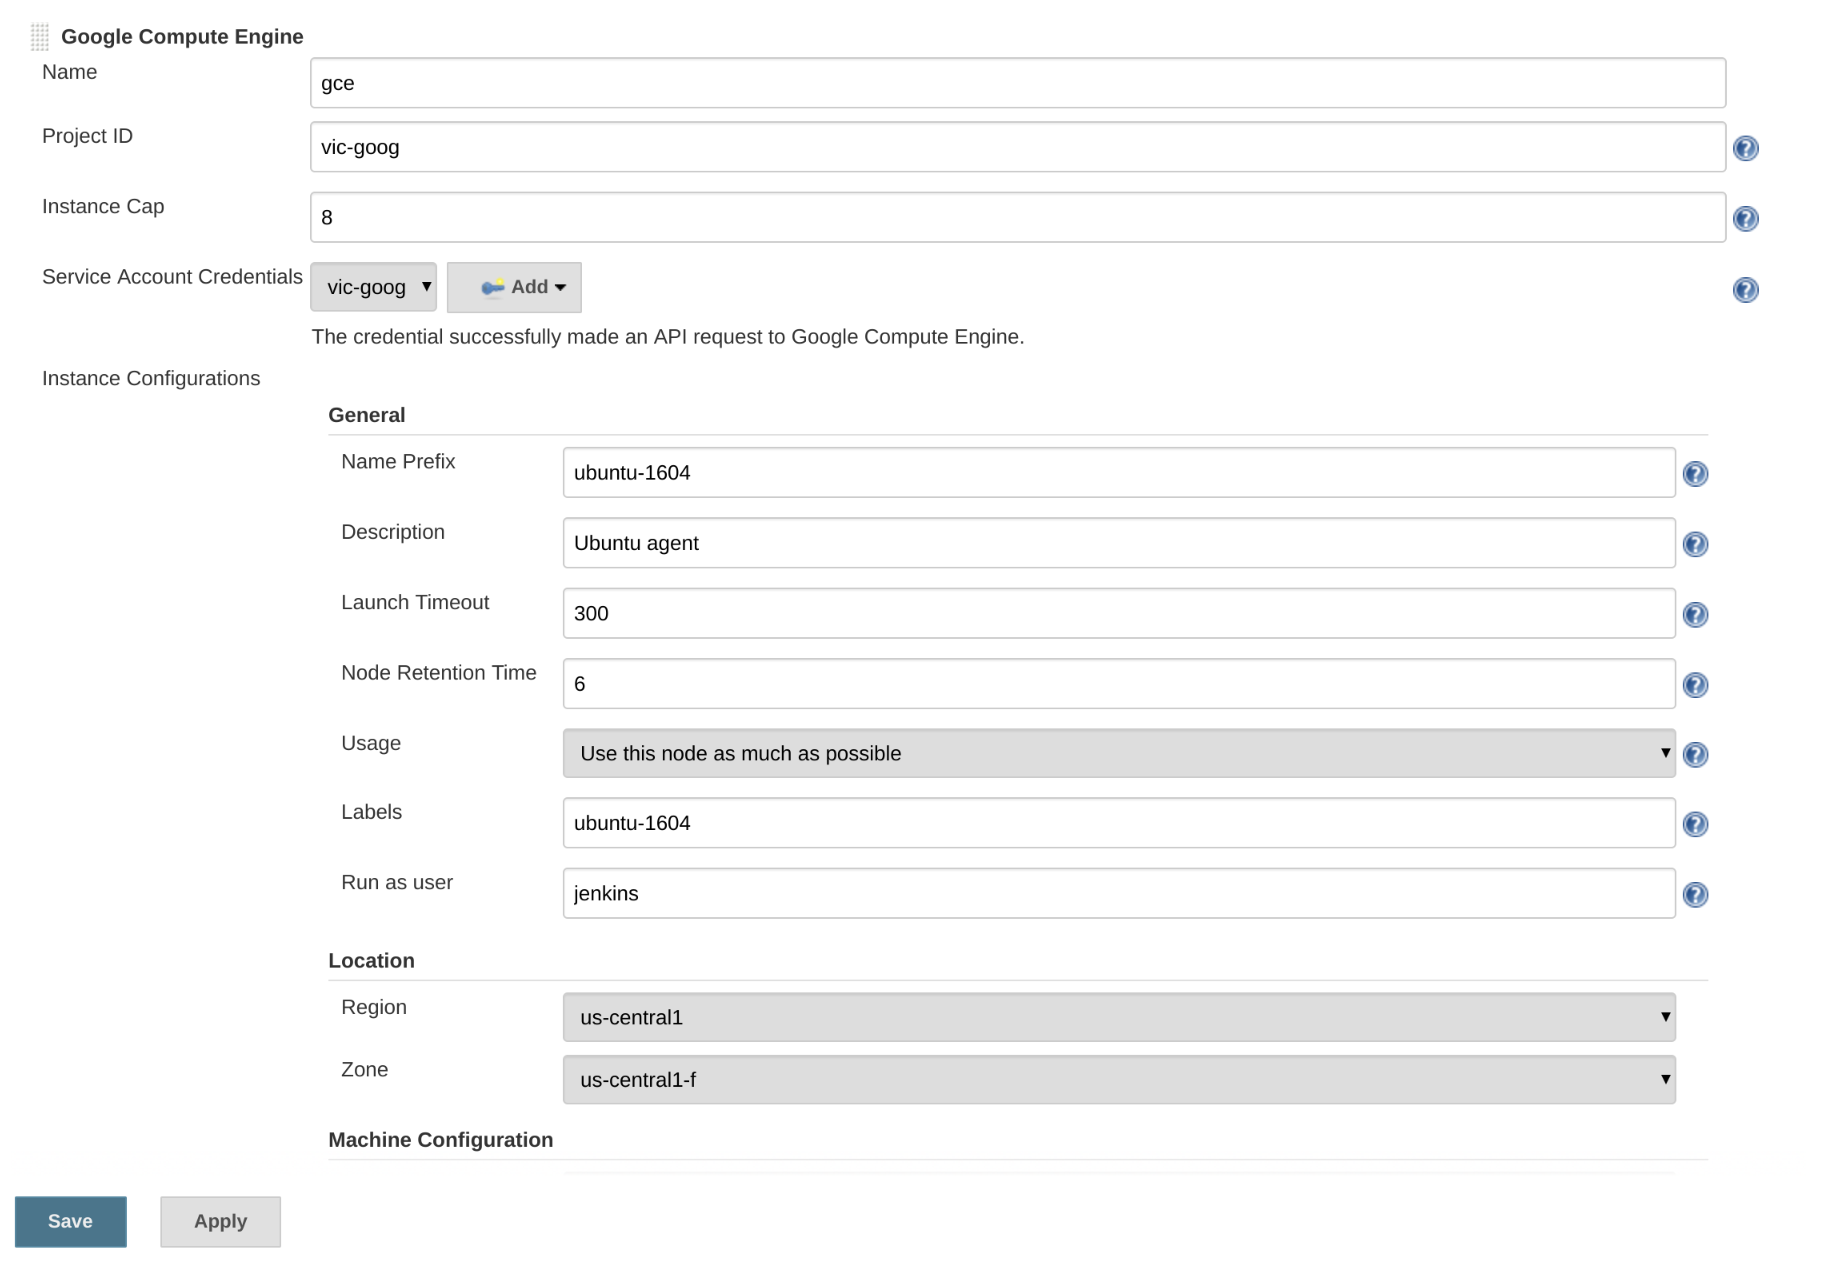
Set the following settings and replace
[YOUR_PROJECT_ID]with your Google Cloud project ID:- Name:
gce - Project ID:
[YOUR_PROJECT_ID] - Instance Cap:
8
- Name:
Choose the service account from the Service Account Credentials drop-down list. It is listed as your Google Cloud project ID.
Configure Jenkins instance configurations
Now that the Compute Engine plugin is configured, you can configure Jenkins instance configurations for the various build configurations you'd like.
- On the Configure Clouds page, click Add add for Instance Configurations.
Enter the following General settings:
- Name:
ubuntu-2004 - Description:
Ubuntu agent - Labels:
ubuntu-2004
- Name:
Enter the following for Location settings:
- Region<:
us-central1 - Zone:
us-central1-f
- Region<:
Click Advanced.
For Machine Configuration, choose the Machine Type of n1-standard-1.
Under Networking, choose the following settings:
- Network: Leave at default setting.
- Subnetwork: Leave at default setting.
- Select Attach External IP?.
Select the following for Boot Disk settings:
- For Image project, choose your Google Cloud project.
- For Image name, select the image you built earlier using Packer.
Click Save to persist your configuration changes.
Creating a Jenkins job to test the configuration
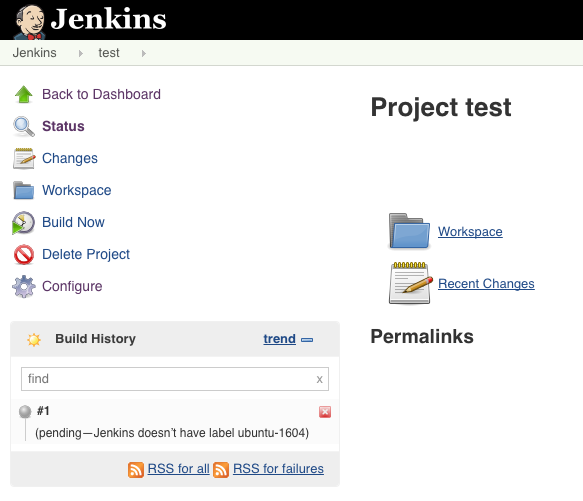
Jenkins is configured to automatically launch an instance when a job is
triggered that requires an agent with the ubuntu-2004 label. Create a job
that tests whether the configuration is working as expected.
- Click Create new job in the Jenkins interface.
- Enter
testas the item name. - Click Freestyle project, and then click OK.
- Select the Execute concurrent builds if necessary and Restrict where this project can run boxes.
- In the Label Expression field, enter
ubuntu-2004. - In the Build section, click Add build step.
- Click Execute Shell.
In the command box, enter a test string:
echo "Hello world!"
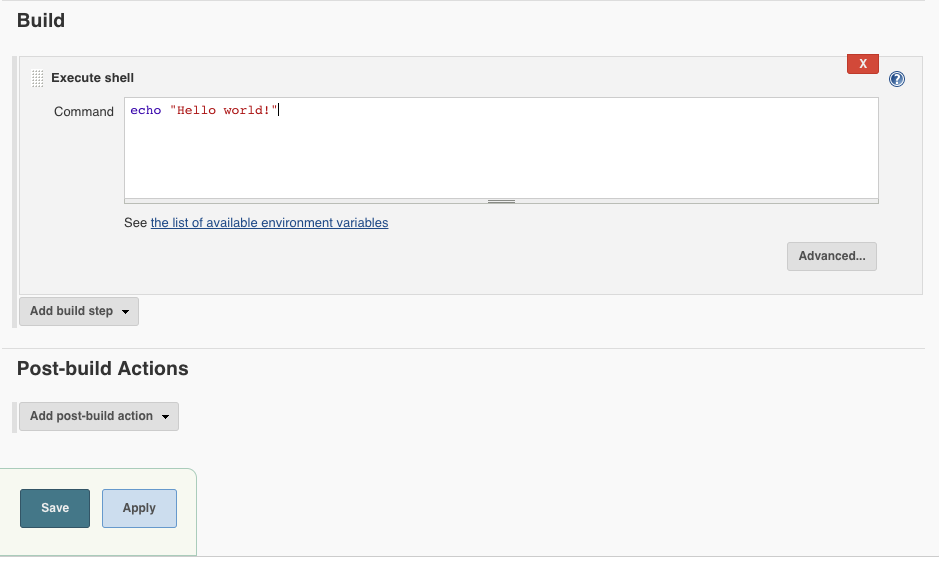
Click Save.
Click Build Now to start a build.
Uploading build artifacts to Cloud Storage
You might want to store build artifacts for future analysis or testing. Configure your Jenkins job to generate an artifact and upload it to Cloud Storage. The build log is uploaded to the same bucket.
In Cloud Shell, create a storage bucket for your artifacts:
export PROJECT=$(gcloud info --format='value(config.project)')
gcloud storage buckets create gs://$PROJECT-jenkins-artifacts
In the job list in the Jenkins UI, click test.
Click Configure.
Under Build, set the Command text field to:
env > build_environment.txt
Under Post-build Actions, click Add post-build action.
Click Cloud Storage Plugin.
In the Storage Location field, enter your artifact path, substituting your Google Cloud project ID for
[YOUR_PROJECT_ID]:gs://[YOUR_PROJECT_ID]-jenkins-artifacts/$JOB_NAME/$BUILD_NUMBER
Click Add Operation.
Click Classic Upload.
In the File Pattern field, enter
build_environment.txt.In the Storage Location field, enter your storage path, substituting your Google Cloud project ID for
[YOUR_PROJECT_ID]:gs://[YOUR_PROJECT_ID]-jenkins-artifacts/$JOB_NAME/$BUILD_NUMBER
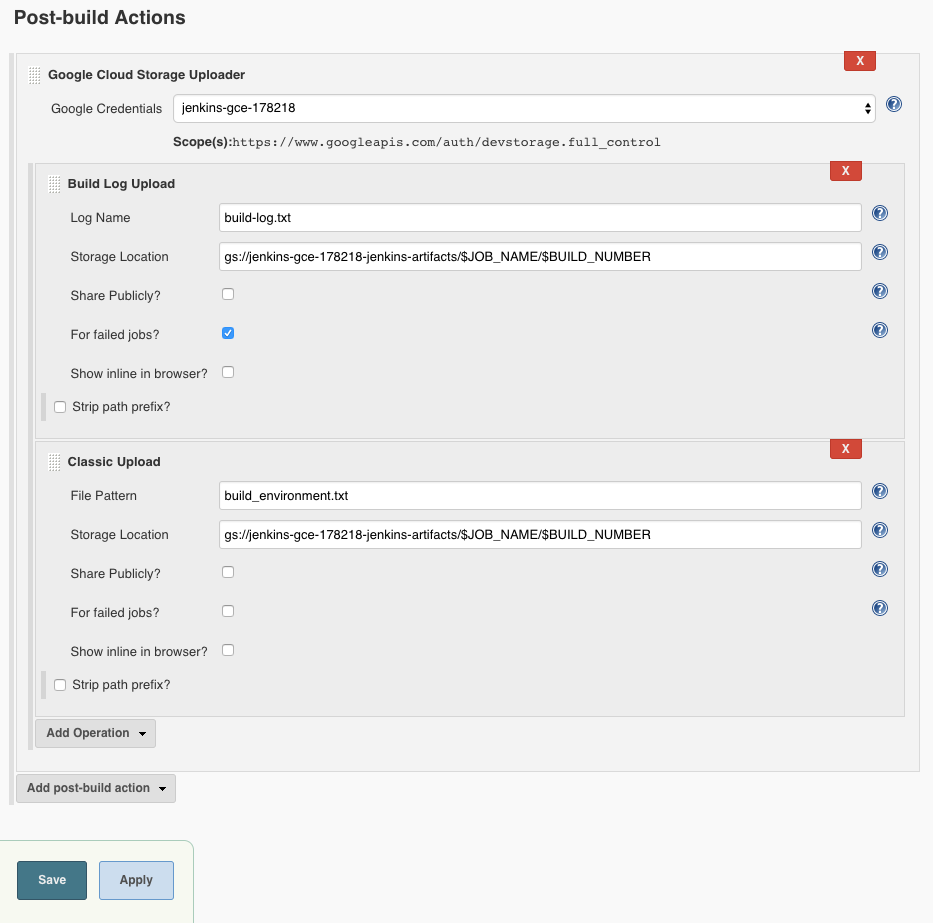
Click Save.
Click Build Now to start a new build. The build runs on the Compute Engine instance that you provisioned previously. When the build completes, it uploads the artifact file,
build_environment.txt, to the configured Cloud Storage bucket.In Cloud Shell, view the build artifact using
gcloud storage:export PROJECT=$(gcloud info --format='value(config.project)') gcloud storage cat gs://$PROJECT-jenkins-artifacts/test/2/build_environment.txt
Configuring object lifecycle management
You're more likely to access recent build artifacts. To save costs on infrequently accessed objects, use object lifecycle management to move your artifacts from higher-performance storage classes to lower-cost and higher-latency storage classes.
In Cloud Shell, create the lifecycle configuration file to transition all objects to Nearline storage after 30 days and Nearline objects to Coldline storage after 365 days.
cat > artifact-lifecycle.json <<EOF
{
"lifecycle": {
  "rule": [
  {
    "action": {
      "type": "SetStorageClass",
      "storageClass": "NEARLINE"
    },
    "condition": {
      "age": 30,
      "matchesStorageClass": ["MULTI_REGIONAL", "STANDARD", "DURABLE_REDUCED_AVAILABILITY"]
    }
  },
  {
    "action": {
      "type": "SetStorageClass",
      "storageClass": "COLDLINE"
    },
    "condition": {
      "age": 365,
      "matchesStorageClass": ["NEARLINE"]
    }
  }
]
}
}
EOF
Upload the configuration file to your artifact storage bucket:
export PROJECT=$(gcloud info --format='value(config.project)')
gcloud storage buckets update gs://$PROJECT-jenkins-artifacts --lifecycle-file=artifact-lifecycle.json
Clean up
Delete any Jenkins agents that are still running:
gcloud compute instances list --filter=metadata.jclouds-group=ubuntu-2004 --uri | xargs gcloud compute instances delete
Using Cloud Deployment Manager, delete the Jenkins instance:
gcloud deployment-manager deployments delete jenkins-1
Delete the Cloud Storage bucket:
export PROJECT=$(gcloud info --format='value(config.project)')
gcloud storage rm gs://$PROJECT-jenkins-artifacts --recursive
Delete the service account:
export SA_EMAIL=$(gcloud iam service-accounts list --filter="displayName:jenkins" --format='value(email)')
gcloud iam service-accounts delete $SA_EMAIL
What's next
- Learn about continuous deployment with Jenkins
- Deploy Jenkins to Kubernetes Engine
- Explore reference architectures, diagrams, and best practices about Google Cloud. Take a look at our Cloud Architecture Center.