本教學課程說明如何使用 Google Cloud 控制台中的 Google Kubernetes Engine (GKE) 「應用程式」頁面。
當您為許多應用程式和資源採用 Kubernetes 時,可能難以識別及追蹤與單一應用程式相關的各種元件。在每個命名空間中部署多個應用程式時,可能難以判斷哪些資源與哪些應用程式相關。此外,您通常必須在多個位置搜尋說明文件和中繼資料,瞭解應用程式的用途、擁有者,以及如何與服務互動。
GKE 提供「應用程式」頁面,協助解決這些挑戰:
「應用程式」頁面是架構中的獨立資源,用於說明系統的中繼資料。您可以在這個頁面以視覺化方式整理資源,不必變更架構。您可以在 YAML 檔案中定義值,將所有應用程式資源分組,並為營運團隊加入重要中繼資料。建立、修改及刪除 YAML 檔案不會影響現有資源,因此您可以立即使用資源,不必擔心系統受到影響。
為示範本頁內容,本教學課程將說明如何對應用程式實作 Kubernetes 應用程式資源,並新增使用者定義的中繼資料,以便在 GKE 中整理及簡化應用程式管理作業。
本教學課程適用於建立應用程式,以便在 GKE 中執行的開發人員。本文假設您熟悉 Kubernetes 的基本概念,並有編寫 Kubernetes 資源 YAML 檔案的經驗。
目標
- 介紹 Kubernetes 應用程式資源。
- 在現有架構中新增 Kubernetes 應用程式資源。
- 透過Google Cloud 控制台建立及查看應用程式的自訂資訊。
費用
在本文件中,您會使用 Google Cloud的下列計費元件:
如要根據預測用量估算費用,請使用 Pricing Calculator。
完成本文所述工作後,您可以刪除已建立的資源,避免繼續計費。詳情請參閱清除所用資源一節。
事前準備
-
In the Google Cloud console, on the project selector page, select or create a Google Cloud project.
-
Verify that billing is enabled for your Google Cloud project.
-
Enable the Compute Engine and Kubernetes Engine APIs.
-
In the Google Cloud console, activate Cloud Shell.
您將在 Cloud Shell 或 Cloud Shell 編輯器中執行本教學課程的指令。
準備環境
在 Cloud Shell 中,為專案設定環境變數:
export PROJECT_ID=PROJECT_ID
gcloud config set core/project $PROJECT_ID
gcloud config set compute/zone us-central1-c
將
PROJECT_ID替換為您的 Google Cloud 專案 ID。建立 GKE 叢集:
gcloud container clusters create sample-cluster在本教學課程中,您會在預設的 GKE 叢集中執行應用程式。
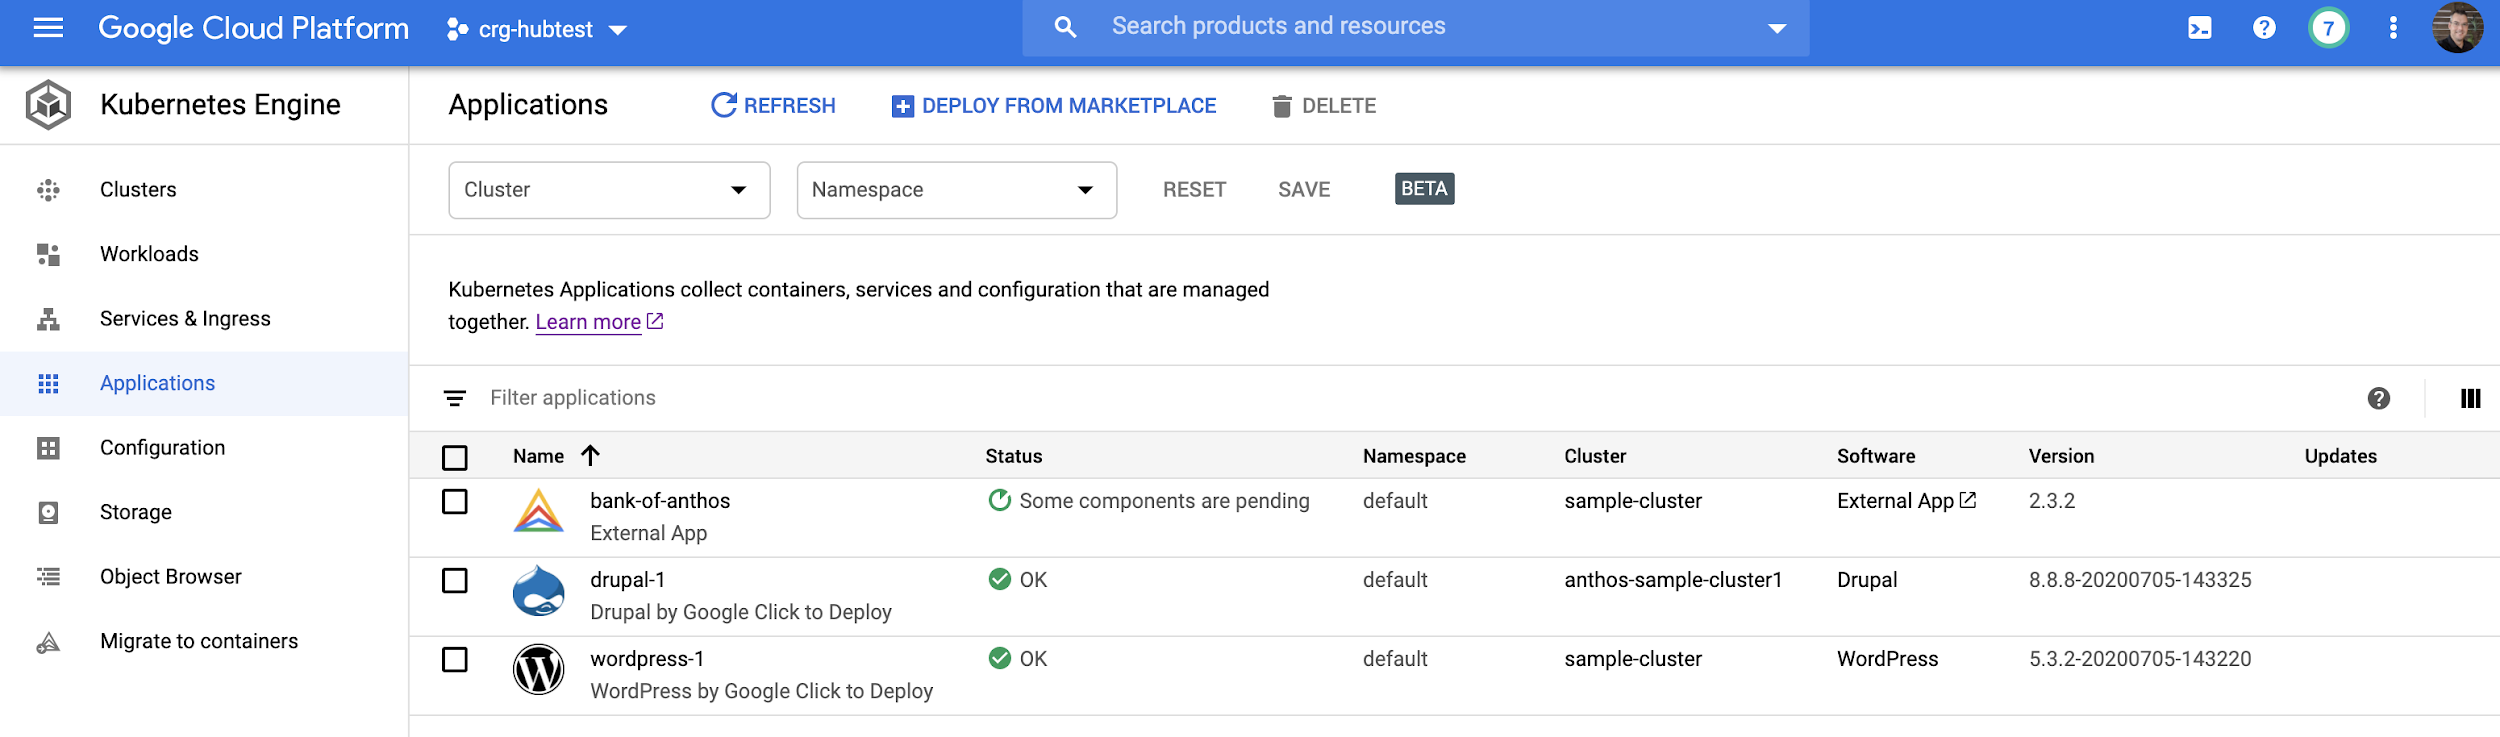
安裝範例應用程式
在本教學課程中,您將使用基本的 Nginx 範例應用程式和 Bank of Anthos 範例應用程式,模擬在相同命名空間中執行的多個應用程式。
在 Cloud Shell 中安裝 Nginx 範例應用程式:
kubectl apply -f https://raw.githubusercontent.com/kubernetes/website/master/content/en/examples/application/web/web.yaml這項指令會建立名為
web的 StatefulSet 資源,以及名為nginx的服務。在 Google Cloud 控制台中,您可以在 GKE 的「Workloads」(工作負載) 和「Services & Ingress」(服務與 Ingress) 頁面查看這些資源。複製包含 Bank of Anthos 範例應用程式的 GitHub 存放區:
git clone https://github.com/GoogleCloudPlatform/bank-of-anthos.git
cd bank-of-anthos
產生 SSH 金鑰,並儲存為 Kubernetes 密鑰:
openssl genrsa -out jwtRS256.key 4096
openssl rsa -in jwtRS256.key -outform PEM -pubout -out jwtRS256.key.pub
kubectl create secret generic jwt-key --from-file=./jwtRS256.key --from-file=./jwtRS256.key.pub
執行 Bank of Anthos 範例應用程式需要 SSH 金鑰。
將範例應用程式部署至叢集:
kubectl apply -f kubernetes-manifests稍待片刻,您就能在 Google Cloud 控制台的下列頁面中,查看應用程式資源:
- 「工作負載」頁面
- 「Services & Ingress」(Service 與 Ingress) 頁面
注意事項:
- Nginx 和 Bank of Anthos 範例應用程式的資源會混在一起。
- 「應用程式」頁面目前不會顯示任何資源。 您會在後續步驟中填寫「應用程式」頁面。
準備 GKE
「應用程式」頁面顯示的資源是透過 Kubernetes 應用程式資源類型指定,這是開放原始碼 Kubernetes 專案提供的自訂資源定義 (CRD)。根據預設,Kubernetes 不會啟用 Application CRD。GKE 中的部分服務 (例如 Marketplace 和應用程式部署) 會安裝應用程式 CRD,但如果您未使用任何這類服務,應用程式 CRD 預設不會提供。
如要安裝 Application CRD,請按照下列步驟操作:
在 Cloud Shell 中,對每個叢集套用一次 Application CRD:
kubectl apply -f https://raw.githubusercontent.com/kubernetes-sigs/application/master/deploy/kube-app-manager-aio.yaml(選用) 指令完成後,請查看叢集中的 Application CRD:
kubectl get crd以下輸出內容是已安裝 CRD 的清單,包括
applications.app.k8s.io:NAME CREATED AT applications.app.k8s.io 2020-07-24T19:32:20Z backendconfigs.cloud.google.com 2020-07-24T19:28:40Z managedcertificates.networking.gke.io 2020-07-24T19:28:57Z scalingpolicies.scalingpolicy.kope.io 2020-07-24T19:28:57Z updateinfos.nodemanagement.gke.io 2020-07-24T19:28:57Z
包括應用程式資源
現在叢集已提供應用程式 CRD,下一個步驟是建立及部署應用程式資源的執行個體。
由於 Application 資源是 Kubernetes 資源,因此結構與其他 Kubernetes 資源類似,包括
apiVersion、kind、metadata和spec的欄位和選項:apiVersion: app.k8s.io/v1beta1 kind: Application metadata: name: ... spec: ...在接下來的章節中,您將使用 Application 資源中提供的各種欄位和選項。
建立基礎應用程式資源
您可以將應用程式資源新增至任何現有資源集。在本教學課程中,您會從空白資源開始,填寫每個部分。
在 Cloud Shell 中,於
kubernetes-manifests目錄建立並編輯application.yaml檔案:touch kubernetes-manifests/application.yaml edit kubernetes-manifests/application.yamlCloud Shell 編輯器隨即開啟並顯示空白檔案。
貼上下列程式碼行,定義第一個應用程式:
apiVersion: app.k8s.io/v1beta1
kind: Application
metadata:
  name: "bank-of-anthos"
在 Cloud Shell 選單列中,按一下「開啟終端機」。
在 Cloud Shell 中套用資源:
kubectl apply -f kubernetes-manifests/application.yaml前往 Google Cloud 控制台的「Applications」頁面。
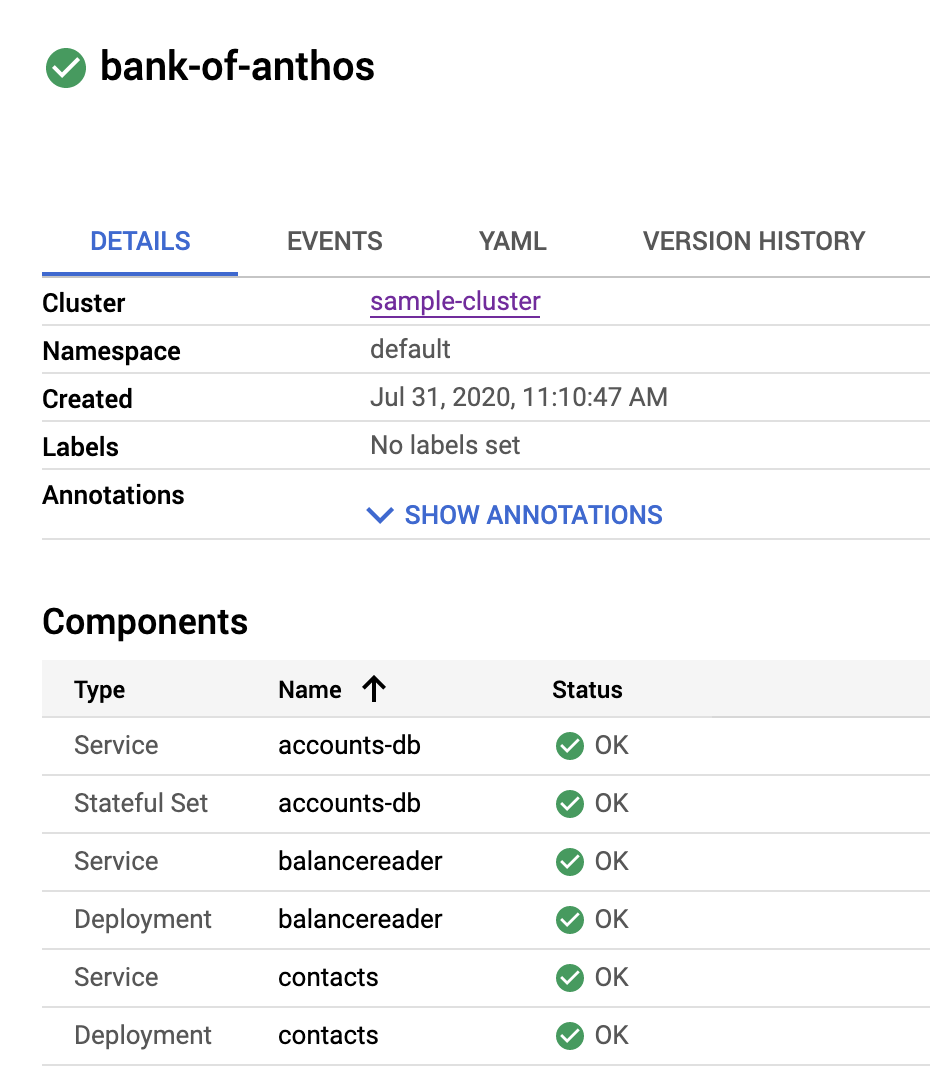
「應用程式」頁面會顯示您新增的資源:

依元件納入資源
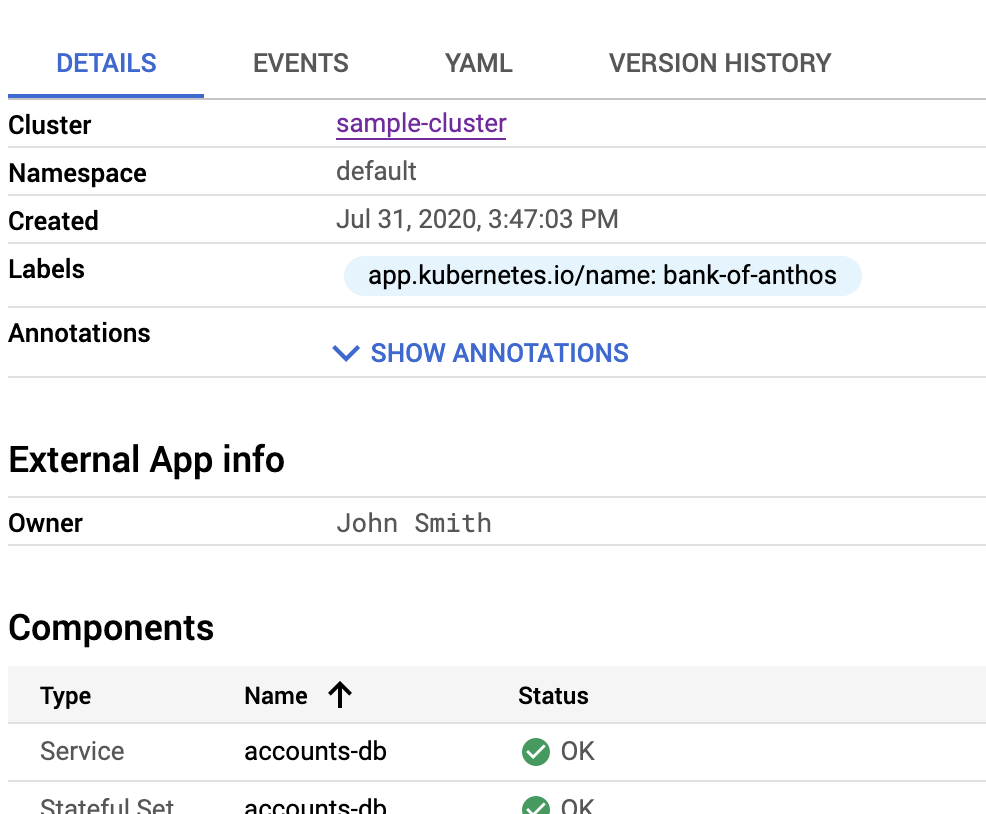
「應用程式」頁面會顯示 Bank of Anthos 應用程式。當您在「名稱」欄位中點選「bank-of-anthos」,會看到應用程式的基本資訊:

您可以在Google Cloud 控制台中新增各種元件。舉例來說,如要顯示服務、部署作業和 StatefulSet,請編輯
application.yaml定義的componentKinds區段,例如:spec: componentKinds: - group: v1 kind: Service - group: apps kind: Deployment - group: v1 kind: StatefulSet在後續步驟中,您會將這些元件新增至 Bank of Anthos 資源定義:
在 Cloud Shell 選單列,點選「開啟編輯器」。
在 Cloud Shell 編輯器中,貼上下列內容,覆寫
kubernetes-manifests/application.yaml檔案的內容:apiVersion: app.k8s.io/v1beta1 kind: Application metadata: name: "bank-of-anthos" spec: componentKinds: - group: v1 kind: Service - group: apps kind: Deployment - group: v1 kind: StatefulSet新增
spec區段後,應用程式定義會加入Service、Deployment和StatefulSet。在 Cloud Shell 中套用資源:
kubectl apply -f kubernetes-manifests/application.yaml在 Google Cloud 控制台中,前往 Bank of Anthos 應用程式的詳細資料頁面。
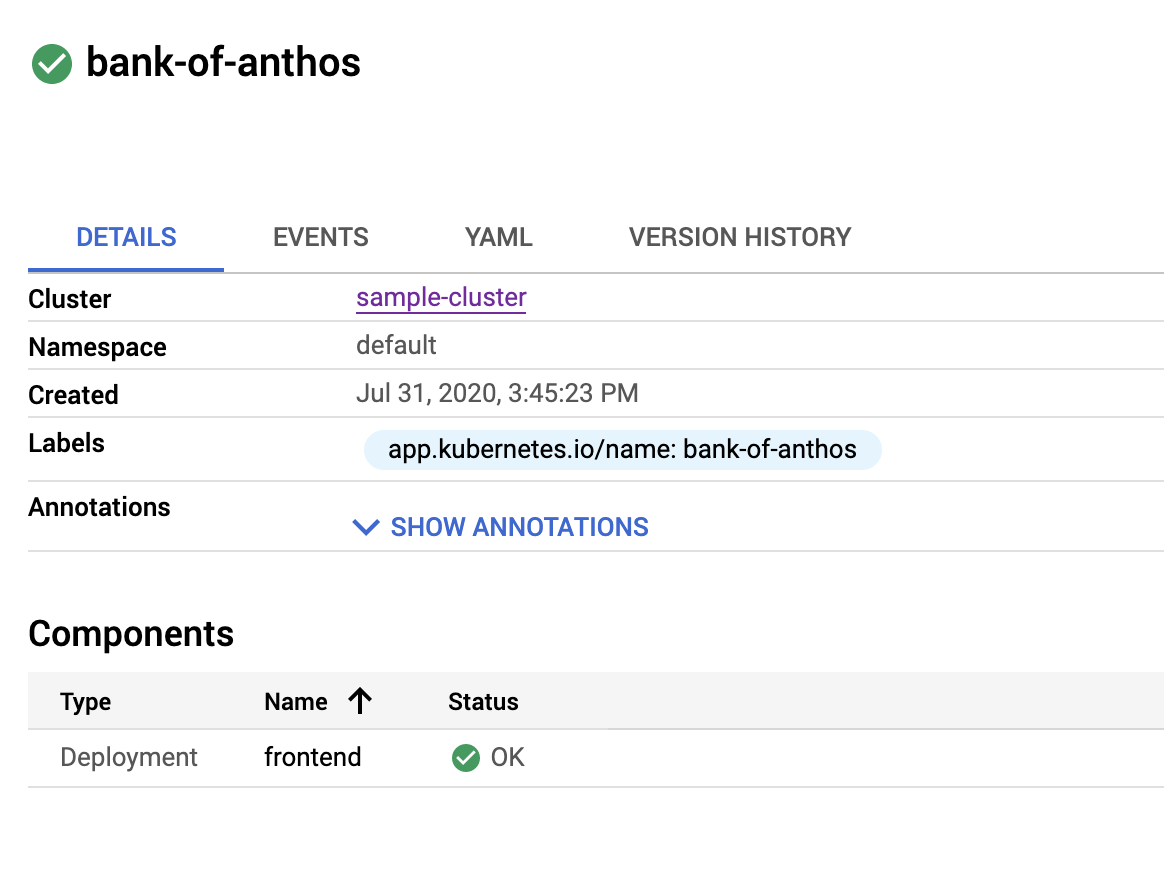
系統會顯示指定類型的元件:
使用選取器篩選資源
在本教學課程中,元件清單包含整個命名空間中,已定義元件集的所有資源,以及兩個範例應用程式的資源。舉例來說,下圖顯示 Nginx 範例應用程式的
nginx服務,以及 Bank of Anthos 範例應用程式的transactionhistory部署作業:
如要確保只顯示一個應用程式的資源 (例如 Bank of Anthos 應用程式),可以使用選取器識別特定資源。如要瞭解選取器運作方式,請按照下列步驟,在資源中新增標籤:
在 Cloud Shell 中開啟
frontend.yaml檔案:edit kubernetes-manifests/frontend.yaml在 Cloud Shell 編輯器中,將下列
label項目貼到第 18 行之後:labels: app.kubernetes.io/name: "bank-of-anthos"metadata區段如下所示:apiVersion: apps/v1 kind: Deployment metadata: name: frontend labels: app.kubernetes.io/name: "bank-of-anthos" spec:完成的
application.yaml檔案如下所示:apiVersion: app.k8s.io/v1beta1 kind: Application metadata: name: "bank-of-anthos" labels: app.kubernetes.io/name: "bank-of-anthos" spec: selector: matchLabels: app.kubernetes.io/name: "bank-of-anthos" componentKinds: - group: v1 kind: Service - group: apps kind: Deployment - group: v1 kind: StatefulSet在 Cloud Shell 中套用資源:
kubectl apply -f kubernetes-manifests/在 Google Cloud 控制台中,前往 Bank of Anthos 應用程式的詳細資料頁面。
系統只會顯示符合特定標籤的資源:
使用
kustomize將標籤套用至所有資源手動為應用程式中的每項資源套用標籤可能很麻煩。下列步驟說明如何使用
kustomize有效率地為所有資源新增標籤:在 Cloud Shell 中下載
kustomize:curl -s "https://raw.githubusercontent.com/\ kubernetes-sigs/kustomize/master/hack/install_kustomize.sh" | bash建立及編輯
kustomization.yaml檔案:touch kubernetes-manifests/kustomization.yaml edit kubernetes-manifests/kustomization.yaml在 Cloud Shell 編輯器中,將下列程式碼行新增至
kustomization.yaml:apiVersion: kustomize.config.k8s.io/v1beta1 kind: Kustomization resources: - accounts-db.yaml - application.yaml - balance-reader.yaml - config.yaml - contacts.yaml - frontend.yaml - ledger-db.yaml - ledger-writer.yaml - loadgenerator.yaml - transaction-history.yaml - userservice.yaml commonLabels: app.kubernetes.io/name: "bank-of-anthos"在這個
kustomization.yaml定義中,您可以指定要對哪些資源套用修改內容,以及要進行哪些修改。在本例中,您指定所有資源都應具有app.kubernetes.io/name: "bank-of-anthos"這個通用標籤。在 Cloud Shell 中,刪除舊資源:
kubectl delete -f kubernetes-manifests/您必須先刪除舊資源,才能套用
kustomization.yaml中指定的新資源。請使用
kustomize旗標 (而非file旗標) 套用資源:./kustomize build kubernetes-manifests/ | kubectl apply -f -在 Google Cloud 控制台中,前往 Bank of Anthos 應用程式的詳細資料頁面。
詳細資料頁面會顯示 Bank of Anthos 範例應用程式的資源,但不會顯示 Nginx 範例應用程式的資源:

在螢幕上新增實用的中繼資料
您可以在Google Cloud 控制台中顯示應用程式的自訂中繼資料。例如應用程式的功能、擁有者、相關資訊的來源,以及登入方式。這類資訊可用於各種用途,例如在貴機構內運作多個應用程式時。
以下各節說明可新增的部分中繼資料。
新增說明和說明文件
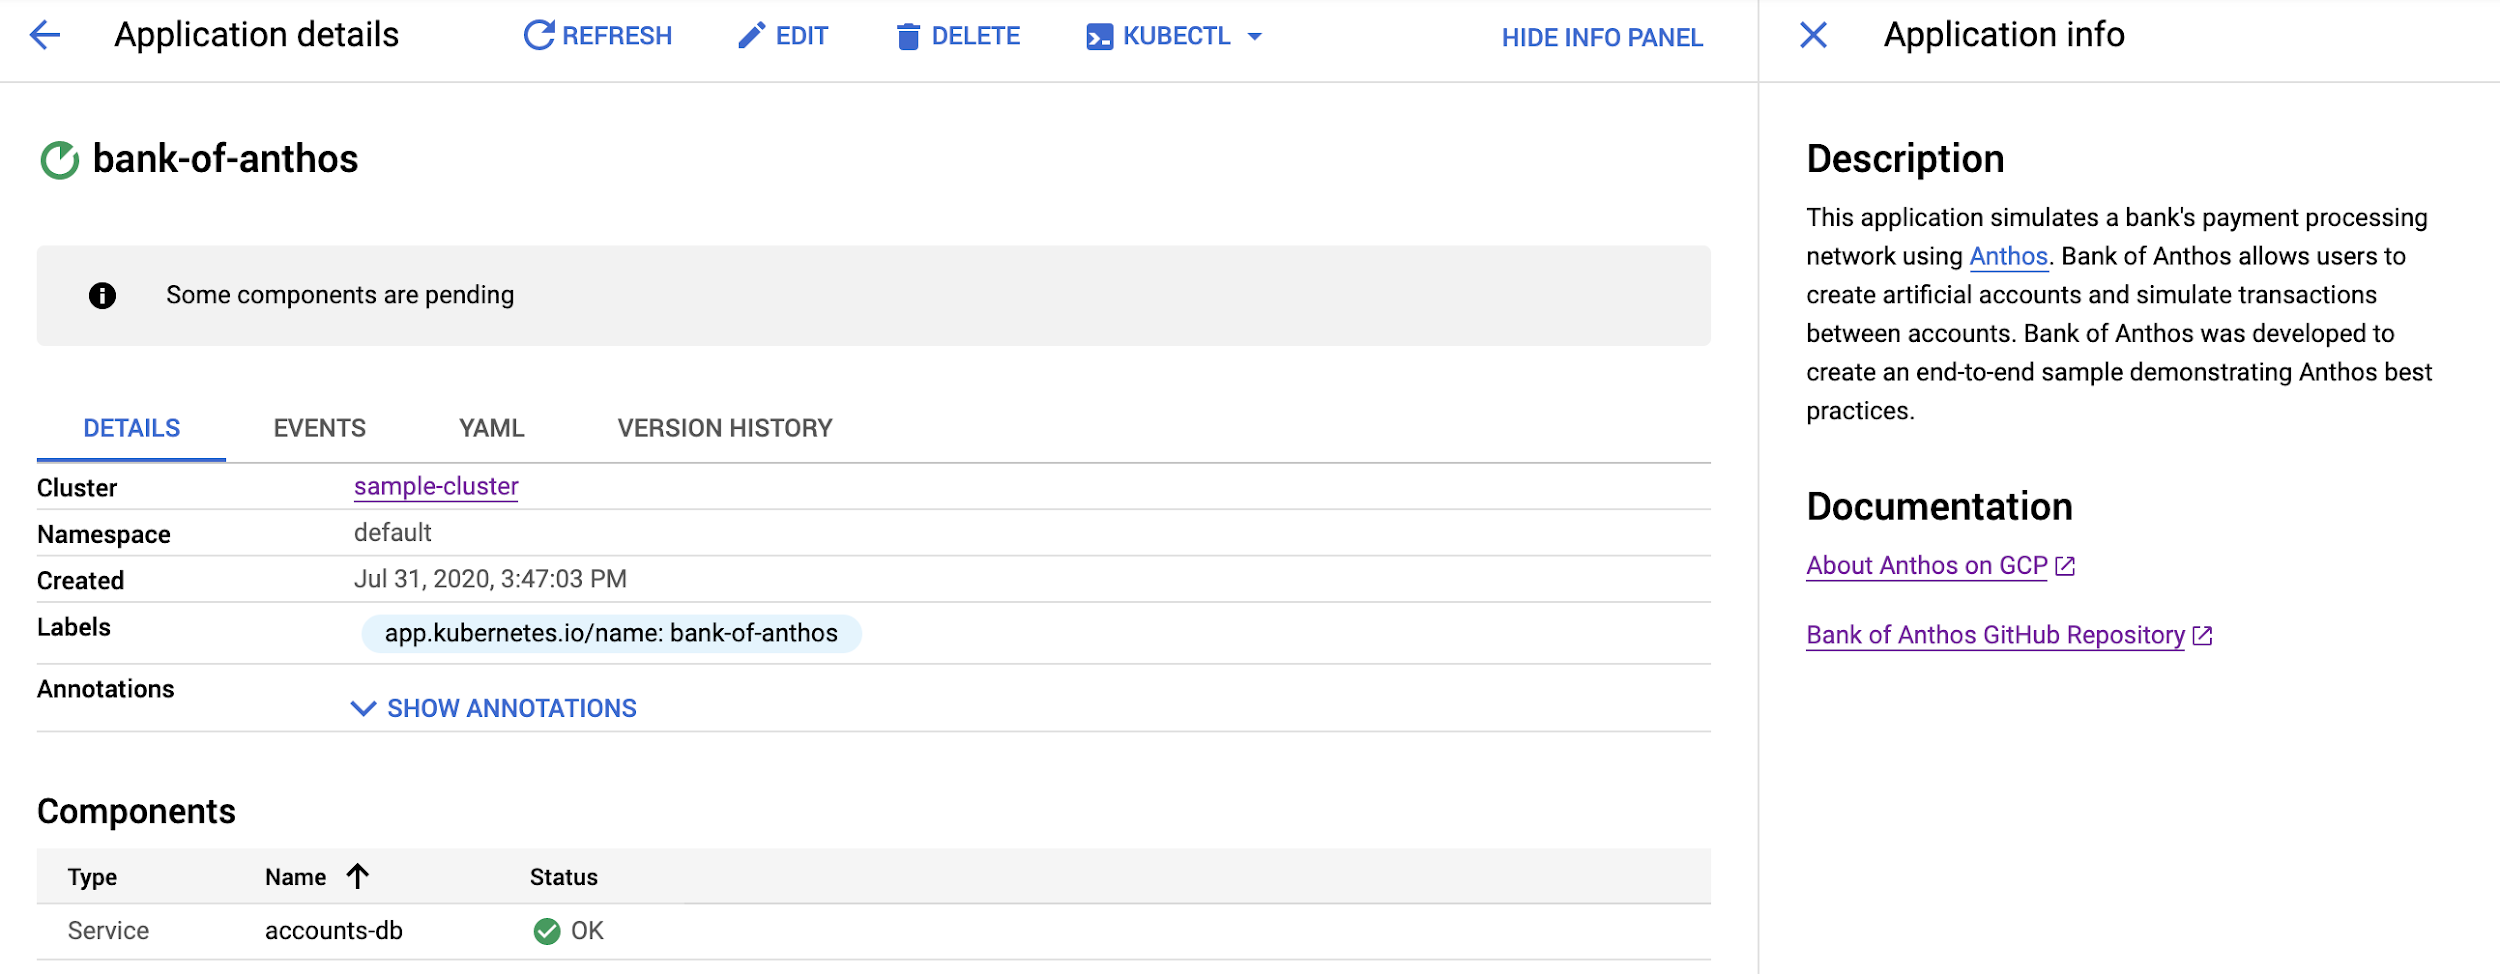
您可以新增說明和連結,這些內容會顯示在「應用程式資訊」面板中。如要從「詳細資料」頁面存取這個面板,請按一下「顯示資訊面板」。
如要在這個面板中顯示資訊,請在
application.yaml檔案的descriptor區段中定義description和links等元素。descriptor: description: links: - description: url:如要更新「
descriptor」部分,請按照下列步驟操作:在 Cloud Shell 編輯器中,貼上下列內容,覆寫
application.yaml檔案的內容:apiVersion: app.k8s.io/v1beta1 kind: Application metadata: name: "bank-of-anthos" labels: app.kubernetes.io/name: "bank-of-anthos" spec: selector: matchLabels: app.kubernetes.io/name: "bank-of-anthos" componentKinds: - group: v1 kind: Service - group: apps kind: Deployment - group: v1 kind: StatefulSet descriptor: description: |- This application simulates a bank's payment processing network using [Anthos](/anthos/). Bank of Anthos allows users to create artificial accounts and simulate transactions between accounts. Bank of Anthos was developed to create an end-to-end sample demonstrating Anthos best practices. links: - description: 'About Anthos on GCP' url: /anthos/ - description: 'Bank of Anthos GitHub Repository' url: https://github.com/GoogleCloudPlatform/bank-of-anthos在 Cloud Shell 中部署 Application 資源:
kubectl apply -f kubernetes-manifests/application.yaml在 Google Cloud 控制台中,前往 Bank of Anthos 應用程式的詳細資料頁面。
如要查看更新,請按一下「顯示資訊面板」。
「應用程式資訊」面板會顯示說明和文件清單:
包含軟體類型
「應用程式」頁面包含應用程式清單中的軟體類型欄位 (「軟體」)。您可以自訂這個欄位,根據需求整理及分類應用程式。舉例來說,您可以指出軟體是內部或外部軟體。或者,如果您有多個應用程式是從共用基本類型建構而來,可以指出應用程式實作的基本類型。
如要為軟體類型新增自訂說明,請使用
application.yaml檔案descriptor區段中的type欄位:descriptor: type: External App您可以在Google Cloud 控制台中,將
type的值顯示為超連結。使用links區段的第一個項目指定超連結的網址。在下列步驟中,您將更新links區段,如下所示:links: - description: 'Bank of Anthos GitHub Repository' url: https://github.com/GoogleCloudPlatform/bank-of-anthos在 Cloud Shell 編輯器中,貼上下列內容,覆寫
application.yaml的內容:apiVersion: app.k8s.io/v1beta1 kind: Application metadata: name: "bank-of-anthos" labels: app.kubernetes.io/name: "bank-of-anthos" spec: selector: matchLabels: app.kubernetes.io/name: "bank-of-anthos" componentKinds: - group: v1 kind: Service - group: apps kind: Deployment - group: v1 kind: StatefulSet descriptor: type: External App description: |- This application simulates a bank's payment processing network using [Anthos](/anthos/). Bank of Anthos allows users to create artificial accounts and simulate transactions between accounts. Bank of Anthos was developed to create an end-to-end sample demonstrating Anthos best practices. links: - description: 'About Anthos on GCP' url: /anthos/ - description: 'Bank of Anthos GitHub Repository' url: https://github.com/GoogleCloudPlatform/bank-of-anthos在 Cloud Shell 中部署 Application 資源:
kubectl apply -f kubernetes-manifests/application.yaml前往 Google Cloud 控制台的「Applications」頁面。
「軟體」欄位會顯示「外部應用程式」:

包含應用程式版本
主要「應用程式」頁面包含版本欄位。實際上,這個欄位的值會以程式輔助方式更新,以參照實際部署的版本。
如要填入版本欄位,請在
descriptor下方加入version欄位,如下列範例所示:descriptor: type: External App version: "2.3.2"在下列步驟中,您會新增應用程式版本的欄位。
在 Cloud Shell 編輯器中,貼上下列內容,覆寫
application.yaml檔案的內容:apiVersion: app.k8s.io/v1beta1 kind: Application metadata: name: "bank-of-anthos" labels: app.kubernetes.io/name: "bank-of-anthos" spec: selector: matchLabels: app.kubernetes.io/name: "bank-of-anthos" componentKinds: - group: v1 kind: Service - group: apps kind: Deployment - group: v1 kind: StatefulSet descriptor: type: External App version: "2.3.2" description: |- This application simulates a bank's payment processing network using [Anthos](/anthos/). Bank of Anthos allows users to create artificial accounts and simulate transactions between accounts. Bank of Anthos was developed to create an end-to-end sample demonstrating Anthos best practices. links: - description: 'About Anthos on GCP' url: /anthos/ - description: 'Bank of Anthos GitHub Repository' url: https://github.com/GoogleCloudPlatform/bank-of-anthos在 Cloud Shell 中部署 Application 資源:
kubectl apply -f kubernetes-manifests/application.yaml前往 Google Cloud 控制台的「Applications」頁面。
Bank of Anthos 應用程式的「版本」欄位顯示為「2.3.2」:

新增維護者詳細資料
在這個步驟中,您要在「應用程式」頁面的主要部分新增自訂靜態文字。您可以在
application.yaml檔案的info區段中指定這些詳細資料,如下所示:info: - name: LABEL value: STRING
如要加入靜態值,請在
info區段中提供LABEL和STRING的詳細資料。舉例來說,您可以輸入Owner代表name,以及John Smith代表value。在 Cloud Shell 編輯器中,貼上下列內容,覆寫
application.yaml的內容:apiVersion: app.k8s.io/v1beta1 kind: Application metadata: name: "bank-of-anthos" labels: app.kubernetes.io/name: "bank-of-anthos" spec: selector: matchLabels: app.kubernetes.io/name: "bank-of-anthos" componentKinds: - group: v1 kind: Service - group: apps kind: Deployment - group: v1 kind: StatefulSet descriptor: type: External App version: "2.3.2" description: |- This application simulates a bank's payment processing network using [Anthos](/anthos/). Bank of Anthos allows users to create artificial accounts and simulate transactions between accounts. Bank of Anthos was developed to create an end-to-end sample demonstrating Anthos best practices. links: - description: 'About Anthos on GCP' url: /anthos/ - description: 'Bank of Anthos GitHub Repository' url: https://github.com/GoogleCloudPlatform/bank-of-anthos info: - name: Owner value: John Smith在 Cloud Shell 中部署 Application 資源:
kubectl apply -f kubernetes-manifests/application.yaml在 Google Cloud 控制台中,前往 Bank of Anthos 應用程式的詳細資料頁面。
詳細資料頁面會顯示 Bank of Anthos 應用程式的擁有者:
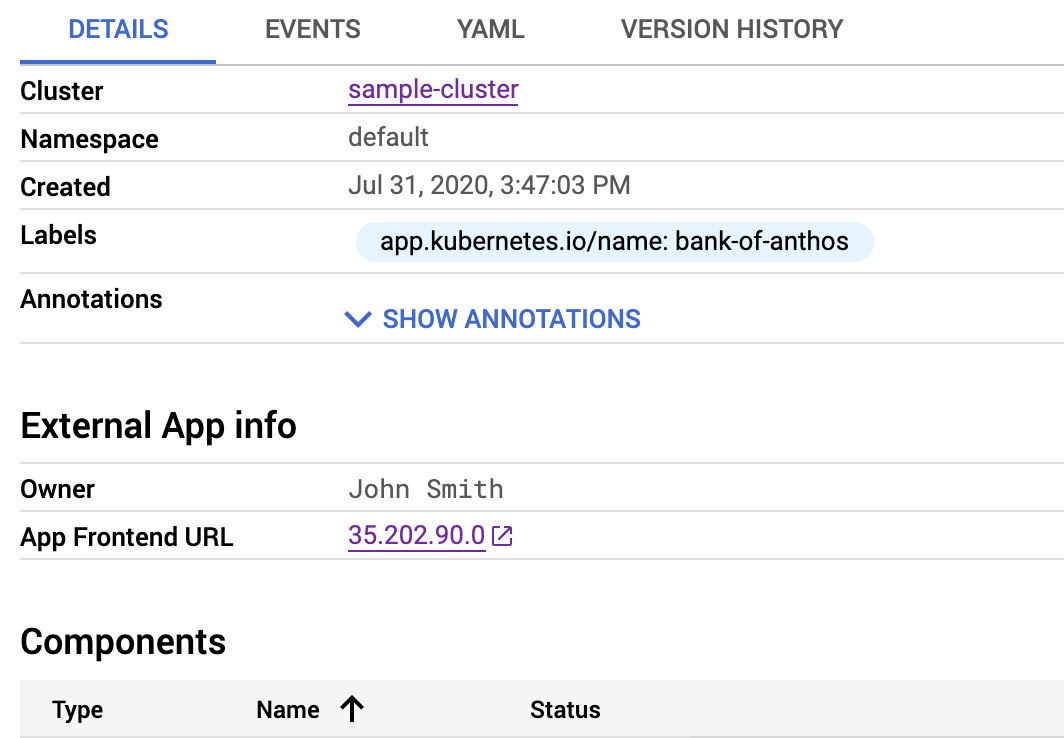
公開應用程式端點
除了靜態值,您也可以從 Deployment 本身公開動態值。在下列步驟中,您會顯示負載平衡器 IP 位址,讓查看應用程式詳細資料頁面的使用者直接存取應用程式。
如要顯示這個值,請使用
serviceRef規格。其他有效規格包括configMapKeyRef、ingressRef和secretKeyRef。在
serviceRef規格中,您可以使用Reference型別加入這些動態值。在本教學課程中,serviceRef的規格如下:info: - name: LABEL type: Reference valueFrom: serviceRef: name: SERVICE_NAME fieldPath: DATA_LOCATION
您可以替換下列值:
LABEL:描述特定參照例項的標籤,例如App Frontend URLSERVICE_NAME:識別服務的名稱,例如frontendDATA_LOCATION:服務中的資料位置,例如status.loadBalancer.ingress[0].ip
serviceRef和ingressRef規格也支援path元素。如果網址需要路徑相關詳細資料,請在path欄位中加入這些詳細資料:info: - name: LABEL type: Reference valueFrom: serviceRef: name: SERVICE_NAME fieldPath: DATA_LOCATION path: /wp-admin
端點 IP 位址和路徑會串連在一起,例如
35.202.90.0/wp-admin。您也可以使用
protocol欄位強制使用 HTTP 或 HTTPS,方法如下:info: - name: LABEL type: Reference valueFrom: serviceRef: name: SERVICE_NAME fieldPath: DATA_LOCATION path: /wp-admin protocol: HTTPS
這些詳細資料會產生下列網址:
https://35.202.90.0/wp-admin
在下列步驟中,您將使用
serviceRef公開 Bank of Anthos 應用程式的服務負載平衡器 IP 位址:在 Cloud Shell 編輯器中,將
application.yaml檔案的內容覆寫為下列內容:apiVersion: app.k8s.io/v1beta1 kind: Application metadata: name: "bank-of-anthos" labels: app.kubernetes.io/name: "bank-of-anthos" spec: selector: matchLabels: app.kubernetes.io/name: "bank-of-anthos" componentKinds: - group: v1 kind: Service - group: apps kind: Deployment - group: v1 kind: StatefulSet descriptor: type: External App version: "2.3.2" description: |- This application simulates a bank's payment processing network using [Anthos](/anthos/). Bank of Anthos allows users to create artificial accounts and simulate transactions between accounts. Bank of Anthos was developed to create an end-to-end sample demonstrating Anthos best practices. links: - description: 'About Anthos on GCP' url: /anthos/ - description: 'Bank of Anthos GitHub Repository' url: https://github.com/GoogleCloudPlatform/bank-of-anthos info: - name: Owner value: John Smith - name: App Frontend URL type: Reference valueFrom: serviceRef: name: frontend fieldPath: status.loadBalancer.ingress[0].ip protocol: HTTPS在 Cloud Shell 中部署 Application 資源:
kubectl apply -f kubernetes-manifests/application.yaml在 Google Cloud 控制台中,前往 Bank of Anthos 應用程式的詳細資料頁面。
詳細資料頁面會顯示 Bank of Anthos 應用程式的端點 IP 位址:
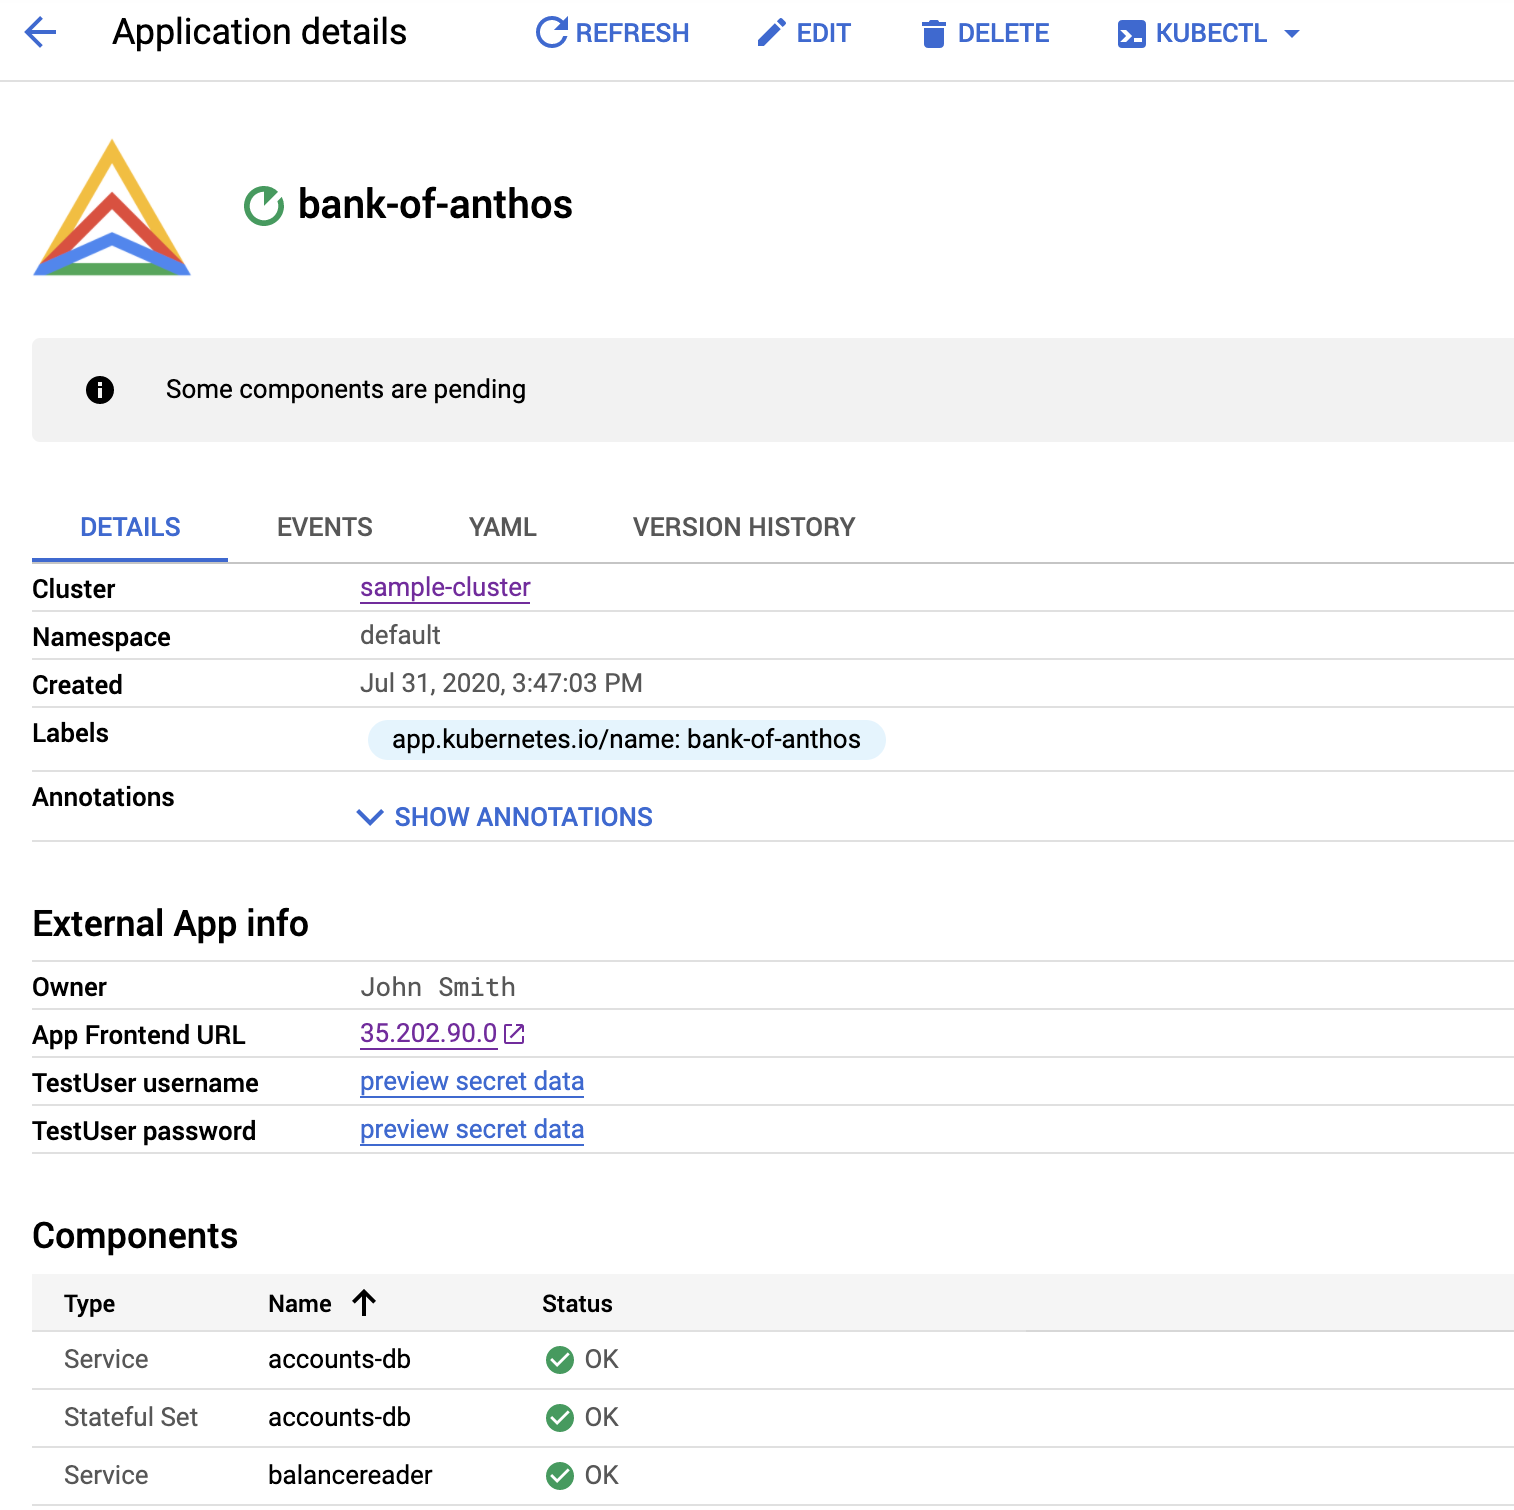
提供存取憑證
如先前所述,您可以使用
secretKeyRef元素,透過Google Cloud 控制台公開 Kubernetes 密鑰。在本教學課程中,您會提供使用者名稱和密碼給接線人員,方便對方登入應用程式。在 Cloud Shell 中建立 Secret:
kubectl create secret generic boa-access --from-literal=boa-user=testuser --from-literal=boa-pass=password在 Cloud Shell 編輯器中,貼上下列內容,覆寫
application.yaml檔案的內容。這項更新包含secretKeyRef註解中的使用者名稱和密碼參照。apiVersion: app.k8s.io/v1beta1 kind: Application metadata: name: "bank-of-anthos" labels: app.kubernetes.io/name: "bank-of-anthos" spec: selector: matchLabels: app.kubernetes.io/name: "bank-of-anthos" componentKinds: - group: v1 kind: Service - group: apps kind: Deployment - group: v1 kind: StatefulSet descriptor: type: External App version: "2.3.2" description: |- This application simulates a bank's payment processing network using [Anthos](/anthos/). Bank of Anthos allows users to create artificial accounts and simulate transactions between accounts. Bank of Anthos was developed to create an end-to-end sample demonstrating Anthos best practices. links: - description: 'About Anthos on GCP' url: /anthos/ - description: 'Bank of Anthos GitHub Repository' url: https://github.com/GoogleCloudPlatform/bank-of-anthos info: - name: Owner value: John Smith - name: App Frontend URL type: Reference valueFrom: serviceRef: name: frontend fieldPath: status.loadBalancer.ingress[0].ip protocol: HTTPS - name: TestUser username type: Reference valueFrom: secretKeyRef: name: boa-access key: boa-user - name: TestUser password type: Reference valueFrom: secretKeyRef: name: boa-access key: boa-pass在 Cloud Shell 中部署 Application 資源:
kubectl apply -f kubernetes-manifests/application.yaml在 Google Cloud 控制台中,前往 Bank of Anthos 應用程式的詳細資料頁面。
按一下「預覽私密資料」。系統會顯示使用者名稱和密碼:
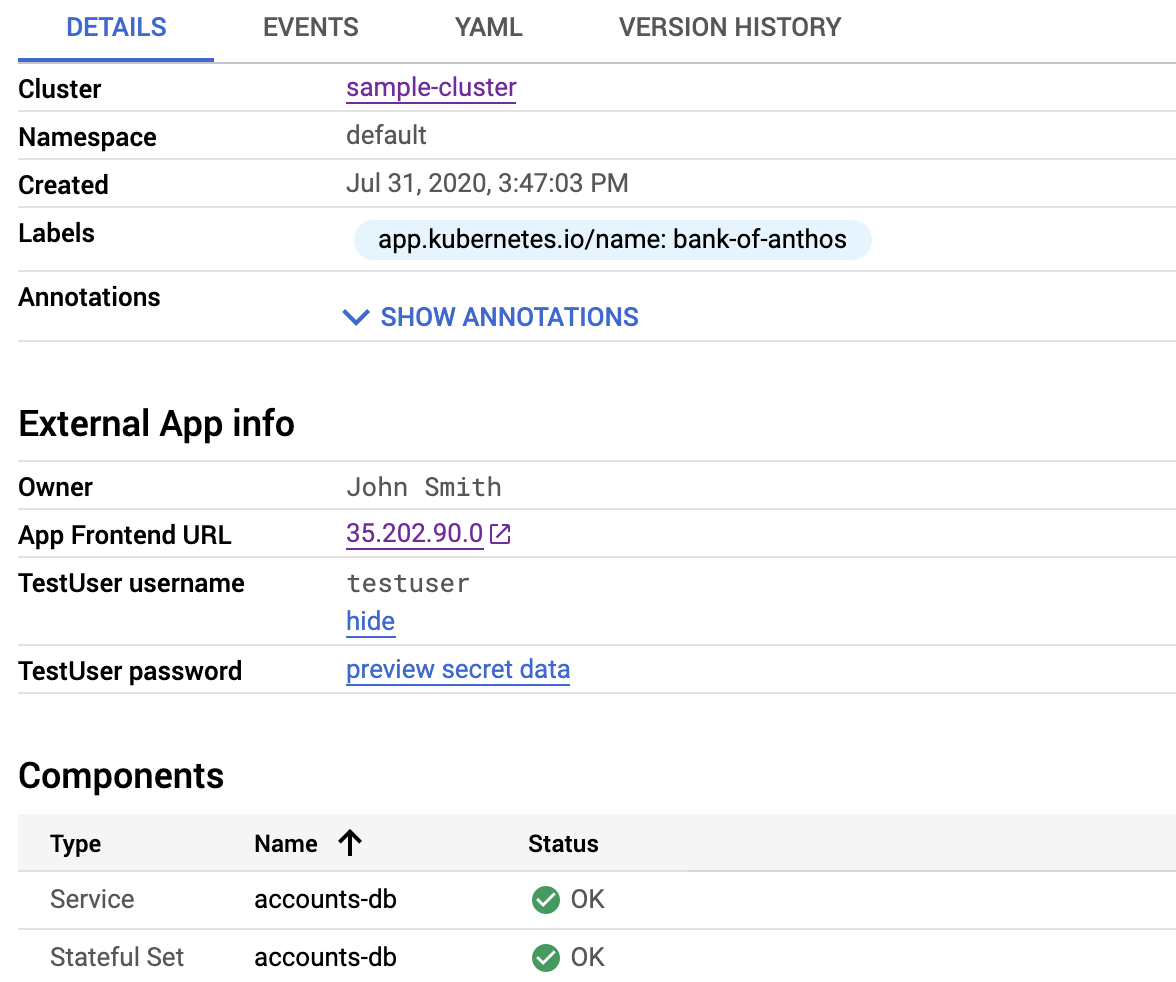
揭露祕密資料的功能對營運團隊來說非常實用。不過,查看這些 Secret 的權限是由 GKE 詳細資料頁面的 Identity and Access Management (IAM) 存取權限控管。任何有權查看叢集的使用者也能查看密鑰,因此請務必謹慎考慮要公開的內容。
新增應用程式圖示
如要讓應用程式脫穎而出,可以加入標誌,顯示在應用程式清單和詳細資料頁面。如要加入標誌,請在
kubernetes-engine.cloud.google.com/icon註解中指定圖片的資料 URI。將圖片轉換為資料 URI 不在本教學課程的討論範圍內。 不過,在 Google 上搜尋「convert image to data uri」會傳回各種實用工具,協助您從圖片產生資料字串。由於本節使用的圖片資料 URI 非常長,因此不適合納入教學課程。您可以在完成的
application.yaml檔案中查看完整資料 URI。資料 URI 字串的開頭應如下所示:data:image/png;base64,iVBORw0KGgoAAAANSUhEUg....結尾為K5CYII=。請勿加入任何結尾引號或 HTML 字元。如需完整
application.yaml檔案,請參閱 gist。如要新增圖示,請更新
application.yaml的metadata區段:複製下列程式碼:
annotations:
  kubernetes-engine.cloud.google.com/icon: >-
    data:image/png;base64,DATA_URI
將
DATA_URI換成先前參照的已完成application.yaml檔案中的字串。在 Cloud Shell 編輯器中,將複製的程式碼貼到
application.yaml的metadata區段中,labels區段之後。該部分的
application.yaml類似於下列內容,其中DATA_URI代表資料 URI 值。apiVersion: app.k8s.io/v1beta1 kind: Application metadata: name: "bank-of-anthos" labels: app.kubernetes.io/name: "bank-of-anthos" annotations: kubernetes-engine.cloud.google.com/icon: >- data:image/png;base64,DATA_URI spec:在 Cloud Shell 中部署應用程式資源:
kubectl apply -f kubernetes-manifests/application.yaml前往 Google Cloud 控制台的「Applications」頁面。
應用程式清單中會顯示標誌:

在 Google Cloud 控制台中,前往 Bank of Anthos 應用程式的詳細資料頁面。
詳細資料頁面的標題會顯示標誌:
清除所用資源
如要避免系統向您的 Google Cloud 帳戶收取本教學課程中所用資源的相關費用,請刪除您在本教學課程中建立的 Google Cloud 專案。
刪除專案
- In the Google Cloud console, go to the Manage resources page.
- In the project list, select the project that you want to delete, and then click Delete.
- In the dialog, type the project ID, and then click Shut down to delete the project.
後續步驟
- 在
click-to-deployGitHub 存放區的 Kubernetes 資料夾中,查看其他application.yaml檔案範例。在chart/<application>/templates/下方尋找各種應用程式的其他application.yaml檔案,例如這個檔案所示。 - 使用 Marketplace 部署作業,在 GKE 上部署 Google Click to Deploy 解決方案。
- 探索 Google Cloud 的參考架構、圖表和最佳做法。 歡迎瀏覽我們的雲端架構中心。