This document is the third part of a series that discusses disaster recovery (DR) in Google Cloud. This part discusses scenarios for backing up and recovering data.
The series consists of these parts:
- Disaster recovery planning guide
- Disaster recovery building blocks
- Disaster recovery scenarios for data (this document)
- Disaster recovery scenarios for applications
- Architecting disaster recovery for locality-restricted workloads
- Disaster recovery use cases: locality-restricted data analytic applications
- Architecting disaster recovery for cloud infrastructure outages
Introduction
Your disaster recovery plans must specify how you can avoid losing data during a disaster. The term data here covers two scenarios. Backing up and then recovering database, log data, and other data types fits into one of the following scenarios:
- Data backups. Backing up data alone involves copying a discrete amount of data from one place to another. Backups are made as part of a recovery plan either to recover from a corruption of data so that you can restore to a known good state directly in the production environment, or so that you can restore data in your DR environment if your production environment is down. Typically, data backups have a small to medium RTO and a small RPO.
- Database backups. Database backups are slightly more complex, because they typically involve recovering to the point in time. Therefore, in addition to considering how to back up and restore the database backups and ensuring that the recovery database system mirrors the production configuration (same version, mirrored disk configuration), you also need to consider how to back up transaction logs. During recovery, after you restore database functionality, you have to apply the latest database backup and then the recovered transaction logs that were backed up after the last backup. Due to the complicating factors inherent to database systems (for example, having to match versions between production and recovery systems), adopting a high-availability-first approach to minimize the time to recover from a situation that could cause unavailability of the database server lets you achieve smaller RTO and RPO values.
When you run production workloads on Google Cloud, you might use a globally distributed system so that if something goes wrong in one region, the application continues to provide service even if it's less widely available. In essence, that application invokes its DR plan.
The rest of this document discusses examples of how to design some scenarios for data and databases that can help you meet your RTO and RPO goals.
Production environment is on-premises
In this scenario, your production environment is on-premises, and your disaster recovery plan involves using Google Cloud as the recovery site.
Data backup and recovery
You can use a number of strategies to implement a process to regularly back up data from on-premises to Google Cloud. This section looks at two of the most common solutions.
Solution 1: Back up to Cloud Storage using a scheduled task
This pattern uses the following DR building blocks:
- Cloud Storage
One option for backing up data is to create a scheduled task that runs a script
or application to transfer the data to Cloud Storage. You can automate
a backup process to Cloud Storage using the
gcloud storage Google Cloud CLI command
or by using one of the Cloud Storage
client libraries.
For example, the following gcloud storage command copies all files from a source
directory to a specified bucket.
gcloud storage cp -r SOURCE_DIRECTORY gs://BUCKET_NAME
Replace SOURCE_DIRECTORY with the path to your source directory
and BUCKET_NAME with a name of your choice for the bucket.
The name must meet the bucket name requirements.
The following steps outline how to implement a backup and recovery process
using the gcloud storage command.
- Install the
gcloud CLIon the on-premises machine that you use to upload your data files from. - Create a bucket as the target for your data backup.
- Create a service account.
- Create an
IAM policy
to restrict who can access the bucket and its objects. Include the service
account created specifically for this purpose. For details about permissions
for access to Cloud Storage, see IAM permissions for
gcloud storage. - Use Service account impersonation to provide access for your local Google Cloud user (or service account) to impersonate the service account you just created earlier. Alternatively you can create a new user specifically for this purpose.
- Test that you can upload and download files in the target bucket.
- Set up a schedule for the script that you use to upload your backups using
tools such as Linux
crontaband Windows Task Scheduler. - Configure a recovery process that uses the
gcloud storagecommand to recover your data to your recovery DR environment on Google Cloud.
You can also use the gcloud storage rsync command to perform real-time incremental syncs between your data and a Cloud Storage bucket.
For example, the following gcloud storage rsync command
makes the contents in a Cloud Storage bucket the same as the contents
in the source directory by copying any missing files or objects or those whose
data has changed. If the volume of data that has changed between successive
backup sessions is small relative to the entire volume of the source data, then
using gcloud storage rsync can be more efficient than using gcloud storage cp
command. By using gcloud storage rsync, you can implement a more frequent
backup schedule and achieve a lower RPO.
gcloud storage rsync -r SOURCE_DIRECTORY gs:// BUCKET_NAME
For more information, see
gcloud storage command for smaller transfers of on-premises data.
Solution 2: Back up to Cloud Storage using Transfer service for on-premises data
This pattern uses the following DR building blocks:
- Cloud Storage
- Transfer service for on-premises data
Transferring large amounts of data across a network often requires careful planning and robust execution strategies. It is a non-trivial task to develop custom scripts that are scalable, reliable, and maintainable. Custom scripts can often lead to lowered RPO values and even increased risks of data loss.
For guidance on moving large volumes of data from on-premises locations to Cloud Storage, see Move or back up data from on-premises storage.
Solution 3: Back up to Cloud Storage using a partner gateway solution
This pattern uses the following DR building blocks:
- Cloud Interconnect
- Cloud Storage tiered storage
On-premises applications are often integrated with third-party solutions that can be used as part of your data backup and recovery strategy. The solutions often use a tiered storage pattern where you have the most recent backups on faster storage, and slowly migrate your older backups to cheaper (slower) storage. When you use Google Cloud as the target, you have several storage class options available to use as the equivalent of the slower tier.
One way to implement this pattern is to use a partner gateway between your on-premises storage and Google Cloud to facilitate this transfer of data to Cloud Storage. The following diagram illustrates this arrangement, with a partner solution that manages the transfer from the on-premises NAS appliance or SAN.

In the event of a failure, the data being backed up must be recovered to your DR environment. The DR environment is used to serve production traffic until you are able to revert to your production environment. How you achieve this depends on your application, and on the partner solution and its architecture. (Some end-to-end scenarios are discussed in the DR application document.)
You can also use managed Google Cloud databases as your DR destinations. For example, Cloud SQL for SQL Server supports transaction log imports. You can export transaction logs from your on-premises SQL Server instance, upload them to Cloud Storage, and import them into Cloud SQL for SQL Server.
For further guidance on ways to transfer data from on-premises to Google Cloud, see Transferring big data sets to Google Cloud.
For more information about partner solutions, see the Partners page on the Google Cloud website.
Database backup and recovery
You can use a number of strategies to implement a process to recover a database system from on-premises to Google Cloud. This section looks at two of the most common solutions.
It is out of scope in this document to discuss in detail the various built-in backup and recovery mechanisms included with third-party databases. This section provides general guidance, which is implemented in the solutions discussed here.
Solution 1: Backup and recovery using a recovery server on Google Cloud
- Create a database backup using the built-in backup mechanisms of your database management system.
- Connect your on-premises network and your Google Cloud network.
- Create a Cloud Storage bucket as the target for your data backup.
- Copy the backup files to Cloud Storage using
gcloud storagegcloud CLI or a partner gateway solution (see the steps discussed earlier in the data backup and recovery section). For details, see Migrate to Google Cloud: Transfer your large datasets. - Copy the transaction logs to your recovery site on Google Cloud. Having a backup of the transaction logs helps keep your RPO values small.
After configuring this backup topology, you must ensure that you can recover to the system that's on Google Cloud. This step typically involves not only restoring the backup file to the target database but also replaying the transaction logs to get to the smallest RTO value. A typical recovery sequence looks like this:
- Create a custom image of your database server on Google Cloud. The database server should have the same configuration on the image as your on-premises database server.
- Implement a process to copy your on-premises backup files and transaction log files to Cloud Storage. See solution 1 for an example implementation.
- Start a minimally sized instance from the custom image and attach any persistent disks that are needed.
- Set the auto delete flag to false for the persistent disks.
- Apply the latest backup file that was previously copied to Cloud Storage, following the instructions from your database system for recovering backup files.
- Apply the latest set of transaction log files that have been copied to Cloud Storage.
- Replace the minimal instance with a larger instance that is capable of accepting production traffic.
- Switch clients to point at the recovered database in Google Cloud.
When you have your production environment running and able to support production workloads, you have to reverse the steps that you followed to fail over to the Google Cloud recovery environment. A typical sequence to return to the production environment looks like this:
- Take a backup of the database running on Google Cloud.
- Copy the backup file to your production environment.
- Apply the backup file to your production database system.
- Prevent clients from connecting to the database system in Google Cloud; for example, by stopping the database system service. From this point, your application will be unavailable until you finish restoring the production environment.
- Copy any transaction log files over to the production environment and apply them.
- Redirect client connections to the production environment.
Solution 2: Replication to a standby server on Google Cloud
One way to achieve very small RTO and RPO values is to replicate (not just back up) data and in some cases database state in real time to a replica of your database server.
- Connect your on-premises network and your Google Cloud network.
- Create a custom image of your database server on Google Cloud. The database server should have the same configuration on the image as the configuration of your on-premises database server.
- Start an instance from the custom image and attach any persistent disks that are needed.
- Set the auto delete flag to false for the persistent disks.
- Configure replication between your on-premises database server and the target database server in Google Cloud following the instructions specific to the database software.
- Clients are configured in normal operation to point to the database server on premises.
After configuring this replication topology, switch clients to point to the standby server running in your Google Cloud network.
When you have your production environment back up and able to support production workloads, you have to resynchronize the production database server with the Google Cloud database server and then switch clients to point back to the production environment
Production environment is Google Cloud
In this scenario, both your production environment and your disaster recovery environment run on Google Cloud.
Data backup and recovery
A common pattern for data backups is to use a tiered storage pattern. When your production workload is on Google Cloud, the tiered storage system looks like the following diagram. You migrate data to a tier that has lower storage costs, because the requirement to access the backed-up data is less likely.
This pattern uses the following DR building blocks:
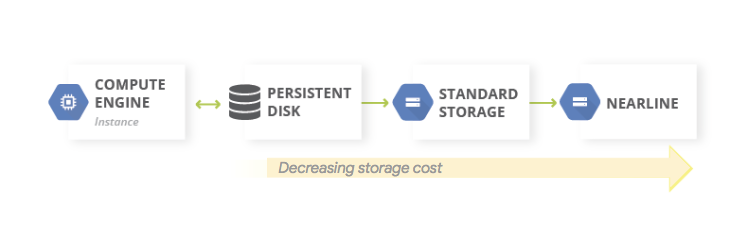
Because the Nearline, Coldline, and Archive storage classes are intended for storing infrequently accessed data, there are additional costs associated with retrieving data or metadata stored in these classes, as well as minimum storage durations that you are charged for.
Database backup and recovery
When you use a self-managed database (for example, you've installed MySQL, PostgreSQL, or SQL Server on an instance of Compute Engine), the same operational concerns apply as managing production databases on premises, but you no longer need to manage the underlying infrastructure.
Backup and DR Service is a centralized, cloud-native solution for backing up and recovering cloud and hybrid workloads. It offers swift data recovery and facilitates the quick resumption of essential business operations.
For more information about using Backup and DR for self-managed database scenarios on Google Cloud, see the following:
Alternatively, you can set up HA configurations by using the appropriate DR building block features to keep RTO small. You can design your database configuration to make it feasible to recover to a state as close as possible to the pre-disaster state; this helps keep your RPO values small. Google Cloud provides a wide variety of options for this scenario.
Two common approaches to designing your database recovery architecture for self-managed databases on Google Cloud are discussed in this section.
Recovering a database server without synchronizing state
A common pattern is to enable recovery of a database server that does not require system state to be synchronized with an up-to-date standby replica.
This pattern uses the following DR building blocks:
- Compute Engine
- Managed instance groups
- Cloud Load Balancing (internal load balancing)
The following diagram illustrates an example architecture that addresses the scenario. By implementing this architecture, you have a DR plan that reacts automatically to a failure without requiring manual recovery.

The following steps outline how to configure this scenario:
- Create a VPC network.
Create a custom image that is configured with the database server by doing the following:
- Configure the server so the database files and log files are written to an attached standard persistent disk.
- Create a snapshot from the attached persistent disk.
- Configure a startup script to create a persistent disk from the snapshot and to mount the disk.
- Create a custom image of the boot disk.
Create an instance template that uses the image.
Using the instance template, configure a managed instance group with a target size of 1.
Configure health checking using Cloud Monitoring metrics.
Configure internal load balancing using the managed instance group.
Configure a scheduled task to create regular snapshots of the persistent disk.
In the event a replacement database instance is needed, this configuration automatically does the following:
- Brings up another database server of the correct version in the same zone.
- Attaches a persistent disk that has the latest backup and transaction log files to the newly created database server instance.
- Minimizes the need to reconfigure clients that communicate with your database server in response to an event.
- Ensures that the Google Cloud security controls (IAM policies, firewall settings) that apply to the production database server apply to the recovered database server.
Because the replacement instance is created from an instance template, the controls that applied to the original apply to the replacement instance.
This scenario takes advantage of some of the HA features available in Google Cloud; you don't have to initiate any failover steps, because they occur automatically in the event of a disaster. The internal load balancer ensures that even when a replacement instance is needed, the same IP address is used for the database server. The instance template and custom image ensure that the replacement instance is configured identically to the instance it is replacing. By taking regular snapshots of the persistent disks, you ensure that when disks are re-created from the snapshots and attached to the replacement instance, the replacement instance is using data recovered according to an RPO value dictated by the frequency of the snapshots. In this architecture, the latest transaction log files that were written to the persistent disk are also automatically restored.
The managed instance group provides HA in depth. It provides mechanisms to react to failures at the application or instance level, and you don't have to manually intervene if any of those scenarios occur. Setting a target size of one ensures you only ever have one active instance that runs in the managed instance group and serves traffic.
Standard persistent disks are zonal, so if there's a zonal failure, snapshots are required to re-create disks. Snapshots are also available across regions, allowing you to restore a disk not only within the same region but also to a different region.
A variation on this configuration is to use regional persistent disks in place of standard persistent disks. In this case, you don't need to restore the snapshot as part of the recovery step.
The variation you choose is dictated by your budget and RTO and RPO values.
Recovering from partial corruption in very large databases
Persistent Disk Asynchronous Replication offers block storage replication with low RPO and low RTO for cross-region active-passive DR. This storage option lets you to manage replication for Compute Engine workloads at the infrastructure level, rather than at the workload level.
If you're using a database that's capable of storing petabytes of data, you might experience an outage that affects some of the data, but not all of it. In that case, you want to minimize the amount of data that you need to restore; you don't need to (or want to) recover the entire database just to restore some of the data.
There are a number of mitigating strategies you can adopt:
- Store your data in different tables for specific time periods. This method ensures that you need to restore only a subset of data to a new table, rather than a whole dataset.
Store the original data on Cloud Storage. This approach lets you create a new table and reload the uncorrupted data. From there, you can adjust your applications to point to the new table.
Additionally, if your RTO permits, you can prevent access to the table that has the corrupted data by leaving your applications offline until the uncorrupted data has been restored to a new table.
Managed database services on Google Cloud
This section discusses some methods you can use to implement appropriate backup and recovery mechanisms for the managed database services on Google Cloud.
Managed databases are designed for scale, so the traditional backup and restore mechanisms you see with traditional RDMBSs are usually not available. As in the case of self-managed databases, if you are using a database that is capable of storing petabytes of data, you want to minimize the amount of data that you need to restore in a DR scenario. There are a number of strategies for each managed database to help you achieve this goal.
Bigtable provides Bigtable replication. A replicated Bigtable database can provide higher availability than a single cluster, additional read throughput, and higher durability and resilience in the face of zonal or regional failures.
Bigtable backups is a fully managed service that lets you save a copy of a table's schema and data, then restore from the backup to a new table at a later time.
You can also export tables from Bigtable as a series of Hadoop sequence files. You can then store these files in Cloud Storage or use them to import the data back into another instance of Bigtable. You can replicate your Bigtable dataset asynchronously across zones within a Google Cloud region.
BigQuery. If you want to archive data, you can take advantage of BigQuery's long term storage. If a table is not edited for 90 consecutive days, the price of storage for that table automatically drops by 50 percent. There is no degradation of performance, durability, availability, or any other functionality when a table is considered long term storage. If the table is edited, though, it reverts back to the regular storage pricing and the 90 day countdown starts again.
BigQuery is replicated to two zones in a single region, but this won't help with corruption in your tables. Therefore, you need to have a plan to be able to recover from that scenario. For example, you can do the following:
- If the corruption is caught within 7 days, query the table to a point in time in the past to recover the table prior to the corruption using snapshot decorators.
- Export the data from BigQuery, and create a new table that contains the exported data but excludes the corrupted data.
- Store your data in different tables for specific time periods. This method ensures that you will need to restore only a subset of data to a new table, rather than a whole dataset.
- Make copies of your dataset at specific time periods. You can use these copies if a data-corruption event occurred beyond what a point-in-time query can capture (for example, more than 7 days ago). You can also copy a dataset from one region to another to ensure data availability in the event of region failures.
- Store the original data on Cloud Storage, which lets you create a new table and reload the uncorrupted data. From there, you can adjust your applications to point to the new table.
Firestore. The managed export and import service lets you import and export Firestore entities using a Cloud Storage bucket. You can then implement a process that can be used to recover from accidental deletion of data.
Cloud SQL. If you use Cloud SQL, the fully managed Google Cloud MySQL database, you should enable automated backups and binary logging for your Cloud SQL instances. This approach lets you perform a point-in-time recovery, which restores your database from a backup and recovers it to a fresh Cloud SQL instance. For more information, see About Cloud SQL backups and About disaster recovery (DR) in Cloud SQL
You can also configure Cloud SQL in an HA configuration and cross-region replicas to maximize up time in the event of zonal or regional failure.
If you enabled near-zero downtime planned maintenance for Cloud SQL, you can evaluate the impact maintenance events on your instances by simulating near-zero downtime planned maintenance events on Cloud SQL for MySQL, and on Cloud SQL for PostgreSQL.
For Cloud SQL Enterprise Plus edition, you can use advanced disaster recovery (DR) to simplify recovery and fallback processes with zero data loss after you perform a cross-regional failover.
Spanner. You can use Dataflow templates for making a full export of your database to a set of Avro files in a Cloud Storage bucket, and use another template for re-importing the exported files into a new Spanner database.
For more controlled backups, the Dataflow connector lets you write code to read and write data to Spanner in a Dataflow pipeline. For example, you can use the connector to copy data out of Spanner and into Cloud Storage as the backup target. The speed at which data can be read from Spanner (or written back to it) depends on the number of configured nodes. This has a direct impact on your RTO values.
The Spanner commit timestamp feature can be useful for incremental backups, by allowing you to select only the rows that have been added or modified since the last full backup.
For managed backups, Spanner Backup and Restore lets you create consistent backups that can be retained for up to 1 year. The RTO value is lower compared to export because the restore operation directly mounts the backup without copying the data.
For small RTO values, you could set up a warm standby Spanner instance configured with the minimum number of nodes required to meet your storage and read and write throughput requirements.
Spanner point-in-time-recovery (PITR) lets you recover data from a specific point in time in the past. For example, if an operator inadvertently writes data or an application rollout corrupts the database, with PITR you can recover the data from a point in time in the past, up to a maximum of 7 days.
Cloud Composer. You can use Cloud Composer (a managed version of Apache Airflow) to schedule regular backups of multiple Google Cloud databases. You can create a directed acyclic graph (DAG) to run on a schedule (for example, daily) to either copy the data to another project, dataset, or table (depending on the solution used), or to export the data to Cloud Storage.
Exporting or copying data can be done using the various Cloud Platform operators.
For example, you can create a DAG to do any of the following:
- Export a BigQuery table to Cloud Storage using the BigQueryToCloudStorageOperator.
- Export Firestore in Datastore mode (Datastore) to Cloud Storage using the DatastoreExportOperator.
- Export MySQL tables to Cloud Storage using the MySqlToGoogleCloudStorageOperator.
- Export Postgres tables to Cloud Storage using the PostgresToGoogleCloudStorageOperator.
Production environment is another cloud
In this scenario, your production environment uses another cloud provider, and your disaster recovery plan involves using Google Cloud as the recovery site.
Data backup and recovery
Transferring data between object stores is a common use case for DR scenarios. Storage Transfer Service is compatible with Amazon S3 and is the recommended way to transfer objects from Amazon S3 to Cloud Storage.
You can configure a transfer job to schedule periodic synchronization from data source to data sink, with advanced filters based on file creation dates, filename filters, and the times of day you prefer to transfer data. To achieve the RPO that you want, you must consider the following factors:
Rate of change. The amount of data that's being generated or updated for a given amount of time. The higher the rate of change, the more resources are needed to transfer the changes to the destination at each incremental transfer period.
Transfer performance. The time it takes to transfer files. For large file transfers, this is typically determined by the available bandwidth between source and destination. However, if a transfer job consists of a large number of small files, QPS can become a limiting factor. If that's the case, you can schedule multiple concurrent jobs to scale the performance as long as sufficient bandwidth is available. We recommend you that you measure the transfer performance using a representative subset of your real data.
Frequency. The interval between backup jobs. The freshness of data at the destination is as recent as the last time a transfer job was scheduled. Therefore, it's important that the intervals between successive transfer jobs are not longer than your RPO objective. For example, if the RPO objective is 1 day, the transfer job must be scheduled at least once a day.
Monitoring and alerts. Storage Transfer Service provides Pub/Sub notifications on a variety of events. We recommend that you subscribe to these notifications to handle unexpected failures or changes in job completion times.
Database backup and recovery
It is out of scope in this document to discuss in detail the various built-in backup and recovery mechanisms included with third-party databases or the backup and recovery techniques used on other cloud providers. If you are operating non-managed databases on the compute services, you can take advantage of the HA facilities that your production cloud provider has available. You can extend those to incorporate a HA deployment to Google Cloud, or use Cloud Storage as the ultimate destination for the cold storage of your database backup files.
What's next?
- Read about Google Cloud geography and regions.
Read other documents in this DR series:
- Disaster recovery planning guide
- Disaster recovery building blocks
- Disaster recovery scenarios for applications
- Architecting disaster recovery for locality-restricted workloads
- Disaster recovery use cases: locality-restricted data analytic applications
- Architecting disaster recovery for cloud infrastructure outages
- Architectures for high availability of MySQL clusters on Compute Engine
Explore reference architectures, diagrams, and best practices about Google Cloud. Take a look at our Cloud Architecture Center.