이 튜토리얼에서는 Google Cloud 콘솔에서 Google Kubernetes Engine(GKE) 애플리케이션 페이지를 사용하는 방법을 설명합니다.
많은 애플리케이션과 리소스에 대해 Kubernetes를 채택하는 경우 하나의 애플리케이션과 관련된 다양한 구성요소를 식별하고 추적하기 어려울 수 있습니다. 각 네임스페이스에 여러 애플리케이션을 배포하는 경우 어떤 리소스가 어떤 애플리케이션에 관련이 있는지 알기 어려울 수 있습니다. 또한 다양한 위치에서 애플리케이션이 무엇인지, 소유자가 누구인지, 서비스와 상호작용하는 방법을 설명하는 문서와 메타데이터를 검색해야 합니다.
GKE는 애플리케이션 페이지에서 이러한 도전과제를 해결하는 데 도움이 됩니다.
애플리케이션 페이지는 아키텍처 내에서 시스템에 대한 메타데이터를 설명하는 독립적인 리소스입니다. 이 페이지를 사용하면 아키텍처를 변경하지 않고도 리소스를 시각적으로 구성할 수 있습니다. YAML 파일에 값을 정의하여 모든 애플리케이션 리소스를 그룹화하고 작업팀의 중요 메타데이터를 포함할 수 있습니다. YAML 파일을 생성, 수정, 삭제해도 기존 리소스에는 영향을 미치지 않으므로 시스템에 대한 위험 없이 리소스를 즉시 작업할 수 있습니다.
이 페이지를 설명하기 위해 이 튜토리얼에서는 애플리케이션에 Kubernetes 애플리케이션 리소스를 구현하고 GKE에서 애플리케이션의 관리를 구성하고 단순화하기 위해 사용자 정의 메타데이터를 추가하는 방법을 보여줍니다.
이 튜토리얼은 GKE에서 실행할 애플리케이션을 만드는 개발자를 대상으로 합니다. 여기서는 사용자가 기본 Kubernetes 개념을 잘 알고 있고 Kubernetes 리소스 YAML 파일을 작성한 경험이 있다고 가정합니다.
목표
- Kubernetes 애플리케이션 리소스를 소개합니다.
- Kubernetes 애플리케이션 리소스를 기존 아키텍처에 추가합니다.
- Google Cloud 콘솔을 통해 애플리케이션에 대한 커스텀 정보를 만들고 봅니다.
비용
이 문서에서는 비용이 청구될 수 있는 Google Cloud구성요소( )를 사용합니다.
프로젝트 사용량을 기준으로 예상 비용을 산출하려면 가격 계산기를 사용합니다.
이 문서에 설명된 태스크를 완료했으면 만든 리소스를 삭제하여 청구가 계속되는 것을 방지할 수 있습니다. 자세한 내용은 삭제를 참조하세요.
시작하기 전에
-
In the Google Cloud console, on the project selector page, select or create a Google Cloud project.
Roles required to select or create a project
- Select a project: Selecting a project doesn't require a specific IAM role—you can select any project that you've been granted a role on.
-
Create a project: To create a project, you need the Project Creator
(
roles/resourcemanager.projectCreator), which contains theresourcemanager.projects.createpermission. Learn how to grant roles.
-
Verify that billing is enabled for your Google Cloud project.
-
Enable the Compute Engine and Kubernetes Engine APIs.
Roles required to enable APIs
To enable APIs, you need the Service Usage Admin IAM role (
roles/serviceusage.serviceUsageAdmin), which contains theserviceusage.services.enablepermission. Learn how to grant roles. -
In the Google Cloud console, activate Cloud Shell.
Cloud Shell 또는 Cloud Shell 편집기에서 이 튜토리얼의 명령어를 실행합니다.
환경 준비
Cloud Shell에서 프로젝트의 환경 변수를 설정하려면 다음을 따르세요.
export PROJECT_ID=PROJECT_ID
gcloud config set core/project $PROJECT_ID
gcloud config set compute/zone us-central1-c
PROJECT_ID를 Google Cloud 프로젝트 ID로 바꿉니다.GKE 클러스터를 만듭니다.
gcloud container clusters create sample-cluster이 튜토리얼에서는 기본 GKE 클러스터에서 애플리케이션을 실행합니다.
샘플 애플리케이션 설치
이 튜토리얼에서는 기본 Nginx 샘플 애플리케이션과 Bank of Anthos 샘플 애플리케이션을 사용하여 같은 네임스페이스에서 실행되는 애플리케이션 여러 개를 시뮬레이션합니다.
Cloud Shell에서 Nginx 샘플 애플리케이션을 설치합니다.
kubectl apply -f https://raw.githubusercontent.com/kubernetes/website/master/content/en/examples/application/web/web.yaml이 명령어는
web이라는 StatefulSet 리소스와nginx라는 서비스를 만듭니다. Google Cloud 콘솔의 GKE 워크로드 페이지와 서비스 및 인그레스 페이지에서 이러한 리소스를 볼 수 있습니다.Anthos Bank 샘플 애플리케이션이 포함된 GitHub 저장소를 클론합니다.
git clone https://github.com/GoogleCloudPlatform/bank-of-anthos.git
cd bank-of-anthos
SSH 키를 생성하고 Kubernetes 보안 비밀로 저장합니다.
openssl genrsa -out jwtRS256.key 4096
openssl rsa -in jwtRS256.key -outform PEM -pubout -out jwtRS256.key.pub
kubectl create secret generic jwt-key --from-file=./jwtRS256.key --from-file=./jwtRS256.key.pub
Bank of Anthos 샘플 애플리케이션을 실행하려면 SSH 키가 필요합니다.
클러스터에 샘플 애플리케이션을 배포합니다.
kubectl apply -f kubernetes-manifests잠시 후 Google Cloud 콘솔의 다음 페이지에서 애플리케이션 리소스를 볼 수 있습니다.
다음에 유의하세요.
- Nginx 및 Bank of Anthos 샘플 애플리케이션의 리소스는 섞입니다.
- 애플리케이션 페이지에는 아직 리소스가 표시되지 않습니다. 이후 단계에서 애플리케이션 페이지를 채웁니다.
GKE 준비
애플리케이션 페이지에 표시되는 리소스는 오픈소스 Kubernetes 프로젝트에서 제공하는 커스텀 리소스 정의(CRD)인 Kubernetes 애플리케이션 리소스 유형으로 지정됩니다. 기본적으로 애플리케이션 CRD는 Kubernetes에서 사용 설정되지 않습니다. Marketplace 및 애플리케이션 배포와 같은 GKE의 일부 서비스는 애플리케이션 CRD를 설치하지만 이러한 서비스를 사용하지 않는 경우 애플리케이션 CRD가 기본적으로 제공되지 않습니다.
애플리케이션 CRD를 설치하려면 다음을 수행합니다.
Cloud Shell에서 각 클러스터에 애플리케이션 CRD를 한 번 적용합니다.
kubectl apply -f https://raw.githubusercontent.com/kubernetes-sigs/application/master/deploy/kube-app-manager-aio.yaml(선택사항) 명령어가 완료되면 클러스터에서 애플리케이션 CRD를 확인합니다.
kubectl get crd다음 출력은
applications.app.k8s.io를 포함한 설치된 CRD의 목록입니다.NAME CREATED AT applications.app.k8s.io 2020-07-24T19:32:20Z backendconfigs.cloud.google.com 2020-07-24T19:28:40Z managedcertificates.networking.gke.io 2020-07-24T19:28:57Z scalingpolicies.scalingpolicy.kope.io 2020-07-24T19:28:57Z updateinfos.nodemanagement.gke.io 2020-07-24T19:28:57Z
애플리케이션 리소스 포함
이제 클러스터에서 애플리케이션 CRD를 사용할 수 있으므로 다음 단계는 애플리케이션 리소스의 인스턴스를 만들고 배포하는 것입니다.
애플리케이션 리소스는 Kubernetes 리소스이므로
apiVersion,kind,metadata,spec의 필드 및 옵션을 포함하여 다른 Kubernetes 리소스와 비슷한 구조를 가집니다.apiVersion: app.k8s.io/v1beta1 kind: Application metadata: name: ... spec: ...다음 섹션에서는 애플리케이션 리소스에서 사용할 수 있는 다양한 필드와 옵션을 다룹니다.
기본 애플리케이션 리소스 만들기
기존 리소스 집합에 애플리케이션 리소스를 추가할 수 있습니다. 이 튜토리얼에서는 빈 리소스로 시작하여 각 섹션을 채웁니다.
Cloud Shell에서
kubernetes-manifests디렉터리에application.yaml파일을 만들고 수정합니다.touch kubernetes-manifests/application.yaml edit kubernetes-manifests/application.yamlCloud Shell 편집기가 열리고 빈 파일이 표시됩니다.
다음 줄을 붙여넣어 첫 번째 애플리케이션을 정의합니다.
apiVersion: app.k8s.io/v1beta1
kind: Application
metadata:
  name: "bank-of-anthos"
Cloud Shell 메뉴 바에서 터미널 열기를 클릭합니다.
Cloud Shell에서 리소스를 적용합니다.
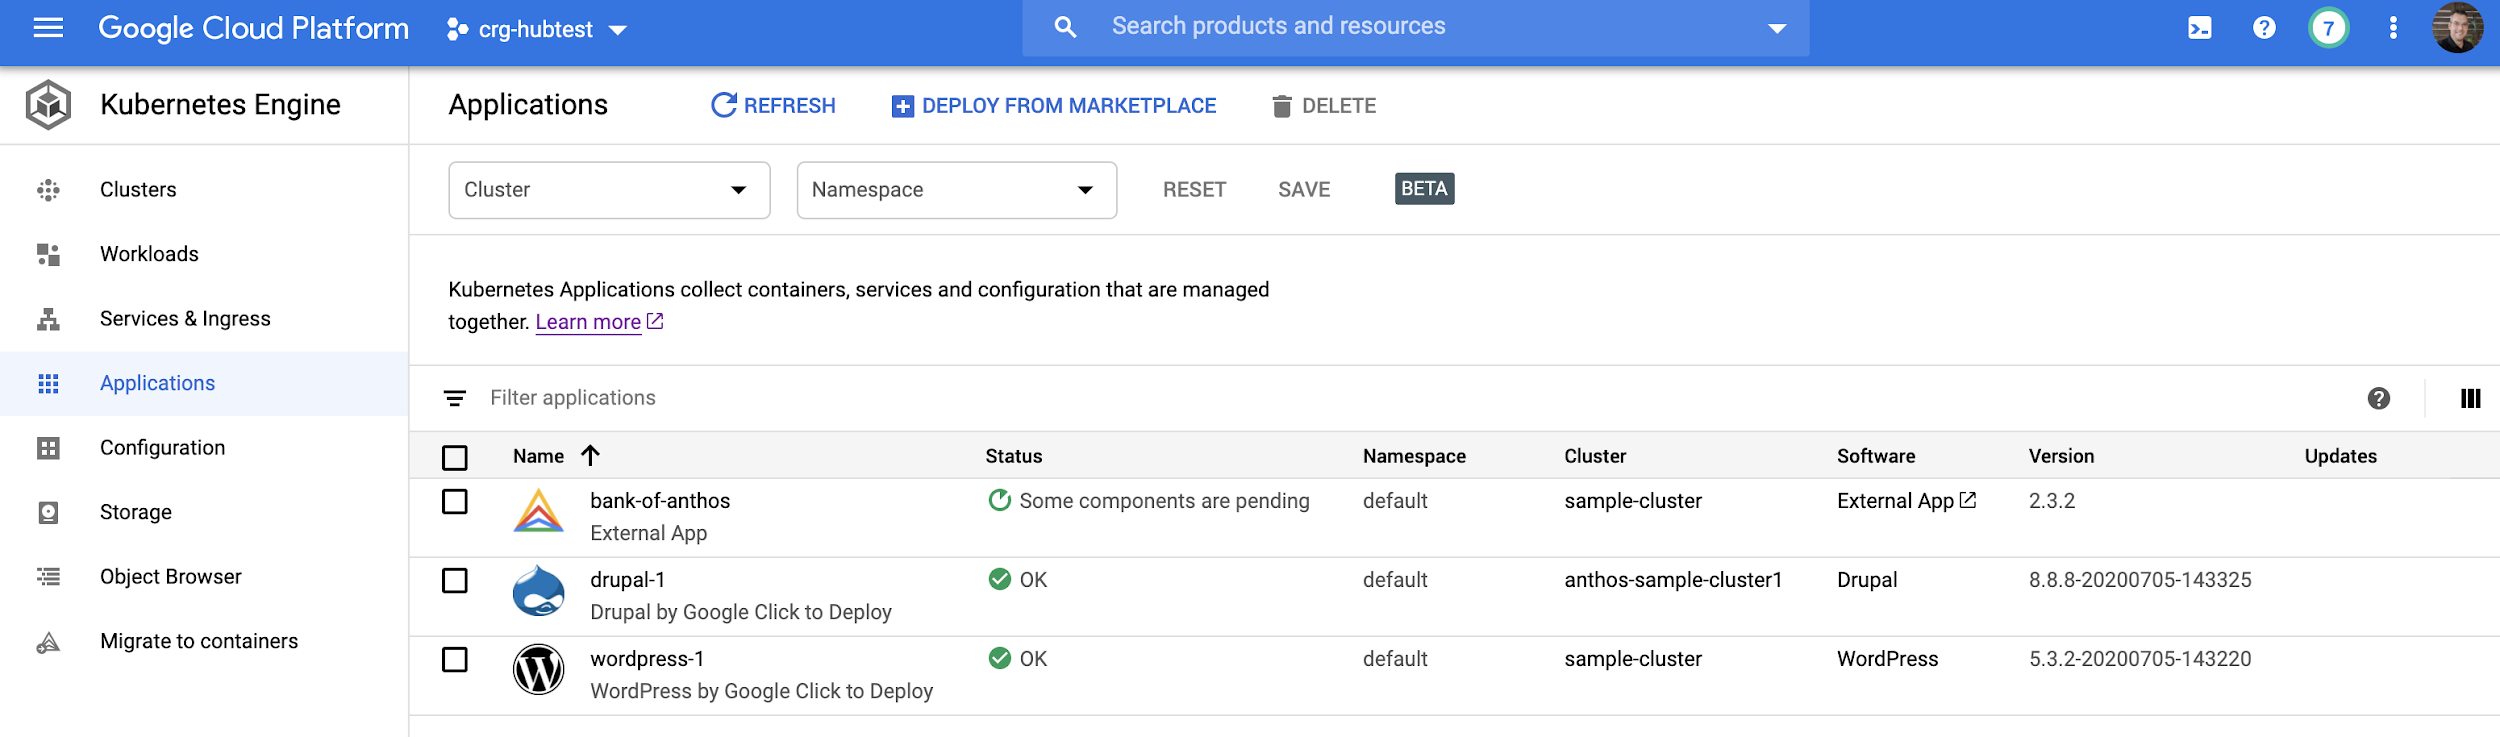
kubectl apply -f kubernetes-manifests/application.yamlGoogle Cloud 콘솔에서 애플리케이션 페이지로 이동합니다.
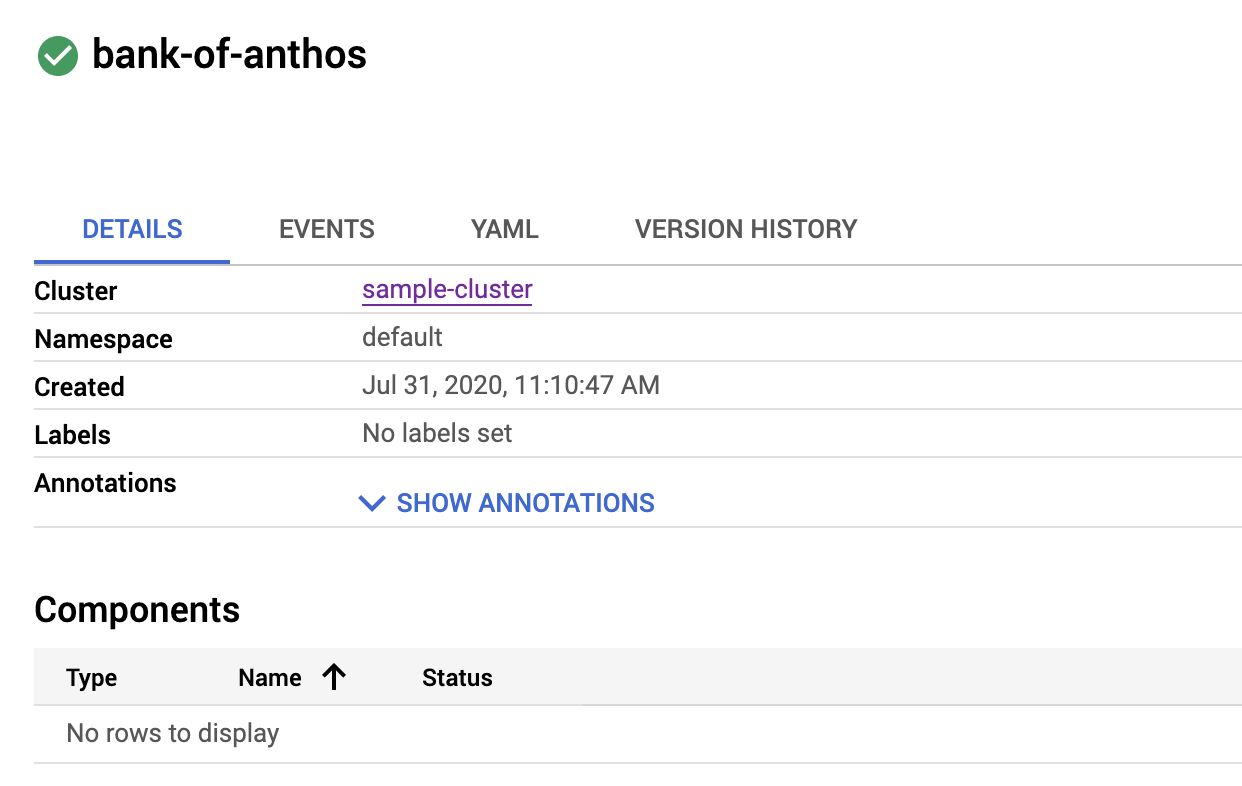
애플리케이션 페이지에 추가한 리소스가 표시됩니다.

구성요소별 리소스 포함
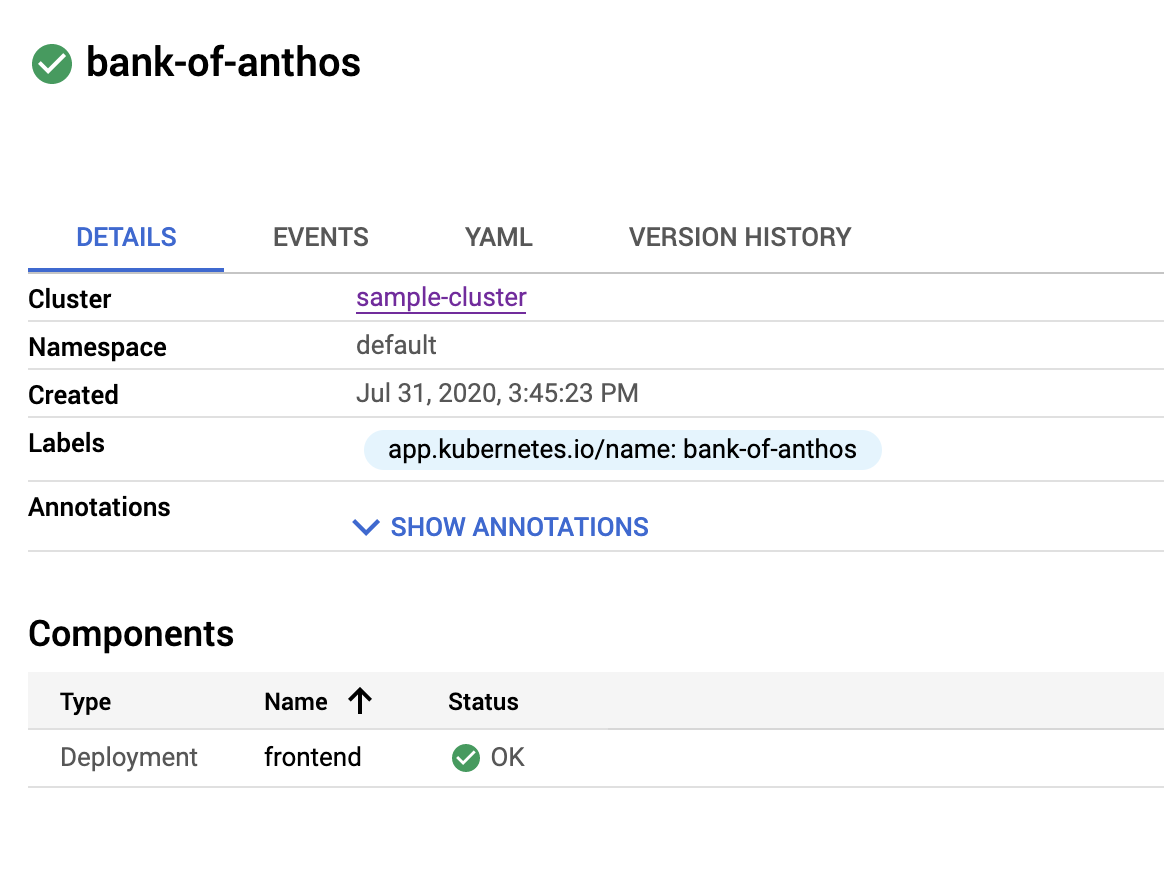
애플리케이션 페이지에 Bank of Anthos 애플리케이션이 표시됩니다. 이름 필드의 bank-of-anthos를 클릭하면 애플리케이션의 기본 정보가 표시됩니다.
Google Cloud 콘솔에 표시할 다양한 유형의 구성 요소를 추가할 수 있습니다. 예를 들어 서비스, 배포, StatefulSet을 표시하려면
application.yaml정의의componentKinds섹션을 수정합니다. 예를 들면 다음과 같습니다.spec: componentKinds: - group: v1 kind: Service - group: apps kind: Deployment - group: v1 kind: StatefulSet다음 단계에서는 이러한 구성요소를 Bank of Anthos 리소스 정의에 추가합니다.
Cloud Shell 메뉴 바에서 편집기 열기를 클릭합니다.
Cloud Shell 편집기에서 다음을 붙여넣어
kubernetes-manifests/application.yaml파일의 콘텐츠를 덮어씁니다.apiVersion: app.k8s.io/v1beta1 kind: Application metadata: name: "bank-of-anthos" spec: componentKinds: - group: v1 kind: Service - group: apps kind: Deployment - group: v1 kind: StatefulSetspec섹션이 추가되면Service,Deployment,StatefulSet가 애플리케이션 정의에 추가됩니다.Cloud Shell에서 리소스를 적용합니다.
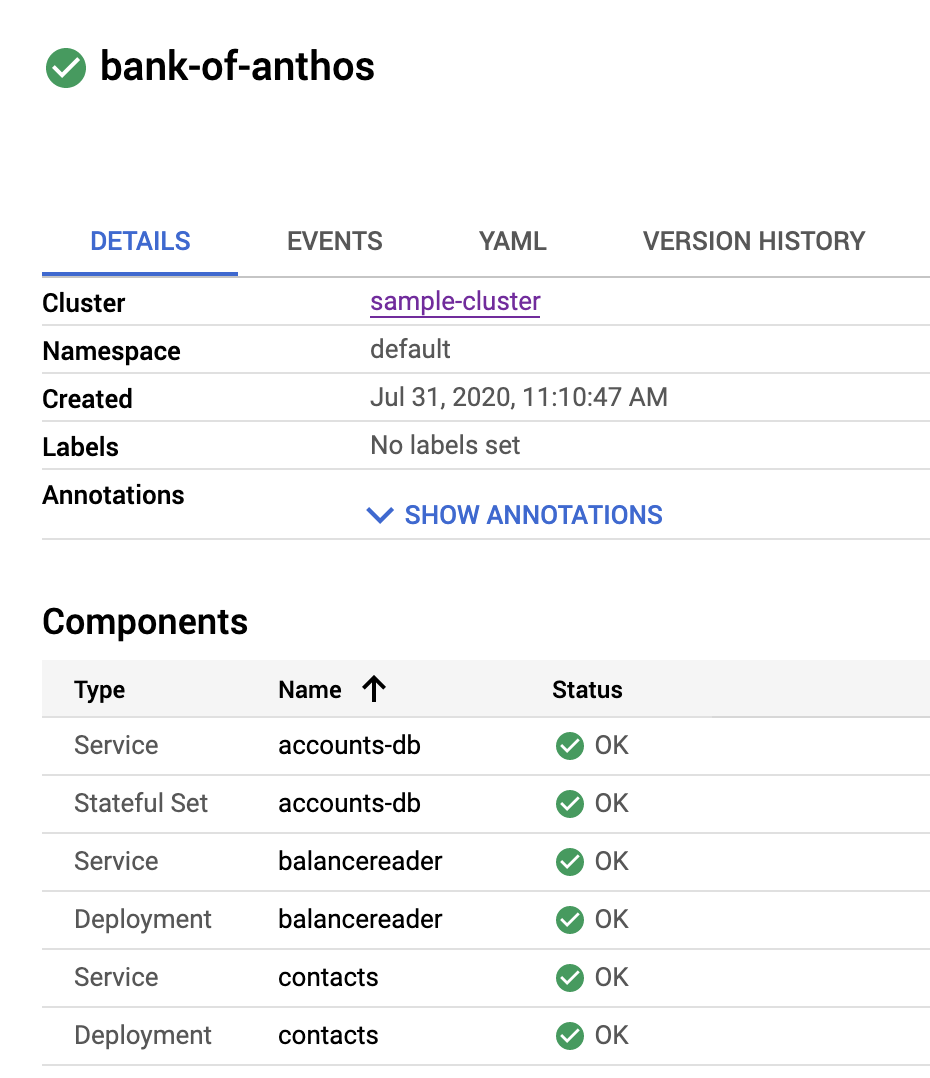
kubectl apply -f kubernetes-manifests/application.yamlGoogle Cloud 콘솔에서 Bank of Anthos 애플리케이션 세부정보 페이지로 이동합니다.
지정된 유형의 구성요소가 표시됩니다.
선택기를 사용하여 리소스 필터링
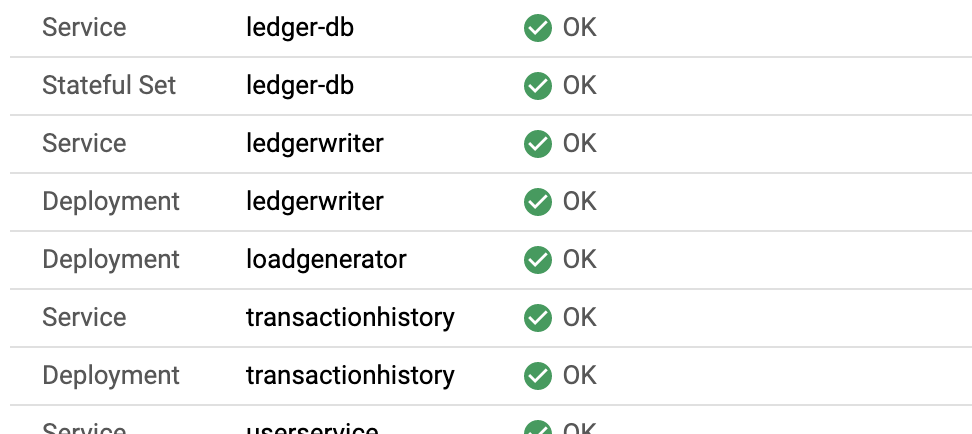
이 시점에서는 튜토리얼의 구성요소 목록에 전체 네임스페이스에서 정의된 구성요소 집합에 대한 두 샘플 애플리케이션의 모든 리소스가 포함됩니다. 예를 들어 다음 다이어그램은 Nginx 샘플 애플리케이션의
nginx서비스와 Bank of Anthos 샘플 애플리케이션의transactionhistory배포를 보여줍니다.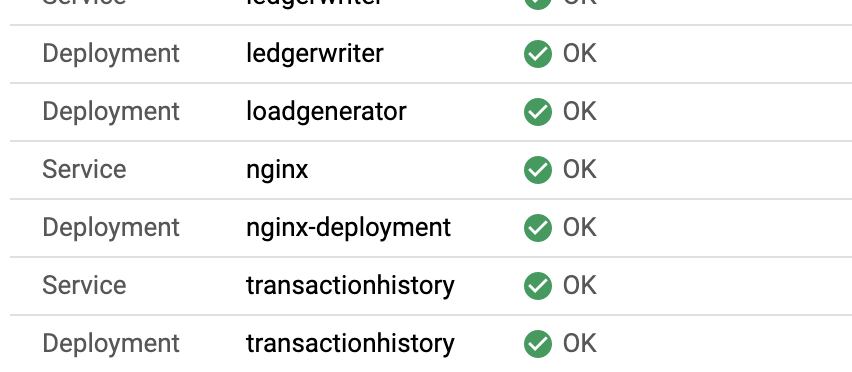
한 애플리케이션의 리소스(예: Bank of Anthos 애플리케이션)만 표시되도록 하려면 선택기를 사용하여 특정 리소스를 식별하면 됩니다. 선택기의 작동 방식을 확인하려면 다음 단계에 따라 리소스에 라벨을 추가합니다.
Cloud Shell에서
frontend.yaml파일을 엽니다.edit kubernetes-manifests/frontend.yamlCloud Shell 편집기에서 다음
label항목을 18번째 줄 뒤에 붙여넣습니다.labels: app.kubernetes.io/name: "bank-of-anthos"metadata섹션은 다음과 같습니다.apiVersion: apps/v1 kind: Deployment metadata: name: frontend labels: app.kubernetes.io/name: "bank-of-anthos" spec:완료된
application.yaml파일은 다음과 같습니다.apiVersion: app.k8s.io/v1beta1 kind: Application metadata: name: "bank-of-anthos" labels: app.kubernetes.io/name: "bank-of-anthos" spec: selector: matchLabels: app.kubernetes.io/name: "bank-of-anthos" componentKinds: - group: v1 kind: Service - group: apps kind: Deployment - group: v1 kind: StatefulSetCloud Shell에서 리소스를 적용합니다.
kubectl apply -f kubernetes-manifests/Google Cloud 콘솔에서 Bank of Anthos 애플리케이션 세부정보 페이지로 이동합니다.
특정 라벨과 일치하는 유일한 리소스만 표시됩니다.
kustomize를 사용하여 모든 리소스에 라벨 적용애플리케이션의 모든 리소스에 라벨을 수동으로 적용하는 것은 지루한 작업일 수 있습니다. 다음 단계는
kustomize를 사용하여 모든 리소스에 라벨을 효율적으로 추가하는 방법을 보여줍니다.Cloud Shell에서
kustomize를 다운로드합니다.curl -s "https://raw.githubusercontent.com/\ kubernetes-sigs/kustomize/master/hack/install_kustomize.sh" | bashkustomization.yaml파일을 만들고 수정합니다.touch kubernetes-manifests/kustomization.yaml edit kubernetes-manifests/kustomization.yamlCloud Shell 편집기에서
kustomization.yaml에 다음 줄을 추가합니다.apiVersion: kustomize.config.k8s.io/v1beta1 kind: Kustomization resources: - accounts-db.yaml - application.yaml - balance-reader.yaml - config.yaml - contacts.yaml - frontend.yaml - ledger-db.yaml - ledger-writer.yaml - loadgenerator.yaml - transaction-history.yaml - userservice.yaml commonLabels: app.kubernetes.io/name: "bank-of-anthos"이
kustomization.yaml정의에서는 수정사항을 적용할 리소스와 적용할 수정사항을 지정합니다. 이 경우 모든 리소스에 공통 라벨(app.kubernetes.io/name: "bank-of-anthos")을 포함하도록 지정합니다.Cloud Shell에서 이전 리소스를 삭제합니다.
kubectl delete -f kubernetes-manifests/kustomization.yaml에 지정된 새 리소스를 적용하기 전에 이전 리소스를 삭제해야 합니다.file플래그 대신kustomize플래그를 사용하여 리소스를 적용합니다../kustomize build kubernetes-manifests/ | kubectl apply -f -Google Cloud 콘솔에서 Bank of Anthos 애플리케이션 세부정보 페이지로 이동합니다.
세부정보 페이지에는 Bank of Anthos 샘플 애플리케이션의 리소스가 표시되고 Nginx 샘플 애플리케이션의 리소스는 표시되지 않습니다.
디스플레이에 유용한 메타데이터 추가
Google Cloud 콘솔에서 애플리케이션의 커스텀 메타데이터를 표시할 수 있습니다. 애플리케이션이 수행하는 작업, 소유자, 자세한 정보를 찾을 수 있는 위치, 로그인 방법을 포함할 수 있습니다. 이러한 유형의 정보는 조직 내에서 여러 애플리케이션을 운영하는 경우를 비롯하여 다양한 사용 사례에 유용합니다.
다음 섹션에서는 추가할 수 있는 메타데이터의 일부를 설명합니다.
설명 및 문서 추가
애플리케이션 정보 패널에 표시되는 설명과 링크를 추가할 수 있습니다. 세부정보 페이지에서 이 패널에 액세스하려면 정보 패널 표시를 클릭합니다.
이 패널에서 정보를 표시하려면
application.yaml파일의descriptor섹션에서description및links와 같은 요소를 정의합니다.descriptor: description: links: - description: url:descriptor섹션을 업데이트하려면 다음을 수행합니다.Cloud Shell 편집기에서 다음을 붙여넣어
application.yaml파일의 콘텐츠를 덮어씁니다.apiVersion: app.k8s.io/v1beta1 kind: Application metadata: name: "bank-of-anthos" labels: app.kubernetes.io/name: "bank-of-anthos" spec: selector: matchLabels: app.kubernetes.io/name: "bank-of-anthos" componentKinds: - group: v1 kind: Service - group: apps kind: Deployment - group: v1 kind: StatefulSet descriptor: description: |- This application simulates a bank's payment processing network using [Anthos](/anthos/). Bank of Anthos allows users to create artificial accounts and simulate transactions between accounts. Bank of Anthos was developed to create an end-to-end sample demonstrating Anthos best practices. links: - description: 'About Anthos on GCP' url: /anthos/ - description: 'Bank of Anthos GitHub Repository' url: https://github.com/GoogleCloudPlatform/bank-of-anthosCloud Shell에서 애플리케이션 리소스를 배포합니다.
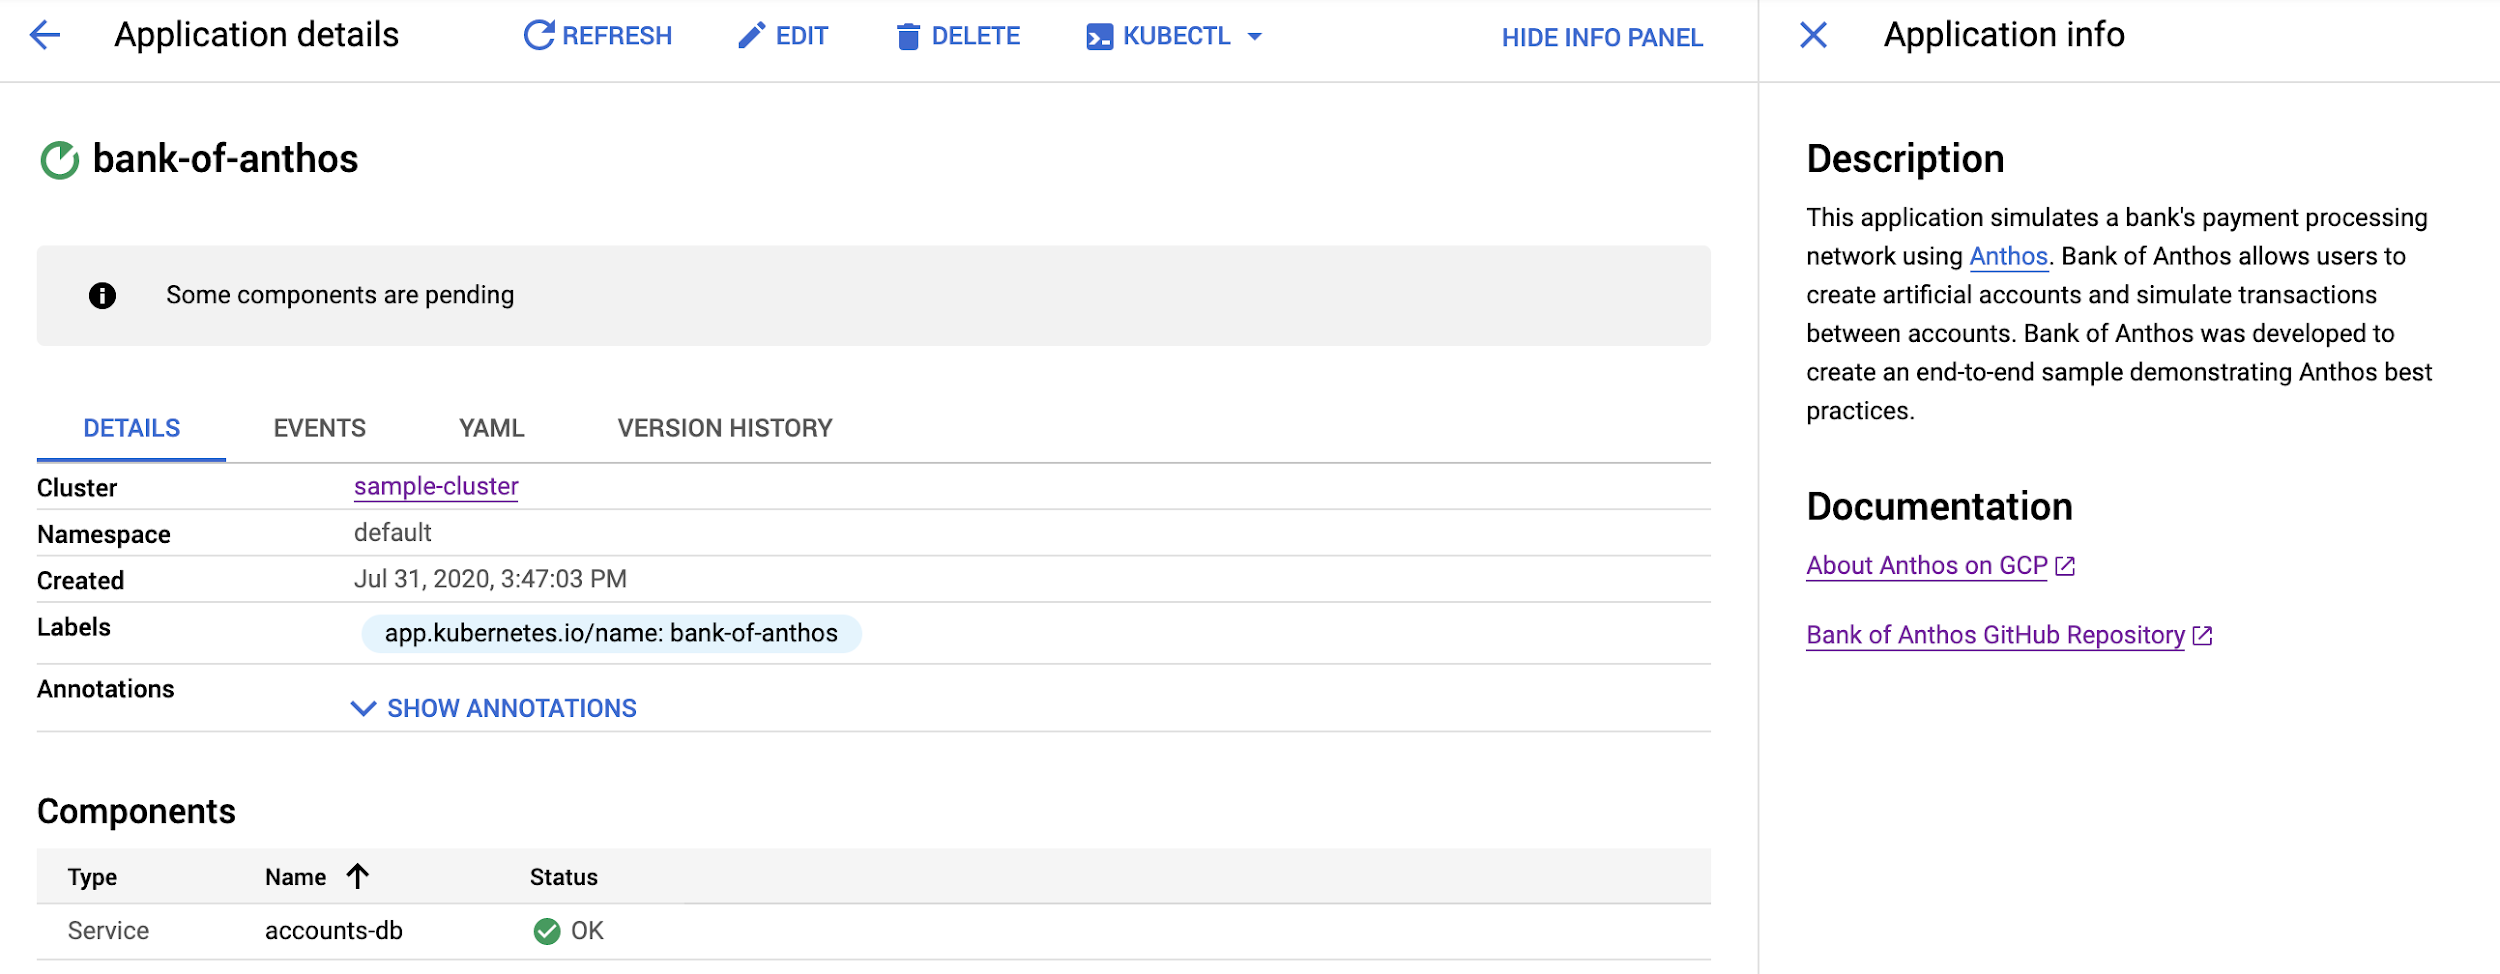
kubectl apply -f kubernetes-manifests/application.yamlGoogle Cloud 콘솔에서 Bank of Anthos 애플리케이션 세부정보 페이지로 이동합니다.
업데이트를 검토하려면 정보 패널 표시를 클릭합니다.
애플리케이션 정보 패널에 설명 및 문서 목록이 표시됩니다.
소프트웨어 유형 포함
애플리케이션 페이지에는 애플리케이션 목록에 있는 소프트웨어 유형의 필드(Software)가 포함되어 있습니다. 이 필드를 맞춤설정하여 필요에 따라 애플리케이션을 구성하고 분류할 수 있습니다. 예를 들어 소프트웨어가 내부용 또는 외부용인지 표시할 수 있습니다. 또는 공유 기본 유형에서 빌드된 앱이 여러 개 있는 경우 애플리케이션이 어떤 기본 유형을 구현하는지 나타낼 수 있습니다.
소프트웨어 유형에 커스텀 설명을 추가하려면
application.yaml파일의descriptor섹션에서type필드를 사용합니다.descriptor: type: External AppGoogle Cloud 콘솔에서
type값을 하이퍼링크로 표시할 수 있습니다.links섹션의 첫 번째 항목을 사용하여 하이퍼링크의 URL을 지정합니다. 다음 단계에서는links섹션을 다음과 같이 업데이트합니다.links: - description: 'Bank of Anthos GitHub Repository' url: https://github.com/GoogleCloudPlatform/bank-of-anthosCloud Shell 편집기에서 다음을 붙여넣어
application.yaml의 내용을 덮어씁니다.apiVersion: app.k8s.io/v1beta1 kind: Application metadata: name: "bank-of-anthos" labels: app.kubernetes.io/name: "bank-of-anthos" spec: selector: matchLabels: app.kubernetes.io/name: "bank-of-anthos" componentKinds: - group: v1 kind: Service - group: apps kind: Deployment - group: v1 kind: StatefulSet descriptor: type: External App description: |- This application simulates a bank's payment processing network using [Anthos](/anthos/). Bank of Anthos allows users to create artificial accounts and simulate transactions between accounts. Bank of Anthos was developed to create an end-to-end sample demonstrating Anthos best practices. links: - description: 'About Anthos on GCP' url: /anthos/ - description: 'Bank of Anthos GitHub Repository' url: https://github.com/GoogleCloudPlatform/bank-of-anthosCloud Shell에서 애플리케이션 리소스를 배포합니다.
kubectl apply -f kubernetes-manifests/application.yamlGoogle Cloud 콘솔에서 애플리케이션 페이지로 이동합니다.
External App(외부 앱)이 Software(소프트웨어) 필드에 표시됩니다.

애플리케이션 버전 포함
기본 애플리케이션 페이지에는 버전 필드가 포함됩니다. 실제로 이 필드의 값은 배포된 실제 버전을 참조하도록 프로그래매틱 방식으로 업데이트됩니다.
버전 필드를 채우려면 다음 예시와 같이
descriptor아래에version필드를 포함합니다.descriptor: type: External App version: "2.3.2"다음 단계에서는 애플리케이션 버전 필드를 추가합니다.
Cloud Shell 편집기에서 다음을 붙여넣어
application.yaml파일의 콘텐츠를 덮어씁니다.apiVersion: app.k8s.io/v1beta1 kind: Application metadata: name: "bank-of-anthos" labels: app.kubernetes.io/name: "bank-of-anthos" spec: selector: matchLabels: app.kubernetes.io/name: "bank-of-anthos" componentKinds: - group: v1 kind: Service - group: apps kind: Deployment - group: v1 kind: StatefulSet descriptor: type: External App version: "2.3.2" description: |- This application simulates a bank's payment processing network using [Anthos](/anthos/). Bank of Anthos allows users to create artificial accounts and simulate transactions between accounts. Bank of Anthos was developed to create an end-to-end sample demonstrating Anthos best practices. links: - description: 'About Anthos on GCP' url: /anthos/ - description: 'Bank of Anthos GitHub Repository' url: https://github.com/GoogleCloudPlatform/bank-of-anthosCloud Shell에서 애플리케이션 리소스를 배포합니다.
kubectl apply -f kubernetes-manifests/application.yamlGoogle Cloud 콘솔에서 애플리케이션 페이지로 이동합니다.
Bank of Anthos 애플리케이션의 Version(버전) 필드가 2.3.2로 표시됩니다.

유지 관리 담당자 세부정보 추가
이 단계에서는 애플리케이션 페이지의 기본 섹션에 커스텀 정적 텍스트를 추가합니다.
application.yaml파일의info섹션에서 이러한 세부정보를 다음과 같이 지정합니다.info: - name: LABEL value: STRING
정적 값을 포함하려면
info섹션에LABEL및STRING에 대한 세부정보를 제공합니다. 예를 들어name에는Owner을,value에는John Smith를 입력할 수 있습니다.Cloud Shell 편집기에서 다음을 붙여넣어
application.yaml의 내용을 덮어씁니다.apiVersion: app.k8s.io/v1beta1 kind: Application metadata: name: "bank-of-anthos" labels: app.kubernetes.io/name: "bank-of-anthos" spec: selector: matchLabels: app.kubernetes.io/name: "bank-of-anthos" componentKinds: - group: v1 kind: Service - group: apps kind: Deployment - group: v1 kind: StatefulSet descriptor: type: External App version: "2.3.2" description: |- This application simulates a bank's payment processing network using [Anthos](/anthos/). Bank of Anthos allows users to create artificial accounts and simulate transactions between accounts. Bank of Anthos was developed to create an end-to-end sample demonstrating Anthos best practices. links: - description: 'About Anthos on GCP' url: /anthos/ - description: 'Bank of Anthos GitHub Repository' url: https://github.com/GoogleCloudPlatform/bank-of-anthos info: - name: Owner value: John SmithCloud Shell에서 애플리케이션 리소스를 배포합니다.
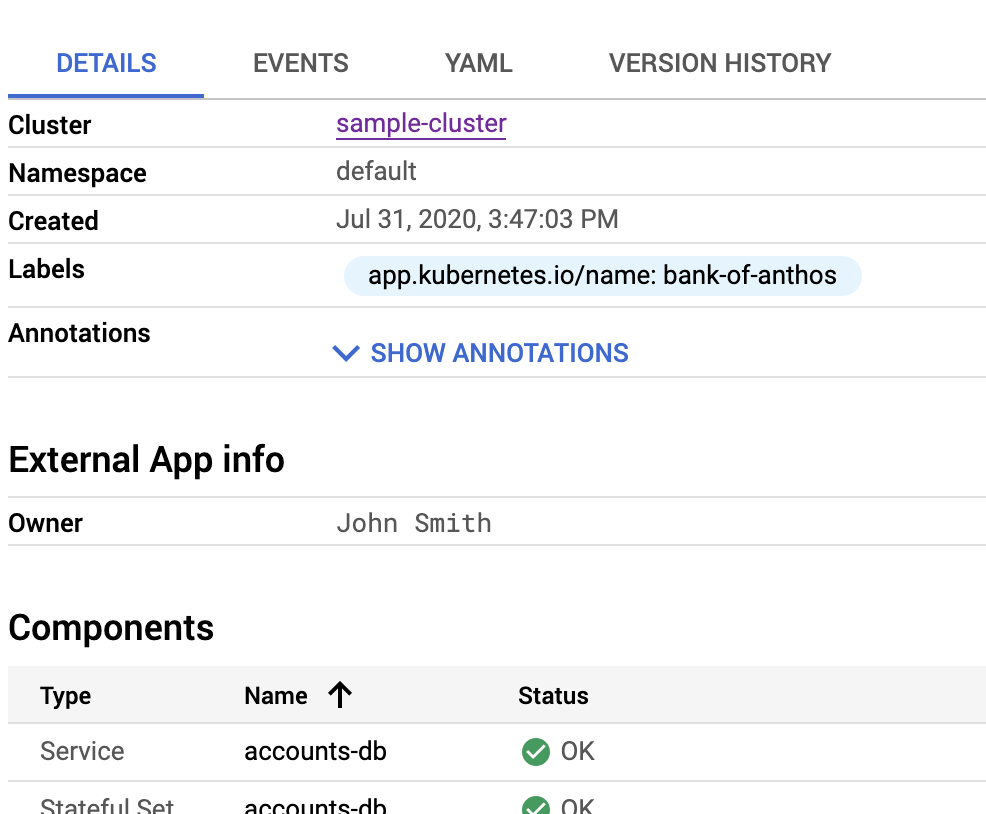
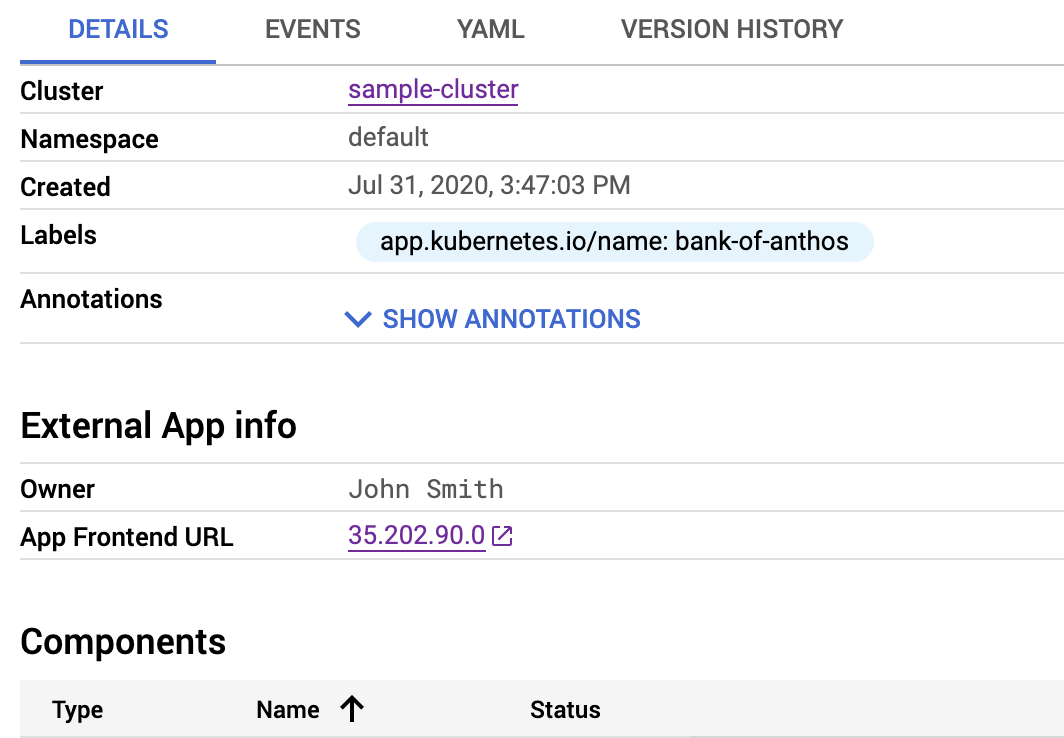
kubectl apply -f kubernetes-manifests/application.yamlGoogle Cloud 콘솔에서 Bank of Anthos 애플리케이션 세부정보 페이지로 이동합니다.
세부정보 페이지에는 Bank of Anthos 애플리케이션의 소유자가 포함되어 있습니다.
애플리케이션 엔드포인트 노출
정적 값 외에도 배포 자체에서 동적 값을 노출할 수 있습니다. 다음 단계에서는 애플리케이션 세부정보 페이지를 보는 모든 사용자가 애플리케이션에 직접 액세스할 수 있도록 부하 분산기 IP 주소를 표시합니다.
이 값을 표시하려면
serviceRef사양을 사용합니다. 다른 유효한 사양에는configMapKeyRef,ingressRef,secretKeyRef가 있습니다.serviceRef사양에서Reference유형을 사용하여 이러한 동적 값을 포함합니다. 이 튜토리얼에서serviceRef사양은 다음과 같습니다.info: - name: LABEL type: Reference valueFrom: serviceRef: name: SERVICE_NAME fieldPath: DATA_LOCATION
다음 값을 바꿀 수 있습니다.
LABEL: 특정 Reference 인스턴스를 설명하는 라벨(예:App Frontend URL)SERVICE_NAME: Service$mdash를 식별하는 이름(예:frontend)DATA_LOCATION: 서비스의 데이터 위치(예:status.loadBalancer.ingress[0].ip)
serviceRef및ingressRef사양은path요소도 지원합니다. URL에 경로 관련 세부정보가 필요한 경우path필드에 해당 세부정보를 포함합니다.info: - name: LABEL type: Reference valueFrom: serviceRef: name: SERVICE_NAME fieldPath: DATA_LOCATION path: /wp-admin
엔드포인트 IP 주소 및 경로가 연결됩니다(예:
35.202.90.0/wp-admin).다음과 같이
protocol필드를 사용하여 HTTP 또는 HTTPS를 강제로 사용할 수도 있습니다.info: - name: LABEL type: Reference valueFrom: serviceRef: name: SERVICE_NAME fieldPath: DATA_LOCATION path: /wp-admin protocol: HTTPS
이러한 세부정보는 다음과 같은 URL을 생성합니다.
https://35.202.90.0/wp-admin
다음 단계에서는
serviceRef를 사용하여 Bank of Anthos 애플리케이션의 서비스 부하 분산기 IP 주소를 노출합니다.Cloud Shell 편집기에서
application.yaml파일의 콘텐츠를 다음과 같이 덮어씁니다.apiVersion: app.k8s.io/v1beta1 kind: Application metadata: name: "bank-of-anthos" labels: app.kubernetes.io/name: "bank-of-anthos" spec: selector: matchLabels: app.kubernetes.io/name: "bank-of-anthos" componentKinds: - group: v1 kind: Service - group: apps kind: Deployment - group: v1 kind: StatefulSet descriptor: type: External App version: "2.3.2" description: |- This application simulates a bank's payment processing network using [Anthos](/anthos/). Bank of Anthos allows users to create artificial accounts and simulate transactions between accounts. Bank of Anthos was developed to create an end-to-end sample demonstrating Anthos best practices. links: - description: 'About Anthos on GCP' url: /anthos/ - description: 'Bank of Anthos GitHub Repository' url: https://github.com/GoogleCloudPlatform/bank-of-anthos info: - name: Owner value: John Smith - name: App Frontend URL type: Reference valueFrom: serviceRef: name: frontend fieldPath: status.loadBalancer.ingress[0].ip protocol: HTTPSCloud Shell에서 애플리케이션 리소스를 배포합니다.
kubectl apply -f kubernetes-manifests/application.yamlGoogle Cloud 콘솔에서 Bank of Anthos 애플리케이션 세부정보 페이지로 이동합니다.
세부정보 페이지에는 Bank of Anthos 애플리케이션에 대한 엔드포인트 IP 주소가 포함됩니다.
액세스 사용자 인증 정보 제공
앞에서 언급했듯이
secretKeyRef요소를 사용하여Google Cloud 콘솔을 통해 Kubernetes 보안 비밀을 노출할 수 있습니다. 이 튜토리얼에서는 운영자가 애플리케이션에 로그인할 수 있도록 운영자에게 사용자 이름과 비밀번호를 제공합니다.Cloud Shell에서 보안 비밀을 만듭니다.
kubectl create secret generic boa-access --from-literal=boa-user=testuser --from-literal=boa-pass=passwordCloud Shell 편집기에서 다음을 붙여넣어
application.yaml파일의 콘텐츠를 덮어씁니다. 이 업데이트에는secretKeyRef주석의 사용자 이름과 비밀번호 참조가 포함됩니다.apiVersion: app.k8s.io/v1beta1 kind: Application metadata: name: "bank-of-anthos" labels: app.kubernetes.io/name: "bank-of-anthos" spec: selector: matchLabels: app.kubernetes.io/name: "bank-of-anthos" componentKinds: - group: v1 kind: Service - group: apps kind: Deployment - group: v1 kind: StatefulSet descriptor: type: External App version: "2.3.2" description: |- This application simulates a bank's payment processing network using [Anthos](/anthos/). Bank of Anthos allows users to create artificial accounts and simulate transactions between accounts. Bank of Anthos was developed to create an end-to-end sample demonstrating Anthos best practices. links: - description: 'About Anthos on GCP' url: /anthos/ - description: 'Bank of Anthos GitHub Repository' url: https://github.com/GoogleCloudPlatform/bank-of-anthos info: - name: Owner value: John Smith - name: App Frontend URL type: Reference valueFrom: serviceRef: name: frontend fieldPath: status.loadBalancer.ingress[0].ip protocol: HTTPS - name: TestUser username type: Reference valueFrom: secretKeyRef: name: boa-access key: boa-user - name: TestUser password type: Reference valueFrom: secretKeyRef: name: boa-access key: boa-passCloud Shell에서 애플리케이션 리소스를 배포합니다.
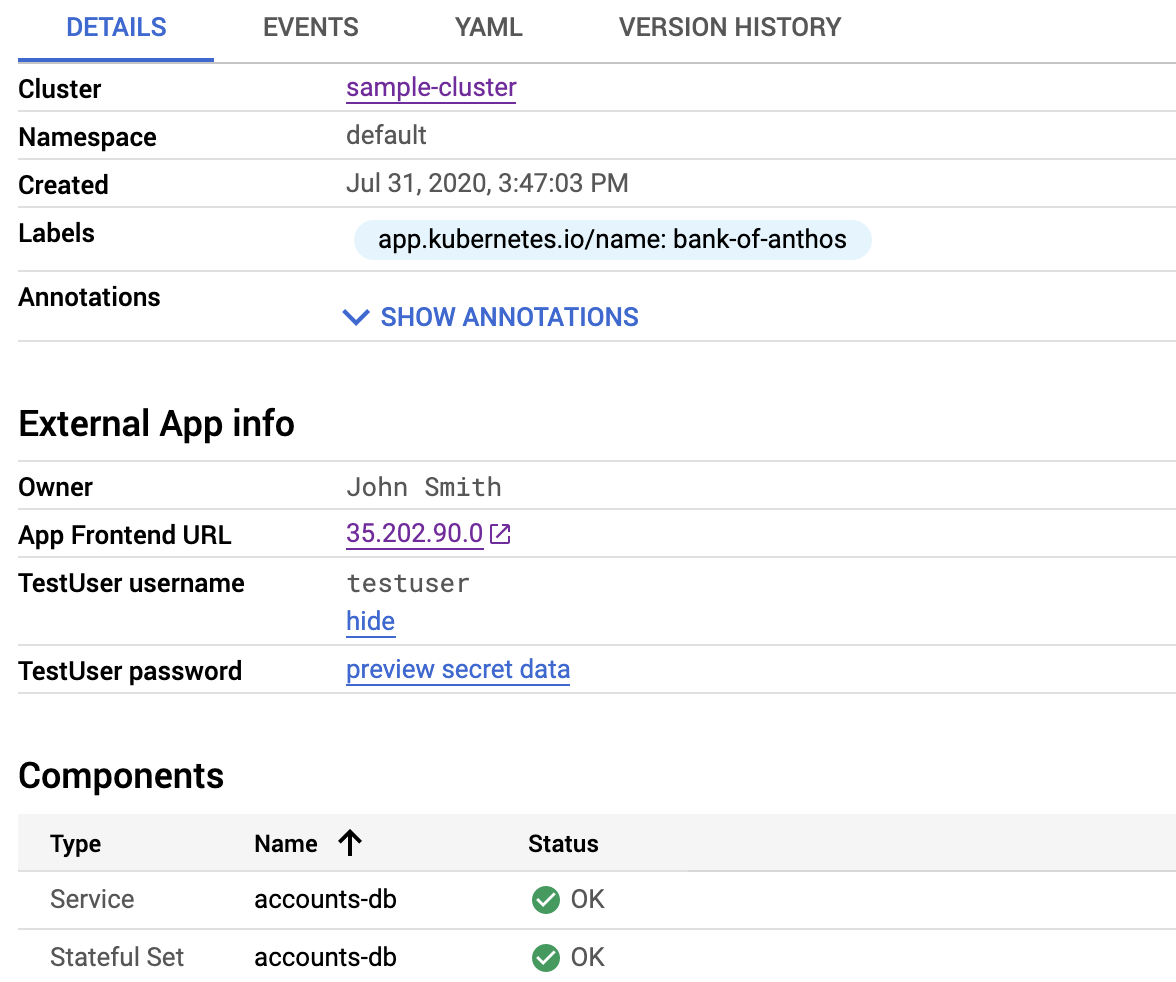
kubectl apply -f kubernetes-manifests/application.yamlGoogle Cloud 콘솔에서 Bank of Anthos 애플리케이션 세부정보 페이지로 이동합니다.
보안 비밀 데이터 미리보기를 클릭합니다. 사용자 이름과 비밀번호가 표시됩니다.
보안 비밀 데이터를 공개하는 기능은 운영팀에게 유용한 기능입니다. 하지만 이러한 보안 비밀을 볼 수 있는 권한은 GKE 세부정보 페이지에 대한 Identity and Access Management(IAM) 액세스 권한의 적용을 받습니다. 클러스터를 볼 수 있는 권한이 있는 사용자는 보안 비밀도 볼 수 있으므로 노출할 내용을 신중하게 고려해야 합니다.
애플리케이션 아이콘 추가
애플리케이션을 돋보이게 하기 위해 로고를 포함하여 애플리케이션 목록 및 세부정보 페이지에 표시할 수 있습니다. 로고를 포함하려면
kubernetes-engine.cloud.google.com/icon주석에 있는 이미지의 데이터 URI를 지정합니다.이미지를 데이터 URI로 변환하는 것은 이 튜토리얼에서 다루지 않습니다. 그러나 Google 검색에서 '이미지를 데이터 uri로 변환'을 검색하면 이미지에서 데이터 문자열을 생성하는 데 도움이 되는 다양한 활용 방법을 확인할 수 있습니다. 이 섹션에 사용된 이미지의 데이터 URI가 너무 길어 튜토리얼에 포함하는 데 적합하지 않습니다. 전체 데이터 URI는 완료된
application.yaml파일에서 확인할 수 있습니다. 데이터 URI 문자열은data:image/png;base64,iVBORw0KGgoAAAANSUhEUg....로 시작하며K5CYII=로 끝납니다. 후행 따옴표 또는 HTML 문자를 포함하지 않아야 합니다.참고를 위해 전체
application.yaml파일이 gist로 제공됩니다.아이콘을 추가하려면
application.yaml의metadata섹션을 업데이트합니다.다음 코드를 복사합니다.
annotations:
  kubernetes-engine.cloud.google.com/icon: >-
    data:image/png;base64,DATA_URI
DATA_URI를 이전에 참조되는 완료된application.yaml파일에서 발견된 문자열로 바꿉니다.Cloud Shell 편집기에서
application.yaml의metadata섹션에 있는labels섹션 다음에 복사한 코드를 붙여넣습니다.application.yaml의 해당 섹션은 다음과 비슷합니다. 여기서DATA_URI는 데이터 URI 값을 나타냅니다.apiVersion: app.k8s.io/v1beta1 kind: Application metadata: name: "bank-of-anthos" labels: app.kubernetes.io/name: "bank-of-anthos" annotations: kubernetes-engine.cloud.google.com/icon: >- data:image/png;base64,DATA_URI spec:Cloud Shell에서 애플리케이션 리소스를 배포합니다.
kubectl apply -f kubernetes-manifests/application.yamlGoogle Cloud 콘솔에서 애플리케이션 페이지로 이동합니다.
로고는 애플리케이션 목록에 표시됩니다.

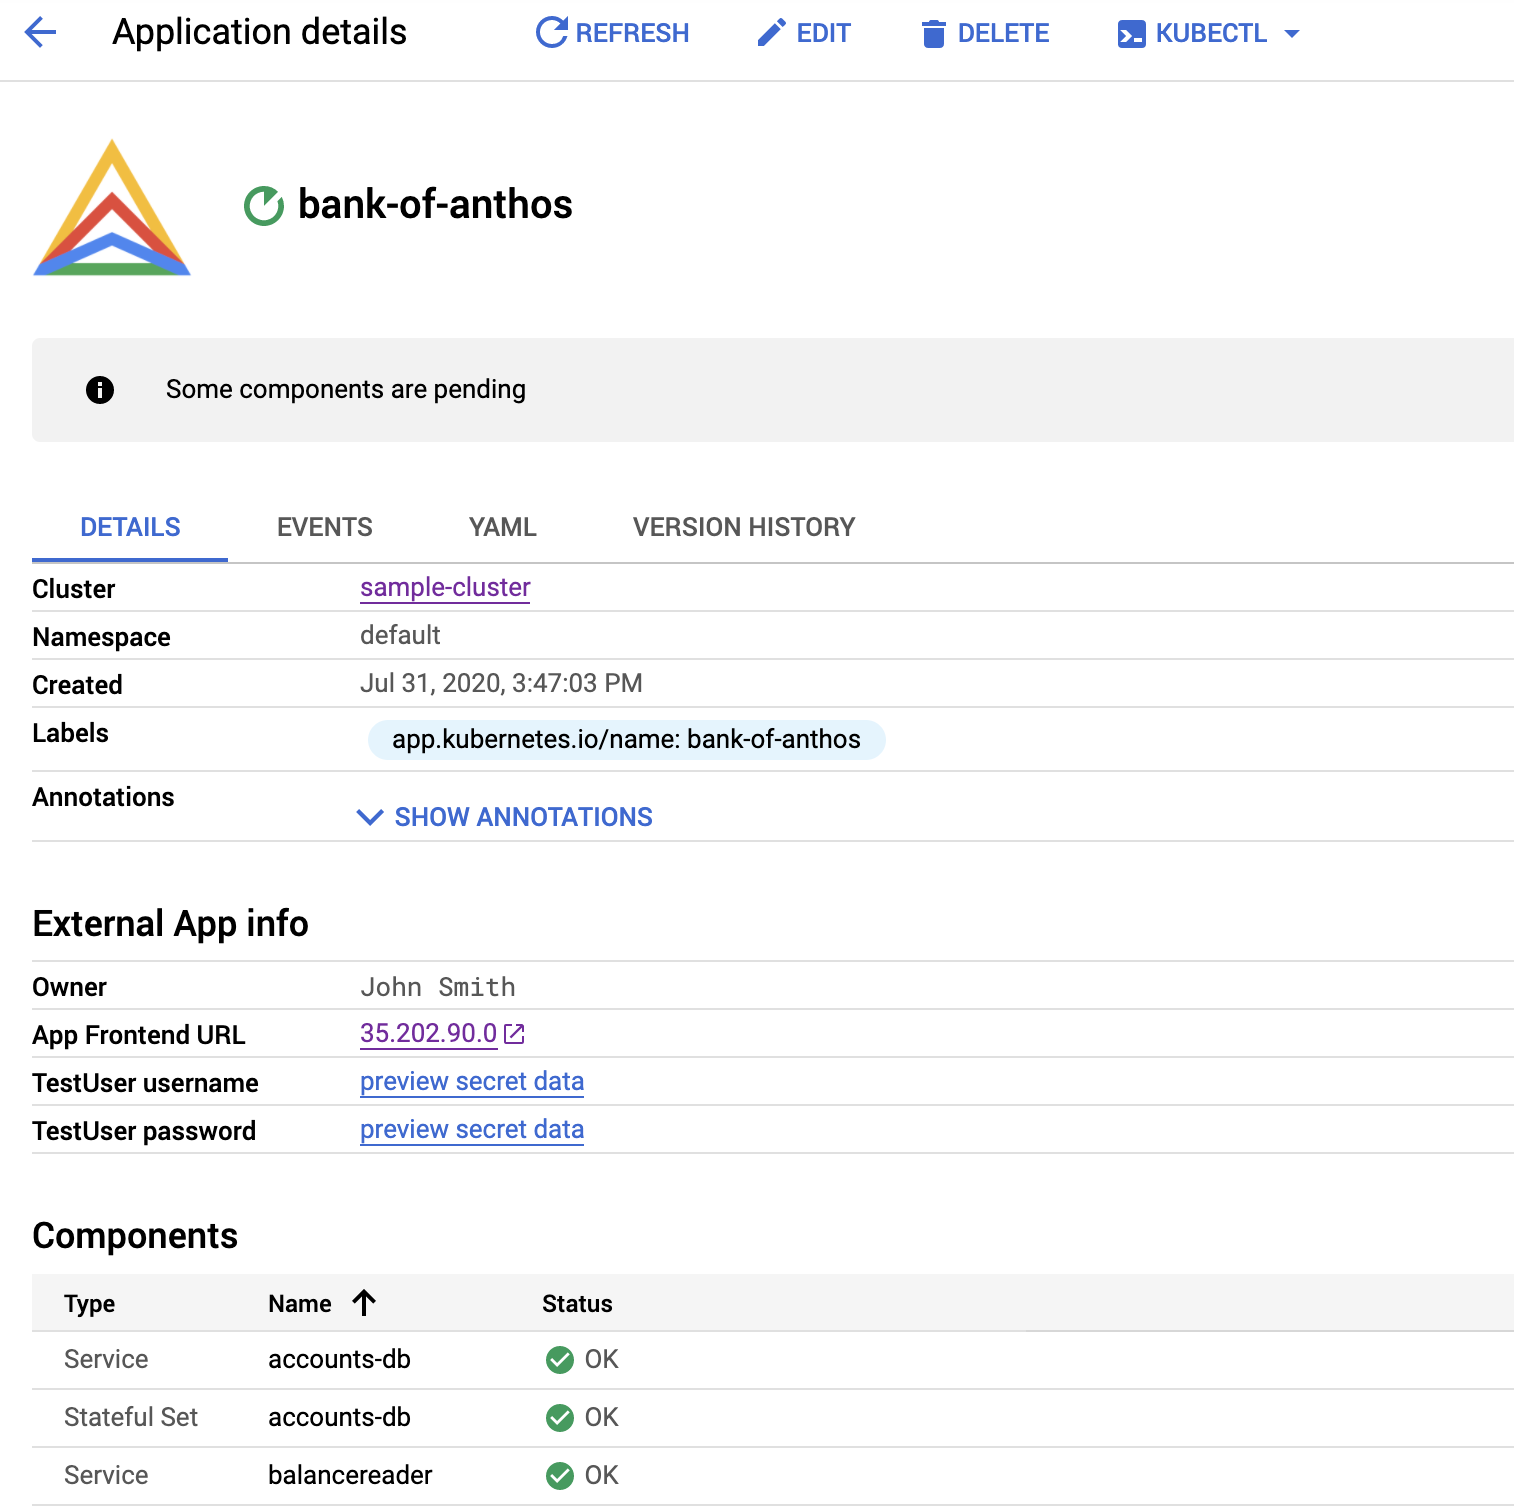
Google Cloud 콘솔에서 Bank of Anthos 애플리케이션 세부정보 페이지로 이동합니다.
로고는 세부정보 페이지의 헤더에 표시됩니다.
삭제
이 튜토리얼에서 사용된 리소스에 대한 비용이 Google Cloud 계정에 청구되지 않게 하려면 이 튜토리얼에서 만든 Google Cloud 프로젝트를 삭제하면 됩니다.
프로젝트 삭제
- In the Google Cloud console, go to the Manage resources page.
- In the project list, select the project that you want to delete, and then click Delete.
- In the dialog, type the project ID, and then click Shut down to delete the project.
다음 단계
click-to-deployGitHub 저장소의 Kubernetes 폴더에서application.yaml파일의 다른 예시를 검토합니다. 다양한 앱에서chart/<application>/templates/아래의 다른application.yaml파일을 찾습니다(예: 이 파일).- GKE용 Google 클릭하여 배포 솔루션을 위해 Marketplace 배포를 사용합니다.
- Google Cloud에 대한 참조 아키텍처, 다이어그램, 권장사항 살펴보기 Cloud 아키텍처 센터 살펴보기