This page covers how to access and manage your workloads and resources within Google Distributed Cloud (GDC) air-gapped. It describes how to authenticate, generate kubeconfig files for zonal and global resources, and manage session inactivity. Understanding these processes ensures secure and reliable access to your projects and workloads.
This page is for audiences within the platform administrator group (such as IT admins) or the application operator group (such as application developers) who want to use GDC resources. For more information, see Audiences for GDC air-gapped documentation.
You can access workloads using the GDC console, gdcloud CLI, or kubectl CLI.
Authenticate your account for access
To sign in to the GDC console or a cluster, work through the following steps:
Console
Open the following URL in a new browser tab to access the Distributed Cloud user interface (UI):
https://GDC_URL
Replace GDC_URL with the
domain name you use to access Distributed Cloud that the
Infrastructure Operator (IO) provides. When opening any URL for the first
time, Distributed Cloud redirects you to your identity provider
login page if the Infrastructure Operator (IO) configured the page.
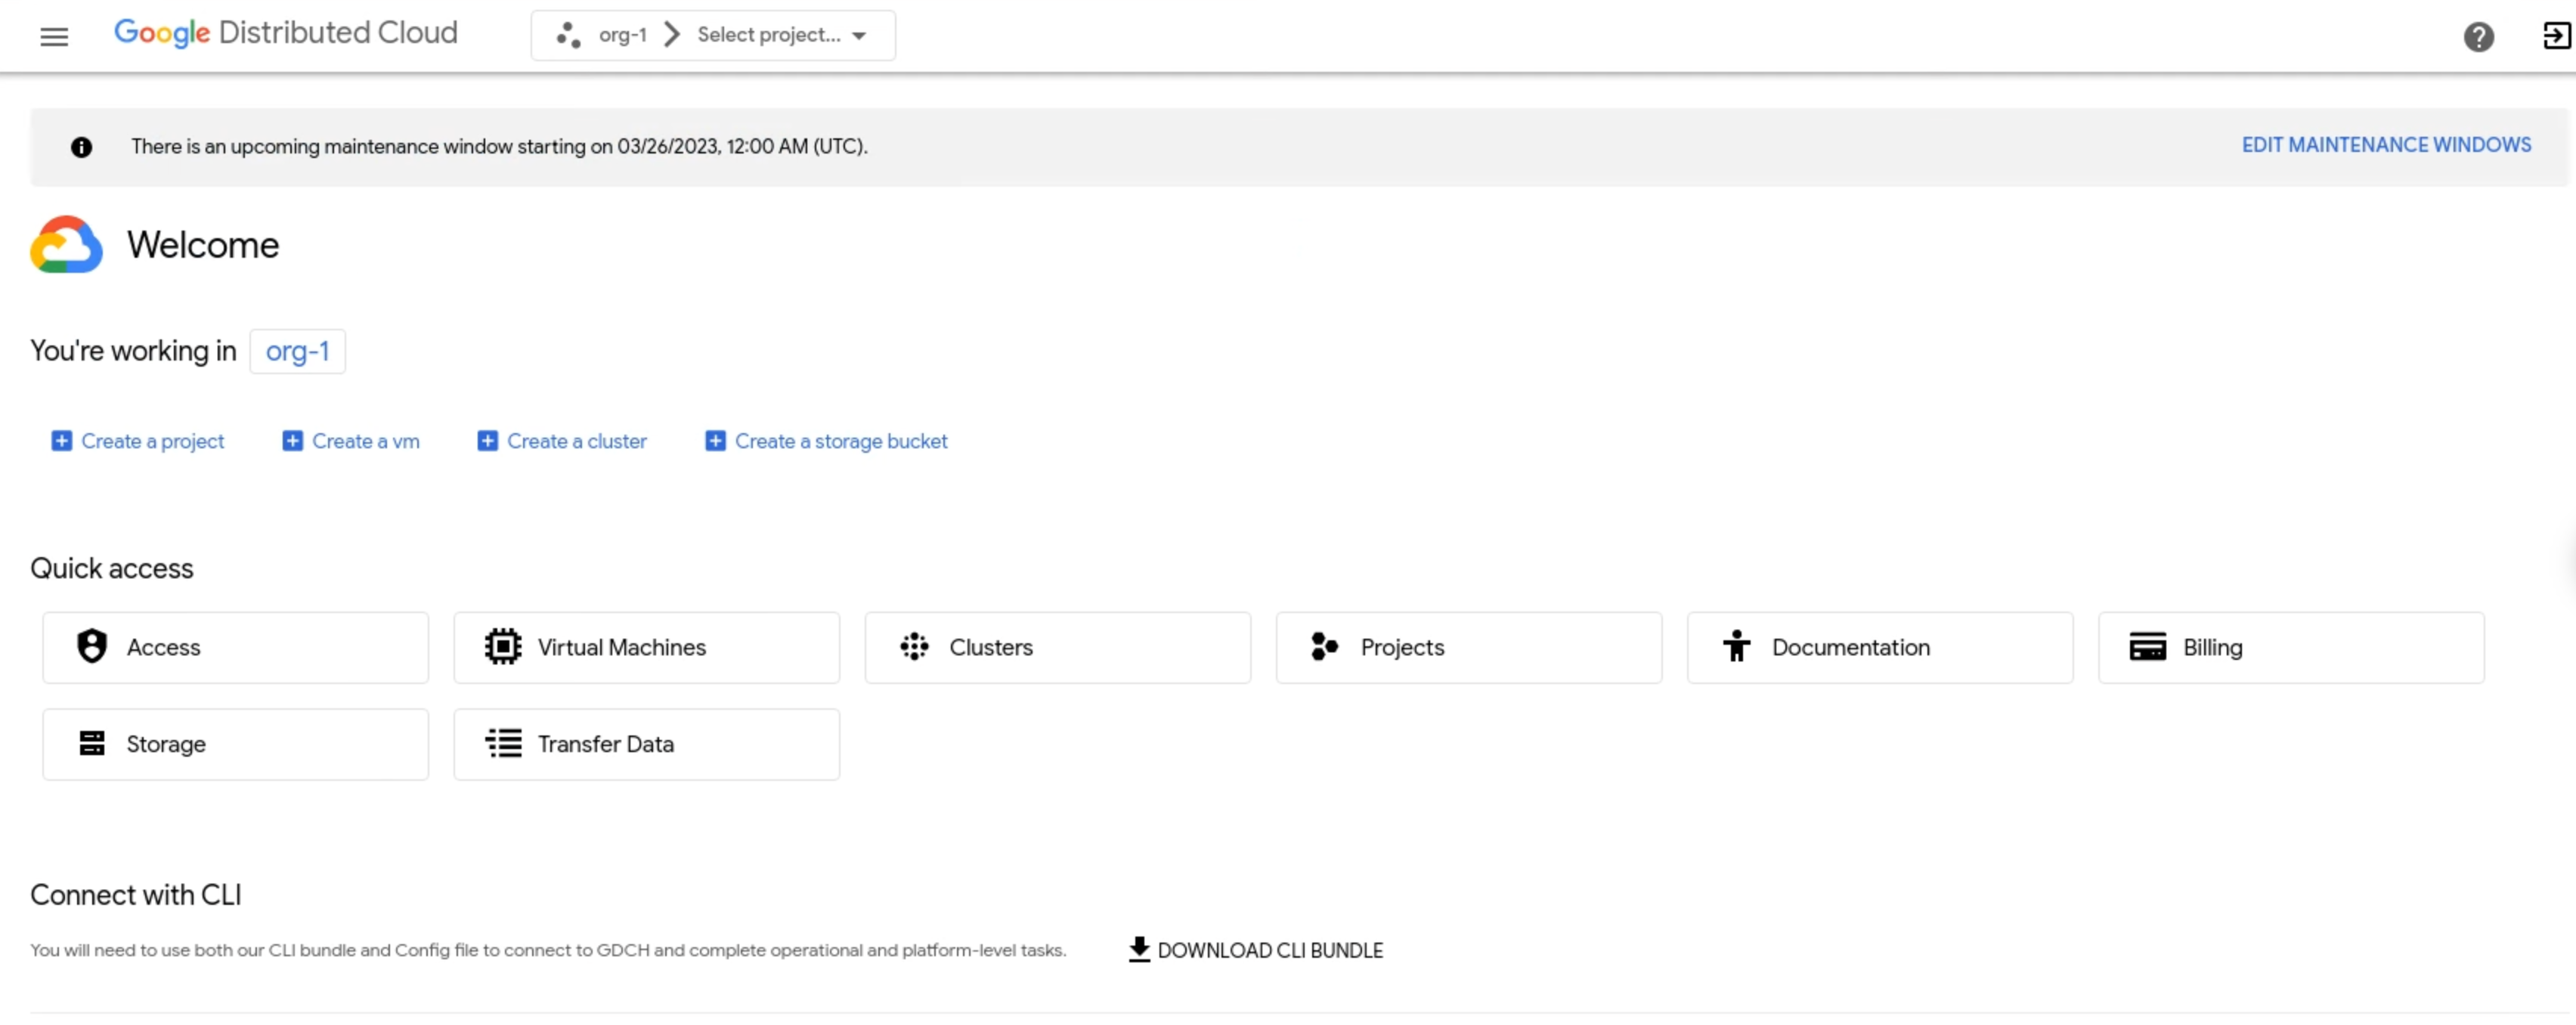
For example, the following image signs in to the console UI for an
organization named org-1:
CLI
When you sign in to the gdcloud CLI, use the
gdcloud auth login command
to authenticate a principal to the gdcloud CLI. The
gdcloud CLI uses that principal for authentication and
authorization to manage Google Cloud resources and services.
Before you sign in, ensure you do the following:
- Download the gdcloud CLI binary and install it in your system. For more information, see Download the gdcloud CLI.
- Set up and initialize the gdcloud CLI default configuration. Make sure to set the correct organization URL, which is used to fetch the login config endpoint. For more information, see gdcloud CLI installation.
- Install the authentication plugin
gdcloud-k8s-auth-plugin. For more information, see gdcloud CLI authentication.
To sign in to a Management API server or Kubernetes cluster, complete the following steps:
- Management API server:
Export the path on where you want to store the Management API server kubeconfig file:
export KUBECONFIG=MANAGEMENT_API_SERVERReplace MANAGEMENT_API_SERVER with the path to the directory of where to store the kubeconfig file.
Authenticate your gdcloud CLI instance to sign in. There are two ways to authenticate:
Standard browser login: Use this authentication flow when logging in from a browser.
gdcloud auth loginSecondary device login: Use this authentication flow if your primary device does not have a browser available. This flow starts the login on the primary device with no browser access and continues the login with the secondary device that has browser access.
Initiate the login on your primary device with no browser:
gdcloud auth login --no-browserThe
KUBECONFIGenvironment variable updates with the kubeconfig files for all API servers and clusters in the organization. If theKUBECONFIGvariable isn't set, the kubectl CLI uses the default kubeconfig file stored in$HOME/.kube/config.To skip editing the kubeconfig files, add the
--skip-kubeconfig-updateflag to your command. For example:gdcloud auth login --no-browser --skip-kubeconfig-updateCopy the gdcloud CLI command output that is printed out, and run it on a machine with browser access.
Follow the instructions on the web page to complete the login process.
On successful login completion, the browser displays the message Authentication successful. Please close this window.
Follow the instructions on the terminal. On successful login, the terminal displays the message: You are now logged in.
- Kubernetes cluster:
Authenticate your gdcloud CLI instance to sign in. There are two ways to authenticate:
Standard browser login: Use this authentication flow when logging in from a browser.
gdcloud auth loginSecondary device login: Use this authentication flow if your primary device does not have a browser available. This flow starts the login on the primary device with no browser access and continues the login with the secondary device that has browser access.
Initiate the login on your primary device with no browser:
gdcloud auth login --no-browserThe command in the primary device prints another
gdcloudcommand that you must run on the secondary device in step c.Repeat step 1 to download the certificate on the secondary device.
Complete the login on the secondary device by entering the command printed on the primary device in step a.
This action opens a browser to sign in to the configured identity provider (IdP). Provide the user and password that you set during the initial gdcloud CLI setup to sign in.
Export your user identity kubeconfig file as a variable:
export KUBECONFIG=/tmp/CLUSTER_NAME-ZONE-kubeconfig-with-user-identity.yamlGenerate a kubeconfig file for a zonal cluster with your user identity:
gdcloud clusters get-credentials CLUSTER_NAME --zone ZONEReplace
ZONEwith the zone name.A kubeconfig file is generated with your user identity. The following YAML file shows an example:
apiVersion: v1
clusters:
- cluster:
  certificate-authority-data: <REDACTED>
  server: https://10.200.0.32:443
name: cluster-name
contexts:
- context:
  cluster: cluster-name
  user: cluster-name-anthos-default-user
name: cluster-name-cluster-name-anthos-default-user
current-context: cluster-name-cluster-name-anthos-default-user
kind: Config
preferences: {}
users:
- name: cluster-name-anthos-default-user
user:
  exec:
    apiVersion: client.authentication.k8s.io/v1
    args:
    - --audience=root-admin
    command: gdcloud-k8s-auth-plugin
    env: null
    installHint: Run 'gdcloud components install gdcloud-k8s-auth-plugin' to use plugin
    interactiveMode: Never
    provideClusterInfo: false
To verify that you can access the cluster, sign in with the generated kubeconfig file with a user identity:
kubectl --kubeconfig /tmp/admin-kubeconfig-with-user-identity.yaml version
Sign out
To sign out of the GDC console, do the following:
Console
Click Logout in the menu bar.

CLI
Log out from the CLI:
gdcloud auth revoke
Manually generate kubeconfig file
If you're managing resources with the kubectl CLI by calling KRM APIs directly, you must generate the kubeconfig file for the cluster or API server that hosts your resource, depending on the resource type you're managing.
You must also be aware of your GDC universe configuration to determine the zones to which you intend to deploy your zonal resources, or the global API server for global resources. For more information, see Global and zonal API servers.
Determine whether the resource you're manipulating is a global or zonal resource. Visit the resource's dedicated documentation for help if you're unsure.
Complete the applicable setup based on your resource type.
Zonal Management API server resources
Complete the following steps to generate your kubeconfig file for the zonal Management API server:
View all available zones:
gdcloud zones listNote the name of the zone that hosts your custom resource.
Set the
ZONEenvironment variable to the zone that hosts your zonal resources:export ZONE="ZONE"Replace
ZONEwith the zone name.Set the
MANAGEMENT_API_SERVERenvironment variable:export MANAGEMENT_API_SERVER="ORG_NAME-admin"Replace
ORG_NAMEwith the name of your organization, such asorg-1.Generate the Management API server kubeconfig file for the targeted zone, and validate the credentials:
export KUBECONFIG=${HOME}/${MANAGEMENT_API_SERVER:?}-kubeconfig.yaml
rm ${KUBECONFIG:?}
gdcloud clusters get-credentials ${MANAGEMENT_API_SERVER:?} --zone ${ZONE:?}
[[ $(kubectl config current-context) == *${MANAGEMENT_API_SERVER:?}* ]] && echo "Success. Your kubeconfig is at $KUBECONFIG" || echo "Failure"
The command
rm ${KUBECONFIG:?}removes the existing kubeconfig file in the home directory. When you generate a new kubeconfig file, it overwrites the existing one. If you don't want to overwrite or remove the existing file, back it up in another safe location.
Zonal Kubernetes cluster resources
Complete the following steps to generate your kubeconfig file for the zonal Kubernetes cluster:
View all available zones:
gdcloud zones listNote the name of the zone that hosts your custom resource.
Set the
ZONEenvironment variable to the zone that hosts your Kubernetes cluster:export ZONE="ZONE"Replace
ZONEwith the zone name.Set the
KUBERNETES_CLUSTERenvironment variable:export KUBERNETES_CLUSTER="KUBERNETES_CLUSTER_NAME"Replace
KUBERNETES_CLUSTER_NAMEwith the name of your Kubernetes cluster.Generate the Kubernetes cluster kubeconfig file for the targeted zone variable, and validate the credentials:
export KUBECONFIG=${HOME}/${KUBERNETES_CLUSTER:?}-kubeconfig.yaml
rm ${KUBECONFIG:?}
gdcloud clusters get-credentials ${KUBERNETES_CLUSTER:?} --zone ${ZONE:?}
[[ $(kubectl config current-context) == *${KUBERNETES_CLUSTER:?}* ]] && echo "Success. Your kubeconfig is at $KUBECONFIG" || echo "Failure"
The command
rm ${KUBECONFIG:?}removes the existing kubeconfig file in the home directory. When you generate a new kubeconfig file, it overwrites the existing one. If you don't want to overwrite or remove the existing file, back it up in another safe location.
Global API server resources
Complete the following steps to generate your kubeconfig file for the global API server:
Set the
GLOBAL_API_SERVERenvironment variable:export GLOBAL_API_SERVER="global-api"Generate the global API server kubeconfig file, and validate the credentials:
export KUBECONFIG=${HOME}/${GLOBAL_API_SERVER:?}-kubeconfig.yaml
rm ${KUBECONFIG:?}
gdcloud clusters get-credentials ${GLOBAL_API_SERVER:?}
[[ $(kubectl config current-context) == *${GLOBAL_API_SERVER:?}* ]] && echo "Success. Your kubeconfig is at $KUBECONFIG" || echo "Failure"
The command
rm ${KUBECONFIG:?}removes the existing kubeconfig file in the home directory. When you generate a new kubeconfig file, it overwrites the existing one. If you don't want to overwrite or remove the existing file, back it up in another safe location.
Session inactivity logout
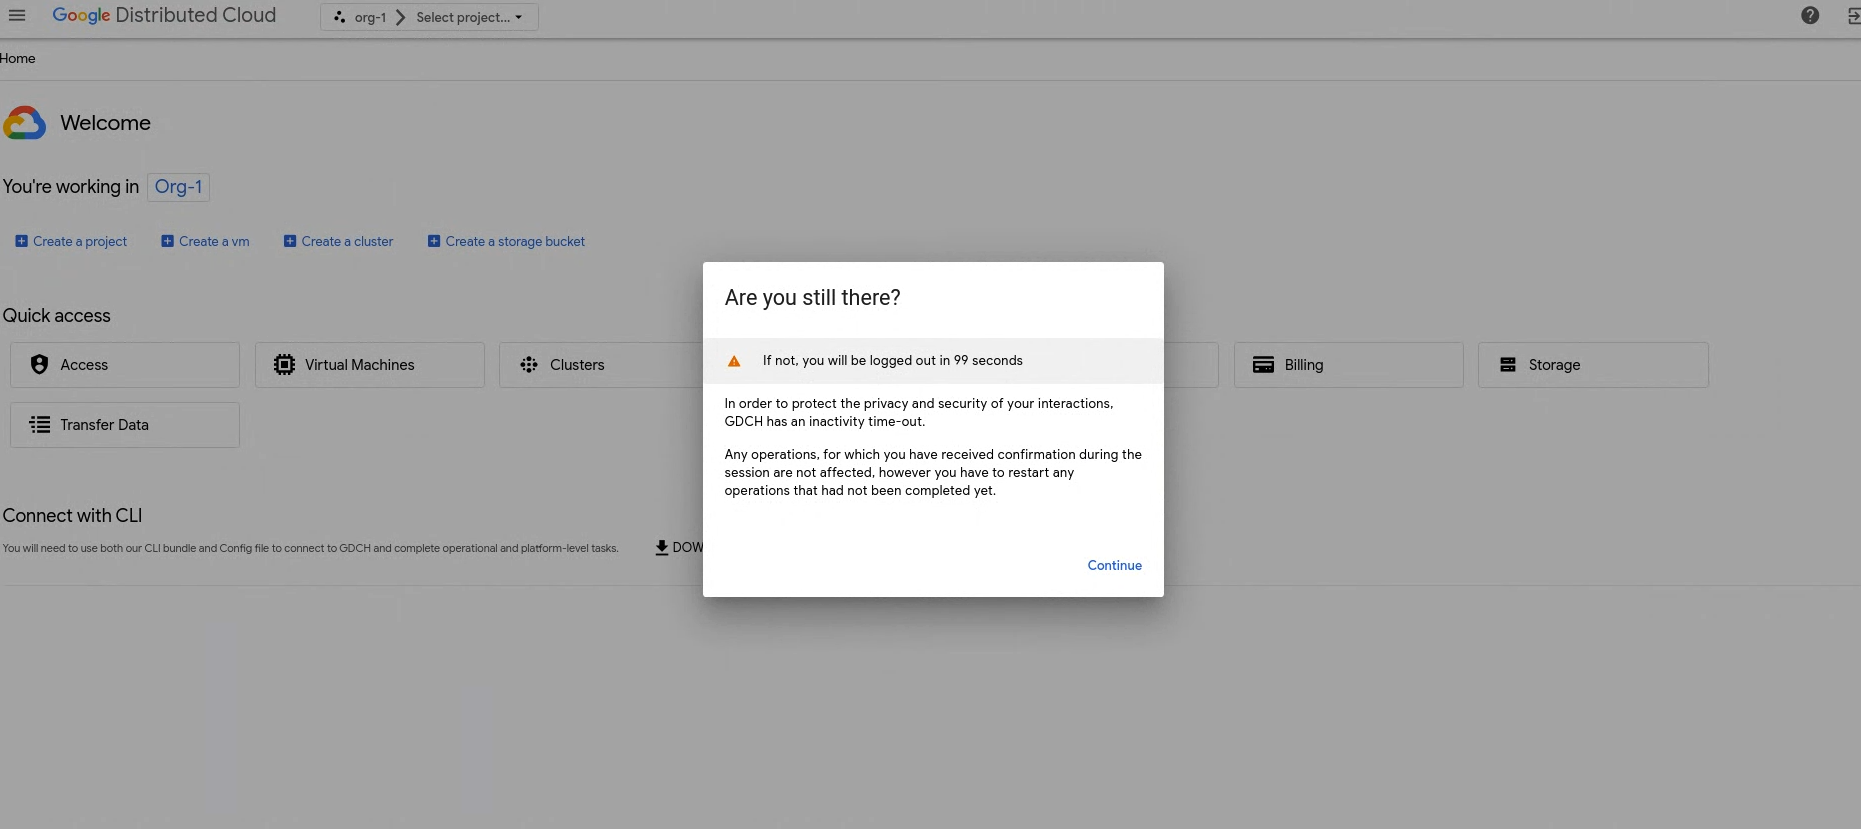
After fifteen or more minutes of inactivity in a session, the GDC console and gdcloud CLI logs you out. Distributed Cloud considers session inactivity as a period during an open session with no active engagement from you, such as no cursor or keyboard movement. An active session lasts up to twelve hours with user activity.
Console
For session inactivity, the GDC console logs you out. Two minutes before the GDC console logs you out for inactivity, you receive a dialog that cautions you of the logout:
After logging you out for inactivity, you see the following screen:
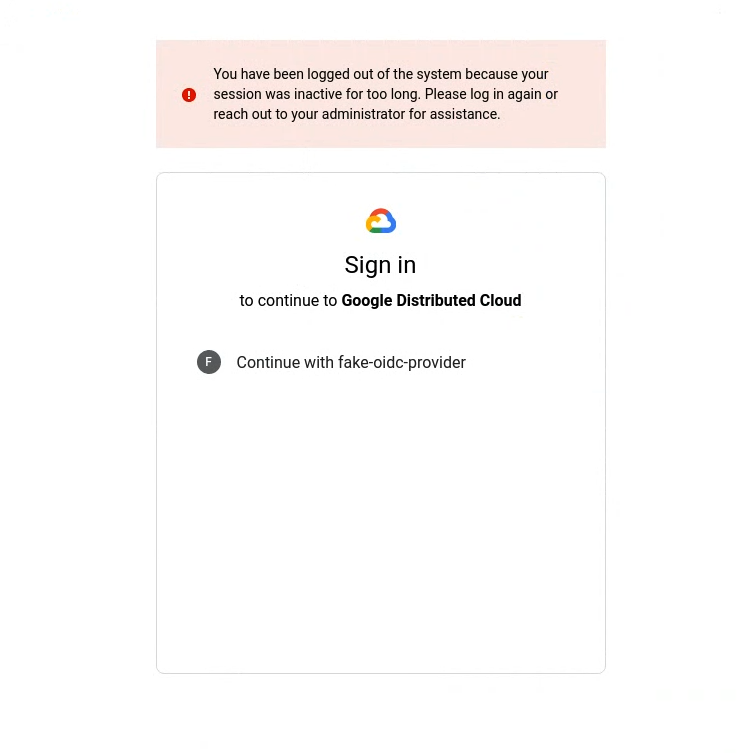
To log back in to the GDC console, select your identity provider and add your login credentials. If you use a service, such as the monitoring dashboard, and the GDC console logs you out for inactivity, log back in to gain access.
gdcloud
For session inactivity, the gdcloud CLI logs you out. After the gdcloud CLI logs you out, and you attempt to run a command, you receive an authorization error:
Error: error when creating kube client: unable to create k8sclient: Unauthorized
To log back in to GDC, follow the CLI steps in Sign in.
If you log back in to GDC through a Management API
server, your kubeconfig file automatically updates. To avoid your kubeconfig
file updating, use the --skip-kubeconfig-update flag in the
gdcloud auth login command.
kubectl
The gdcloud CLI expires your kubeconfig files after session
inactivity. If you attempt to run a kubectl command after inactivity,
you receive an authorization error:
error: You must be logged in to the server (Unauthorized)
To log back in and use your kubeconfig file, follow the CLI steps in Sign in. For every session timeout, you must regenerate your kubeconfig files.
Monitor sign in and new user activities
Activities such as signing in are exported as audit logs. For more information about viewing audit logs, see Audit logs.