Google Distributed Cloud (GDC) air-gapped lets you manage your Kubernetes clusters after creation using GKE on GDC. This service lets you adapt to your evolving container workload requirements.
Before you begin
To view and manage node pools in a Kubernetes cluster, you must have the following roles:
- User Cluster Admin (
user-cluster-admin) - User Cluster Node Viewer (
user-cluster-node-viewer)
These roles are not bound to a namespace.
To run commands against a Kubernetes cluster, make sure you have the following resources:
Locate the Kubernetes cluster name, or ask your Platform Administrator what the cluster name is.
Sign in and generate the kubeconfig file for the Kubernetes cluster if you don't have one.
Use the kubeconfig path of the Kubernetes cluster to replace
KUBERNETES_CLUSTER_KUBECONFIGin these instructions.
Perform node maintenance
When you need to repair or maintain nodes, first put the nodes into maintenance mode. Putting nodes into maintenance mode safely drains their pods and workloads, and excludes the nodes from pod scheduling. In maintenance mode, you can work on your nodes without a risk of disrupting pod traffic.
How it works
Maintenance mode for GDC is similar to running kubectl
cordon and kubectl drain for a specific node. Here are a few details that are
relevant to maintenance mode:
- Specified nodes are marked as unschedulable. This action is what
kubectl cordondoes. - Node taints are added to specified nodes to indicate that no pods can be
scheduled or executed on the nodes. This action is similar to
kubectl
drain
. - A 20-minute timeout is enforced to ensure that the nodes don't get stuck waiting for pods to terminate. Pods might not terminate if they are configured to tolerate all taints or they have finalizers. GDC clusters attempt to terminate all pods, but if the timeout is exceeded, the node is put into maintenance mode. This timeout prevents running pods from blocking upgrades.
- If you have a VM-based workload running on the node, GDC clusters apply a
NodeSelectorto the virtual machine instance (VMI) pod, then stop the pod. TheNodeSelectorensures that the VMI pod is restarted on the same node when the node is removed from maintenance mode.
Put a node into maintenance mode
Choose the nodes you want to put into maintenance mode by specifying IP address
ranges for the selected nodes in the maintenanceBlocks section of your cluster
configuration file. The nodes you choose must be in a Ready state, and
functioning in the cluster.
To put nodes into maintenance mode:
Edit the cluster configuration file to select the nodes you want to put into maintenance mode.
You can edit the configuration file with an editor of your choice, or you can edit the cluster custom resource directly by running the following command:
kubectl edit cluster KUBERNETES_CLUSTER_NAME \
    -n KUBERNETES_CLUSTER_NAMESPACE \
    --kubeconfig KUBERNETES_CLUSTER_KUBECONFIG
Replace the following for the Kubernetes cluster:
KUBERNETES_CLUSTER_NAME: the name of the cluster.KUBERNETES_CLUSTER_NAMESPACE: the namespace of the cluster.KUBERNETES_CLUSTER_KUBECONFIG: The path of the kubeconfig file.
After the cluster configuration is applied, the cluster puts the applicable nodes into maintenance mode.
Add the
maintenanceBlockssection to the cluster configuration file to specify either a single IP address, or an address range, for nodes you want to put into maintenance mode.The following sample shows how to select multiple nodes by specifying a range of IP addresses:
...
metadata:
  name: my-cluster
  namespace: cluster-my-cluster
spec:
  maintenanceBlocks:
    cidrBlocks:
    - 172.16.128.1-172.16.128.64
...
Get the status of the nodes in your cluster:
kubectl get nodes -n KUBERNETES_CLUSTER_NAME \
    --kubeconfig KUBERNETES_CLUSTER_KUBECONFIG
The response is something like the following:
NAME                STATUS                     ROLES    AGE     VERSION
user-gdc-01        Ready                      master   2d22h   v1.23.5-gke.1502
user-gdc-04        Ready                      none     2d22h   v1.23.5-gke.1502
user-gdc-05        Ready,SchedulingDisabled   none     2d22h   v1.23.5-gke.1502
user-gdc-06        Ready                      none     2d22h   v1.23.5-gke.1502
A status of
SchedulingDisabledindicates that a node is in maintenance mode.Get the number of nodes in maintenance mode:
kubectl get nodepools --kubeconfig KUBERNETES_CLUSTER_KUBECONFIGThe response looks similar to the following output:
NAME   READY   RECONCILING   STALLED   UNDERMAINTENANCE   UNKNOWN
np1    3       0             0         1                  0
The
UNDERMAINTENANCEcolumn in this sample shows that one node is in maintenance mode.Clusters also add the following taints to nodes when they are put into maintenance mode:
baremetal.cluster.gke.io/maintenance:NoExecutebaremetal.cluster.gke.io/maintenance:NoSchedule
Resize node pools
Any KUBERNETES cluster in the GDC environment can have its
node pool resized to scale with workload changes. To manage node pools in a Kubernetes
cluster, you must have the User Cluster Admin (user-cluster-admin) role.
This role is not bound to a namespace.
To scale a node pool in an existing cluster, complete the following steps:
Console
- In the dashboard, select the project in which the cluster you intend to edit exists.
- In the navigation menu, select Kubernetes Engine > Clusters.
- Select the cluster name that the node pool is associated with. The Cluster details page is displayed.
- Click the Node pools tab.
- Select the edit Edit icon for the node pool you want to resize. The Edit node pool prompt is displayed.
Update the Number of nodes field to reflect the new amount of nodes required in the node pool. You can increase or decrease the number of nodes to fit your workload requirements.
Click Save.
Navigate back to the Node pools tab for your cluster and confirm the resized node pool has the
Readystatus and has the correct number of nodes. It can take a few minutes for the node pool to scale to your specification.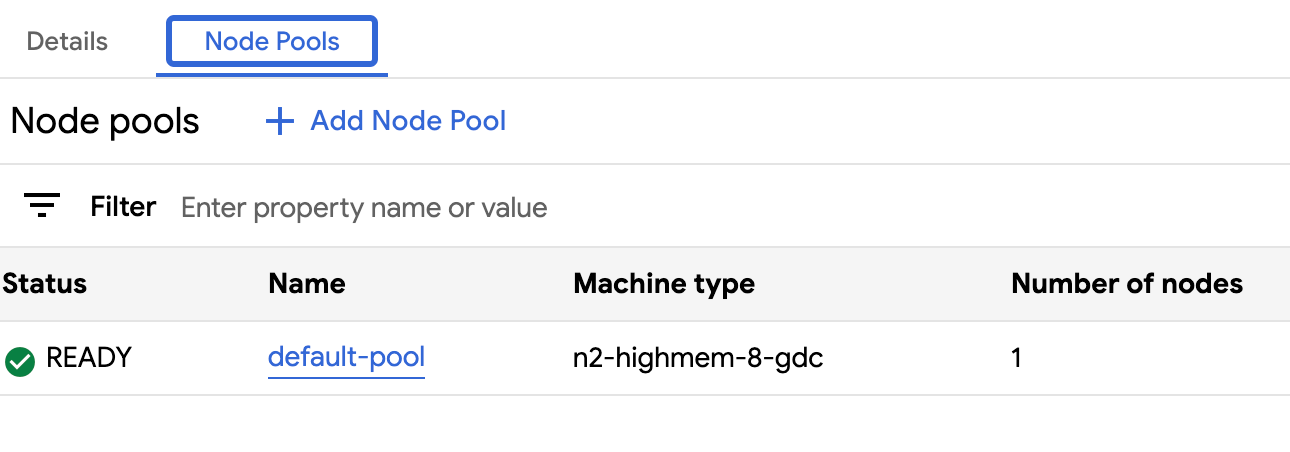
API
Open the
Clustercustom resource spec with thekubectlCLI using the interactive editor:kubectl edit clusters.cluster.gdc.goog/KUBERNETES_CLUSTER_NAME -n platform \ --kubeconfig MANAGEMENT_API_SERVERReplace the following:
KUBERNETES_CLUSTER_NAME: The name of the cluster that hosts the node pool.MANAGEMENT_API_SERVER: The zonal API server's kubeconfig path where the Kubernetes cluster is hosted. If you have not yet generated a kubeconfig file for the API server in your targeted zone, see Sign in for details.
Update the
nodeCountfield for the node pool to resize:nodePools: ... - machineTypeName: n2-standard-2-gdc name: nodepool-1 nodeCount: NUMBER_OF_WORKER_NODESReplace
NUMBER_OF_WORKER_NODESwith the updated number of worker nodes to provision in the node pool.Save the file and exit the editor.
Verify your node scaling is complete by checking the node pool's configuration:
kubectl get clusters.cluster.gdc.goog/KUBERNETES_CLUSTER_NAME -n platform -o json \
    --kubeconfig MANAGEMENT_API_SERVER | jq .status.workerNodePoolStatuses
Confirm the
readyNodesnumber reflects the amount of nodes you set for the node pool. It can take a few minutes for the node pool to scale to your specification.
Move clusters in project hierarchy
Projects provide logical grouping of service instances. You can add and remove Kubernetes clusters from the GDC project hierarchy to group your services appropriately.
Attach project to a cluster
When creating a cluster from the GDC console, you must attach at least one project before you can successfully deploy container workloads to it. If you must add additional projects to an existing cluster, complete the following steps:
- In the navigation menu, select Kubernetes Engine > Clusters.
- Click the cluster from the cluster list to open the Cluster details page.
- Select Attach Project.
- Select the available projects to add from the project list. Click Save.
Detach project from a cluster
To detach a project from an existing Kubernetes cluster, complete the following steps:
- In the navigation menu, select Kubernetes Engine > Clusters.
- Click the cluster from the cluster list to open the Cluster details page.
Click delete Detach for the project to detach from the cluster.
View all clusters in an organization
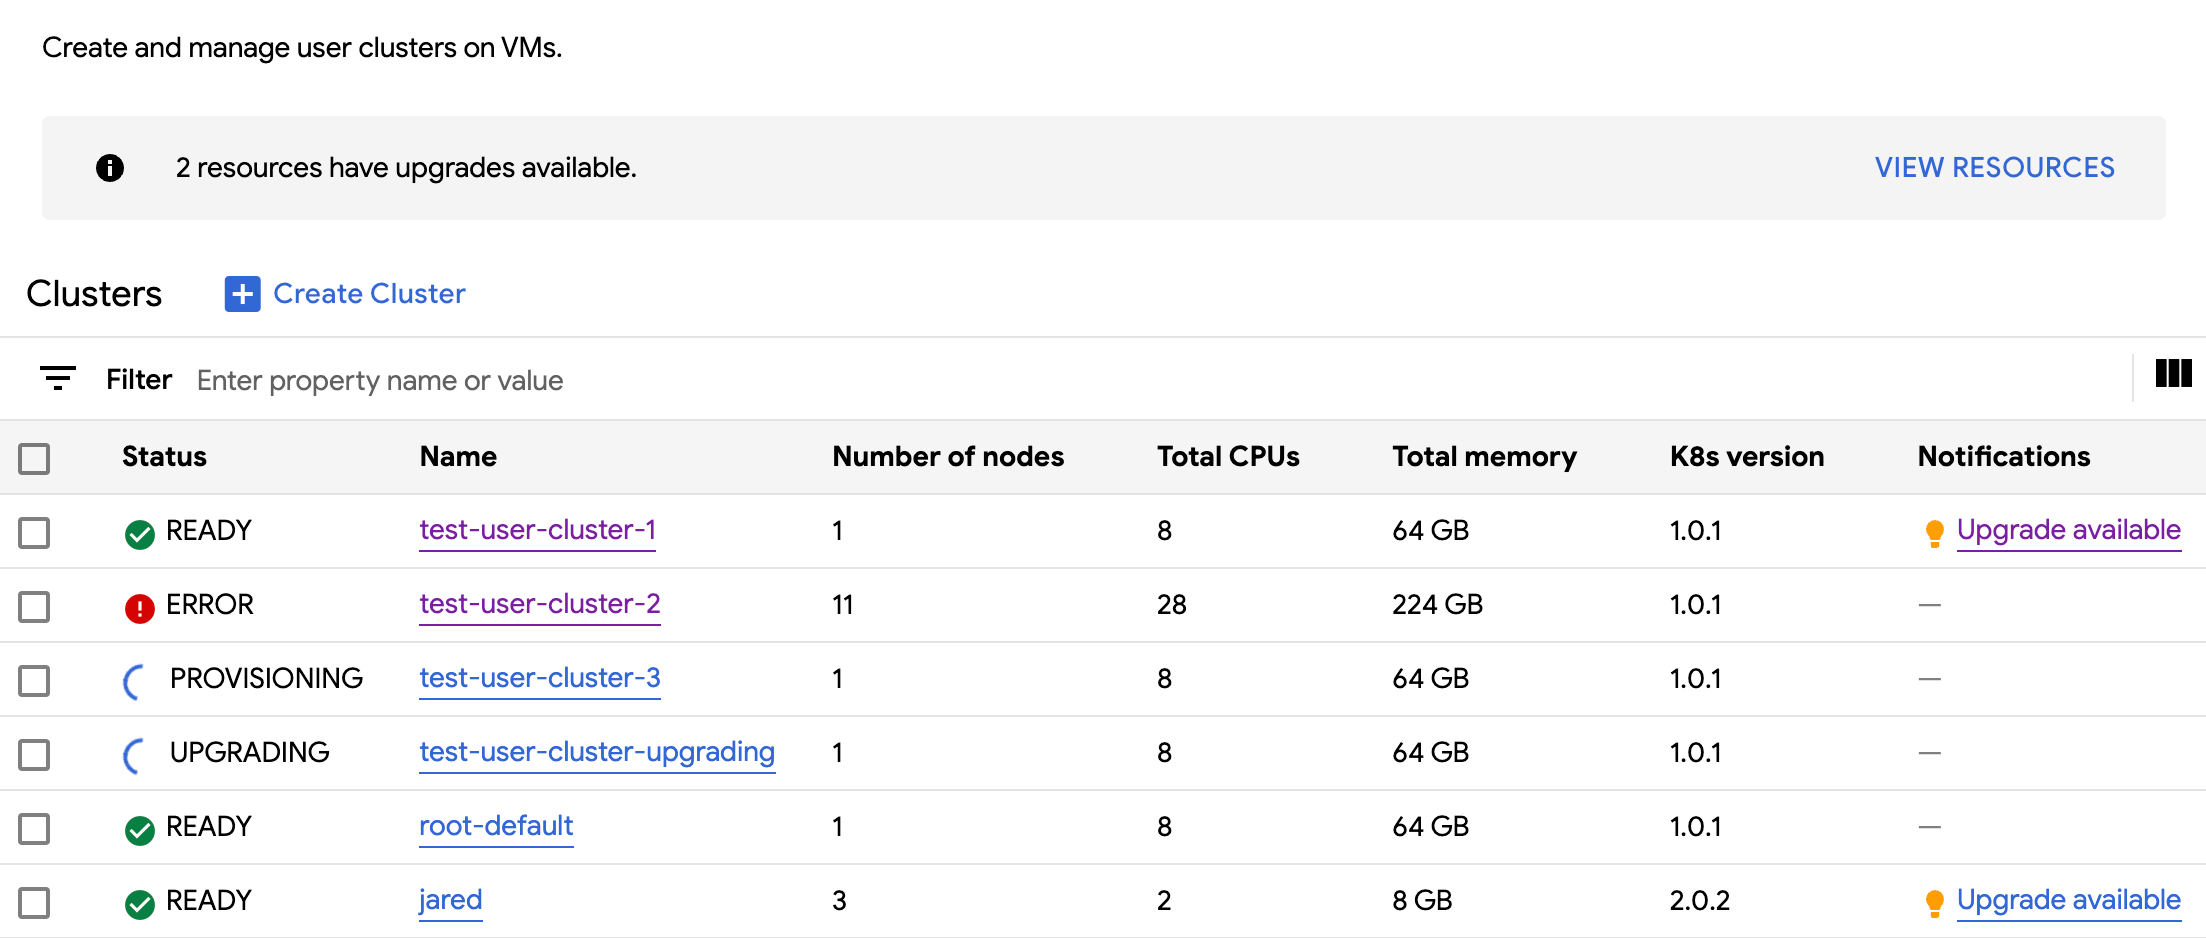
You can view all available Kubernetes clusters in an organization, including their statuses, Kubernetes versions, and other details. Since Kubernetes clusters are a zonal resource, you can only list clusters per zone.
Console
In the navigation menu, select Kubernetes Engine > Clusters.
All available clusters in the organization with their statuses and other information are displayed:
kubectl
List the zone's available Kubernetes clusters in an organization:
kubectl get clusters.cluster.gdc.goog -n platform \
    --kubeconfig MANAGEMENT_API_SERVER
Replace
MANAGEMENT_API_SERVERwith the zonal API server's kubeconfig path. If you have not yet generated a kubeconfig file for the API server in your targeted zone, see Sign in for details.The output is similar to the following:
NAME        STATE     K8S VERSION
user-vm-1   Running   1.25.10-gke.2100
user-test   Running   1.26.5-gke.2100
View updatable properties
For each Kubernetes cluster, a set of properties are available to change after it is
created. You can only change the mutable properties that are in the spec of
the Cluster custom resource. Not all properties in the spec are eligible to
update after the cluster is provisioned. To view these updatable properties,
complete the following steps:
Console
In the navigation menu, select Kubernetes Engine > Clusters.
In the list of Kubernetes clusters, click a cluster name to view its properties.
Editable properties have an edit Edit icon.
kubectl
View the list of properties for the
Clusterspec and the valid values corresponding to each property:kubectl explain clusters.cluster.gdc.goog.spec \ --kubeconfig MANAGEMENT_API_SERVERReplace
MANAGEMENT_API_SERVERwith the zonal API server's kubeconfig path. If you have not yet generated a kubeconfig file for the API server in your targeted zone, see Sign in for details.The output is similar to the following:
KIND:     Cluster
VERSION:  cluster.gdc.goog/v1

RESOURCE: spec <Object>

DESCRIPTION:
    <empty>

FIELDS:
  clusterNetwork    <Object>
    The cluster network configuration. If unset, the default configurations
    with pod and service CIDR sizes are used. Optional. Mutable.

  initialVersion    <Object>
    The GDC air-gapped version information of the user cluster during cluster creation.
    Optional. Default to use the latest applicable version. Immutable.

  loadBalancer  <Object>
    The load balancer configuration. If unset, the default configuration with
    the ingress service IP address size is used. Optional. Mutable.

  nodePools <[]Object>
    The list of node pools for the cluster worker nodes. Optional. Mutable.

  releaseChannel    <Object>
    The release channel a cluster is subscribed to. When a cluster is
    subscribed to a release channel, GDC maintains the cluster versions for
    users. Optional. Mutable.
Update these settings by using the GDC console or
kubectlCLI. For example, you can resize a node pool.
Scale ingress service IP address size
You can scale your ingress service IP address size after you create a Kubernetes cluster.
Open the
Clustercustom resource spec with thekubectlCLI using the interactive editor:kubectl edit clusters.cluster.gdc.goog/KUBERNETES_CLUSTER_NAME -n platform \ --kubeconfig MANAGEMENT_API_SERVERReplace the following:
KUBERNETES_CLUSTER_NAME: The name of the cluster that provides the IP address.MANAGEMENT_API_SERVER: The zonal API server's kubeconfig path where the Kubernetes cluster is hosted. If you have not yet generated a kubeconfig file for the API server in your targeted zone, see Sign in for details.
Update the
ingressServiceIPSizefield to the new IP address size:... spec: ... loadBalancer: ingressServiceIPSize: INGRESS_SERVICE_IP_SIZE ...Replace
INGRESS_SERVICE_IP_SIZEwith the updated ingress service IP address size.Save the file and exit the editor.
There is no set limit on the ingress service IP address size. The amount of IP addresses you request is fulfilled based on your organization. If the request cannot be fulfilled, the cluster reports an error.
Upgrade a Kubernetes cluster
You can perform an automated or manual upgrade of your Kubernetes cluster. For more instructions on how to upgrade your cluster, see the Cluster upgrade section.