This page provides an overview of delivering Looks and Explores to Looker's native delivery destinations and to any integrated services that are available for your Looker instance. For information about scheduling dashboards, visit the Scheduling and sending dashboards documentation page.
The Looker Scheduler is the name of the pop-up window in which you configure the settings for your content delivery. For Looks, you can use the Scheduler to send one-time or recurring deliveries. Explores can be sent as one-time deliveries only. To schedule Explore content for recurring delivery, you must first save it as a Look.
If you are a Looker developer, you must turn off Development Mode to enable these scheduling options.
The delivery options available to you are dependent on the delivery-related permissions granted to you by your Looker admin.
Opening the Scheduler from a folder
For Explores, you can open the Scheduler from within the Explore only, not from a folder.
To open the Scheduler from within a folder or subfolder, find the folder or subfolder containing the dashboard you want to deliver. When you navigate to a folder, any Looks and dashboards within the folder are listed in list view or grid view.
A calendar icon indicates that you have scheduled at least one recurring delivery for that content (in grid view, you must hover over the content thumbnail to see the calendar icon, if present).
![]()
In list view you can open the Scheduler by:
- Clicking an item's calendar icon, if present
- Clicking an item's three-dot menu and choosing Edit Schedule (if there is already a schedule for the item), Add Schedule (if there is not yet a schedule for the item), or Send (to create a one-time delivery)
- Opening the content, clicking the gear menu in the upper right, and choosing Schedule (for recurring deliveries) or Send (for one-time deliveries)
In grid view, you can open the Scheduler by:
- Clicking an item's calendar icon, if present
- Opening the content, clicking the gear menu in the upper right, and choosing Schedule (for recurring deliveries) or Send (for one-time deliveries)
Creating a delivery
To create a delivery from within the Looker content, open the legacy Scheduler by clicking the gear menu in the upper right of the content and choosing Schedule (for recurring deliveries) or Send (for one-time deliveries).
Looker displays the legacy Scheduler.

For recurring deliveries, the left panel of the legacy Scheduler shows all schedules created for the content and highlights the title of the schedule you are creating or editing. The left panel lists schedules in reverse chronological order from when they were last updated. You can duplicate or delete existing schedules by clicking the Duplicate or Delete icon to the right of the schedule, respectively.
If this is the first schedule you're creating for this content, the main panel displays scheduling options set to their default values. You can modify those values as desired. If you have previously created one or more schedules for this content, the main panel displays the saved scheduling settings for the schedule at the top of the list. Then:
- To edit an existing schedule's options, select that schedule and change the options as desired. When you are done, click Save All.
- To create additional schedules for the same content, click New + and enter the settings for that additional schedule.
When you are done, click Save All.
The following sections explain each scheduling setting.
Naming the delivery
Give the schedule a unique title in the Give your schedule a name field. The title will appear in the left panel after you save the schedule, in the list of schedules you've created, and on the schedule management pages in the Admin panel.
Depending on the destination of your delivery, the title may also appear in other places:
- For email deliveries, the title is used for the email's subject line and as part of the filename if you select a format that uses an email attachment.
- For webhooks, the title is included in the webhook payload under the Title field.
- For deliveries to an Amazon S3 bucket, the title is used in the filename of the delivery and in any error emails that are sent. The filename of the delivery follows the format
TITLE_TIMESTAMP_HASH, whereHASHis a random six-character identifier andTIMESTAMPfollows the patternYYYY-MM-DDTHHMM(for example, the timestamp portion would look like2019-05-31T0933for May 31, 2019 at 9:33 AM). The timestamp's timezone will match the schedule's Delivery time zone. - For deliveries to integrated services that generate a file attachment, the title is included in the filename of the delivery.
For SFTP deliveries, the title is included in the filename of the delivery. The filename of the delivery follows the format
TITLE_TIMESTAMP_TOKEN, whereTOKENis a random six-character identifier andTIMESTAMPfollows the patternYYYY-MM-DDTHHMM(for example, the timestamp portion would look like2019-05-31T0933for May 31, 2019 at 9:33 AM). The timestamp's timezone will match the schedule's Delivery time zone.For SFTP deliveries, only alphanumeric, underscore (_), and hyphen (-) characters are supported in the filename of the delivery. Looker will strip any characters other than
A-Z,a-z,0-9,_or-characters from what you enter in the Give your schedule a name field.
Choosing the delivery destination
Depending on how your Looker admin has configured your permissions, all destinations may not be visible.
The Where should this data go? setting may display several destination options for data deliveries. Each destination offers different delivery options.
Destinations include:
- webhook
- Amazon S3 bucket
- SFTP
- Any integrated services that your Looker admin has enabled for your instance — you can see a list of available services for delivering Looks and Explores in the Delivery options for third-party integrations section of this page
Once you've selected a data destination, a new setting field appears for you to add specific details about that destination, such as an email address or a webhook URL.
Delivery options for email
Choose Email in the Where should this data go? section. Your content will be delivered to a list of email addresses that you specify.
In the Who should it be emailed to section, enter the email addresses of the recipients. Enter a single email address, or multiple addresses separated by commas, and click Add.
Depending on the settings for your Looker instance and on your assigned permissions, you may be able to send emails to email addresses that are unassociated with any user account on your Looker instance. These are classified as external emails. To deliver content to external users, your Looker admin must have granted you permissions to deliver content to external users or have added those recipients' email domains to the Email Domain Allowist for Scheduled Content.
If a recipient is another Looker user, that person will see the option to link back to the dashboard from the email, unless your Looker admin has set your Looker instance's emailed data policy to Send Data Only or the Include links option is deselected.
If all recipients unsubscribe from a scheduled email delivery, that schedule is deleted from Looker, even from the schedule management pages for users and admins. If a recipient unsubscribes on behalf of an email group, no members of the group will receive scheduled email deliveries.
See the Applying advanced delivery options section on this page for more information about email deliveries.
Check Include a custom message to add a customized message in the body of the email. Looker limits the number of characters in a custom message to 1,500.
Emailed deliveries may not exceed 20 MB (for formats that are delivered in the email body) and 15 MB (for formats that are delivered as an attachment).
Delivery options for webhooks
Webhooks are an increasingly common way to trigger exchanges between internet-based services. With a web service like Zapier, webhooks can let Looker data be delivered to a wide range of applications; for example, you may be able to schedule periodic delivery of a Look or dashboard to a webhook. When you set up a delivery, Looker will prompt you for the webhook address.
In the Where should this data go? section, choose Webhook. In the Webhook URL section, enter the URL where Looker should send an HTTPS request for this delivery. You can obtain this URL from the web service you're using to handle your webhook. To set up a webhook, go to your web service and do the following:
- Obtain a URL where Looker should send an HTTPS request.
- Specify a destination application for your Looker data delivery. The destination application may require additional configuration in order to receive data from Looker.
The exact procedure differs depending on what web service and destination application you're using to deliver the dashboard. See this Looker Community post on Scheduling Looks and dashboards using webhooks (3.46+) for guidelines on setting up another application to receive the webhook data from Looker.
Looker will attempt delivery to a webhook for a maximum of 30 minutes. Ensure that the destination can respond within 30 minutes to the webhook delivery attempt.
Delivery options for Amazon S3 buckets
Amazon S3 buckets are a common way to store large amounts of data. You or your company will need to have created an S3 bucket with Amazon before Looker can use it.
If you choose the Amazon S3 destination option, Looker prompts you for additional settings about formatting and about the Amazon S3 bucket as described on this page. See this Looker Community post on Scheduling (unlimited) results to S3 for more details about delivering data using an Amazon S3 bucket.
In the Where should this data go? section, choose Amazon S3. The S3 Details section appears and prompts you for information about your Amazon S3 bucket:
- Bucket: The name of your Amazon S3 bucket.
- Optional Path: The folder that you want to save your data to, if any.
- Access Key: The Access Key ID to your S3 bucket, provided by Amazon.
- Secret Key: The Secret Access Key to your S3 bucket, provided by Amazon.
- Region: The Amazon services region where your S3 bucket is hosted.
Delivery options for SFTP servers
Choose SFTP in the Where should this data go? section to deliver your dashboard to an SFTP server. Sending results to an SFTP server is a good method to use when your data or visualization is too large to send via email. If you choose this delivery option, Looker prompts you for the SFTP server address, username, and password as described below.
Note the following about SFTP deliveries:
- To receive SFTP deliveries from Looker, be sure your network admin has added Looker's IP addresses to your SFTP server's IP allowlist or inbound traffic rules.
- When delivering to an SFTP server, only alphanumeric, underscore (_), and hyphen (-) characters are supported in the filename of the delivery. Looker will strip any characters other than
A-Z,a-z,0-9,_or-characters from what you enter in the Give your schedule a name field.
When you choose to SFTP, Looker prompts you for the URL and login information for the server:
Address: The URL or IP address of the SFTP server to which you want to send your data. For example:
sftp://files.looker.com/Marketing/In/sftp://192.168.0.10/Marketing/In/
This example URL ends with the
/character. This indicates that the file will be saved in a folder namedIn. If you leave out the trailing/, the file will be saved in theMarketingfolder, and "In" will be prepended to the filename. You must have write access to the folder in which you want to create the file.Username and Password: Login credentials for the SFTP server
Preferred key exchange algorithm: This field is optional. To configure it, choose the preferred SSH key exchange algorithm for establishing the connection. The supported options are:
diffie-hellman-group-exchange-sha1diffie-hellman-group1-sha1diffie-hellman-group14-sha1diffie-hellman-group-exchange-sha256
If the connection is not established within five minutes, choose a different algorithm. Some algorithms take a long time to generate an SSH key. This option lets you use an algorithm that might take less time. Choosing one of the algorithms makes it the preferred algorithm for establishing the SSH connection. If the algorithm is not supported by the server, all the other algorithms are used in subsequent attempts. When this field is set to Default, the original order of algorithms in the connection library is used.
Currently, SFTP support is limited to username and password credentials. SSH private key credentials are not supported.
The host key algorithms supported by Looker SFTP deliveries are:
ssh-rsassh-dssssh-rsa-cert-v01@openssh.comssh-rsa-cert-v00@openssh.com
Looker stores SFTP fingerprints for your SFTP server. If you encounter errors with your SFTP delivery, it could indicate that the SFTP fingerprints are invalid. In this case, contact your Looker admin.
If you receive the error
Java::JavaLang::NullPointerExceptionswhen delivering data to an SFTP server, this may be due to a bug in JRuby that prevents the use of elliptic-curve (EC) algorithms and/or host keys for SSH connections from Looker to SFTP destinations. To avoid issues with sending data to SFTP destinations, do not use EC algorithms in the~/.ssh/configor/etc/ssh_configfiles or store EC host keys in~/.sshon your Looker host.
Looker uploads the file to the specified directory on your SFTP server, using the following convention for the filename:
<name>_<timestamp>_<token>.<file extension>
- The name you provided in the Give your schedule a name field, after Looker removes all characters other than
A-Z,a-z,0-9,_or- - The timestamp the schedule was sent, in the format
%Y-%m-%dT%H%M - A token consisting of a random six-character string
- The file extension
For example: Test_Schedule_2019-04-11T1130_HWkvys.csv
Delivery options for third-party integrations
You can schedule or send a Look or the results of an Explore to a service that is integrated with Looker, such as Slack, Dropbox, Google Drive, and others. Integrations must be enabled by your Looker admin. Looker admins must specifically give permissions for users and embed users to send and schedule data to third-party integrations.
When an integrated service is selected in the Destination field of the Scheduler, several new fields may appear and prompt you for more information.
The following list shows the Looker Action Hub services to which you can deliver a Look or the results of an Explore.
Here is how to use the list:
- The URLs shown in the Link to README file column provide instructions for enabling and configuring the integrated service to work with Looker.
- The URLs shown in the How to use this integration column provide instructions for how to send data from Looker to the integrated service. Some of these articles also contain enablement instructions.
- Required LookML tags lists any required tags that must be used with the
tagsparameter in the content's underlying model. - Action type indicates what level of data the integrated service is sending: field, query, or dashboard. A field-level action sends the value of a single, specified cell in a data table. A query-level action sends the results of an entire query, such as all rows in an Explore or a Look. A dashboard-level action sends an image of a dashboard.
- Uses Google OAuth authentication indicates whether the integrated service uses Google OAuth credentials for authentication.
- Uses data streaming indicates whether the integrated service supports streamed query results.
| Integrated service | Description | Link to README file | How to use this integration | Required LookML tags |
Action type | Uses Google OAuth authentication (Yes/No) | Uses data streaming (Yes/No) | |
|---|---|---|---|---|---|---|---|---|
| Airtable | Add records to a table in Airtable. | View README on GitHub | View Community article | None | Query | No | No | |
| Amazon SageMaker Infer | Perform an inference using Amazon SageMaker. | No README available | No article available | None | Query | No | Yes | |
| Amazon SageMaker Train: Linear Learner | Start a training job on Amazon SageMaker, using the Linear Learner algorithm. | No README available | No article available | None | Query | No | Yes | |
| Amazon SageMaker Train: Xgboost | Start a training job on Amazon SageMaker, using the Xgboost algorithm. | No README available | No article available | None | Query | No | Yes | 5.6 |
| Amazon Web Services EC2 Stop Instance | Stop an EC2 Instance using the Amazon EC2 API. | View README on GitHub | View Community article | aws_resource_id | Field, query | No | No | |
| Auger | Uses query result to build a predictive model. | View README on GitHub | See README | None | Query | No | Yes | |
| Azure Storage | Send and store a data file on Azure Storage. | View README on GitHub | View Community article | None | Query, dashboard | No | Yes | |
| Braze | The Braze action lets you flag users within Braze using the REST API Endpoint from a Look. Ensure there's a braze_id field tagged in the results. MAX EXPORT: 10000. |
View README on GitHub | See README | braze_id | Query | No | Yes | |
| DataRobot | Send data to DataRobot and create a new project. | View README on GitHub | See README | None | Query | No | Yes | |
| DigitalOcean — Stop Droplet | Stop DigitalOcean process using the DigitalOcean API. | View README on GitHub | View Community article | digitalocean_droplet_id | Field, query | No | No | |
| DigitalOcean Spaces | Send to and store a data file in DigitalOcean Storage. | View README on GitHub | View Community article | None | Query, dashboard | No | Yes | |
| Dropbox | Send and store a data file on Dropbox. | No README available | View documentation | None | Query, dashboard | Yes | No | |
| Facebook Custom Audiences | Upload data to Facebook Ads Custom Audiences from Customer List. | View README on GitHub | See README | None | Query | Yes | Yes | |
| Firebase | Use Firebase to send push notifications to mobile. | No README available | No article available | None | Query | No | No | |
| Google Ads Customer Match | Upload data to Google Ads Customer Match. | View README on GitHub | View documentation | None | Query | Yes | Yes | |
| Google Analytics Data Import | Upload data to a Google Analytics dataset. | View README on GitHub | See README | None | Query | Yes | Yes | |
| Google Cloud Storage | Write data files to a Google Cloud Storage bucket. | View README on GitHub | View Community article | None | Query, dashboard | No | Yes | |
| Google Drive | Send data to Google Drive. | No README available | View documentation | None | Query, dashboard | Yes | Yes | |
| Google Sheets | Send CSV data to a Google Sheet. | No README available | View documentation | None | Query | Yes | Yes | |
| Hubspot Companies | Add properties to your Companies using the Hubspot V3 API. | View README on GitHub | See README | hubspot_company_id | Query | No | Yes | |
| Hubspot Contacts | Add properties to your Contacts using the Hubspot V3 API. | View README on GitHub | See README | hubspot_contact_id | Query | No | Yes | |
| Kloudio | Add data to a Google Sheet. | View README on GitHub | See README | None | Query | No | No | |
| mParticle | Bulk export your user or event data from Looker to mParticle. | View README on GitHub | See README | See README | Query | No | Yes | |
| Salesforce Campaigns | Add contacts or leads to Salesforce campaign. | View README on GitHub | See README | sfdc_contact_id or sfdc_lead_id | Query | Yes | No | |
| Segment Group | Add traits and/or users to your Segment groups. | View README on GitHub | View documentation | segment_group_id and user_id, or segment_group_id and segment_anonymous_id | Query | No | Yes | |
| Segment Identify | Add traits to your Segment users using Identify. | View README on GitHub | View documentation | email or user_id or segment_anonymous_id or segment_group_id | Query | No | Yes | |
| Segment Track | Connect to a number of integrations provided by Segment to identify and target users for marketing workflows. | View README on GitHub | View documentation | email or user_id or segment_anonymous_id or segment_group_id | Query | No | Yes | |
| SendGrid | Send data and schedule results to send to a email address using SendGrid's API. | View README on GitHub | View Community article | None | Query, dashboard | No | No | |
| Slack | Send Looker content in direct messages, public channels, and private channels in Slack using OAuth. It is available for Looker-hosted deployments on 6.24+ with the [IP Allowlist](/looker/docs/admin-panel-server-ip-allowlist) feature disabled. | No README available | View documentation | None | Query, dashboard | Yes | Yes | |
| Slack Attachment (API Token) | Send data directly into a Slack channel along with user credentials. You may also want to reference Lookerbot documentation for additional Slack functionality. | View README on GitHub | View documentation | None | Query, dashboard | No | No | |
| Teams — Incoming Webhook | Send data to Microsoft Teams using an incoming webhook. | View README on GitHub | See README | None | Query, dashboard | No | No | |
| Tray | Connect to a number of integrations provided by Tray.io to automate workflows. | View README on GitHub | View Community article | None | Query | No | Yes | |
| Twilio — Send Data | Send data from a Look or schedule results to send to a phone number using Twilio's API. | View README on GitHub | View Community article | None | Query | No | No | |
| Twilio — Send Message | Send a message to a series of phone numbers (data columns tagged as phone numbers) in a Look. | View README on GitHub | See README | phone | Field, query | No | No | |
| Zapier | Connect to a number of integrations that are provided by Zapier to automate workflows. | View README on GitHub | View Community article | None | Query | No | Yes |
Choosing the data format
For deliveries to email, the option to select a data format is not available if your Looker admin has set your Looker instance's emailed data policy to Send Link Only.
Looks and Explores present different formatting options depending on the delivery destination. To choose the format for your delivery, select the appropriate icon in the Format data as section of the Scheduler.
See the table below for an explanation of how each format is delivered to each destination.
| Format | Webhook | Amazon S3 | SFTP | |
|---|---|---|---|---|
| Data Table | The data table in the body of the email in HTML format | Not available for this destination | Not available for this destination | Not available for this destination |
| Visualization | The visualization in the body of the email as a PNG image | Not available for this destination | Not available for this destination | Not available for this destination |
| CSV | The data table as a comma-separated text-file attachment | The data table as a comma-separated text-file attachment | The data table as a comma-separated text-file attachment | The data table as a comma-separated text-file attachment |
| XLSX | The data table as an Excel file attachment | The data table as an Excel file attachment | The data table as an Excel file attachment | The data table as an Excel file attachment |
| JSON — Simple | The data table as a JSON file attachment. In this format, Looker uses a dimension or measure's field name as its rendered value rather than the field's label. | The data table as a JSON file attachment. In this format, Looker uses a dimension or measure's field name as its rendered value rather than the field's label. | The data table as a JSON file attachment. In this format, Looker uses a dimension or measure's field name as its rendered value rather than the field's label. | The data table as a JSON file attachment. In this format, Looker uses a dimension or measure's field name as its rendered value rather than the field's label. |
| JSON — Label | Not available for this destination | The data table in JSON format. In this format, Looker uses field labels as its rendered value in its JSON output. | Not available for this destination | Not available for this destination |
| JSON — Simple, Inline | Not available for this destination | The data table submitted directly in JSON format. In this format, Looker uses a dimension or measure's field name as its rendered value rather than the field's label. | Not available for this destination | Not available for this destination |
| JSON — Detailed, Inline | Not available for this destination | The data table submitted directly in JSON format, with additional details such as field metadata, cache information, the time when the query was completed, and how long it took the query to run. In this format, Looker uses a dimension or measure's field name as its rendered value rather than the field's label. | The data table submitted directly in JSON format, with additional details such as field metadata, cache information, the time when the query was completed, and how long it took the query to run. In this format, Looker uses a dimension or measure's field name as its rendered value rather than the field's label. | The data table submitted directly in JSON format, with additional details such as field metadata, cache information, the time when the query was completed, and how long it took the query to run. In this format, Looker uses a dimension or measure's field name as its rendered value rather than the field's label. |
| Text | The data table as a tab-delimited text-file attachment | The data table as a tab-delimited text-file attachment | The data table as a tab-delimited text-file attachment | The data table as a tab-delimited text-file attachment |
| HTML | The data table as an HTML file attachment | The data table as an HTML file attachment | The data table as an HTML file attachment | The data table as an HTML file attachment |
Triggering delivery
You will not see this option if sending an Explore or a one-time delivery of a Look.
When scheduling recurring deliveries, you have two options to trigger deliveries:
- Repeating interval: Select this option to use the delivery schedule you set in the Specifying the delivery recurrence section on this page.
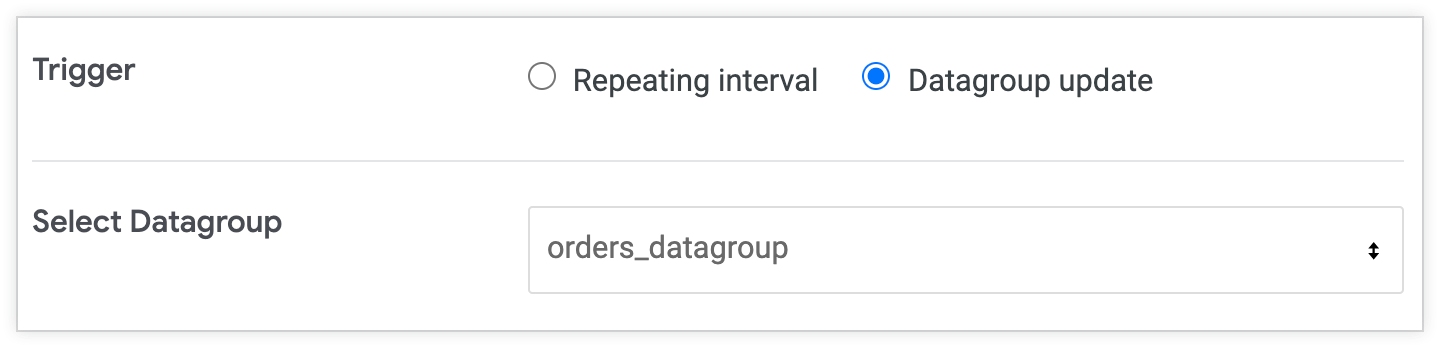
- Datagroup update: If your LookML developer has configured datagroups, you can schedule delivery to occur after a datagroup has been triggered, has managed the cache, and has rebuilt relevant PDTs.
Specifying the datagroup trigger
You will not see this option if sending an Explore, a one-time delivery of a Look, or if you have specified a repeating interval trigger for your recurring delivery.
To use a datagroup trigger, select Datagroup update in the Trigger section of the Scheduler. Then choose the source datagroup from the Select Datagroup drop-down.
To schedule content using a datagroup trigger, the model file on which the content is based needs to include a datagroup. Looker lists all datagroups defined in the models that are included in the given Look or dashboard tile, even if the datagroups are not used to handle caching for queries or PDTs.
Schedules based on datagroups are only triggered to deliver once the regeneration process has completed for all PDTs that are persisted with that datagroup, ensuring that your delivery includes the most up-to-date data.
Specifying the delivery recurrence
You will not see this option if sending an Explore, a one-time delivery of a Look, or if you have specified a datagroup update trigger for your recurring delivery.
For deliveries that use a repeating interval, you can customize the timing of your schedule in the Deliver this schedule section. Select Repeating interval in the Trigger section of the Scheduler. The timing options change depending on whether you choose Daily, Weekly, Monthly, Hourly, or By minute. You can adjust the time zone for the schedule in Advanced options section.
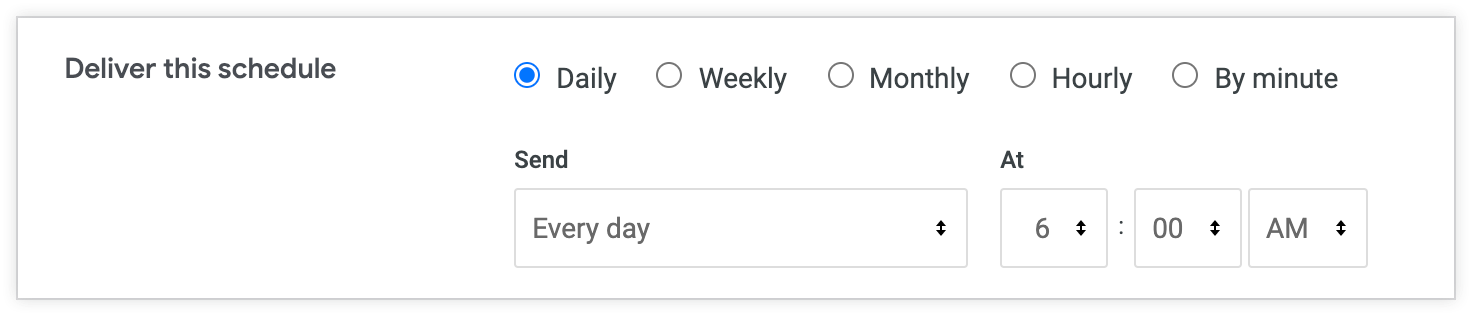
The end time for Hourly and By minute intervals is not inclusive. The last delivery will be sent at the last selected interval prior to the specified end time. For example, if content is scheduled Hourly between 12:00 a.m. and 11:00 p.m., it will be sent on the hour, every hour, from 12:00 a.m. to 10:00 p.m. If content is scheduled By minute every 30 minutes between 12:00 a.m. and 11:00 p.m., the last delivery in that timeframe will be sent at 10:30 p.m.
Applying filters to the delivery
You will not see this option if sending an Explore.
If you are delivering a Look or dashboard that has filters, you can modify the filter conditions to further filter the results delivered.
Click Filters to see and modify the filters associated with this Look or dashboard for your delivery. Changing these filter options in the Scheduler does not change the filters in your Look or dashboard. If a dashboard filter requires a filter value and the schedule filter is blank, a schedule will display no results upon delivery.
If you change field names that serve as filters in your Looks or dashboards, be sure to review the Filters section of your scheduled Looks and dashboards and update the filters as needed to reflect your changes. If a scheduled content delivery includes filters that no longer function (for example, if the referenced field has changed), the scheduled delivery could expose unfiltered data.
To further customize deliveries, you can use the matches a user attribute filter option (if your Looker admins have configured user-specific values called user attributes). Setting a filter to one of these attributes automatically customizes the results for each user, meaning that you can send customized results to many users even if you send a one-time delivery. You can read more about this on the User attributes documentation page.
Applying advanced delivery options
The Advanced options section provides additional customization for your delivery. Click the arrow next to Advanced options to expand this menu. The options available depend on the selected destination and format of your delivery, and whether you're delivering a dashboard, a Look, or an Explore. The links in the table below direct to a description of each option that is available for deliveries of Looks or Explores to Looker's native destinations. Deliveries to third-party integrations may have unique advanced options available.
Send this schedule if
For recurring deliveries of Looks, you can customize the schedule to deliver the Look content only when certain conditions are met. Alerts provide a similar function for dashboard tiles.
In the Send this schedule if drop-down, specify whether you want to deliver the Look content only if there are results, only if there are no results, or if there are either results or no results. For example, you can user filters to create conditions for situations you want to monitor, such as items that are below a certain quantity of inventory, expenditures that are above a certain value, and so forth, and then deliver the content only if that condition has been reached.
You can also specify there to be a delivery only if the query results have changed since the last data delivery was sent by checking the box next to and results changed since last run. This option is not available if you want to use the All Results limit option.
Limit
You can limit the size of your delivery by selecting one of the following limit options for your data:
- Results in Table: Data is sent as a single delivery.
- All Results: Data is streamed (see more in the What are all the row limits in Looker? Best Practices page). This is useful for large datasets, as it bypasses file-size, browser, and memory limitations.
If you choose Results in Table, Looker will obey whatever row limitations you've set up in the saved Look or the Explore. If you choose All Results, Looker will return all the rows of the query, regardless of any saved Look settings, and regardless of Looker's typical 5,000 row limit. This can be desirable for retrieving very large datasets, but you should use caution to ensure the query is not too large for your database.
Limit options for email
When sending Looks and Explores, you can limit the size of your email to stay within your email server's message size limitations. Select one of the following limit options for your data:
- Results in Table: Data is sent with a 5,000 row limit. This is the only choice available for emails using the Data Table or Visualization format options. Emails with over 5,000 rows will not be sent.
- All Results: If you are using the Text, CSV, JSON — Simple, XLSX, or HTML format options, you can send all of the rows of the results of a saved Look. This option ignores any limits set on a saved Look or Looker's typical 5,000 row limit. There is, however, a total data limit of 15 MB so that email applications will accept the attachment. Emails over 15 MB with an attachment will not be sent. If you specify a Data Table or Visualization format and then select All Results, Looker automatically changes the format to use a text attachment to support sending all results.
To verify that you are within the row or data limit for scheduled emails, you can enter your own email address as the recipient and click Send Test to send the data to yourself immediately. If you do not receive the email, it is likely that you have reached the row limit or the data limit for emails.
Email options
Deliveries to email have additional delivery options as described below.
Run schedule as recipient
This option is available only for the email destination.
The Run schedule as recipient option lets admins specify a list of users who will each receive the content delivery as if they ran the query, based on their permissions. Non-admin users may also enter their own email address to receive a delivery as if they had queried the content, based on their permissions. This means that each user's access filters and user attributes will be applied to the data included in each email.
For example, a Looker admin needs to schedule a report that counts Users who are grouped by State to a series of users, and each user has different access filter values.
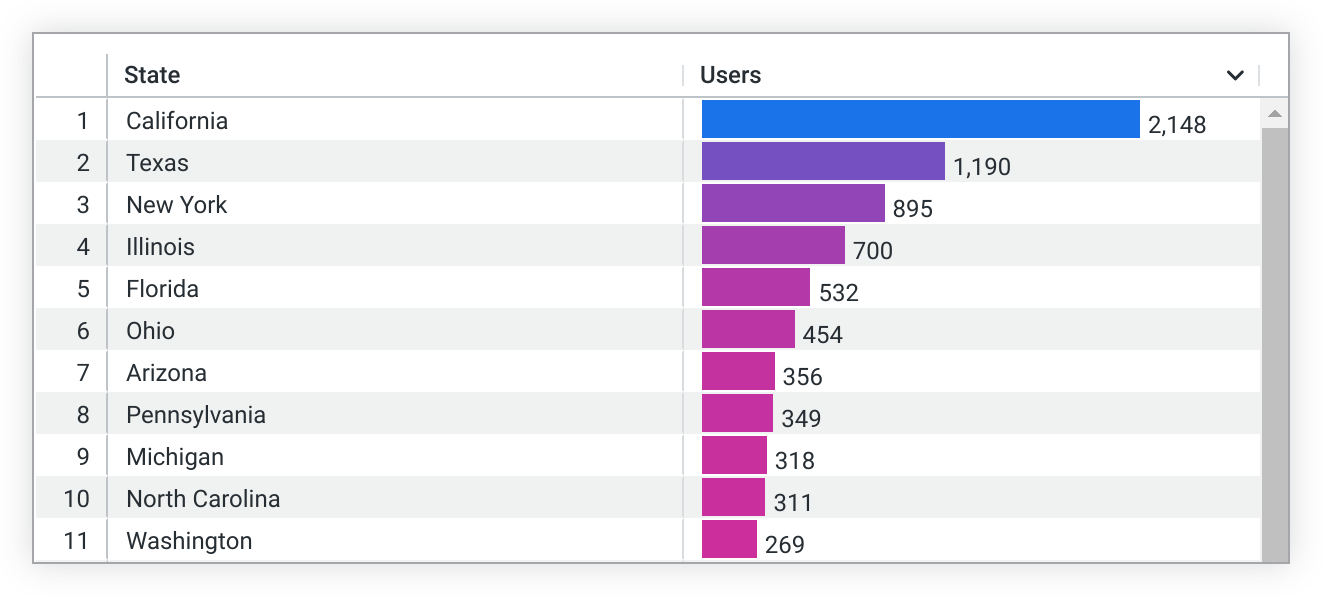
User A has an access filter set as users.state = 'California'. When Run schedule as recipient is selected, the scheduled query will apply the access filter users.state = 'California' and send filtered results to user A. The results will show a row only for California.

This option takes into account the permissions of the user creating the schedule as well as the types of email addresses added to the Who should it be emailed to? text field.
In some cases, the Run schedule as recipient option is not available:
- When a non-admin adds an email address other than their own
- When a Looker admin adds the email of a disabled user
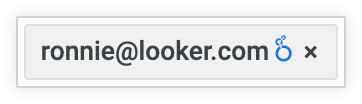
- When a Looker admin adds an email that does not belong to a Looker user (a Looker account is indicated by a Looker icon next to the recipient)
- If the email was added before the Run schedule as recipient option was selected, then the option is disabled automatically. It becomes available again if that email address is deleted from the list of recipients.
- If the email address was added after the Run schedule as recipient option was selected, then adding the email address will produce an error and the email will be removed automatically from the Who should it be emailed to? field. The Run schedule as recipient option will remain enabled.
In the special case where a user is listed as a recipient on a schedule that has Run schedule as recipient enabled and then that user's account is disabled, the schedule will fail to deliver to the disabled user starting the next time it runs. If that user's account is deleted, the entire schedule will fail to deliver to any recipients. A Looker admin or user with the see_schedules permission will be able to diagnose this failure in the Scheduler History page in the Admin panel.
Include links
If your Looker admin has set your Looker instance's emailed data policy to Send Links and Data, the Scheduler will display an option to Include links. When this option is checked, email data deliveries include a link back to Looker that says "View full report" for delivered Looks and Explores and "View full dashboard" for delivered dashboards.
This link lets the email recipients further explore the data on your Looker instance. Recipients must log in to Looker and have permissions to access the model on which the delivered content is based to view that content in Looker. If you want to remove this link from your data delivery emails, uncheck the Include Links checkbox.
Format options
Deliveries not using the Visualization format have additional delivery options as described below.
Apply visualization options
This option is not available for Look or Explore deliveries in Visualization format.
Select Apply visualization options for your data delivery to appear similar to a table chart. Any of the following settings in the Plot, Series, and Formatting menus that are configured for the visualization will be applied:
- Show Row Numbers
- Hide Totals
- Hide Row Totals
- Limit Displayed Rows to a maximum of 500 rows shown or hidden
- Show Full Field Name
- Custom labels for each column (the JSON — Detail, Inline format always uses raw field names, not the field label — see the Change in JSON formatting Community post for more information about how Looker renders fields in JSON format)
- Conditional Formatting for deliveries of table chart visualizations in Excel format
Conditional formatting displays in Excel deliveries of Looks and Explores with table chart visualizations only if the Along a scale rule is applied.
Unselect Apply visualization options for Looker to send the data as it appears in the Data section of the Look or a dashboard tile's Explore from Here window. JSON — Label uses the field label, even if Apply visualization options is unselected.
Formatted data values
This option is not available for Look or Explore deliveries in Visualization format.
You can configure the data's formatting:
- Select Formatted data values if you want the data to appear more similar to the Explore experience in Looker, although some features (such as linking) aren't supported by all file types.
- Unselect Formatted data values if you do not want to apply any special formatting of your query results, such as rounding long numbers or adding special characters your Looker developers may have put in place. This is often preferred when data is being fed into another tool for processing.
Table resolution
When delivering content to email in Visualization format, you can customize the width of your visualization by using the Table resolution drop-down menu. Your width options are:
- Normal: 800 pixels
- Wide: 1680 pixels
If you choose Wide and the visualization width exceeds the limit set by your email client, email delivery recipients may need to scroll horizontally to see the entire visualization.
Timezone
By default, Looker uses the time zone associated with your account to determine when to send your data delivery. If you don't have a time zone associated with your account, Looker uses your Application time zone. If you want to specify a different time zone, select Use custom timezone. The time zone you select does not affect the data in your Look or dashboard, just the timing of the delivery.
Testing the delivery
Click the Send Test button to send a one-time test delivery to the specified destination.
Saving the delivery
A summary of your delivery settings is displayed at the bottom of the Scheduler.
For one-time deliveries, when you are finished configuring delivery options, click the Send button to deliver your content immediately to your specified destination.
For recurring deliveries, when you are finished configuring delivery options, click the Save All button to save your schedule and close the window. The content will be delivered according to your delivery settings. If you reopen the Scheduler, your saved schedule appears in the left panel. You have the option of duplicating or deleting the schedule by clicking the Duplicate or Delete icon, respectively.
Your saved schedule will also appear on the Schedules You've Created page in your user profile and the Schedules and Schedule History pages in the Admin panel. See the Viewing deliveries section on this page for more information.
Viewing deliveries
You can view the schedules that you have created and, given the appropriate permissions, all the schedules for the Looker instance.
Viewing deliveries that you created
You can see a list of all schedules that you have created on the Schedules You've Created page, which you can reach by clicking on your user profile icon and selecting Schedules. See the Viewing Your Scheduled Data Deliveries page for more information about viewing and managing the schedules that you've created.
Viewing deliveries created by other users
If your Looker admin has granted you permissions to view the Schedules and Schedule History admin pages, you can see the list of all schedules for the entire Looker instance. You will not be able to edit or delete those schedules, however.
Things to know
At times a scheduled email delivery could fail to reach one or more of its recipients. This could happen if the underlying model has an error, if the recipient does not have access to the data, or if there are rendering problems or page errors.
A few other challenges can arise:
- If your company has set up its own email settings in the Admin section of Looker, your Looker admins will need to make sure that the settings are correct and that your email provider is functioning properly.
- Depending on the Limit setting, the data delivery will be limited either to 5,000 rows or to a maximum file size of 15 MB for email with attachments and 20 MB for emails with inline content. Emails with more rows or data than these limits will not be sent.
- If an email does not send at the expected time — but does eventually arrive — it is likely because you're competing with other Looker tasks. These tasks can include other scheduled emails, many people exploring data at the same time, or persistent derived tables being built. If this happens, check with your Looker admins about competing tasks.
- If a specific email keeps disappearing from your distribution list, it's likely because a user is unsubscribing from that scheduled email. This can be a particular challenge if you use a group email alias to send to multiple people, because any individual recipient can unsubscribe that entire email alias. If you need to understand un-subscriptions, check out this Looker Community post on monitoring scheduler unsubscribe events.