This page describes how to create a custom block that can be added to the Looker Marketplace and accessed by other Looker users.
Please note that you must be a member of the Looker Partner Network or a Looker customer to submit content to the Looker Marketplace.
For information about Looker Blocks that are already built and available for use, see the Looker Blocks documentation page. For information on customizing blocks that you have installed from the Marketplace, see the Customizing Looker Marketplace Blocks documentation page.
To develop a block and make it available to all Looker users through the Looker Marketplace, follow the steps described on this page:
- Set up and connect the data source to Looker.
- Create a project and add required files.
- Make your block accessible.
- Submit your block for Looker review.
Setting up and connecting the data source to Looker
Blocks are data models, so they work best when they're designed for a specific, easily repeatable dataset. Most block installation errors occur when the user's dataset fails to match the schema, table, and field names in the block.
- If you are building a block for a specific dataset, such as Google Analytics data, take note of any settings or customizations that you have made to the dataset. When possible, keep such customizations to a minimum to streamline installation for your users. Provide specific instructions in a README file.
- If you are building a block for a general analytical pattern, such as cohort retention, take note of which fields you expect your user's dataset to contain. Most likely, your users will not have the same schema, table, and field names as in your dataset. Use LookML constants for table and field names, and inform your user of which fields they need to update in a README file.
Once you have determined your data source, connect your data source to Looker so that you can begin modeling. If you need to change any of the default connection settings, make a note in your README file.
Creating a project and adding required files
Create a project to represent your block. Consider using a naming convention such as block-<database_dialect>-<role> (for example, block-redshift-admin).
Next, create the following files in your project:
- A manifest file that defines the project name, connection name, and any other constants
- A view file for each view
- An explore file for each Explore
- A model file that includes all view files, explore files, and LookML dashboard files in the project
- At least three LookML dashboard files
- A
marketplace.jsonfile that contains information that will be displayed in the Marketplace listing for this block - A LICENSE file that includes the text of the MIT open source license
- A README file that details setup instructions and options
Users who install your block can refine the base Explores, views, and dashboards in a separate refinements.lkml file. The following sections explain each required file type in further detail:
- Creating a manifest file
- Creating view and explore files
- Creating a model file
- Creating LookML dashboard files
- Creating a marketplace.json file
- Creating a LICENSE file
- Creating a README file
Creating a manifest file
Create a manifest file for your project. The manifest file should start with a project name and then define some LookML constants for your users to change. For example, you should define the Looker connection name as a constant with export: override_required so that users can override it with their own connection name.
Here is a sample manifest file:
project_name: "block-ga-360"

################# Constants ################

## Used in google_analytics_block.model connection param
constant: CONNECTION_NAME {
  value: "looker-private-demo"
  export: override_required
}

## Used in ga_sessions.view sql_table_name
constant: SCHEMA_NAME {
  value: "bigquery-public-data.google_analytics_sample"
  export: override_optional
}

constant: GA360_TABLE_NAME {
  value: "ga_sessions_*"
  export: override_optional
}
Creating view and explore files
Create a view.lkml file for each view. If a user's schema and table names might differ from yours, make sure to define the schema and table names as constants in your manifest file so that users who download your block can update the schema and table names in the autogenerated manifest file. Then, reference those constants in the sql_table_name parameters of your views.
Here is an example of a block view.lkml file:
view: user_facts {

  # SCHEMA_NAME and GA360_TABLE_NAME are constants
  sql_table_name: @{SCHEMA_NAME}.@{GA360_TABLE_NAME} ;;

  dimension: clientID {
    type: string
    sql: ${TABLE.clientId}
  }

}
Next, create one or more explore.lkml files. Make sure each explore file includes the necessary views for that explore. Design your Explores thoughtfully to contain logical joins, drills, and curated Explore pages. After another user installs the block from the Marketplace, it should be simple for their business users to jump in and start analyzing their data.
You can find a general list of modeling best practices on our Community Forum and in the Looker Best Practices, such as Best practice: LookML dos and don'ts and Best practice: Writing sustainable, maintainable LookML.
Here is an example of an explore.lkml file:
include: "/Google_Analytics/Sessions/*.view.lkml"

explore: future_input {
  view_label: "Audience Traits"
  label: "BigQuery ML Customer Likelihood to Purchase"
  description: "This explore allows you to slice and dice likeliness to purchase scores by different customer traits to see how they differ. The default range of data you are looking at is in the past 30 days"
  join: future_purchase_prediction {
    type: left_outer
    sql_on: ${future_purchase_prediction.clientId} = ${future_input.client_id} ;;
    relationship: one_to_one
  }
}
Creating a model file
Create a model file that includes all view, explore, and dashboard files in your project. Make sure the connection name is referenced as a LookML constant from your manifest file.
Define at least one datagroup to set a caching policy.
Here is an example of a model file:
connection: "@{CONNECTION_NAME}"

include: "/views/*.view.lkml"
include: "/explores/*.explore.lkml"
include: "/dashboards/*.dashboard.lookml"

datagroup: nightly {
  sql_trigger: SELECT TIMEZONE('US/Pacific',GETDATE())::DATE;;
}
Creating LookML dashboard files
For inclusion in the Looker Marketplace, each block must include a minimum of three LookML dashboards that provide meaningful, helpful analysis. The dashboards should be aesthetic, functional, and comprehensive and should not feature any blurred-out data.
Although there are no hard design requirements for LookML dashboards, Looker recommends these general design best practices:
- Consistent color palette throughout the dashboard
- At least seven tiles
- A minimum of three different visualization types (for example, single value, bar, and line)
Custom visualizations are not supported when developing dashboards for Blocks. Use Looker's native visualization types instead.
See the Dashboard parameters and the Dashboard element parameters documentation pages for more information on customizing LookML dashboards and the visualizations within LookML dashboards, respectively. See the Redshift Admin LookML dashboard file from the Redshift Admin Block for an example of a LookML dashboard file.
Creating a marketplace.json file
Create a marketplace.json file to provide information about how the listing should be displayed in the Marketplace. Each block in the Looker Marketplace must provide this additional information to help users select the block that best fits their needs. Your marketplace.json file should contain:
- Marketplace
label,category_label, andbrandingfields - A list of LookML constants that will need to be filled out by users to populate the model LookML (for example, connection names)
Here is an example of a marketplace.json file for the Google BigQuery Performance block:
{
  "label": "Google BigQuery Performance",
  "category_label": "Models",
  "branding": {
    "image_uri": "https://marketplace-api.looker.com/block-icons/google-cloud.png",
    "tagline": "This Block provides a comprehensive overview of all cost and performance data for one or multiple BigQuery projects, enabling users to effectively monitor BigQuery usage down to a per user level. It can be used to set up alerts to long running or high cost queries."
  },

  "constants": {
    "CONNECTION_NAME": {
      "label": "Connection Name",
      "value_constraint": "connection"
    },
    "SCHEMA_NAME": {
      "label": "Schema Name"
    },
    "AUDIT_LOG_EXPORT_TABLE_NAME": {
      "label": "Audit Log Export Table Name",
      "description": "The table name of your BigQuery Optimization data (typically cloudaudit_googleapis_com_data_access_*)."
    }
  },
  "models": [
    {
      "name": "block_bigquery_optimization_v2",
      "connection_constant": "CONNECTION_NAME"
    }
  ]
}
The following screenshot shows the Marketplace listing that would be generated by this marketplace.json file.
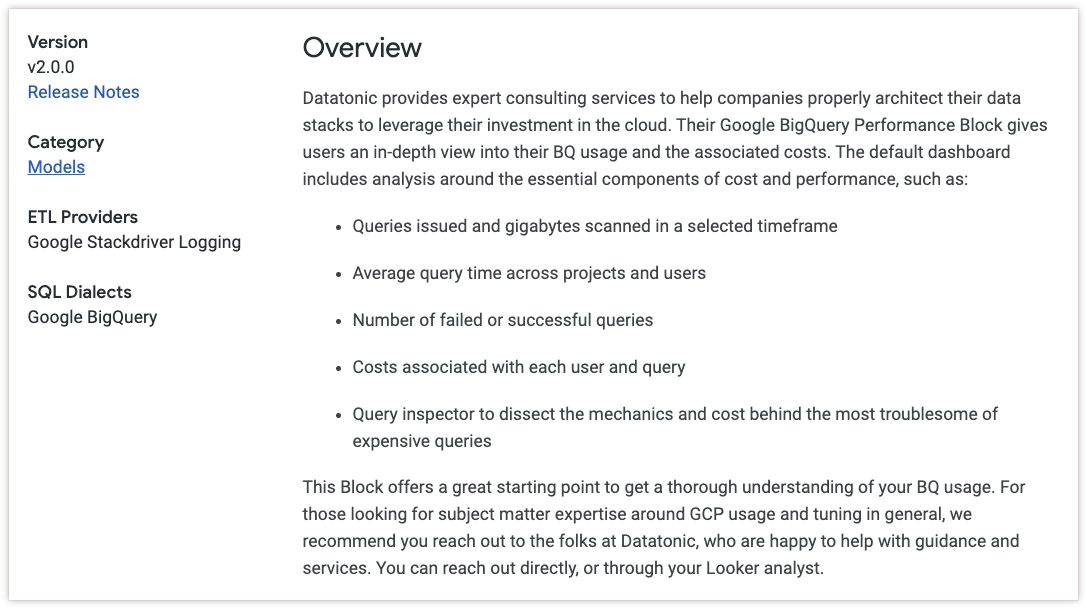
- The
"label"field controls the title of the block. In this example, this is Google BigQuery Performance. - The
"tagline"field controls the first paragraph of the Marketplace listing. - The
"image_uri"field controls the image shown in the top left corner of the Marketplace listing. In this example, this is the Google Cloud logo. - The
"constants"field prompts users to populate their constants in the Marketplace UI during the installation process. In this example, three constants are listed in themarketplace.jsonfile (CONNECTION_NAME,SCHEMA_NAME, andAUDIT_LOG_EXPORT_TABLE_NAME), so the user will be prompted to specify values for those three fields before installing.
Creating a LICENSE file
All Looker Blocks must be licensed under the MIT open source license. Include the text from this license in a file named LICENSE. See the Redshift Admin Block LICENSE file for an example of a LICENSE file.
Creating a README file
The README file should contain all instructions for implementing the block and should explicitly identify where any customizations are needed, such as in the autogenerated manifest file](#the_autogenerated_manifest_file) or the refinements file. See the Redshift Admin Block README file for an example of a README file.
Things to consider for your README:
- What data source does the user need? Do they need to pay for a subscription?
- What permissions should the database user have?
- What Looker connection settings are needed?
- Will the block field names match the field names in your user's dataset? If not, what should your user change?
Autogenerated files
When users install your block, their Looker instance creates a new Looker project with your project's files as read-only files. It will also autogenerate the following files for your user:
- A read-only
marketplace_lock.lkmlfile that contains marketplace listing information - A manifest file that references the listing from
marketplace_lock.lkml - A
refinements.lkmlfile that includes all views and explores from your block - A read-only model file that includes both the model file from your block and the
refinements.lkmlfile
Users who install your block from the Looker Marketplace can use the refinements.lkml file to refine your LookML and can even add new LookML files. See the Customizing Looker Marketplace Blocks documentation page for more information about how users can customize your block.
The autogenerated manifest file
The autogenerated manifest file allows users who install your block to set variables such as the connection name. The LookML constants defined in the block manifest file can either be edited in the autogenerated manifest file, or set by your users in the block download user interface.
The refinements file
The autogenerated refinements.lkml file allows users who install your block to refine views and Explores that are defined your block. This is where users who download your block will do the bulk of LookML customization to fit their use case.
Here is an example of an autogenerated refinements.lkml file:
include: "//ga360-v2/**/*.view.lkml"
include: "//ga360-v2/**/*.explore.lkml"

\# Use LookML refinements to refine views and explores that are defined in the remote project.
\# Learn more at: https://docs.looker.com/data-modeling/learning-lookml/refinements
\#
\#
\# For example we could add a new dimension to a view:
\#     view: +flights {
\#       dimension: air_carrier {
\#         type: string
\#         sql: ${TABLE}.air_carrier ;;
\#       }
\#     }
\#
\# Or apply a label to an explore:
\#     explore: +aircraft {
\#       label: "Aircraft Simplified"
\#     }
\#
Making the block project accessible
Host your block LookML on a publicly accessible GitHub repository.
All Looker Blocks must be licensed under the MIT open source license, and the license text must be included in a LICENSE file in the repository.
Submitting the block for review
Once your block is ready for submission, follow the instructions at Submitting content to the Looker Marketplace to create supporting documentation for your block, submit your block to the Looker team for review, and publish your block to the Looker Marketplace.