This page explains how to install and configure the necessary components to implement a CI/CD workflow in Looker.
These instructions use a three-tier system that comprises development, QA, and production. However, the same principles can be applied to a two-tier or four-tier system.
These instructions also assume the use of GitHub as your Git provider. You can use other Git providers to create a CI/CD workflow; however, you must possess the expertise to modify these instructions for your provider.
Follow the instructions in the section that is relevant to you:
Prerequisites
Linux environment
This process uses tools called Gazer and Spectacles that are designed to work with Unix-like operating systems. Each LookML developer must have access to the command line in a Linux environment or macOS where you plan to run your CI/CD workflow.
If you are using Windows, Gazer and Spectacles can be used inside of Microsoft's Windows Subsystem For Linux (WSL). WSL lets you run a variety of different Linux flavors. If you don't have a preferred Linux operating system, the latest version of Ubuntu Linux is a good choice due to its broad support.
These instructions provide examples for Linux systems and may require modification if you are using macOS or WSL.
One Looker instance per tier
To enable this configuration you will need one Looker instance for each tier of your system. For example, a system with a development stage, QA stage, and production stage will need three separate instances. The instances may be hosted by Google or customer-hosted.
Identical connection names
Database connections should have the same name within each Looker instance, regardless of what tier they represent. For example, a sales connection should have that name in all instances, rather than sales_dev or sales_qa.
The connections can point to the same database or different databases. However, if they point to the same database, they should have different scratch schemas defined so that persistent derived tables in the development or QA instance don't interfere with production.
For example, if the same database is used for all three instances they might be configured as follows:
| Production | QA | Development | |
| Connection Name | sales |
sales |
sales |
| Database | sales_db |
sales_db |
sales_db |
| Scratch Schema | prod_sales_scratch |
qa_sales_scratch |
dev_sales_scratch |
Or, if a unique database is used for all three instances, they might be configured as follows:
| Production | QA | Development | |
| Connection Name | sales |
sales |
sales |
| Database | sales_db_prod |
sales_db_qa |
sales_db_dev |
| Scratch Schema | sales_scratch |
sales_scratch |
sales_scratch |
Git repository
A single git repository will be used for each project across all three tiers. The development instance will track the main branch, while the QA and production instances will generally point to git tags (described in more detail later).
First time only setup steps
The steps in this section only need to be completed one time by someone with Looker Admin permissions, as well as administrator permissions on their git provider.
Git credentials
Each developer's Linux environment needs to connect to the same repository that you are using to manage your LookML. This is likely an external repository hosted in a service such as GitHub. You will need an account with that service that has the appropriate credentials to configure the repository. Using the account, you can set up an SSH key to allow your Linux environment to connect to that service automatically.
For GitHub, follow the instructions at Adding a new SSH key to your GitHub account.
Creating and configuring a Git server repository
For the CI/CD workflow to function, LookML must be stored in a git repository and connected to a Looker project. In the project settings, Git Production Branch Name must be set to main and Enable Advanced Deploy Mode must be enabled.
If the following steps have not already been performed, follow these instructions for GitHub:
Create New Repo
- In the GitHub UI, press the + button in the upper right corner, and then select New repository.
- Select the owner (likely your organization) and enter a REPOSITORY_NAME.
- Choose whether to make the repository public or private (private repos require a paid GitHub subscription), and check the box to initialize it with a README file.
- Press the Create repository button.
- Press the green button labeled <> Code and copy the SSH URL. It will look similar to:
git@github.com:org_name/REPOSITORY_NAME.git. - In Looker, create a new project.
- Enter development mode and choose the project settings item from the left side bar, and then Configure Git.
- Paste in the repository URL (
git@github.com:org_name/REPOSITORY_NAME.gitin this example) and select Continue. - Copy the deploy key and go back to the GitHub UI for this repository.
- Choose Settings and then Actions - General.
- Under Workflow permissions verify that Allow GitHub Actions to create and approve pull requests is checked and click Save.
- Switch to the Deploy keys page of GitHub settings.
- Click the Add deploy key button and paste the deploy key into the Key field.
- Add a title such as
Looker-REPOSITORY_NAME, check the Allow write access checkbox, and push the Add key button. - Return to Looker and choose Test and Finalize Setup.
- Choose project settings again from the left side bar. Change the Git Production Branch Name to
main. - Choose Enable Advanced Deploy Mode and select Save Project Configuration.
Beneath the project settings icon on the left side you should see a deploy icon for the Deployment Manager.
Use Existing Repo
- Navigate to the GitHub repository that stores your LookML.
- Choose Settings and then Actions - General.
- Under Workflow permissions verify that Allow GitHub Actions to create and approve pull requests is checked and click Save.
- Go to the <> Code section of the GitHub repository.
- Press the green button labeled <> Code and copy the SSH URL. It will look similar to:
git@github.com:org_name/REPOSITORY_NAME.git. - In Looker, create a new project.
- Enter development mode and choose the project settings item from the left side bar, then Configure Git.
- Paste in the repository URL (
git@github.com:org_name/REPOSITORY_NAME.gitin this example) and select Continue. - Copy the deploy key and go back to the GitHub UI for this repository.
- Choose Settings and then Deploy keys.
- Click the Add deploy key button and paste the deploy key into the Key field.
- Add a title such as
Looker-REPOSITORY_NAME, check the Allow write access checkbox, and push the Add key button. - Return to Looker and choose Test and Finalize Setup.
- Choose project settings again from the left side bar. Change the Git Production Branch Name to
main. - Choose Enable Advanced Deploy Mode and select Save Project Configuration.
Beneath the project settings icon on the left side you should see a deploy icon for the Deployment Manager.
Creating GitHub actions
It's useful to create several GitHub actions so that various checks occur automatically each time LookML changes are made. Adding these actions requires that you are able to make changes to your Git repository on your Linux environment. If that is not already available, follow the Configuring Git instructions.
To add the GitHub actions, go to your repository's directory on the Linux environment and add the subdirectory .github/workflows. After they are setup, these actions can be run manually from the Actions page of the GitHub UI.
Look-At-Me-Sideways (LAMS)
LAMS is an open source linter that inspects your LookML for errors and bad practices. Add a file named lams.yml to the .github/workflows directory with these contents:
name: LAMS

on:
  pull_request:
    branches: [ main ]
  push:
  workflow_dispatch:

jobs:
  lams_job:
    runs-on: ubuntu-latest
    name: LAMS LookML Linter Job
    steps:
    - name: Checkout your LookML
      uses: actions/checkout@v4
      with:
        ref: ${{ github.event.pull_request.head.sha }}
        fetch-depth: 0
    - name: Setup Node
      uses: actions/setup-node@v1
      with:
        node-version: '16.x'
    - name: Install LAMS
      run: npm install -g @looker/look-at-me-sideways@3
    - name: Run LAMS
      run: lams --reporting=no
Each time a commit is pushed to GitHub, or a pull request is opened to merge code with the main branch, LAMS will run.
Release Please
Release Please is an open source tool that automatically tags releases with the proper version numbers.
Add a file named release-please.yml to the .github/workflows directory with these contents:
name: release-please

on:
  push:
    branches:
      - main
  workflow_dispatch:

permissions:
  contents: write
  pull-requests: write

jobs:
  release-please:
    runs-on: ubuntu-latest
    steps:
      - uses: google-github-actions/release-please-action@v3
        with:
          release-type: simple
Conventional commits
This GitHub action will verify that a pull request is opened with a title that adheres to the conventional commit standard.
Add a file named lint_pr_title.yml to the .github/workflows directory with these contents:
name: "Lint Pull Request Title"

on:
  pull_request_target:
    types:
      - opened
      - edited
      - synchronize

jobs:
  main:
    name: Validate PR title
      runs-on: ubuntu-latest
      steps:
        - uses: amannn/action-semantic-pull-request@v5
      env:
        GITHUB_TOKEN: ${{ secrets.GITHUB_TOKEN }}

permissions:
  pull-requests:
    read statuses: write
Push the changes to GitHub
Finally, use the following commands to commit these GitHub action changes and push them to GitHub:
git add .github/workflows/
git commit -m "chore: Added github actions"
git push
Protecting the main branch
In the GitHub UI you should enable branch protections for the main branch so that ordinary developers can't push changes directly to that branch. Instead, they make changes in a different branch then open a pull request. The pull request can be reviewed by another developer before it is approved and merged with main.
To configure branch protection, go to the GitHub UI for the repository, choose Settings and then Branches, and press the Add branch protection rule button:

Enter main as the Branch name pattern, and check the following options:
- Require a pull request before merging
- Require approvals
- Dismiss stale pull request approvals when new commits are pushed
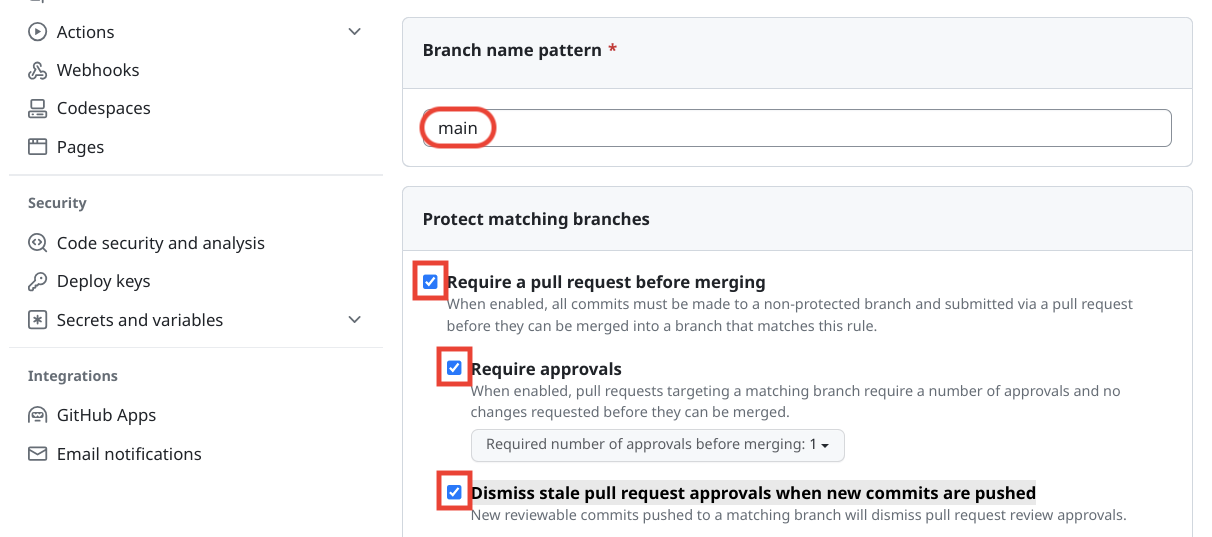
Finally, press the Create button at the bottom of the page.
When a pull request is created the GitHub actions configured earlier in these instructions will run. After they run for the first time they can also be selected in this UI so that they must succeed before the pull request can be merged to main.
Configuring pull requests
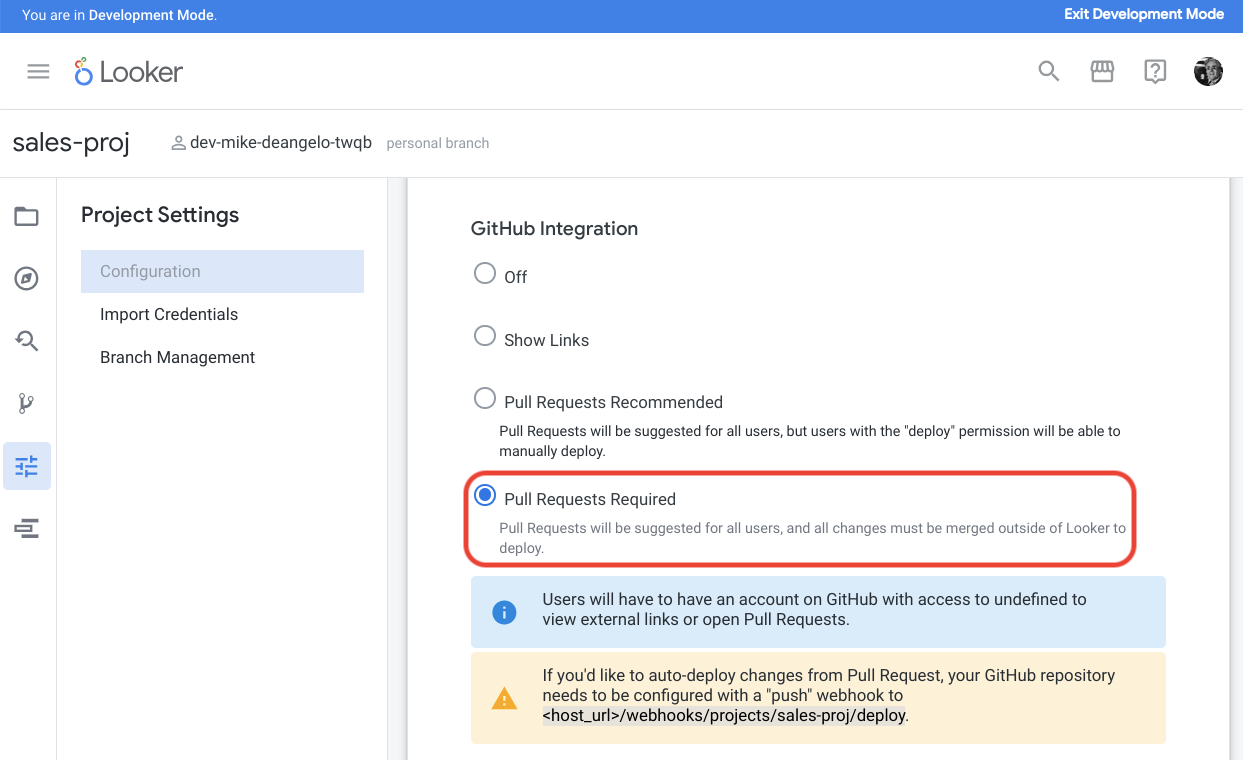
In Looker you can require that pull requests are used and make Looker open PRs on behalf of the developer. This should only be configured for the development instance. The QA and production instance will use Advanced Deploy Mode to get their updates.
Enable this by going to the Project Configuration page for each project, and then select Pull Requests Required under the heading GitHub Integration.
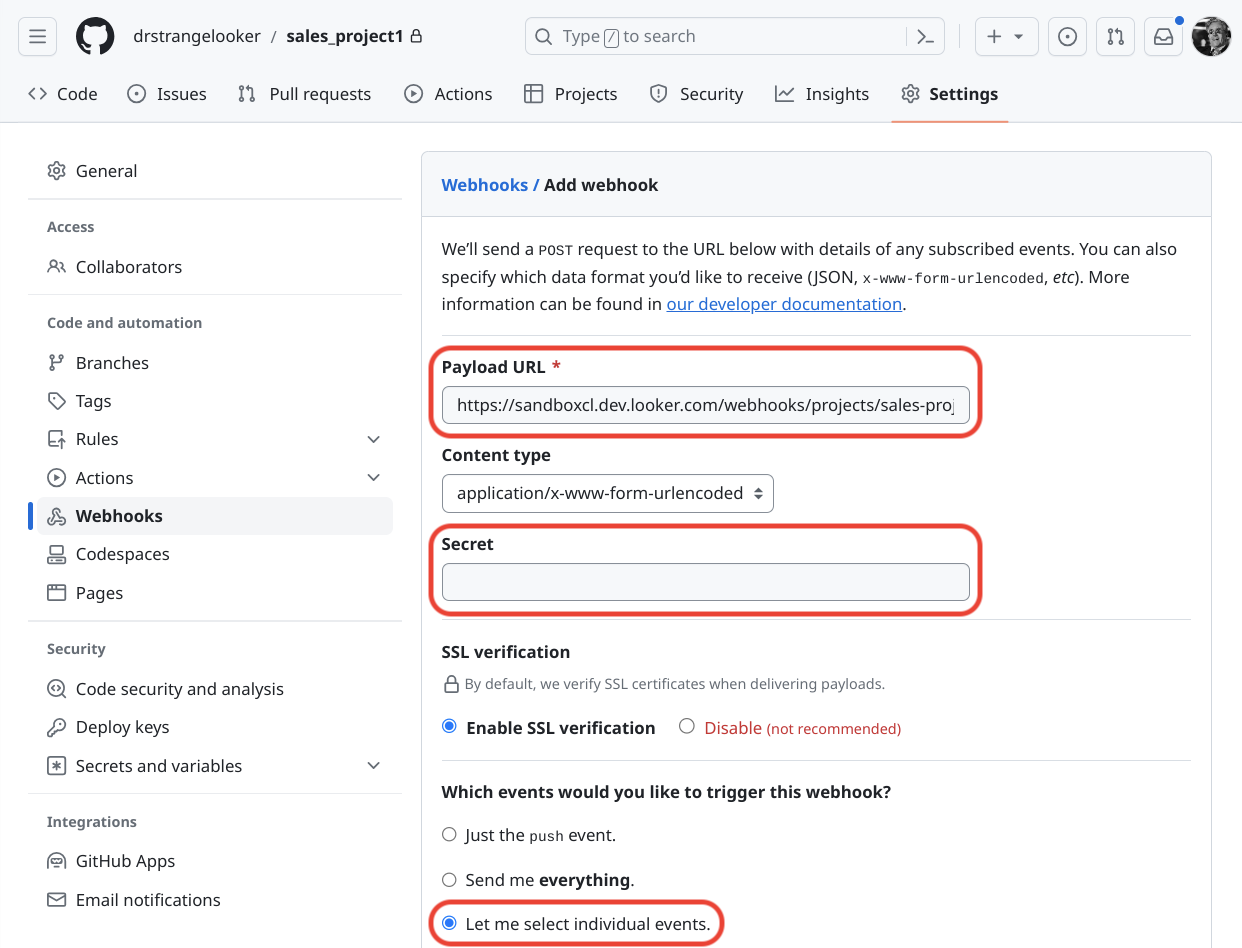
Press the button to set a webhook secret, copy the random string that is generated, and press the Save Project Configuration button.
Back in the GitHub UI for your repository, choose Settings and then Webhooks. Press the Add webhook button from the upper right:
- In the field labeled Payload URL enter
https://LOOKER_HOST_NAME/webhooks/projects/PROJECT_NAME/deploy - In the field labeled Secret paste the secret that you saved from Looker
- For the question Which events would you like to trigger this webhook? choose Let me select individual events
Verify that Pull Requests and Pushes are selected:
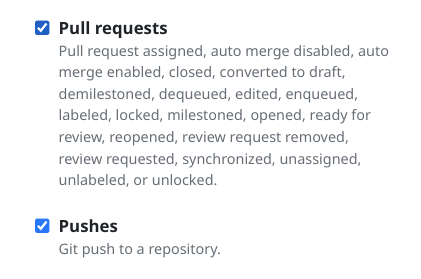
Finally, press the Add webhook button at the bottom of the page.
Setup steps for each Looker developer
All of the following installation steps should be performed on your Linux environment.
Installing Ruby
The Ruby programming language needs to be installed to run Gazer. Any version of Ruby after 2.7.7 will work with Gazer, but Ruby 3.x.x is preferred. To install Ruby on Ubuntu Linux, run these commands:
sudo apt update
sudo apt install ruby
Confirm that ruby is installed properly by running ruby -v. This should give a response similar to the following:
ruby 3.1.3p185 (2022-11-24 revision 1a6b16756e) [x86_64-linux]
These commands will also work on Debian Linux, Linux Mint, and several other Linux flavors that use the Aptitude package manager. You may need to search for commands that work on other Linux flavors, or for commands to install on macOS. Check Installing Ruby for more information.
Installing Gazer
Gazer is an open source project created by Google employees to navigate and manage Spaces, Looks, and dashboards using a command line tool.
With Ruby installed, Ruby's Gem tool can be used to install Gazer:
gem install gazer
Confirm that Gazer is installed with the command gzr version. This should give a response similar to the following:
v0.3.12
Installing Spectacles
Spectacles is an open source tool used to test LookML (their paid version is no longer available). Details for installing it can be found on their Getting Started page.
Installing Git
Git version control software can be installed on Ubuntu Linux with this command:
sudo apt update
sudo apt install git
Confirm the install was successful with the command git --version. This should give a response similar to the following:
git version 2.42.0.609.gbb76f46606
These commands will also work on Debian Linux, Linux Mint, and several other Linux flavors that use the Aptitude package manager. You may need to search for commands that work on other Linux flavors. Instructions for Fedora and macOS, for example, can be found at Getting Started - Installing Git.
Configuring Git
Git on your Linux environment needs to be configured to interact with whichever Git repository your LookML is stored in. These instructions have been written for LookML Git repositories stored in GitHub.
Name and email
GitHub (and most other Git implementations) need to know your name and email address so that they can record activity. Configure your name and email in Git by running the following commands:
git config --global user.name "FIRST_NAME LAST_NAME"
git config --global user.email "EMAIL_ADDRESS"
Git credentials
In the initial CI/CD setup git credentials were created. The private SSH key that was generated should be configured in a $HOME/.ssh/config file. To create the file, use these commands:
touch $HOME/.ssh/config
chmod 600 $HOME/.ssh/config
Insert the following text into the $HOME/.ssh/config file:
Host github.com
  User git
  IdentityFile ~/.ssh/KEY_NAME
  ControlMaster auto
  ControlPath ~/.ssh/ctrl-%r@%h:%p
  ControlPersist yes
In place of KEY_NAME, use the name of the private key file that you generated with the Adding a new SSH key to your GitHub account instructions. The private key file has the same name as the public key file, but without the .pub extension. For example, if you used the public key found in the file id_ed25519.pub, the private key would be named id_ed25519.
Setting Up Your Local Git Repository
After you've configured your LookML repository, you need to make a copy of it in your Linux environment. To do this, run this command:
git clone GIT_URL
For example, the command could appear as follows:
git clone git@github.com:my_org_name/sales_project.git
This will copy the LookML repository to a subdirectory, for example sales_project. Use the command cd SUB_DIRECTORY to go into the repository. In this example, the command would be cd sales_project.
Once in your repository's directory you can use the following commands:
| Command | Purpose |
|---|---|
git checkout BRANCH_NAME |
Used to switch branches. In most cases, the primary branch is called main; however, in older systems, it might be called master. |
git fetch |
Used to retrieve the latest changes from the server. |
git pull |
Used to apply changes to the checked out local files. git pull implicitly does a git fetch. |
git tag |
Used to create a meaningful tag for a particular revision. |
git push |
Used to push local changes to the server. |
Configuring Gazer
To use Gazer, you will need API credentials for each of the development, QA, and production instances. For instructions on creating API credentials, see the Admin settings - Users page. The API credentials may have already been created by the person who initially set up the CI/CD workflow. In that case, you can use the existing credential; new credentials won't need to be generated for each person.
Store your API credentials in a .netrc file with minimal permissions in your home directory. You can create an empty file with the correct permissions using these commands:
touch $HOME/.netrc
chmod 600 $HOME/.netrc
Add entries like the following to the file, but use your own Looker server host names for machine, the API client_id for the login, and the API client_secret for the password. For example:
machine dev.example.looker.com
  login 80ka7nl6lj87ftmn
  password u7kw3mj5h2trfz0

machine qa.example.looker.com
  login fi3qtv5at5crvd1q
  password bdxtaeghnzyz0wm

machine example.looker.com
  login k7lr6yv57wvzy9p2
  password wcvr5qjd2isbs2s
Test that this works by running a Gazer command against each server, such as the following:
gzr user me --host dev.example.looker.com
This should give a result similar to this:
+----+---------------+---------+----------+------------------+--------------+
|  id|email          |last_name|first_name|personal_folder_id|home_folder_id|
+----+---------------+---------+----------+------------------+--------------+
|2345|jsm@example.com|Smith    |John      |              2161|           708|
+----+---------------+---------+----------+------------------+--------------+
If the previous command doesn't work, you may need to add --port 443 to end of the gzr command, as follows:
gzr user me --host dev.example.looker.com --port 443
Configuring Spectacles
Spectacles uses the same API client_id and client_secret as Gazer. In your Spectacles directory, create a file for each tier named config-TIER.yaml, for example, config-dev.yaml. Add the following content to the files as appropriate for that tier's Looker instance, such as the following:
config-dev.yaml
base_url: https://dev.example.looker.com/
client_id: 80ka7nl6lj87ftmn
client_secret: u7kw3mj5h2trfz0
config-qa.yaml
base_url: https://qa.example.looker.com/
client_id: fi3qtv5at5crvd1q
client_secret: bdxtaeghnzyz0wm
config-prod.yaml
base_url: https://example.looker.com/
client_id: k7lr6yv57wvzy9p2
client_secret: wcvr5qjd2isbs2s
You can test each file by running the following command and substituting each filename:
$ spectacles connect --config-file config-dev.yaml
You should expect a response similar to the following:
Connected to Looker version 23.18.60 using Looker API 4.0