Overview
This page explains how to set up a connection in Looker to Google BigQuery Standard SQL or Google BigQuery Legacy SQL.
The general steps for setting up a Google BigQuery Standard SQL or Google BigQuery Legacy SQL connection are as follows:
On your BigQuery database, configure the authentication that Looker will use to access your BigQuery database. Looker supports the following authentication options for BigQuery:
- Service account: See the Authentication with BigQuery service accounts section on this page for information.
- OAuth: See the Authentication with OAuth section on this page for information.
On your BigQuery database, if you want to use persistent derived tables (PDTs) on the connection, create a temporary dataset that Looker can use to create PDTs on your database. See the section Creating a temporary dataset for persistent derived tables on this page for the procedure.
In Looker, set up the Looker connection to your BigQuery database. See the section Connecting Looker to BigQuery on this page for the procedure.
In Looker, test the connection between Looker and your BigQuery database. See the section Testing the connection on this page for the procedure.
Encrypting network traffic
It is a best practice to encrypt network traffic between the Looker application and your database. Consider one of the options described on the Enabling secure database access documentation page.
Authentication with BigQuery service accounts
One way that Looker can authenticate into your BigQuery database is with a BigQuery service account. You create the service account on your BigQuery database using the API Manager in the Google Cloud console. You must have Google Cloud administrator permissions to create the service account. See the documentation on creating a service account.
Creating a service account and downloading the JSON credentials certificate
To create a BigQuery service account, follow these steps:
Open the credentials page in the API Manager in the Google Cloud console and select your project.
Select CREATE CREDENTIALS and choose Service account.
Enter a name for the new service account, optionally add a description, and select CREATE AND CONTINUE.
Your service account requires two Google BigQuery predefined roles:
- BigQuery > BigQuery Data Editor
- BigQuery > BigQuery Job User
Select the first role in the Select a role field, select ADD ANOTHER ROLE, and then select the second role.

After selecting both roles, select CONTINUE, and then select DONE.
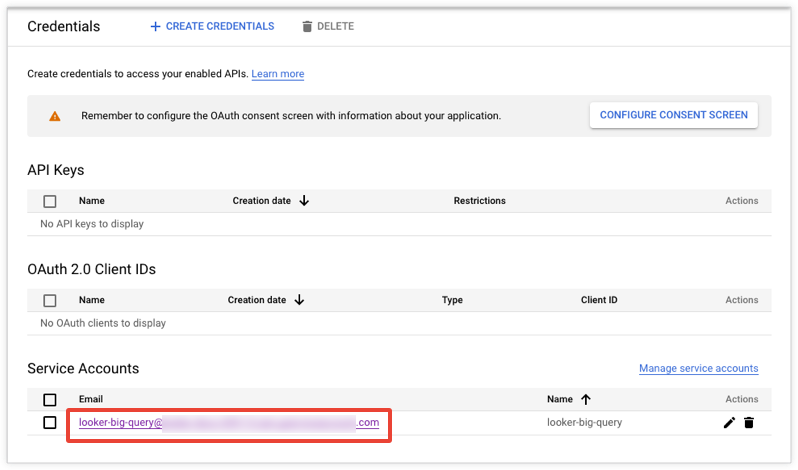
In the Credentials page, select your new service account:
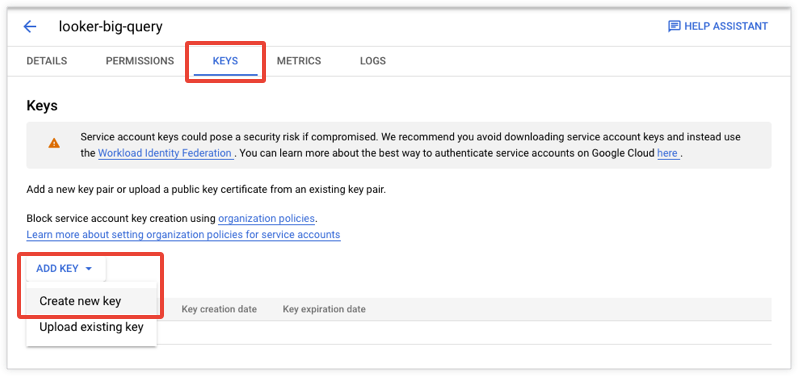
Select KEYS, and then select ADD KEY, and then, in the drop-down, select Create new key:
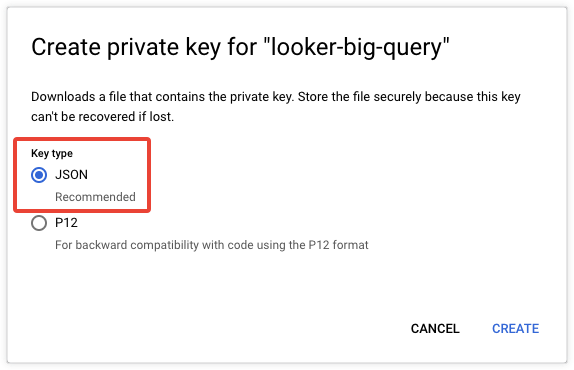
Select JSON under Key type, and then select CREATE:
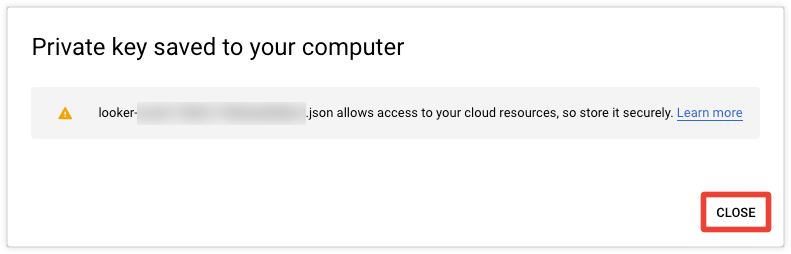
The JSON key will be saved to your computer.
After noting the download location, select CLOSE:
Select DONE.
Find the email address that corresponds to the service account. You will need this address to configure the Looker connection to BigQuery:

Once you create the service account on your BigQuery database, you will enter this service account information and the certificate file details in the Service Account Email, Service Account JSON/P12 File, and Password fields of Looker's Connections window when you set up the Looker connection to BigQuery.
Authentication with OAuth
Looker supports OAuth for Google BigQuery connections, meaning that each Looker user authenticates in to Google with their own Google OAuth credentials and authorizes Looker to access the database.
OAuth lets database administrators perform the following functions:
- Audit which Looker users are running queries against the database.
- Enforce role-based access controls using Google permissions.
- Use OAuth tokens for all processes and actions that access Google BigQuery, instead of embedding BigQuery IDs and passwords in multiple places.
Note the following for BigQuery connections with OAuth:
- If a database administrator changes the BigQuery OAuth client credentials, any schedules or alerts that a user owns will be affected. Users must sign in again if their administrator changes the BigQuery OAuth credentials. Users can also go to their Looker Account page from their user profile account page to sign in to Google.
- Because BigQuery connections that use OAuth are "per user," caching policies are also per user and not just per query. This means that, instead of using cached results whenever the same query is run within the caching period, Looker will use cached results only if the same user has run the same query within the caching period. For further information on caching, see the Caching queries documentation page.
- If you want to use persistent derived tables (PDTs) on a BigQuery connection with OAuth, you must create an additional service account for Looker to access your database for PDT processes. See the Persistent derived tables on a BigQuery connection section on this page for information.
- Admins, when they sudo as another user, will use that user's OAuth authorization token. See the Users documentation page for information on using the
sudocommand. - Google BigQuery connections that are configured for OAuth authentication don't support query killing.
Configuring a BigQuery database project for OAuth
The following sections describe how to generate OAuth credentials and how to configure an OAuth consent screen.
In the following cases, you don't need to perform these procedures:
- If you've already configured an OAuth consent screen for another application in your project, you won't need to create another — you configure only one consent screen for all applications in a project. In this case, you can go right to the procedure for configuring the Looker (Google Cloud core) connection to your database.
If you're on a Looker (Google Cloud core) instance, Looker can use the OAuth application credentials that your Looker admin used when they created the Looker (Google Cloud core) instance. If you're using the same OAuth application credentials as your Looker (Google Cloud core) instance, you can skip the procedures in this section and the Configuring the Looker connection for BigQuery with OAuth section and instead follow the steps in the Looker (Google Cloud core) documentation for using OAuth with BigQuery.
OAuth credentials and the OAuth consent screen must be configured in the Google Cloud console. The Google generic description is on the Google Cloud support site and on the Google Dev console site.
Depending on the type of users who are accessing BigQuery data in Looker and whether your BigQuery data is public or private, OAuth may not be the most appropriate authentication method. Likewise, the type of data requested from the user and degree of access needed to that user's data when they're authenticating in to Google to use Looker may require verification by Google. See more about verification in the Generating Google OAuth credentials section on this page.
Generating Google OAuth credentials
Go to the Google Cloud console.
In the Select a project drop-down, navigate to your BigQuery project. This should take you to your project dashboard.
In the left menu, select the APIs & Services page. Then select Credentials. On the Credentials page, select the down arrow in the Create credentials button, and select OAuth client ID from the drop-down menu:
Google requires that you configure an OAuth consent screen, which lets your users choose how to grant access to their private data, before you can generate your OAuth credentials. To configure your OAuth consent screen, see the Configuring an OAuth consent screen section on this page.
If you've already configured an OAuth consent screen, Google displays the Create OAuth client ID page, which lets you create an OAuth client ID and secret to use in your BigQuery connection to Looker. From the Application type drop-down, select Web application. The page will expand and display additional options:
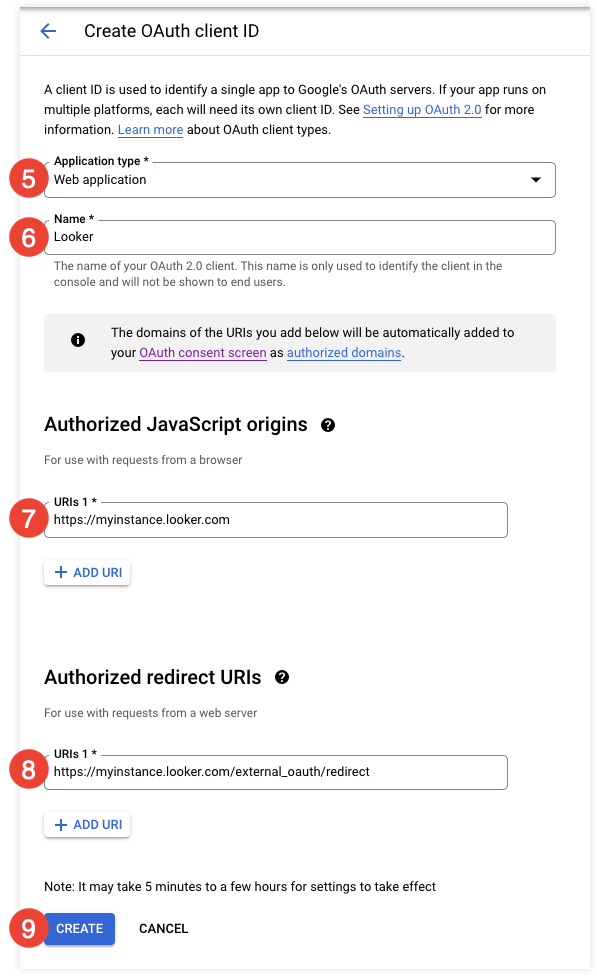
In the Name field, enter a name for the app, such as Looker.
In the Authorized JavaScript origins section, select + ADD URI to display the URIs 1 field. In the URIs 1 field, enter the URL to your Looker instance, including the
https://. For example:- If Looker hosts your instance:
https://<instancename>.looker.com - If you have a customer-hosted Looker instance:
https://looker.<mycompany>.com - If your Looker instance requires a port number:
https://looker.<mycompany>.com:9999
- If Looker hosts your instance:
In the Authorized redirect URIs section, select + ADD URI to display the URIs 1 field. In the URIs 1 field, enter the URL to your Looker instance, followed by
/external_oauth/redirect. For example:https://<instancename>.looker.com/external_oauth/redirectorhttps://looker.<mycompany>.com:9999/external_oauth/redirect.Select Create. Google displays your Client ID and your Client Secret.
Copy your client ID and your client secret values. You will need them to configure the OAuth for the BigQuery connection in Looker.
Configuring an OAuth consent screen
Google requires that you configure an OAuth consent screen, which lets your users choose how to grant access to their private data and provides a link to your organization's terms of service and privacy policy.
In the left menu, select the OAuth consent screen page. Before you can configure your OAuth consent screen, you must choose the type of users to whom you're making this app available. Depending on your selection, your app may require verification by Google.
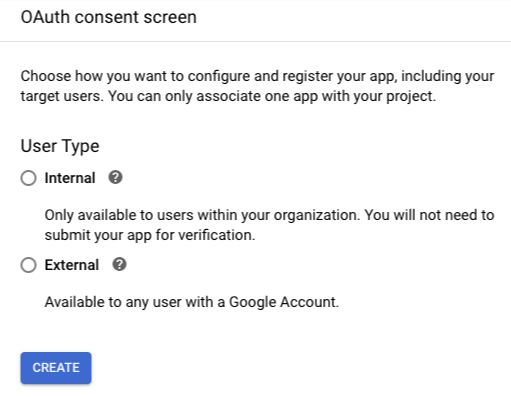
Make your selection and select Create. Google displays the OAuth consent screen page. You can configure this screen for all applications in your project, including both internal and public applications.
Google will perform a verification for public applications if any of these are true:
- The application uses Google APIs that use restricted or sensitive scopes.
- The OAuth consent screen includes an application logo.
- The project has exceeded the domain threshold.
Do the following to configure your OAuth consent screen:

In the App name field, enter the name of the application that the user is granting access to — in this case, Looker.
In the User support email field, enter the support email that users should contact with login or consent issues.
Select ADD DOMAIN to reveal the Authorized domain 1 field. In this field, enter the domain of the URL to your Looker instance. For example, if Looker hosts your instance at
https://<instance_name>.cloud.looker.com, the domain islooker.com. For customer-hosted Looker deployments, enter the domain on which you host Looker.In the Developer contact information section, enter one or more email addresses that Google can use to contact you about your project.
The remaining fields are optional, but you can use them to further customize your consent screen.
Select SAVE AND CONTINUE.
Google displays the Scopes page, where you can configure scopes. Looker requires only the default scopes, so no additional scope configuration is required. Select SAVE AND CONTINUE.
On the Summary page, select BACK TO DASHBOARD.
You can now continue the procedure for generating your OAuth credentials.
For more information about configuring the Google OAuth consent screen, see the Google support documentation.
Configuring the Looker connection for BigQuery with OAuth
To enable OAuth for your BigQuery connection, select the OAuth option on the Looker Connection page when you are setting up the Looker connection to BigQuery. When you select the OAuth option, Looker will display the OAuth Client ID and OAuth Client Secret fields. Paste in the Client ID and Client Secret values that you obtained as a step in the Generating Google OAuth credentials procedure on this page.
There are some Google Workspace admin settings that can interrupt BigQuery OAuth:
- Session length: If you have set a session length for BigQuery OAuth, to avoid Looker session timeouts you will need to use the Exempt Trusted Apps feature to add Looker to your trusted apps. Refer to the Set session length for Google Cloud services help article to view the steps for this procedure.
- Context-Aware Access settings: Check the Google Workspace Context-Aware Access settings for anything that might block specific users from completing the OAuth flow. Refer to the Protect your business with Context-Aware Access help article for information on Context-Aware Access.
How Looker users authenticate in to BigQuery with OAuth
Once the Looker connection to BigQuery is set up for OAuth, users can use Looker to perform their initial authentication into your BigQuery database by doing one of the following:
- Authenticating in to Google from a Looker query that uses the BigQuery connection
- Authenticating in to Google from the OAuth Connection Credentials section on their Looker Account page
Authenticating in to Google from a query
Once the Looker connection to BigQuery is set up for OAuth, Looker will prompt users to sign in with their Google Account before running queries that use the BigQuery connection. Looker shows this prompt from Explores, dashboards, Looks, and SQL Runner.
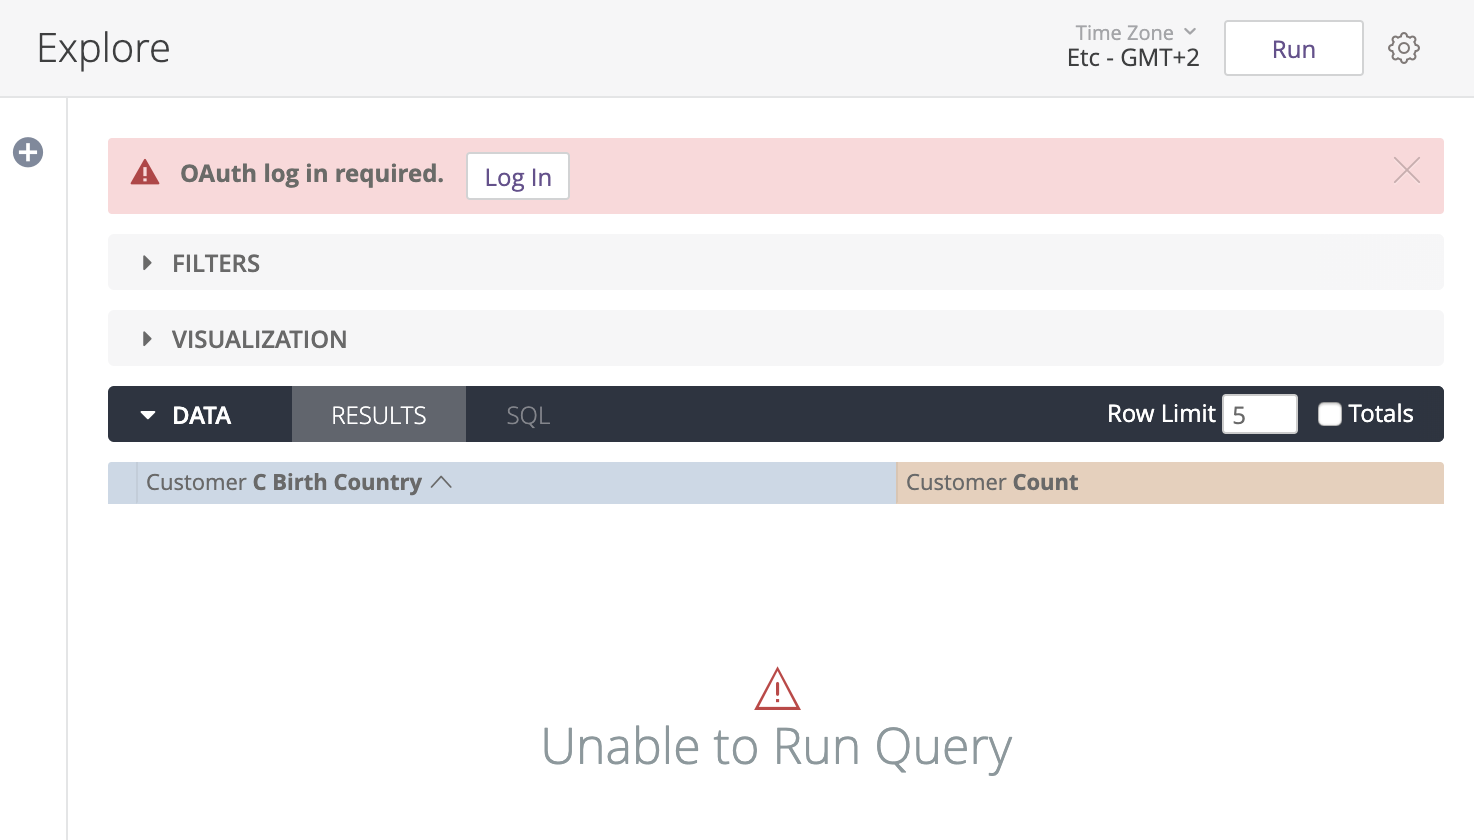
The user must select Log In and authenticate with OAuth. After the user authenticates into BigQuery, the user can select the Run button in the Explore and Looker will load the data into the Explore.
Authenticating in to Google from the user account page
Once the Looker connection to BigQuery is set up for OAuth, a user can authenticate into their Google Account from the Looker user account page:
- From Looker, select the profile icon and select Account from the user menu.
- Go to the OAuth Connection Credentials section, and select the Log In button for the appropriate BigQuery database connection.
- Select the appropriate account from the Sign in with Google page.
- Select Allow on the OAuth consent screen to allow Looker to view and manage your data in Google BigQuery.
Once you authenticate in to Google through Looker, you can log out or reauthorize your credentials at any time through your Account page, as described on the Personalizing your user account documentation page. Although Google BigQuery tokens don't expire, a user may select Reauthorize to sign in with a different Google Account.
Revoking OAuth tokens
Users can revoke access from applications like Looker to the Google Account by visiting their Google Account settings.
Google BigQuery tokens don't expire; however, if a database admin changes the database connection's OAuth credentials in a way that invalidates the existing credentials, users will have to sign in with their Google Account again before running any queries that use that connection.
Persistent derived tables on a BigQuery connection
If you want to use persistent derived tables (PDTs) for your BigQuery connection, you may need to do the following, depending on your connection configuration:
- Use the Google Cloud console to create a temporary dataset in your BigQuery database that Looker can use to write PDTs. See the Creating a temporary dataset for persistent derived tables section on this page for the procedure. This step is required for PDTs, regardless of the other configuration options on the connection.
- Use the API Manager in the Google Cloud console to create a separate service account for Looker's PDT processes. See the section Creating a service account and downloading the JSON credentials certificate on this page for the procedure. The type of authentication on your connection affects whether a PDT service account is required, and also where you enter the PDT service account information in Looker's Connections window when you set up the Looker connection to BigQuery:
- If your connection uses OAuth for user authentication, you must create a separate service account for PDT processes. You will enter the service account information and the certificate file details in the PDT Overrides section of Looker's Connections window. Looker's Connections window displays the PDT Overrides section automatically when you turn on the Enable PDTs toggle for a connection that is also configured with the OAuth option in the Authentication field. See the Enabling PDTs for Looker connections to BigQuery with OAuth section for more information.
- If your connection uses service accounts for user authentication, you have the option of creating a separate service account for PDT processes. If you choose to have a separate PDT service account, you will enter the service account information in the PDT Overrides section for the Service Account Email, Service Account JSON/P12 File, and Password fields of Looker's Connections window. The PDT Overrides section appears when you turn on the Enable PDTs toggle for a Looker connection to BigQuery using service account authentication.
Creating a temporary dataset for persistent derived tables
To enable persistent derived tables (PDTs) for your BigQuery connection, turn on the Enable PDTs toggle on the Looker Connection page when you are setting up the Looker connection to BigQuery. When you enable PDTs, Looker will display the Temp Project and Temp Database fields. In these fields, you'll enter the project ID and dataset name that Looker can use to create PDTs. You should configure the database or schema in advance with the appropriate write permissions.
You can set up a temporary dataset using the Google Cloud console:
Open the Google Cloud console and select your project.
Select the three-dot menu, and then select Create dataset.
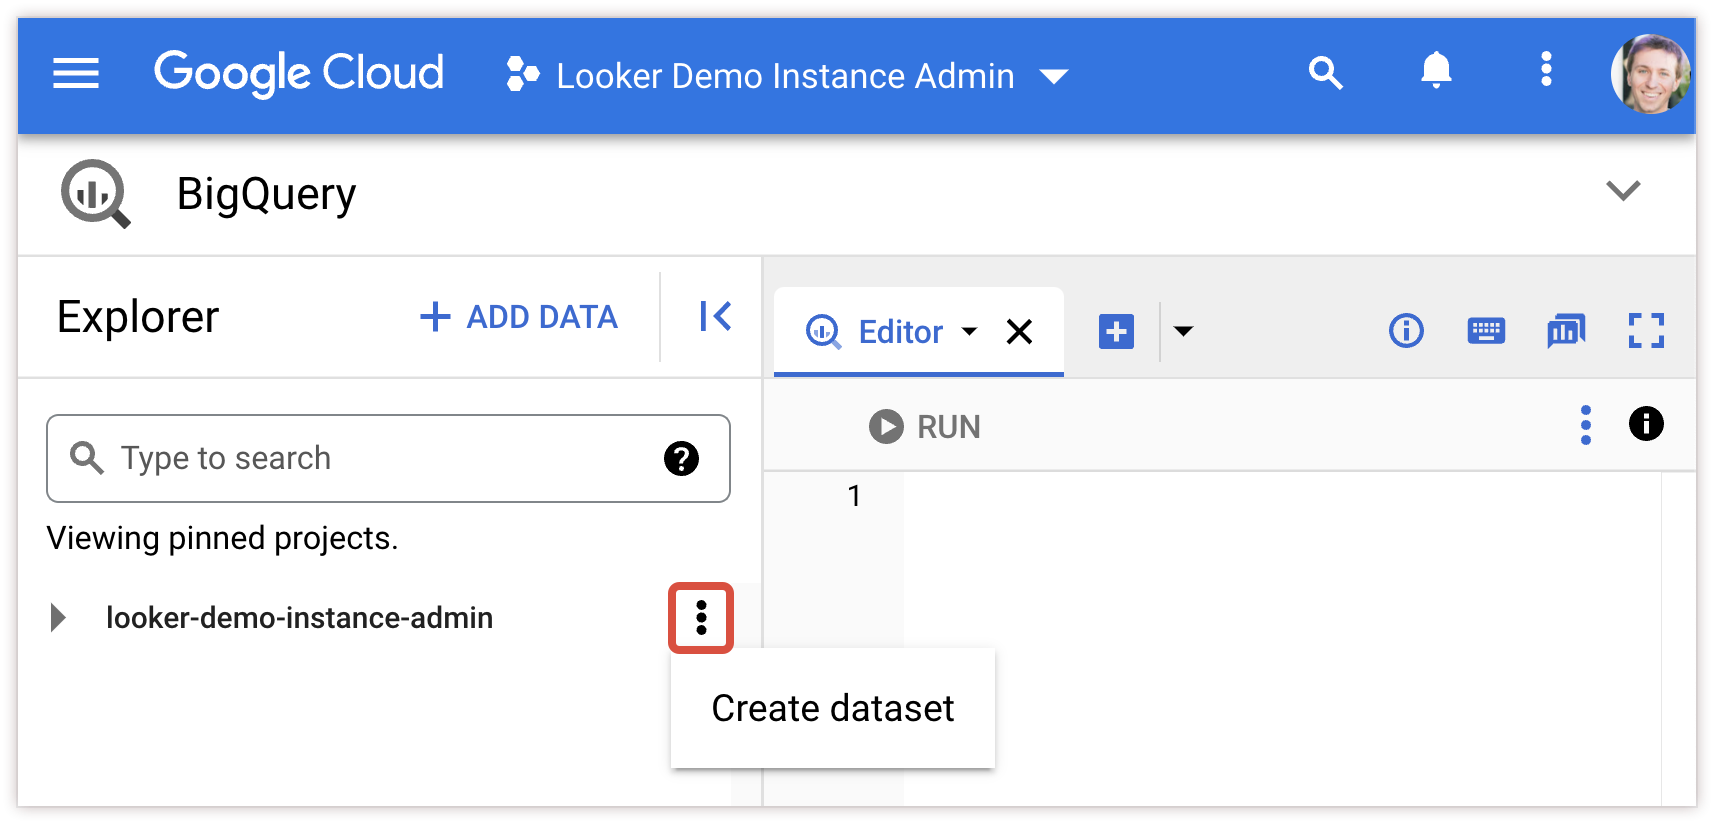
Enter a Dataset ID (typically
looker_scratch), and then select your Data location (optional), Default table expiration, and encryption key management solution. Select CREATE DATASET to finish.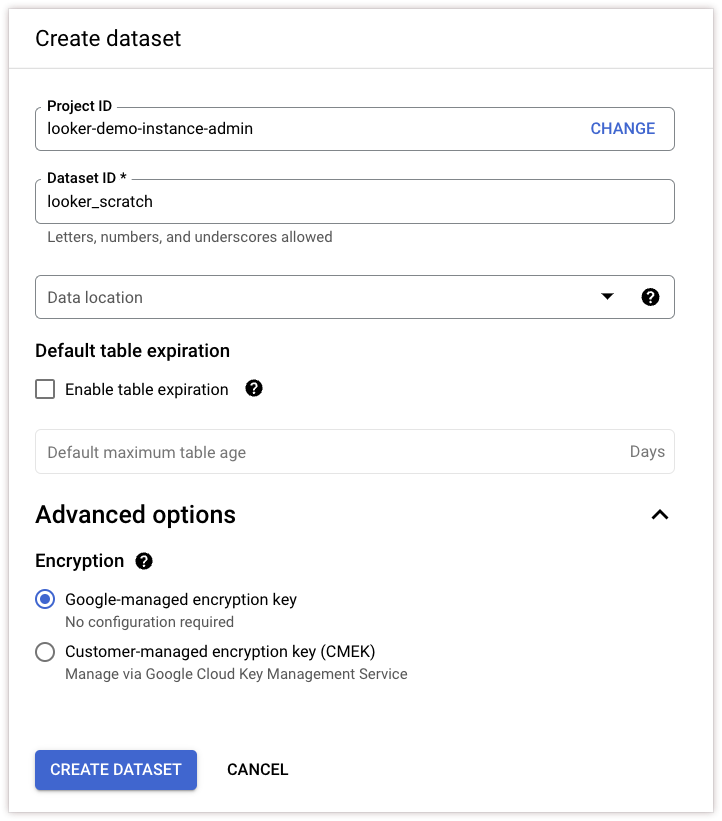
Now that you have created the dataset, you can specify the project and dataset in the Temp Project and Temp Database fields of the Looker Connections window when you set up the Looker connection to BigQuery.
Enabling PDTs for Looker connections to BigQuery with OAuth
For BigQuery connections that use OAuth, your users authenticate into Looker with their OAuth credentials. Looker supports PDTs for BigQuery connections with OAuth, but Looker itself cannot use OAuth, so you must set up a BigQuery service account specifically to allow Looker to access your database for PDT processes.
You can set up a PDT service account on your BigQuery database using the Google Cloud API Manager. See the Creating a service account and downloading the JSON credentials certificate section on this page.
Once you create the service account on your BigQuery database, enter the service account information and the certificate file details in the PDT Overrides section of Looker's Connections window when you set up the Looker connection to BigQuery. See the PDT Overrides section for information about the PDT Overrides fields.
PDT Overrides
For BigQuery connections that use OAuth, and for connections where you want to use different credentials, datasets, or billing projects for your PDTs, you can enable the PDT Overrides toggle to enter different information that is specific to PDTs on your connection. (See the PDT Overrides section of the Connecting Looker to your database documentation page for more information on why PDT overrides can be helpful.)
If you have turned on the Enable PDTs toggle for a connection, the Looker Connections window displays the Enable PDT Overrides toggle. Turn on the Enable PDT Overrides toggle and use the following fields in the PDT Overrides section to enter the information for the service account that Looker can use for PDT processes on your database:
PDT Override Billing Project ID: Specify the project to use for billing for PDT build and maintenance queries (trigger check queries). Queries against the PDT will still use the billing project specified in the Billing Project ID field of the general settings. The PDT override billing project is never used for storage, only for billing. If you're going to use this field, the service account must have at minimum the bigquery.jobUser role.
PDT Override Dataset: The name of the dataset that you want Looker to use for PDTs on the connection.
PDT Override Service Account file: Use the Upload File button to upload the certificate file for the BigQuery service account that you want to use for PDT processes on the connection. You can get this file from the Google Cloud API Manager as a step in the Creating a service account and downloading the JSON credentials certificate procedure. The service account that you use for the PDT dataset needs to have read and write access.
Username: This field applies only if you upload a P12 file in the PDT Override Service Account file field of the PDT Overrides section. Enter the email address for the BigQuery service account that you want to use for PDT processes on the connection. You can get this email address from the Google Cloud API Manager as a step in the Creating a service account and downloading the JSON credentials certificate procedure.
Password: This field applies only if you upload a P12 file in the PDT Override Service Account file field of the PDT Overrides section. Enter the password to the .p12 credentials file for the BigQuery service account that you want to use for PDT processes on the connection.
PDT Override Additional JDBC Parameters: Add any additional JDBC parameters that should be used for the PDTs on the connection, such as BigQuery labels (see the Job labels and context comments for BigQuery connections section on this page for more information). The following are some of the other supported parameters:
connectTimeout: Number of milliseconds to wait for a connection. Defaults to 240000.readTimeout: Number of milliseconds to wait for a read. Defaults to 240000.rootUrl: If you have a BigQuery instance in a private network, specify an alternate endpoint to connect to BigQuery other than the default public endpoint.
Connecting Looker to BigQuery
You create a database connection in Looker on the Connect your database to Looker page. There are two options for opening the Connect your database to Looker page:
- Select Connections from the Database section in the Admin panel. On the Connections page, click the Add Connection button.
- Click the Create button in the main navigation panel, and then select the Connection menu item.
Fill out the connection details. The majority of these settings are common to most database dialects and are described on the Connecting Looker to your database documentation page. The following settings are mentioned either to highlight them or to clarify how they apply specifically to BigQuery connections:
SQL Dialect: Select Google BigQuery Standard SQL or Google BigQuery Legacy SQL.
Project scope: Select whether the connection should be able to be used with all projects or with only one project. See the Connecting Looker to your database page for more information.
Enable SSH Server: For instances that are deployed on Kubernetes infrastructure and have the ability to add SSH server configuration information, you can turn on the Enable SSH Server toggle to configure the SSH Server and SSH Tunnel fields. See the Connecting Looker to your database page for more information.
Billing Project ID: The project ID (unique identifier) of the Google Cloud billing project. The billing project is the Google Cloud project that gets billed, but you can still query datasets in a different Google Cloud project if your LookML developers specify fully scoped table names in the
sql_table_nameparameter of your LookML views, Explores, or joins. For BigQuery, a fully scoped table name uses the format<project_name>.<dataset_name>.<table_name>. Without a fully scoped reference, BigQuery looks for the table in the billing project and dataset that you specify in Looker's Connections page for the BigQuery connection to Looker. See the BigQuery documentation for an explanation of the resource hierarchy in BigQuery.Storage Project ID: The project ID of the storage project, if you separate compute and storage in different projects. You can query datasets in a different Google Cloud project if your LookML developers specify fully scoped table names in the
sql_table_nameparameter of your LookML views, Explores, or joins. For BigQuery, a fully scoped table name uses the format<project_name>.<dataset_name>.<table_name>. Without a fully scoped reference, BigQuery looks for the table in the billing project and dataset that you specify in Looker's Connections page for the BigQuery connection to Looker. See the BigQuery documentation for an explanation of the resource hierarchy in BigQuery.Primary Dataset: The name of the dataset that you want Looker to default to when it queries your database. The default dataset must be located within the billing project that is specified for the connection; you cannot enter a value such as
project_name.dataset_namein the Database field to specify a dataset in a different project.Your LookML project can access tables in other datasets (including tables in public datasets) if your LookML developers specify fully scoped table names in the
sql_table_nameparameter of your LookML views, Explores, or joins. For BigQuery, a fully scoped table name uses the format<project_name>.<dataset_name>.<table_name>. To query a table in another dataset, the table must be accessible by the service account (for connections that use service account authentication) or by the user running the query (for connections that use OAuth authentication). If your LookML code does not specify fully scoped table names, BigQuery will search for the table in the dataset that you specify in the Dataset field of the BiqQuery connection.If your project doesn't have any datasets (which may be the case if you separate compute and storage in separate projects), you can provide an arbitrary Dataset value, but then you must always use fully scoped table names in your LookML.
Authentication: The type of authentication that Looker will use to access your database. Some of these options are supported only for Looker (Google Cloud core) instances:
- Application Default Credentials: (Looker (Google Cloud core) only) Select this option to use Application Default Credentials (ADC) to authenticate into your database (see the Looker (Google Cloud core) documentation for more information).
- Service Account: Select this option to use a BigQuery service account for Looker to authenticate into your database (see the Authentication with BigQuery service accounts for more information). When Service Account is selected, you will see the following fields:
- Upload service JSON or P12 File: Use the Upload File button to upload the certificate file for the BigQuery service account. You can get this file from the Google Cloud API Manager as a step in the Creating a service account and downloading the JSON credentials certificate procedure.
- Service Account Email: This field applies only if you upload a P12 file in the Upload service JSON or P12 File field. Enter the email address for the BigQuery service account, which you get from the Google Cloud API Manager as a step in the Creating a service account and downloading the JSON credentials certificate procedure.
- Password: The password for the P12 credentials file for the BigQuery service account. The Password field applies only if you upload a P12 file in the Upload service JSON or P12 File field.
OAuth: Select this option to enable each Looker user to authenticate into Google BigQuery and authorize Looker to access the database with the user's BigQuery account. See the Authentication with OAuths section on this page for more information on implementing OAuth for your BigQuery connection. When OAuth is selected, you will see the following fields:
- OAuth Client ID: The OAuth client ID. You get this information from the Google Cloud console as a step in the Generating Google OAuth credentials procedure.
- OAuth Client Secret: The OAuth client secret. You get this information from the Google Cloud console as a step in the Generating Google OAuth credentials procedure.
Max connections per node: The maximum number of connections that Looker can establish with your database. See the Connecting Looker to your database documentation page for more information.
Connection Pool Timeout: If your users request more connections than the Max connections per node setting is configured for, the requests will wait for others to finish before they are executed. The Connection Pool Timeout is the maximum amount of time that a request will wait. See the Connecting Looker to your database documentation page for more information.
Max concurrent queries for this connection: The maximum number of concurrent queries Looker can submit to your database connection at once. See the Connecting Looker to your database documentation page for more information.
Max concurrent queries per user for this connection: The maximum number of concurrent queries Looker will submit to this database connection at once for each user. See the Connecting Looker to your database documentation page for more information.
Max Billing Gigabytes: On BigQuery connections, you are charged for each query based on its size. To help prevent users from accidentally running a query that is too expensive, you can set a maximum number of gigabytes that a user is allowed to pull in a single query. You can leave the Max Billing Gigabytes field blank if you aren't limiting query size. See the BigQuery pricing page for more information.
Additional JDBC parameters: Add any additional JDBC parameters, such as BigQuery labels (see the Job labels and context comments for BigQuery connections section on this page for more information.) These are some of the other supported parameters:
connectTimeout: Number of milliseconds to wait for a connection. Defaults to 240000.readTimeout: Number of milliseconds to wait for a read. Defaults to 240000.rootUrl: If you have a BigQuery instance in a private network, specify an alternate endpoint to connect to BigQuery other than the default public endpoint.
Maintenance Schedule: The
croninterval for the Looker regenerator. See the Connecting Looker to your database documentation page for more information.Disable Context: This option disables context comments on a BigQuery connection. Context comments on Google BigQuery connections are disabled by default because context comments invalidate Google BigQuery's ability to cache and can negatively impact cache performance. You can enable context comments for a BigQuery connection by turning off the Disable Context toggle. See the Job labels and context comments for BigQuery connections section for more information.
SSL: Enable the toggle to use SSL encryption to protect data as it passes between Looker and your database. See the Connecting Looker to your database documentation page for more information.
Precache tables and columns: If you want SQL Runner to not preload table information and, instead, to load table information only when a table is selected, clear this option. See the Precache tables and columns section of the Connecting Looker to your database page for more information.
Fetch and cache schema: If you know that your information schema is slow, you can disable the Fetch and cache schema option for your connection. Disabling this feature will prevent some of the Looker SQL optimization for certain features, so you should enable the Fetch and cache schema option unless you know that your connection's information schema is particularly slow. See the Connecting Looker to your database documentation page for more information.
Enable PDTs: Enable this toggle to allow persistent derived tables (PDTs) on the connection. See the Persistent derived tables on a BigQuery connection section on this page for more information. You will need to specify the temporary dataset on your database that Looker will use to write PDTs. See the Creating a temporary dataset for persistent derived tables section on this page for the procedure. Note: If your connection is configured for OAuth, you will need to use the PDT Overrides section to specify a service account that Looker can use for PDT processes on your BigQuery connection. See the Enabling PDTs for Looker connections to BigQuery with OAuth section for details.
Temp Project: The project ID of the project that contains the dataset you want to use to write PDTs. If a Temp Project is not specified, then Looker writes PDTs to the project specified in the Storage Project ID field of the Database Settings section of the connection settings. If a Storage Project ID is not specified, then Looker writes PDTs to the project specified in the Billing Project ID field of the Database Settings section of the connection settings.
Temp Database: The BigQuery dataset that you created in the Google Cloud console to allow Looker to write persistent derived tables to your database. See the Creating a temporary dataset for persistent derived tables section for the procedure.
Max Number of PDT Builder Connections: The maximum number of concurrent table builds that the Looker regenerator can initiate on your database connection. See the Connecting Looker to your database documentation page for more information.
Retry failed PDT builds: When the Retry Failed PDT Builds toggle is enabled, the Looker regenerator will attempt to rebuild a PDT that failed in the previous regenerator cycle, even if the PDT's trigger condition is not met. See the Connecting Looker to your database documentation page for more information.
PDT API Control: This toggle determines whether the
start_pdt_build,check_pdt_build, andstop_pdt_buildAPI calls can be used for this connection. See the Connecting Looker to your database documentation page for more information.Enable PDT Overrides: Enable this toggle to configure separate connection settings that Looker should use for writing PDTs to your database. See the PDT Overrides section on this page for more information on the PDT Overrides fields.
Database Time Zone: The default time zone for BigQuery is UTC. The time zone setting that you specify here needs to match your BigQuery time zone setting. See the Database Time Zone section of the Connecting Looker to your database page for more information.
Query Time Zone: See the Query Time Zone section of the Connecting Looker to your database page for more information.
Once you fill in all the applicable fields for the connection, you can test your connection as needed.
To save these settings, click Connect.
Testing the connection
You can test your connection settings from a couple of places in the Looker UI:
- Select the Test button at the bottom of the Connections Settings page, as described on the Connecting Looker to your database documentation page.
- Select the Test button by the connection's listing on the Connections admin page, as described on the Connections documentation page.
For new connections, if Looker displays Can connect, then select Add connection. Looker will run the rest of the connection tests to verify that the service account was set up correctly and with the proper roles.

Testing a connection that uses OAuth
- In Looker, go into Development Mode.
- For an existing BigQuery connection that uses OAuth, navigate to the project files for a Looker project that uses your BigQuery connection. For new BigQuery connections that use OAuth, open a model file and replace the model's
connectionvalue with the name of the your new BigQuery connection, and then save the model file. - Open one of the model's Explores or dashboards and run a query. When you try to run a query, Looker will prompt you to log in with your Google Account. Follow the Google OAuth login prompts.
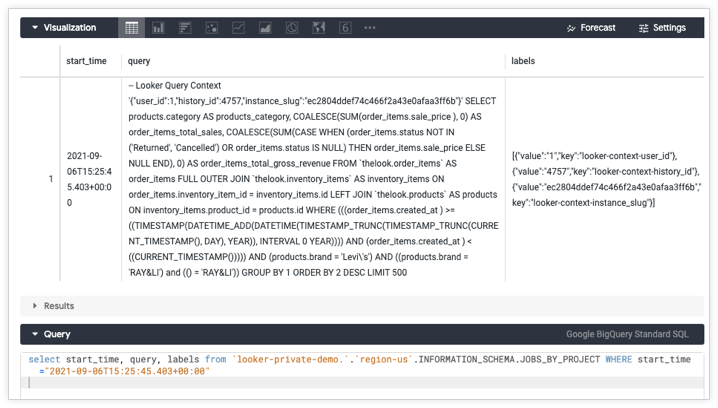
Job labels and context comments for BigQuery connections
For BigQuery connections, Looker sends query context in the form of BigQuery job labels. By default, Looker sends the following context label keys for BigQuery connections:
looker-context-user_id: The unique identifier for each user on the Looker instance. You can match this user ID to the user IDs on the Users page in the Admin menu.looker-context-history_slug: The unique identifier for each query that is run on the database by the Looker instance.looker-context-instance_slug: The ID number of the Looker instance that issued the query. Looker support can use this information to help you troubleshoot, if necessary.
You can configure additional job labels for Looker to send with every query on the BigQuery connection by using the Additional JDBC parameters text field of the Connections page. In the Additional JDBC parameters field, add an additional JDBC parameter, labels, and provide a comma-separated list of URL-encoded key=value pairs. For example, if you include this in the Additional JDBC parameters field:
labels=this%3Dconnection-label,that%3Danother-connection-label
The %3D is the URL-encoding for =, so this would add the following two labels to every query that Looker sends to the BigQuery database, in addition to the default Looker context labels:
this:connection-labelthat:another-connection-label
Note that BigQuery has restrictions on job labels:
- Any connection label that has the same key as a context label will be ignored.
- If the union of connection labels and context labels exceeds the maximum of 64 total labels, context labels are the first to be dropped, followed by connection labels, until the total number of labels is at most 64.
Looker ensures that context labels conform to all BigQuery's label validity requirements, but does not check connection labels for validity. Configuring invalid connection labels may cause queries to fail.
The BigQuery job labels that Looker sends by default (looker-context-user_id, looker-context-history_id, and looker-context-instance_slug) correspond to the SQL context comments that Looker attaches to SQL queries for database dialects other than BigQuery. For BigQuery connections, context comments are disabled by default because they invalidate BigQuery's ability to cache, and can negatively impact cache performance. You can enable context comments for a BigQuery connection by turning off the Disable Context toggle for the BigQuery connection. We recommend that you keep the default setting for Disable Context Comment, so that you are able to use BigQuery's cache. But if you deselect the Disable Context Comment option for a BigQuery connection, Looker will send SQL context comments and BigQuery job labels to your database.
SQL context comments and BigQuery job labels convey the same information. For example, Looker might generate the following SQL context comments for a query:
-- Looker Query Context

'{"user_id":1,"history_id":4757,"instance_slug":"ec2804ddef74c466f2a43e0afaa3ff6b"}'
Then Looker would generate the following BigQuery job labels for the same query:
[{"value":"1","key":"looker-context-user_id"},

 {"value":"4757","key":"looker-context-history_id"},

 {"value":"ec2804ddef74c466f2a43e0afaa3ff6b","key":"looker-context-instance_slug"}]
Feature support
For Looker to support some features, your database dialect must also support them.
Google BigQuery Standard SQL
Google BigQuery Standard SQL supports the following features as of Looker 25.20:
| Feature | Supported? |
|---|---|
| Support level | Supported |
| Looker (Google Cloud core) | Yes |
| Symmetric aggregates | Yes |
| Derived tables | Yes |
| Persistent SQL derived tables | Yes |
| Persistent native derived tables | Yes |
| Stable views | Yes |
| Query killing | Yes |
| SQL-based pivots | Yes |
| Timezones | Yes |
| SSL | Yes |
| Subtotals | Yes |
| JDBC additional params | Yes |
| Case sensitive | Yes |
| Location type | Yes |
| List type | Yes |
| Percentile | Yes |
| Distinct percentile | Yes |
| SQL Runner Show Processes | No |
| SQL Runner Describe Table | No |
| SQL Runner Show Indexes | No |
| SQL Runner Select 10 | Yes |
| SQL Runner Count | Yes |
| SQL Explain | No |
| OAuth 2.0 credentials | Yes |
| Context comments | Yes |
| Connection pooling | No |
| HLL sketches | Yes |
| Aggregate awareness | Yes |
| Incremental PDTs | Yes |
| Milliseconds | Yes |
| Microseconds | Yes |
| Materialized views | Yes |
| Period-over-period measures | Yes |
| Approximate count distinct | Yes |
Google BigQuery Legacy SQL
Google BigQuery Legacy SQL supports the following features as of Looker 25.20:
| Feature | Supported? |
|---|---|
| Support level | Supported |
| Looker (Google Cloud core) | Yes |
| Symmetric aggregates | Yes |
| Derived tables | Yes |
| Persistent SQL derived tables | Yes |
| Persistent native derived tables | Yes |
| Stable views | No |
| Query killing | Yes |
| SQL-based pivots | Yes |
| Timezones | No |
| SSL | Yes |
| Subtotals | No |
| JDBC additional params | Yes |
| Case sensitive | Yes |
| Location type | Yes |
| List type | Yes |
| Percentile | Yes |
| Distinct percentile | Yes |
| SQL Runner Show Processes | No |
| SQL Runner Describe Table | No |
| SQL Runner Show Indexes | No |
| SQL Runner Select 10 | Yes |
| SQL Runner Count | Yes |
| SQL Explain | No |
| OAuth 2.0 credentials | Yes |
| Context comments | Yes |
| Connection pooling | No |
| HLL sketches | No |
| Aggregate awareness | Yes |
| Incremental PDTs | No |
| Milliseconds | Yes |
| Microseconds | Yes |
| Materialized views | No |
| Period-over-period measures | No |
| Approximate count distinct | Yes |
Next steps
After you've connected your database to Looker, configure sign-in options for your users.