LookML project files are organized into folders in the file browser section of the Looker IDE. This page provides instructions for creating and managing folders and files in a LookML project.
For information about the structure and purpose of each type of file in a LookML project, see the Types of files in a LookML project documentation page.
Important file and folder naming conventions
When you're creating files and folders, keep the following naming conventions in mind:
- Case sensitivity: LookML is case sensitive. Be sure to adhere to your project's conventions when naming your folders. For example, if your convention is to use all lowercase letters in your project, you would want to name your folder
viewsinstead ofViews. This makes a difference especially when you need to specify a file's path, such as when including files. Generally, it's a good idea to consistently use lowercase letters when you name LookML objects and folders. - Spaces and special characters: Filenames cannot include spaces or any of the following characters:
/?*:|"<>% - File extensions: When creating LookML files with the Looker IDE, Looker will automatically add the
.lkmlextension to the end of the filename if you don't include the extension manually. For example, if you enter the filenameflights_data_tests, Looker will name the fileflights_data_tests.lkml. - Changing the displayed name of a LookML object: If you want to change the displayed name of a model or LookML object, consider using the
labelparameter or thealiasparameter instead of renaming the file or object. Thelabelandaliasparameters change the displayed name while preserving the underlying URL used for emails or other systems. In general, you should take precautions to make model changes as noninvasive as possible. If you do need to rename a model or an object, use the Content Validator to update all references to the model or object.
Creating folders
You can create folders for different file types (such as view files or model files). You can even create subfolders, which is very useful if you want to include a subset of your views.
To create a folder:
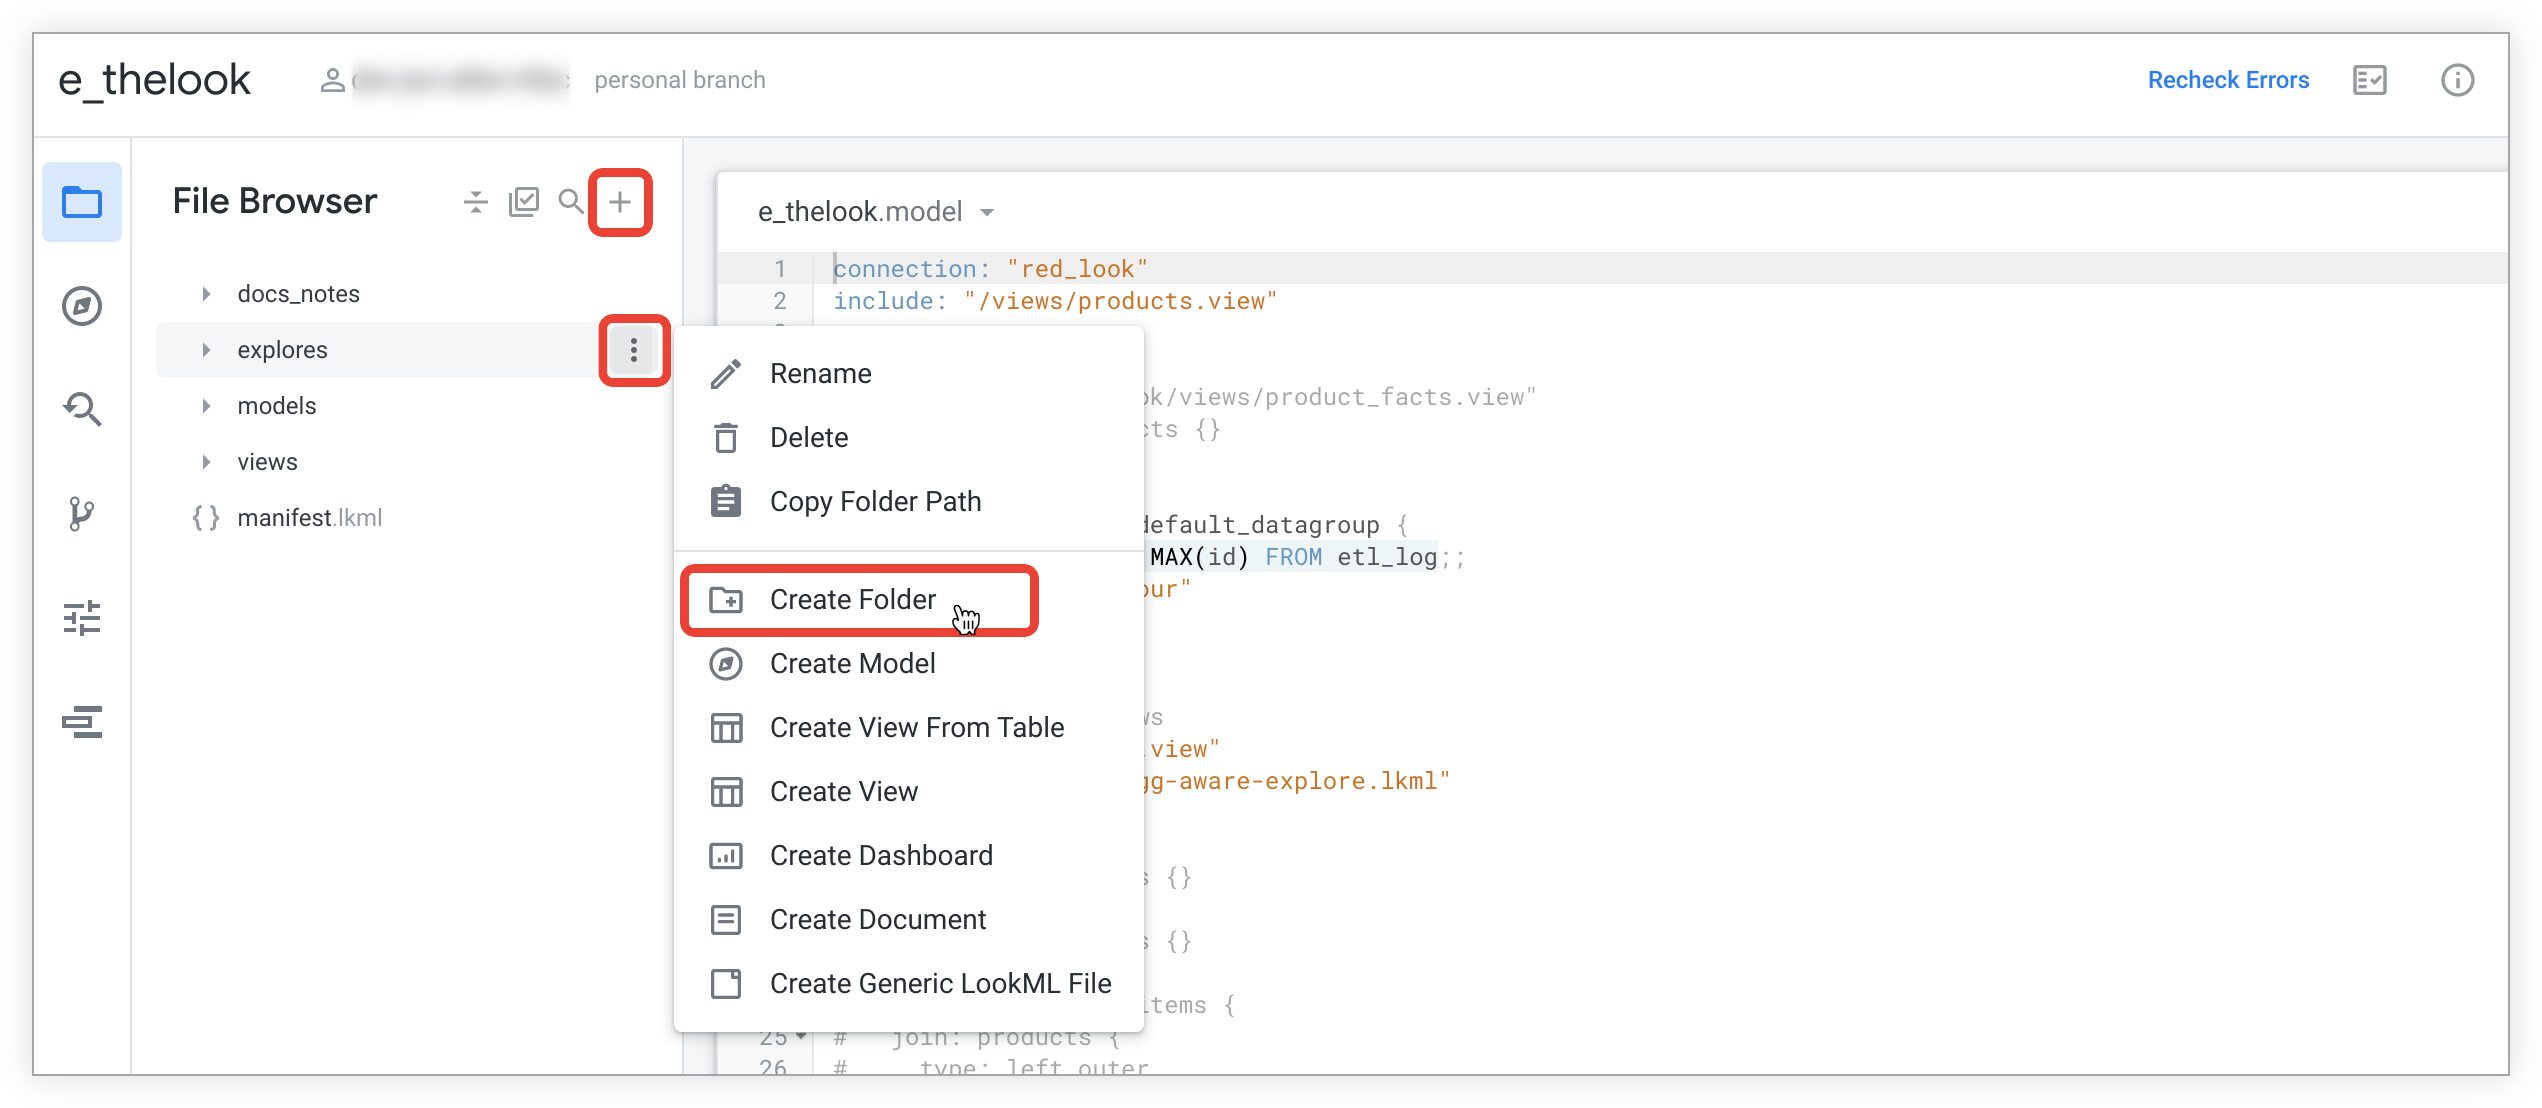
- Select the Create Folder option from the appropriate menu:
- To create a new folder at the top level of your directory structure, use the Add file or folder menu, which you can access by selecting the + (plus) icon at the top of the File Browser panel.
- To create a new subfolder under an existing folder, use the three-dot Folder Options menu for the existing folder.
- Enter a name for the new folder.
- Select Create.
The new folder is added to the navigation pane.
Creating files
Looker automatically creates a model file and view files that are based on your database when you generate a model. For existing projects, you can create new files manually.
To create a new file in your LookML project:
Select the appropriate menu:
- To create a new file at the top level of your directory structure, use the Add file or folder menu, which you can access by selecting the + (plus) icon at the top of the File Browser panel.
- To create a new file under an existing folder, use the three-dot Folder Options menu for the existing folder.
Select the type of LookML file that you want to create. Select the links in the following list for a more detailed description of each type of file. You can create the following types of files:
- Model files with the file extension
.model.lkml - View files with the file extension
.view.lkml(see the Considerations for creating view files section for more information) - Project manifest files that are always named
manifest.lkml(see the Considerations for creating files section for more information) - Dashboard files with the file extension
.dashboard.lookml - Document files with the file extension
.md - Locale strings files with the file extension
.strings.json(see the Considerations for creating files section for more information) - Generic LookML files, which are used for the following types of files:
- Explore files with the file extension
.explore.lkml(see the Considerations for creating files section for more information) - Data test files with the file extension
.lkml - Refinements files with the file extension
.lkml - Any other files you're using to house LookML elements
- Explore files with the file extension
- Model files with the file extension
In the Create File dialog, enter a name for the new file. See the important file and folder naming conventions section for limitations and guidelines for naming your files.
Select Create. The new file will be displayed where you created it. You can move it to another folder if necessary.
Considerations for creating files
Keep the following considerations in mind when you're creating files:
- It is recommended that you use the Looker IDE to add files to your LookML project, either by creating them in the Looker IDE or by uploading them in the Looker IDE. If you instead create files outside of the Looker IDE and then use the Looker IDE to Pull from (production branch), be sure to use the correct naming conventions and include the
.lkmlextension in the filename (orexplore.lkmlfor Explore files). If a filename includes unsupported characters, the Looker IDE file browser will show the filename in red, and you won't be able to see the contents of the file until you rename the file with supported characters. In addition, the Looker IDE won't display the file at all if the file does not have the.lkmlextension. - Once you create a file, be sure to use the
includeparameter if you want to reference elements from the file in other LookML files of your project. See theincludeparameter documentation page for more information. - If you create a file that is nested under seven or more folders, the File Explorer won't display the file.
- A model file must have a unique name across all projects on your instance. If your instance contains two
.model.lkmlfiles with the same name, it is likely that you will encounter errors, such as model configuration errors on the LookML Projects page and rendering errors for LookML dashboard errors, since LookML dashboards use the model name in their URL format (<hostname>/dashboard/model_name::<dashboard_name> - Project manifest files can be created only by selecting the + (plus) icon to open the Add file or folder menu at the top of the file browser in the Looker IDE, and only if the project doesn't have a manifest file already. This is because a project can have only one manifest file, and the manifest file must be located at the root level of the project's directory structure.
- The Create Locale Strings File option is available only from the Add file or folder + (plus) icon at the top of the file browser in the Looker IDE. However, once a locale strings file is created (or uploaded), you can move the file to a folder. If you are creating locale strings files to localize your model and would also like to take advantage of the Looker built-in UI localization, you must name your strings files using specific locale codes, which you can find in the Locale section of the Users documentation page.
- When you create an Explore file, the file must have the
.explore.lkmlextension at the end of its filename. If you are uploading the file, you must use the full.explore.lkmlextension. If you are using the Looker IDE to create the file with the Generic LookML files option, Looker will add.lkmlto the end of the filename if the extension isn't there, but you still must manually add the.explorepart of the extension to the filename. For example, to create an Explore file calledflightsusing the Looker IDE, you can enter eitherflights.exploreorflights.explore.lkml, and the file will be namedflights.explore.lkml.
Considerations for creating view files
Most LookML developers start with one or more view files that are created automatically when the LookML project is generated from a set of tables in a database. However, in addition to the methods described on this page for creating blank view files and for uploading files, there are many ways a Looker developer in Development Mode can add view files to a LookML project:
Creating view files based on tables in a database:
- Generating view files from database tables when you first connect to your database, as described on the Generating a LookML model documentation page
- Generating view files from database tables for a project that is already connected to a database, as described in the Adding a new view from an existing database table section on this page
Creating a view file for a derived table:
- Starting with a blank view file using one of the options described on this page and then manually defining your derived table, as described in the Defining a native derived table in LookML section of the Creating native derived tables documentation page
- Having Looker create the derived table LookML from an Explore, as described in the Using an Explore to begin defining your native derived tables section of the Creating native derived tables documentation page
- Having Looker create the derived table LookML from a SQL Runner query, as described on the Using SQL Runner to create derived tables documentation page
To use a new view, add it to your model file using the explore parameter, or use the join parameter to join it to an existing Explore in your model file.
Adding a new view from an existing database table
You can create a view file from an existing database table while in Development Mode.
Within a project, select the Add file or folder menu by selecting the + (plus) at the top of the project file list in the Looker IDE, or you can select a folder's menu to create the file inside the folder.
Select Create View From Table.
Looker displays a list of tables that are associated with one of your connections. To change the connection, use the Connection drop-down in the upper left.
Select any tables that you would like to create views from by checking the box to the left of the table name. You can collapse and expand databases or schemas in this list to access all available tables.
Go to the bottom of the page and select Create Views.
Looker generates views containing LookML for all the table columns.
Uploading files
You can also upload files to your project from your computer. This is helpful if you have created JSON data files or LookML files locally on your computer.
To upload a file to your project, use the drag-and-drop function in the Looker IDE to follow these steps:
- Navigate to your project files.
- Drag the file from your computer into the Looker IDE. The file will be displayed at the root of your directory structure.
- Once the file is uploaded, move the item to another folder.
Deleting files and folders
Deleting a folder also deletes its contents, so be careful when you delete folders. Before you delete a folder, follow these steps:
- Verify that you want to delete the files in the folder, or move the files to a different location before you delete the folder.
- Verify that the folder does not contain any files that are referred to in
includestatements in your project. See the Usingincludewith IDE folders section of theincludeparameter documentation page for information on usingincludewith IDE folders.
To delete a folder or a file, select Delete from the item's three-dot File Options menu in the left panel of the IDE.
When you delete a folder, the IDE shows a confirmation dialog. The dialog specifies how many items are included in the deletion, which includes the folder and any files inside the folder.
If you delete a model file, the model is not removed from any model sets to which the model belonged. If a new model file is created with the same name as a deleted model, the new model is included in any model sets that included the deleted model. This can result in giving unwanted access to the new model file. Looker admins can edit model sets and remove a deleted model to prevent this issue.
Deleting files and folders in bulk
Deleting a folder also deletes its contents, so be careful when you delete folders. Before you delete a folder, follow these steps:
- Verify that you want to delete the files in the folder, or move the files to a different location before you delete the folder.
- Verify that the folder does not contain any files that are referred to in
includestatements in your project. See the Usingincludewith IDE folders section of theincludeparameter documentation page for information on usingincludewith IDE folders.
To delete folders and files in bulk, follow these steps:
Select the Bulk Edit icon at the top of the File Browser panel.

Select the items to delete. The number of files selected is displayed next to the Select Files header.
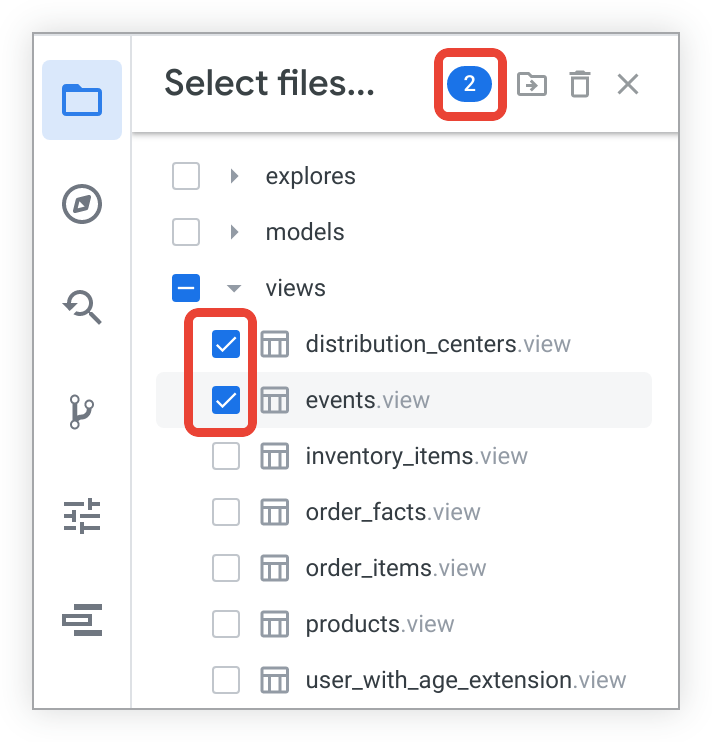
- To select or deselect individual files, expand their folders and select the checkbox next to the filenames.
- To select or deselect entire folders and their contents, select the checkbox next to the folder name.
- To select an entire section of the directory list, use Shift-click. Select the checkbox for the top item in the range, and then hold down the Shift key and select the checkbox for the last item in the list. Both items, as well as all items in between them, will be selected. You can also Shift-click on an item to select the item and every item preceding it in the directory list.
Select the Delete Items trash icon. The IDE will then display a dialog listing the items selected.

Confirm the items to be deleted by selecting Yes, Delete, or return to item selection by selecting Cancel.
Select the X in the Select Files header to exit bulk edit mode.
Moving items in a foldered project
To move files, drag a file or a folder into another folder.
The destination folder does not need to be expanded to receive other folders or files. A folder automatically expands when you hover over it.
When you change a file's path, be sure to update any include statements in your project to match the new path. See the Using include with IDE folders section of the include parameter documentation page for information on using include with IDE folders.
Also, be aware that when you change a file's path, Git effectively deletes the file and creates a new file with the new path. This means that the Git history for the file will be empty, because Git considers it a new file. To see the file's Git history before it was moved, use your Git interface to navigate to the file in its original location and view the Git history from there. (The same logic applies for a renamed file, since Git effectively deletes the file and creates a new file with a different name.)
Moving files and folders in bulk
To move folders and files in bulk:
Select the Bulk Edit icon at the top of the File Browser panel.
Select the items to move. The number of files selected is displayed next to the Select Files header.
- To select or deselect individual files, expand their folders and select the checkbox next to the filenames.
- To select or deselect entire folders and their contents, select the checkbox next to the folder name.
- To select an entire section of the directory list, use Shift-click. Select the checkbox for the top item in the range, and then hold down the Shift key and select the checkbox for the last item in the list. Both items, as well as all items in between them, will be selected. You can also Shift-click on an item to select the item and every preceding file in the directory list
Select the Move Items folder icon to select option. The IDE will then display a folder selection dialog.

In the Move to dialog, choose a folder for the selected items, or select New Folder to create a new folder. The project name will display the path of the folder that you have selected at the top of the next menu page. To move items to the root directory of your project, select Move without a folder selected.
Confirm the selected destination by selecting Move, create a new folder within the selected folder by selecting New Folder, or return to the main folder options menu by selecting the project name link in the path.
Select the X in the Select Files header to exit bulk edit mode.
After you change a file's path, be sure to update any include statements in your project to match the new path. See the Using include with IDE folders section of the include parameter documentation page for information on using include with IDE folders.
Also, be aware that when you change a file's path, Git effectively deletes the file and creates a new file with the new path. This means that the Git history for the file will be empty, because Git considers it a new file. To see the file's Git history before it was moved, use your Git interface to navigate to the file in its original location and view the Git history from there. (The same logic applies for a renamed file, since Git effectively deletes the file and creates a new file with a different name.)