Embedding Looker content using iframes is just one of the methods that developers can use when they want to add a dashboard, a Look, or an Explore to their web application. This tutorial presents another method for developers that want to add a Looker visualization into a React App. This tutorial is based on a Create React App starter and uses Looker visualization components.
These are the steps covered in this tutorial:
- Get the query slug from Looker
- Create a React application with Looker visualization components
- Create a backend helper service
- Start the server and the React app
Get the query slug from Looker
There are few things that must be done in Looker since the React app depends on them.
Get a query slug
You need the query ID or slug that'll be used as a prop of the visualization component. This article explains how you can get the query slug from an Explore URL.
Configure CORS in your Looker instance
Cross-Origin Resource Sharing (CORS) is controlled by the same domain allowlist as embedding.
This is documented in more detail on the Signed embedding documentation page.
- Navigate to Admin > Platform Embed on your Looker instance. This requires Admin privileges.
- The React app runs by default at
http://localhost:3000. By adding this address to the Embedded Domain Allowlist you are telling Looker to allow requests from the app and respond to those requests using the same address. This step is mandatory since the app will be making API requests to the Looker instance else there won't be communication between Looker and the app.
Create the React application
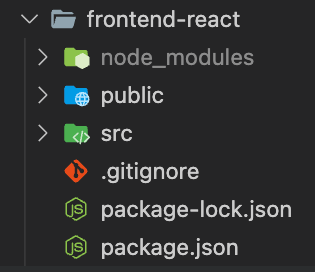
The frontend of this demo uses Create React App to create the single-page React application. Run the following commands at the root folder of the demo (get-started-viz-components) to create the app and install the dependencies:
npx create-react-app frontend-react cd frontend-react npm i
@looker/visualizations npm i @looker/components @looker/components-data
styled-components
After running these commands your folder structure should look like this:
Check the package.json file and make sure that react-dom is also installed, else install it by running npm i react-dom.
The package.json of this demo looks like this:
{
  "name": "frontend-react",
  "version": "0.1.0",
  "private": true,
  "dependencies": {
    "@looker/components": "^4.0.3",
    "@looker/components-data": "^1.0.0",
    "@looker/sdk": "^22.16.0",
    "@looker/sdk-rtl": "^21.4.0",
    "@looker/visualizations": "^1.1.1",
    "@testing-library/jest-dom": "^5.16.5",
    "@testing-library/react": "^12.1.0",
    "@testing-library/user-event": "^12.4.0",
    "i": "^0.3.7",
    "npm": "^8.19.2",
    "react": "^16.14.0",
    "react-dom": "^16.14.0",
    "react-scripts": "5.0.1",
    "styled-components": "^5.3.6",
    "web-vitals": "^2.1.4"
  },
  "scripts": {
    "start": "react-scripts start",
    "build": "react-scripts build",
    "test": "react-scripts test",
    "eject": "react-scripts eject"
  },
  "eslintConfig": {
    "extends": [
      "react-app",
      "react-app/jest"
    ]
  },
  "browserslist": {
    "production": [
      ">0.2%",
      "not dead",
      "not op_mini all"
    ],
    "development": [
      "last 1 chrome version",
      "last 1 firefox version",
      "last 1 safari version"
    ]
  }
}
Configure the environment variables
Create a .env file in the root directory of the app (./frontend-react) and set the following variables:
REACT_APP_LOOKER_API_HOST=https://your-looker-instance.looker.com
REACT_APP_BACKEND_SERVER=http://localhost:3001/
REACT_APP_BACKEND_SERVER is the address of the backend helper service that we will use to make an API call to Looker to extract the access token.
REACT_APP_LOOKER_API_HOST is the address of the Looker instance that will be receiving API requests from the React app.
Initialize client side SDK
The React app will use the SDK to make API requests to the Looker server. Since this is done on the frontend, you can use the following helper to initialize the sdk:
import { Looker40SDK } from '@looker/sdk'
import {
  AuthToken,
  AuthSession,
  BrowserTransport,
  DefaultSettings,
} from '@looker/sdk-rtl'

class SDKSession extends AuthSession {
  // This is a placeholder for the fetchToken function.
  // It is modified to make it useful later.
  async fetchToken() {
    return fetch('')
  }

  activeToken = new AuthToken()
  constructor(settings, transport) {
    super(settings, transport || new BrowserTransport(settings))
  }

  // This function checks to see if the user is already authenticated
  isAuthenticated() {
    const token = this.activeToken
    if (!(token && token.access_token)) return false
    return token.isActive()
  }

  // This function gets the current token or fetches a new one if necessary
  async getToken() {
    if (!this.isAuthenticated()) {
      const token = await this.fetchToken()
      const res = await token.json()
      this.activeToken.setToken(res.user_token)
    }
    return this.activeToken
  }

  // This function authenticates a user, which involves getting a new token
  // It returns a modified object with a new authorization header.
  async authenticate(props) {
    const token = await this.getToken()
    if (token && token.access_token) {
      props.mode = 'cors'
      delete props.credentials
      props.headers = {
        ...props.headers,
        Authorization: `Bearer ${this.activeToken.access_token}`,
      }
    }
    return props
  }
}

// This class sets the fetchToken to use the 'real' address of the backend server.
class SDKSessionEmbed extends SDKSession {
  async fetchToken() {
    return fetch(`${process.env.REACT_APP_BACKEND_SERVER}`)
  }
}

// This creates a new session with the 'real' address of the backend server.
const session = new SDKSessionEmbed({
  ...DefaultSettings,
  base_url: process.env.REACT_APP_LOOKER_API_HOST,
})

// This exports the SDK with the authenticated session
export const sdk = new Looker40SDK(session)
Embed the visualization into the app
Now that you have the query slug (in our example it's Jlm4YHPeT3lLGA9UtHjZcA) of the visualization and the sdk object has been instantiated, the next step is to use the Looker visualization components to embed and render the visualization into the app:
import { sdk } from '../src/helpers/CorsSession'
import { Query, Visualization } from '@looker/visualizations'
import { DataProvider } from '@looker/components-data'
import { ComponentsProvider } from '@looker/components'
function App() {
return (
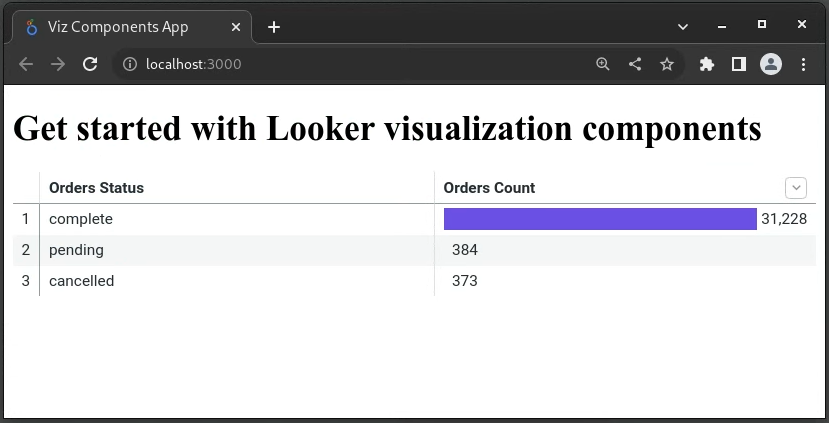
<>
<h1>Get started with Looker visualization components</h1>
<ComponentsProvider>
<DataProvider sdk={sdk}>
{/* Change this query slug to match your query slug */}
<Query query="Jlm4YHPeT3lLGA9UtHjZcA">
<Visualization />
</Query>
</DataProvider>
</ComponentsProvider>
</>
)
}
export default App
The frontend is ready. You can add more components, add more styling to the app, etc.
Create a backend helper service
The final step is to build the backend helper service that'll receive the call from the frontend, use the Looker-Node SDK to authenticate the user, extract their access token then send it back to the frontend.
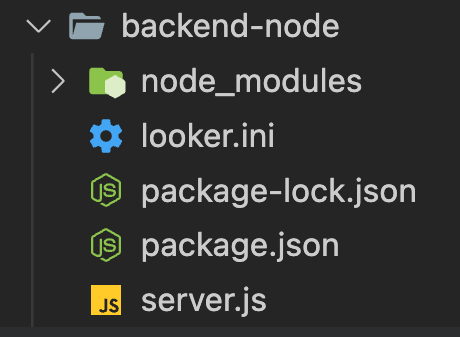
For simplicity we're going to build a Node server with one endpoint. The server will use express, cors, and @looker/sdk-node dependencies. You can run the following commands starting at the root folder (get-started-viz-components):
mkdir backend-node
cd backend-node
npm init -y
npm i express cors @looker/sdk-node
To authenticate the SDK from the backend we'll use a looker.ini file. You can find more detail on how to populate the file on the SDK-Node page. After running these commands your folder structure should look like this:
The package.json should look like this:
{
  "name": "looker-embed-backend",
  "version": "1.0.0",
  "description": "Backend helper service for getting started with Looker Viz components",
  "main": "server.js",
  "scripts": {
    "start": "node server.js"
  },
  "author": "Looker",
  "license": "Apache-2.0",
  "dependencies": {
    "@looker/sdk-node": "^22.16.0",
    "cors": "^2.8.5",
    "express": "^4.18.2"
  }
}
Next we'll add this code into a new server.js file:
const cors = require('cors')
const express = require('express')
const { LookerNodeSDK } = require('@looker/sdk-node')

const port = 3001
const app = express()
// The following init40 method will authenticate using
// the looker.ini file
const sdk = LookerNodeSDK.init40()

app.use(
  cors({
    origin: '*',
  })
)
app.use(express.json())

app.get('/', async (req, res) => {
  const userId = await sdk.ok(sdk.me('id'))
  const accessToken = await sdk.login_user(userId.id)
  const user = {
    user_token: accessToken.value,
    token_last_refreshed: Date.now(),
  }
  res.json({ ...user })
})

app.listen(port, async () => {
  console.log(`Backend Server listening on port ${port}`)
})
Start the Server and the React App
- Open a terminal and navigate to the
backend-nodefolder then runnpm start - Open a second terminal then navigate to the
frontend-reactfolder and runnpm start - Once the backend helper service and the react app are up and running, you can open the browser and go to
http://localhost:3000/to see the visualization embedded into the application.