You can import files from other LookML projects and external repositories into your current project, which lets you use model files, view files, and other files in more than one project. Imported projects are read-only; if you want to edit the files you must edit them from their own LookML project (or from some other editor that is connected to the files' Git repository).
There are several use cases for importing files into your LookML project. Following are a few examples:
Building on top of an installed Looker Block without having to make direct changes to it. If Looker makes changes to the block, you can pull the changes in because all the LookML you've added to it is kept in a separate repository.
Maintaining a base project that is autogenerated based on the database schema. You can put all your custom dimensions, measures, and the like in a separate project that imports all the LookML from the autogenerated project. You can regularly regenerate the base project as the database schema changes without overwriting all your custom LookML.
Encapsulating shared objects in a single project and then importing them into multiple other projects. For example, if you've got a table that is common to multiple databases, you could put the view for it in one project and maintain it in that one place. Then have multiple other projects make use of it by importing the table into those projects.
To import files from another project, perform the following tasks:
- Create a project manifest file.
- Specify the local or remote projects that you want to import.
- View files from an imported project.
- Include files from an imported project.
You will then be able to reference fields from the imported project's files and override the values of constants defined in the imported project, if the constants allow override.
Creating a project manifest file
Any project that imports files from other projects must have a project manifest file. If your project doesn't already have a manifest file, you can create one from the + icon at the top of the file browser in the Looker IDE.
To import projects, specify them in the manifest. You can specify local or remote projects, as described in the following sections.
Importing local projects
Local project import can be used only if the imported project is present on the same Looker instance. It is also recommended that developers have model permissions for the imported project's models. If your developers have model permissions in the imported project, versioning will be dynamic, meaning that changes in the imported project will immediately impact the project that imports it. This lets developers validate changes in both projects before pushing to production. Also, for developers with model permissions in both projects, the imported project files will reflect the developer's Development Mode status. So, if the developer is in Development Mode, the Looker IDE will show the Development Mode of the imported project's files. If the developer is in Production Mode, the Looker IDE will display the Production Mode of the imported project.
In the manifest file, the project_name parameter specifies the name of the current project (Looker automatically fills in this parameter when you create the manifest file for the project). To import a local project into the current project, use one or more local_dependency parameters to specify the project or projects to import:
# This project
project_name: "my_project"

# The project to import
local_dependency: {
  project: "my_other_project"
}
In the following scenarios, you should use remote project import instead of local project import:
- Your developers don't have model permissions in the imported project's models. When this is the case, Looker makes a clone of the Production Mode of the imported project and displays that static version of the files in the IDE. This static version would never show the Development Mode version of the files, and may also be out of date with the current Production Mode without alerting the developer. It would be better to use remote project import and provide a
refthat specifies a Git branch or a Git release in the remote project. If you do that, Looker will automatically detect new commits in the remote project so your developers would be alerted and could then bring in the latest version of the remote project files. - Your developers need to always work with the production version of an imported project.
- Your developers need to work with a static version of the imported project's files.
Importing remote projects
In a remote import, the imported project does not need to be on the same instance. Rather, the project is imported through its remote Git repository.
To import a remote repository, use the remote_dependency parameter to provide the information for the remote repository. The remote_dependency parameter takes the following information and subparameters:
- The name of the imported project, which can be anything you like. In the following example, the project's name is
ga_360_block. You use this name inincludestatements to reference the imported files in LookML projects. The name is also used as the folder name under theimported_projectsfolder of the Looker IDE. - The
urlsubparameter, where you specify the address of the external Git repository. Use the main URL of the repository. - The
refsubparameter, where you specify a Git branch, a Git release tag, or the SHA of a commit in the Git repository. You can specify a commit SHA if you want static versioning, so that changes in the imported project won't be automatically reflected in your project (this is a good option for Looker Blocks). Or you can specify a Git branch or a Git release tag if you want Looker to automatically detect new commits in the remote project. See the Automatically detecting new versions of a remote project section on this page for more information. - The
override_constantsubparameter, which is an optional subparameter that lets you override the value of a constant that was defined in an imported project.
Here is an example of a remote_dependency parameter in a project manifest file. This example uses an HTTPS connection:
remote_dependency: ga360_block {
  url: "https://github.com/llooker/google_ga360"
  ref: "master"
  override_constant: connection {
    value: "importing_project_connection"
  }
}
You can also use SSH:
remote_dependency: ga360_block {
  url: "git@github.com:llooker/google_ga360.git"
  ref: "master"
  override_constant: connection {
    value: "importing_project_connection"
  }
}
Once you add the remote dependency, you may need to configure the import credentials for the remote project, see the Configuring authentication credentials for private remote repositories section on this page.
Automatically detecting new versions of a remote project
You can have Looker automatically detect new commits in the remote project if you specify a Git branch or a Git release tag in the ref subparameter of remote_dependency in your manifest file.
For example, here is a remote dependency where the master branch is specified in the ref subparameter:
remote_dependency: exchange_rate {
  url: "https://github.com/llooker/datablocks-exchangerate.git"
  ref: "master"
}
Subsequently, when the master branch is updated with new commits, Looker will automatically detect the changes.
And here is an example where the v1.0 release tag is specified:
remote_dependency: e_faa_original {
  url: "https://github.com/llooker/google_ga360"
  ref: "v1.0"
}
Regardless of the type of value that you specify for the ref parameter, even a commit SHA, the IDE will display the Update Dependencies button in the top project navigation bar when you add a remote_dependency parameter to your project.

Click Update Dependencies to bring in the remote project files. If this is the first remote dependency that you've added to your project, updating dependencies will also prompt Looker to create a manifest lock file. Looker uses the manifest lock file to track the version of the remote project(s).
If you specify a Git branch or a Git release tag in the ref subparameter, Looker will check for new commits whenever the Looker IDE refreshes, which happens when a Looker developer goes into Development Mode, performs a Git action in the IDE, or refreshes the browser.
If new commits exist, Looker will display the Update Dependencies option in the Git actions panel of the IDE.

Select the Update Dependencies option to bring in the latest remote project files to your project.
Once you have the latest files, you can validate your LookML to verify that all of your project's references work with the updated remote project files. You can then fix any broken references and deploy your changes with no downtime for your users.
Manifest lock file
Looker uses the manifest lock file with the filename manifest_lock.lkml to track the versions of remote imported projects. The manifest lock file is listed in the file browser panel of the Looker IDE.
Looker developers don't need to create or edit the manifest lock file, since lock files are managed automatically by Looker.
The manifest lock file shows each remote project, represented by a remote_dependency entry with url and ref subparameters:
- The
remote_dependencyparameter indicates the name for the remote project that a Looker developer specified in the manifest file. - The
urlsubparameter indicates the address of the external Git repository that a Looker developer specified in the manifest file. - The
refsubparameter shows the version of the project (indicated by a commit SHA) that Looker is using in your project:- If the remote project was defined in the manifest file with a
refof a Git branch or a Git release tag, therefparameter shows which version of the files (the remote project commit SHA) your project is currently using. If there are new commits in the remote project, Looker will display the Update Dependencies button in the IDE so you can bring in the latest remote project files. Therefvalue in the manifest lock file will then be updated to show the latest commit SHA for that branch or release tag. - If the remote project was defined in the manifest file with a
refof a specific commit SHA, therefparameter in the manifest lock file will be the same commit SHA.
- If the remote project was defined in the manifest file with a
Configuring authentication credentials for private remote repositories
To configure authentication credentials for private remote repositories, navigate to the Import Credentials page by selecting Settings in the left navigation pane within the IDE.
The Import Credentials settings show a list of the URLs for each remote repository that has been defined in the project manifest file, the type of authentication used for the repository (https or ssh), and whether Looker can successfully connect to the repository.
Adding authentication credentials
To add authentication credentials for a repository:
On the Import Credentials page under the URL heading, hold the pointer over a repository name to display the Test and Configure buttons, and click Configure.

Looker displays the Configure Git Authentication dialog to let you configure credentials for the remote repository. The dialog will indicate the type of credentials that are required for that particular repository.
If the repository requires a username and password (or personal access token) for authentication, enter your username and password or token and click Save Changes.
If the repository requires an SSH key, such as in the example of using SSH to import a remote project explained earlier on this page, Looker displays a dialog that shows your local SSH key. Click Copy Key to copy the SSH key to your clipboard, and add it to your repository's list of keys.
After saving the credentials, click Test to test Looker access to the repository.

Once you pass the connection tests and connect to the repository, the Import Credentials section shows a green checkmark next to the repository name.
Editing authentication credentials
To edit the authentication credentials for a repository:
To display the Test and Edit buttons, hold the pointer over a repository that already has configured authentication credentials, and click Edit.

If the repository requires a username and password (or personal access token) for authentication, click Clear Credentials, and, in the confirmation dialog, click Yes, clear credentials.
Enter the new credentials in the Configure Git Authentication dialog, and click Save Changes.
Viewing files from an imported project
The Looker IDE displays imported project files in the imported_projects folder of the left navigation pane. You can select an imported project file to view its contents.
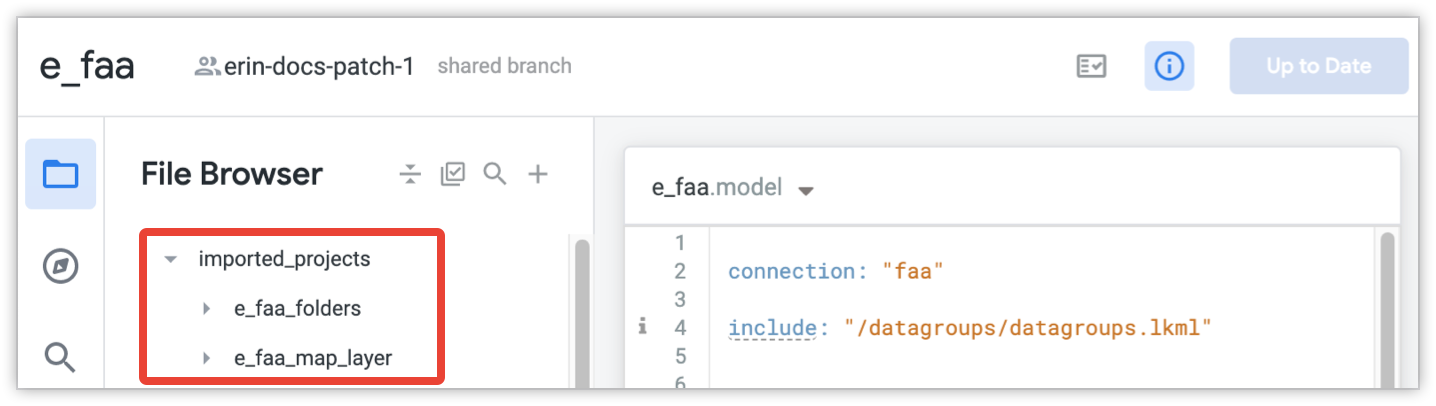
Files from local projects and remote projects are listed in the imported_projects folder.
You can also view objects from imported project files that are included in the active project from the object browser. Access the object browser from the navigation bar of the Looker IDE.
![]()
In addition, users with develop permission can use the metadata panel to see information about objects from imported projects, including links to navigate to the imported file where the object is defined. See the Metadata for LookML objects documentation page for more information.
Including files from an imported project
The include parameter in a model file specifies the project files that will be available to that model. Once you specify a local or remote imported project in the manifest file, you can use the include parameter in a model file to specify files from the imported project. Only files whose project is listed in the manifest file can be included.
To include a file from another project, use the filename with two forward slashes (//) and the name of the imported project. Follow the imported project name with a single forward slash (/) and the full path to the file you want to include.
For example, these include commands indicate the users view file from the e_flights imported project and the orders view from the e_commerce imported project:
include: "//e_flights/views/users.view.lkml"
include: "//e_commerce/public/orders.view.lkml"
See the Path syntax section of the include parameter page for information on specifying paths with IDE folders enabled.
You can use wildcards to include multiple files. For example, to include all view files in the /views/ directory of the e_flights imported project:
include: "//e_flights/views/*.view"
Furthermore, you can use wildcards to scope to specific directory levels or to recursive directories in imported project:
include: "//e_flights/*/*.view.lkml"
include: "//e_commerce/*/*.view.lkml"
See the Wildcard examples section of the include parameter page for information on using wildcards with IDE folders enabled.
Including model files
You cannot include a model file from another project. Instead, if you want to reuse, refine, or extend Explores across projects, in the imported project you can create a separate Explore file, then include that Explore file in other projects. See the Including Explores in a model section of the include parameter documentation page for more information.
Including files that include other files
When you include a file that includes other files, all the includes are resolved before the file is passed on to the next project that includes it.
For example, if in your current project you import a file (A) from another project (proj_A) and the imported file contains an include parameter that includes file B from project proj_B, then file B will be included into file A before file A is imported into the current project.
Importing data files
Files stored in the Data section of a project are not imported. To reference a data file from an imported project, such as in the map_layer parameter, use the full path and filename of the file. For example:
map_layer: json_from_imported_project {
  file: "//path_to_imported_project/folder/filename.topojson"
  ...
}
Referencing files from an imported project
After you have imported a view file into your project, you can use the syntax ${view_name.field_name} to reference the imported view's fields as if the view file were part of that project. For example, say that you have imported the ga_360_block project in your project manifest file, and you have the following include statement in your model file:
include: "//ga_360_block/ga_block.view"
You would use the syntax ${ga_block.hits_total} to reference the hits_total field from the included ga_block view.
Using constants in files from an imported project
LookML constants allow you to define a value in your project's manifest file that can be reused throughout your project. The export subparameter of the constant parameter specifies whether a constant's value can be overridden when files that reference that constant are imported into another project.
The export parameter has the following possible values:
none: The default value forexport. The constant's value cannot be overridden in your importing project. The importing project uses the constant value specified in the imported project's manifest file.override_optional: The constant's value can optionally be overridden in your importing project. If a value is not provided in the importing project's manifest file, the original value from the imported project is used.override_required: The importing project must override the constant value originally specified in the imported project's manifest file. If a new constant value is not provided in the importing project, Looker will display an error.
When you import files that reference a constant into your project, you can use the override_constant subparameter of local_dependency or remote_dependency in your project's manifest file to provide a new value for that constant, as long as that constant has export set to override_optional or override_required in its original project. When you override the value of a constant from an imported project, your project will use the value you specify with the override_constant parameter.
As an example, assume you are managing multiple databases on a single Looker instance, with a separate project for each database. Also assume that the data schemas are identical for each database, and that your goal is to define an analysis once and apply it to each dataset.
In this example, suppose proj_core is the base project in which you have defined views that you would like to import into other projects. In addition, one of the views that you would like to import is the orders view, which is defined as follows:
view: orders {
  sql_table_name: "@{schema_name}.orders"
}
The schema that the orders view is based on is specified in the sql_table_name parameter using the schema_name constant, which is defined in the proj_core manifest file. In the following example, because the schema_name constant is set to export: override_required, any project that imports schema_name must override its value using the override_constant parameter:
constant: schema_name {
  value: "proj_core_schema"
  export: override_required
}
For example, assume you want to import the orders view into a local project called proj_a. There is also a table called orders in the database for proj_a with an identical structure to the orders table in the base project, proj_core.
Since proj_core and proj_a are on the same instance, you can import the orders view into proj_a using local_dependency. Using the override_constant subparameter of local_dependency, you can then update the schema_name constant to point to the schema proj_a_schema in the manifest file for proj_a:
project_name: "proj_a"

local_dependency: {
  project: "proj_core"
  override_constant: schema_name {
    value: "proj_a_schema"
  }
}
In this example, because the schema_name constant is set to export: override_required in project_core, Looker will display an error if you don't override its value in proj_a (the importing project).
Overriding the schema_name constant in proj_a lets you use the fields you defined in the orders view in proj_core, rather than creating a new view file and defining your fields from scratch. In this example, the orders view corresponds to a different table for each project:
- In
proj_core, theordersview is based on theproj_core_schema.orderstable in your database. - In
proj_a, theordersview is based on theproj_a_schema.orderstable in your database.