UI 구성요소가 삽입된 애플리케이션을 개선하는 방법의 한 가지 예는 구성요소를 사용하여 대시보드의 탭 탐색 기능을 만드는 것입니다.
다음 예시에서는 Looker의 확장 프로그램 프레임워크를 사용하여 빌드된 기본 TypeScript 확장 프로그램에 탭 대시보드를 추가합니다.
이 예시를 진행하려면 설정이 요구사항을 충족하는지 확인한 후 다음 단계를 따르세요.
- 기본 TypeScript 확장 프로그램을 빌드합니다.
- 대시보드 연결 및 저장을 위해
src/Dashboards.tsx파일을 만듭니다. src/Tabs.tsx구성요소를 만들어Tabs구성요소를 저장합니다.src/App.tsx에서 HelloWorld 참조를 바꿉니다.- 삽입 사용 권한으로
manifest.lkml파일을 업데이트합니다. - Looker 인스턴스에 확장 프로그램을 게시합니다.
요구사항
시작하려면 몇 가지 요소가 필요합니다.
- 확장 프로그램 프레임워크가 사용 설정된 Looker 인스턴스에 액세스할 수 있어야 합니다.
develop권한이 있어야 합니다.- Looker 내에서 UI 탭 내에 배치할 여러 사용자 정의 대시보드가 있어야 합니다.
- 확장 프로그램 프레임워크에서 빌드하든 독립 실행형 React 애플리케이션에서 빌드하든 상관없이 Looker의 API로 인증하고 Looker SDK 객체에 액세스할 수 있어야 합니다. 자세한 내용은 Looker API 인증 또는 확장 프로그램 프레임워크를 참조하세요.
- 이 예시에서는 Looker 삽입 SDK를 사용합니다. 인스턴스에 대해 Embed SDK를 실행하려면 관리자 패널의 삽입 페이지 내에 삽입된 도메인 허용 목록에
http://localhost:8080이 포함되어야 합니다. - Looker 구성요소 NPM 패키지를 설치했는지 확인합니다. 구성요소 패키지 설치 및 사용에 대한 자세한 내용은 GitHub 및 NPM에서 제공되는 README 문서에서 찾을 수 있습니다.
1단계: 기본 TypeScript 확장 프로그램 빌드
Looker 확장 프로그램 빌드 소개 문서 페이지의 안내에 따라 확장 프로그램을 빌드합니다. 확장 프로그램을 TypeScript 확장 프로그램으로 만들려면 다음과 같이 변경합니다.
create-looker-extension도구를 사용하여 확장 프로그램 템플릿을 만드는 경우 2단계에서 사용할 언어로 TypeScript를 선택합니다.- 확장 프로그램 템플릿을 만들기 위해 Git 저장소를 클론하는 경우 2단계에서
extension-examples/react/TypeScript/helloworld-ts디렉터리로 이동합니다.
2단계: src/Dashboards.tsx 파일을 만들어 대시보드 연결 및 저장
새 확장 프로그램의 src 디렉터리 내에서 Dashboards.tsx 파일을 만듭니다. 이 파일은 Looker 내에서 빌드한 대시보드를 연결하고 저장합니다.
파일 내에 다음 코드를 붙여넣습니다. 이 코드는 대시보드 객체 3개를 만들고 ID를 지정합니다. 필요에 따라 대시보드 객체를 더 많거나 적게 만들 수 있습니다.
인스턴스 URL https://mycompany.looker.com에는 3개의 위치가 있습니다. 이를 Looker 인스턴스 URL로 변경합니다.
import React, { useCallback } from "react";
import { LookerEmbedSDK } from "@looker/embed-sdk";
import styled from "styled-components";

export const EmbeddedDashboard1 = (props: { id: number | string }) => {
 const [dashboard, setDashboard] = React.useState();
 const setupDashboard = (dashboard: any) => {
   setDashboard(dashboard);
 };
 const embedCtrRef = useCallback((el) => {
   const hostUrl = "https://mycompany.looker.com/";
   if (el && hostUrl) {
     el.innerHTML = "";
     LookerEmbedSDK.init(hostUrl);
     LookerEmbedSDK.createDashboardWithId(props.id)
       .withNext()
       .appendTo(el)
       .build()
       .connect()
       .then(setupDashboard)
       .catch((error) => {
         console.error("Connection error", error);
       });
   }
 }, []);
 return <EmbedContainer ref={embedCtrRef}></EmbedContainer>;
};

export const EmbeddedDashboard2 = (props: { id: number }) => {
 const [dashboard, setDashboard] = React.useState();
 const setupDashboard = (dashboard: any) => {
   setDashboard(dashboard);
 };
 const embedCtrRef = useCallback((el) => {
   const hostUrl = "https://mycompany.looker.com/";
   if (el && hostUrl) {
     el.innerHTML = "";
     LookerEmbedSDK.init(hostUrl);
     LookerEmbedSDK.createDashboardWithId(props.id)
       .withNext()
       .appendTo(el)
       .build()
       .connect()
       .then(setupDashboard)
       .catch((error) => {
         console.error("Connection error", error);
       });
   }
 }, []);
 return <EmbedContainer ref={embedCtrRef}></EmbedContainer>;
};

export const EmbeddedDashboard3 = (props: { id: number }) => {
 const [dashboard, setDashboard] = React.useState();
 const setupDashboard = (dashboard: any) => {
   setDashboard(dashboard);
 };
 const embedCtrRef = useCallback((el) => {
   const hostUrl = "https://mycompany.looker.com/";
   if (el && hostUrl) {
     el.innerHTML = "";
     LookerEmbedSDK.init(hostUrl);
     LookerEmbedSDK.createDashboardWithId(props.id)
       .withNext()
       .appendTo(el)
       .build()
       .connect()
       .then(setupDashboard)
       .catch((error) => {
         console.error("Connection error", error);
       });
   }
 }, []);

 return <EmbedContainer ref={embedCtrRef}></EmbedContainer>;
};

export const EmbedContainer = styled.div`
 width: 100%;
 height: 95vh;
 & > iframe {
   width: 100%;
   height: 100%;
 }
`;
앞의 코드 예시에서는 다음과 같은 작업을 수행합니다.
import 문은 필요한 종속 항목을 가져옵니다.
import React, { useCallback } from "react";
import { LookerEmbedSDK } from "@looker/embed-sdk";
import styled from "styled-components";
다음 코드 블록은 대시보드 iframe이 포함된
EmbedContainer객체인EmbeddedDashboard1객체를 만듭니다. iframe은 전달된 대시보드 ID를 사용하여 Looker Embed SDK에서 생성됩니다.https://mycompany.looker.com/를 Looker 인스턴스 URL로 업데이트해야 합니다.export const EmbeddedDashboard1 = (props: { id: number | string }) => { const [dashboard, setDashboard] = React.useState(); const setupDashboard = (dashboard: any) => { setDashboard(dashboard); }; const embedCtrRef = useCallback((el) => { const hostUrl = "https://mycompany.looker.com/"; if (el && hostUrl) { el.innerHTML = ""; LookerEmbedSDK.init(hostUrl); LookerEmbedSDK.createDashboardWithId(props.id) .withNext() .appendTo(el) .build() .connect() .then(setupDashboard) .catch((error) => { console.error("Connection error", error); }); } }, []); return <EmbedContainer ref={embedCtrRef}></EmbedContainer>; };다음 두 개의 코드 블록은
EmbeddedDashboard2및EmbeddedDashboard3에 대해 이 프로세스를 반복합니다. 다시 한번,https://mycompany.looker.com/을 Looker 인스턴스 URL로 업데이트합니다.마지막 블록은 EmbedContainer 스타일을 지정합니다.
  export const EmbedContainer = styled.div`
    width: 100%;
    height: 95vh;
    & > iframe {
      width: 100%;
      height: 100%;
    }
`;
3단계: Tabs 구성요소를 저장할 src/Tabs.tsx 파일 만들기
새 확장 프로그램의 src 디렉터리 내에서 Tabs.tsx 파일을 만듭니다. 이 파일은 Tabs 구성요소를 저장하고 각 대시보드의 Looker 대시보드 ID를 참조합니다.
이 파일 안에 다음 코드를 붙여넣습니다(이 섹션의 다음 섹션에서는 코드가 수행하는 작업을 설명합니다.).
import React from "react";
import { ComponentsProvider, Tabs2, Tab2 } from "@looker/components";
import { EmbeddedDashboard1, EmbeddedDashboard2, EmbeddedDashboard3,
} from "./Dashboards";
export const Tabs = () => (
<ComponentsProvider>
<Tabs2>
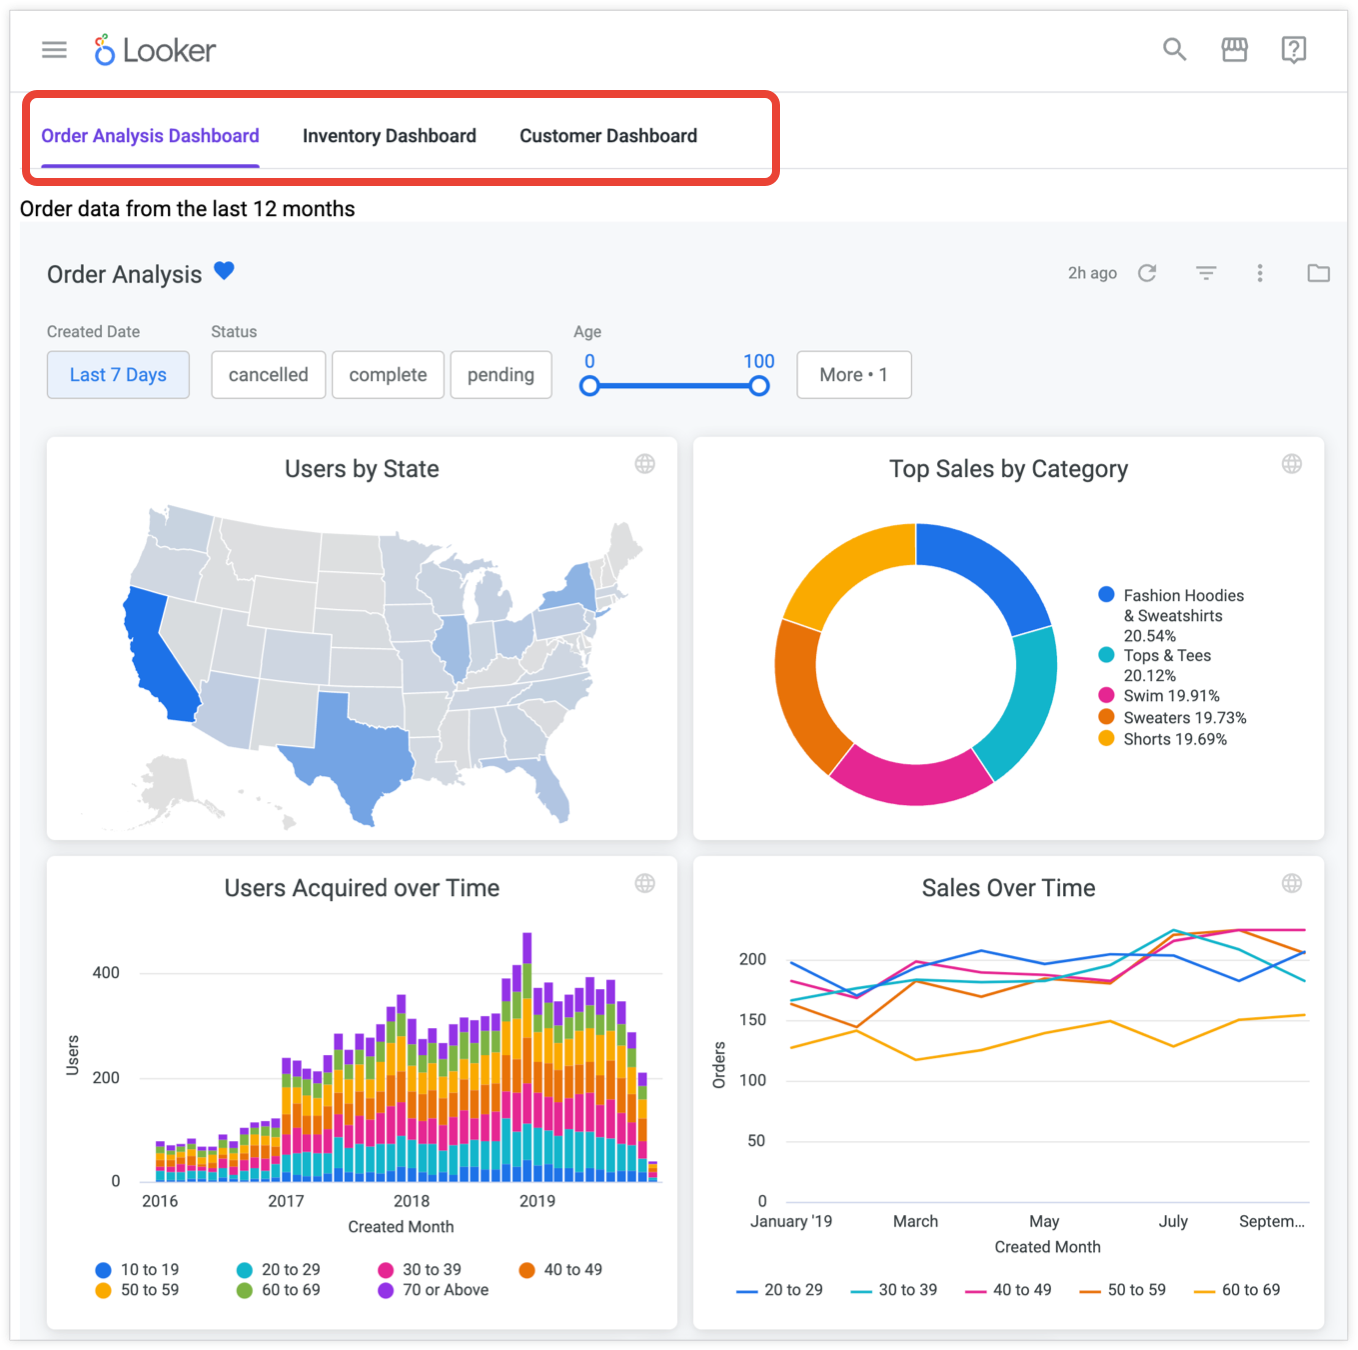
<Tab2 id="5" label="Order Analysis Dashboard">
Order data from the last 12 months
<EmbeddedDashboard1 id={5} />
</Tab2>
<Tab2 id="2" label="Inventory Dashboard">
Current global inventory
<EmbeddedDashboard2 id={2} />
</Tab2>
<Tab2 id="7" label="Customer Dashboard">
Anonymized customer data
<EmbeddedDashboard3 id={7} />
</Tab2>
</Tabs2>
</ComponentsProvider>
)
앞의 코드 예시에서는 다음과 같은 작업을 수행합니다.
import 문은
Dashboards.tsx파일에서 생성된EmbeddedDashboard객체뿐 아니라 필요한 종속 항목과 구성요소를 가져옵니다.import React from "react"; import { ComponentsProvider, Tabs2, Tab2 } from "@looker/components"; import { EmbeddedDashboard1, EmbeddedDashboard2, EmbeddedDashboard3, } from "./Dashboard";export 문을 사용하면
Tabs객체를 다른 구성요소로 가져올 수 있습니다.export const Tabs = () => (ComponentsProvider는 테마 설정을 지원하는 개별 구성요소를 래핑합니다.<ComponentsProvider> </ComponentsProvider>Tabs2구성요소 및 하위 구성요소Tab2를 사용하여 3개의 탭을 만들고 Looker 대시보드에 연결할 수 있습니다.<Tabs2> <Tab2 id="5" label="Order Analysis Dashboard"> Order data from the last 12 months <EmbeddedDashboard1 id={5} /> </Tab2> <Tab2 id="2" label="Inventory Dashboard"> Current global inventory <EmbeddedDashboard2 id={2} /> </Tab2> <Tab2 id="7" label="Customer Dashboard"> Anonymized customer data <EmbeddedDashboard3 id={7} /> </Tab2> </Tabs2>Tab2의id속성은 고유한 탭 ID를 허용합니다. 환경에 필요한 대로 ID를 업데이트합니다.label속성은 각 탭에 나타날 라벨을 허용합니다. 사용 중인 대시보드에 적합하게 ID를 업데이트합니다.- Tab2 태그 내에 위치하는 문자열이 해당 탭의 콘텐츠 영역 상단에 표시됩니다. 필요에 따라 문자열을 업데이트하거나 삭제합니다.
EmbeddedDashboard1,EmbeddedDashboard1,EmbeddedDashboard1객체가 탭 내에 배치됩니다.id속성은 대시보드의 대시보드 ID를 허용하여 해당 탭에 삽입합니다. 탭 형식의 대시보드를 직접 빌드할 때는 이 값을 사용하려는 대시보드의 대시보드 ID로 바꿉니다.dashboards/뒤의 URL에서 숫자 대시보드 ID를 찾을 수 있습니다. 예를 들어 URL이https://example.looker.com/dashboards/61?Recording+Date=10+weeks&Country=US이면 대시보드 ID는61이 됩니다.
4단계: src/App.tsx에서 HelloWorld 참조 교체
src 디렉터리에서 App.tsx 파일로 이동합니다. HelloWorld import 문을 삭제합니다.
import { HelloWorld } from './HelloWorld'
다음으로 바꿉니다.
import { Tabs } from './Tabs'
또한 src/App.tsx 파일에서 <HelloWorld/>를 <Tabs/>로 바꿉니다.
더 이상 사용하지 않으므로 이 디렉터리에서 HelloWorld.tsx 파일을 삭제할 수도 있습니다.
5단계: 삽입 사용 권한으로 manifest.lkml 파일 업데이트
LookML 프로젝트의 manifest.lkml 파일에 대한 사용 권한 섹션에 다음 사용 권한을 추가합니다.
use_embeds: yes
manifest.lkml 파일은 다음과 같습니다.
application: name {
  label: "label"
  url: "http://localhost:8080/bundle.js"
  # file: "bundle.js
  entitlements: {
    core_api_methods: ["me"] #Add more entitlements here as you develop new functionality
    use_embeds: yes
  }
}
이제 왼쪽 탐색 패널의 애플리케이션 폴더에 표시되는 확장 프로그램으로 이동할 수 있습니다. yarn develop으로 로컬 개발 서버를 시작한 경우 삽입된 탭 형식의 대시보드를 볼 수 있습니다.
6단계: Looker 인스턴스에 확장 프로그램 게시
다른 Looker 사용자에게 확장 프로그램을 표시하려면 다음 단계에 따라 Looker 인스턴스에 확장 프로그램을 게시합니다.
- 개발 서버가 실행 중인 상태에서
localhost:8080/bundle.js로 이동합니다. - 컴퓨터에서 브라우저 창의 콘텐츠를
.js파일로 로컬 저장합니다. - 개발 모드인지 확인한 다음
.js파일을 확장 프로그램 프로젝트로 드래그 앤 드롭합니다. 변경사항을 저장합니다. manifest.lkml파일에서url: "http://localhost:8080/bundle.js"줄을 주석 처리합니다.manifest.lkml파일에서# file: "bundle.js"줄의 주석 처리를 삭제하고 파일 이름이 프로젝트에 업로드한.js파일의 파일 이름과 일치하는지 확인합니다. 변경사항을 저장합니다.- 변경사항을 커밋하고 배포합니다.
변경사항을 배포한 후에는 더 이상 확장 프로그램을 보기 위해 로컬 개발 서버를 시작할 필요가 없으며, Looker 인스턴스의 사용자는 왼쪽 탐색 패널의 애플리케이션 폴더로 이동하여 확장 프로그램을 볼 수 있습니다.