This documentation page describes how to set up a custom domain and set up access to a Looker (Google Cloud core) instance that meets the following criteria:
- The instance is configured for private connections.
- The instance was set up to use private services access at the time of creation.
To access this kind of instance, perform the following steps:
- Set up the custom domain.
- Create VMs and a private zone.
- Configure the reverse proxy servers.
- Create and configure the load balancer.
- Create firewall rules.
- Update the DNS A record.
- Update the OAuth credentials.
Set up a custom domain
After your Looker (Google Cloud core) instance has been created, you can set up a custom domain.
Before you begin
Before you can customize the domain of your Looker (Google Cloud core) instance, identify where your domain's DNS records are stored, so that you can update them.
Required roles
To get the permissions that
you need to create a custom domain for a Looker (Google Cloud core) instance,
ask your administrator to grant you the
Looker Admin (roles/looker.admin)
IAM role on the project the instance resides in.
For more information about granting roles, see Manage access to projects, folders, and organizations.
You might also be able to get the required permissions through custom roles or other predefined roles.
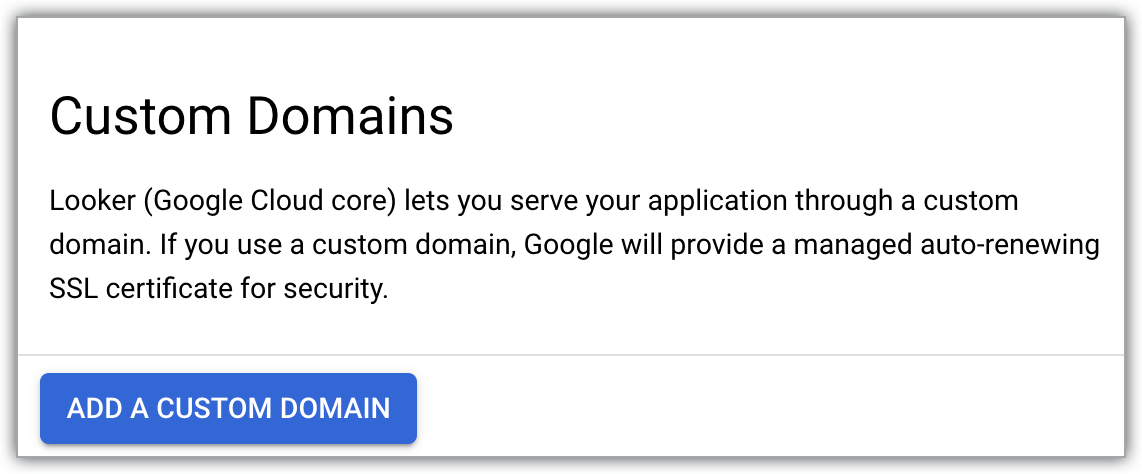
Create a custom domain
In the Google Cloud console, follow these steps to customize the domain of your Looker (Google Cloud core) instance:
- On the Instances page, click the name of the instance for which you would like to set up a custom domain.
- Click the CUSTOM DOMAIN tab.
Click ADD A CUSTOM DOMAIN.
This opens the Add a new custom domain panel.
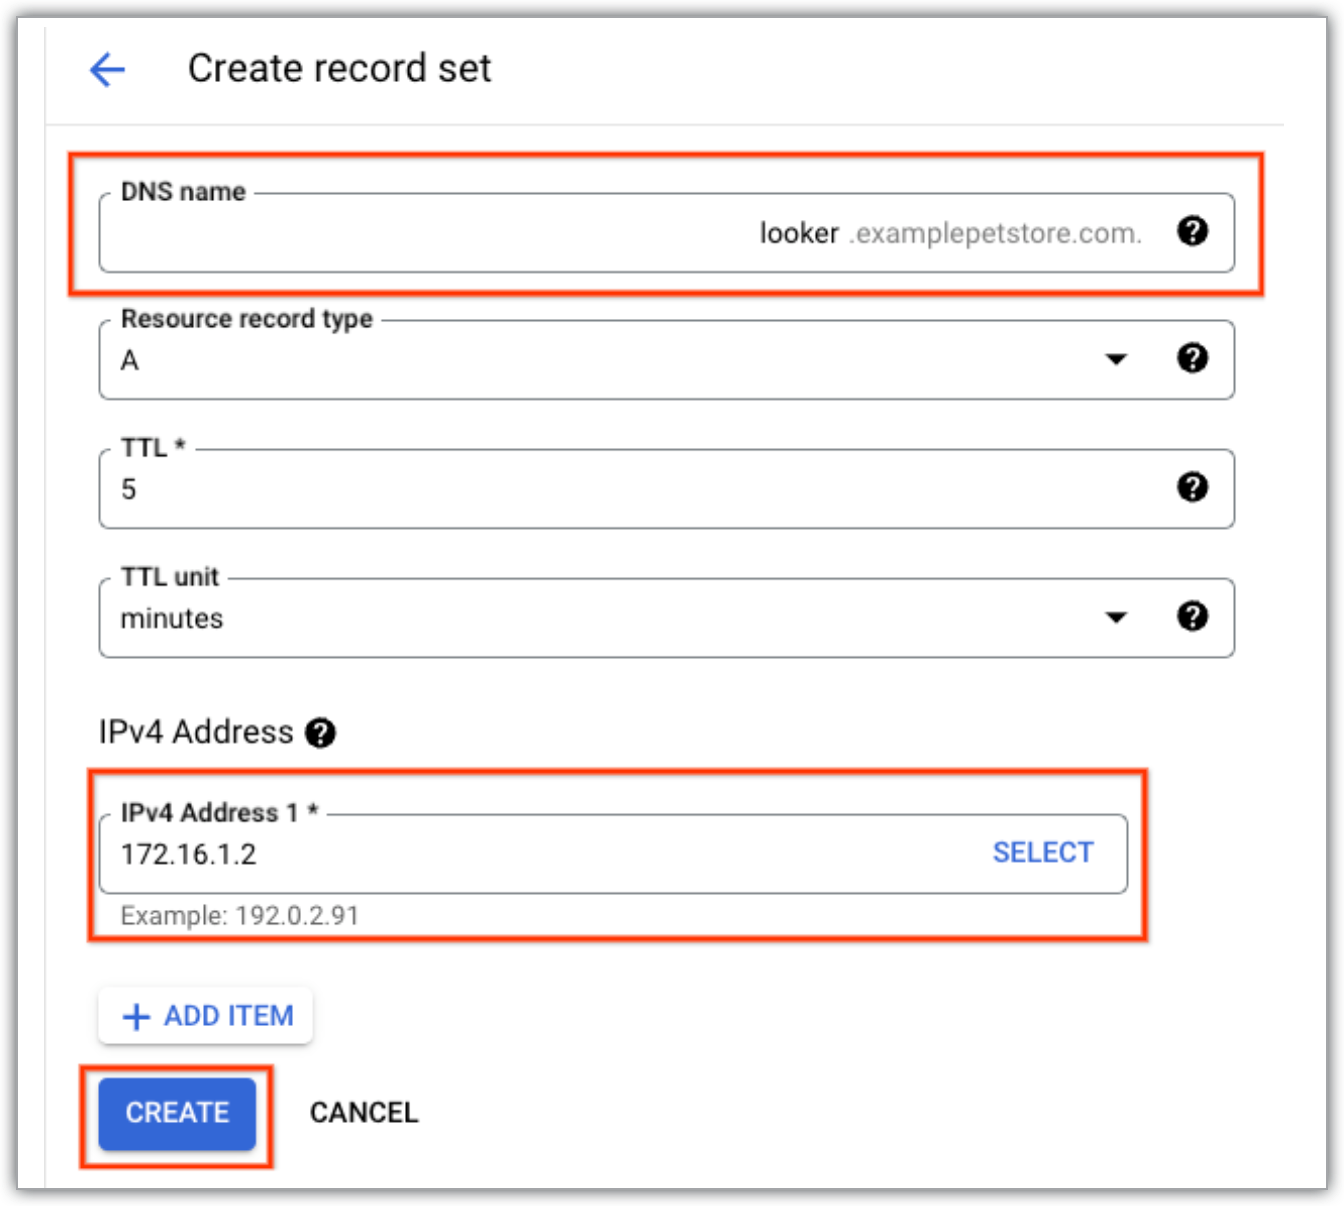
Using only letters, numbers, and dashes, enter the hostname of up to 64 characters for the web domain that you would like to use — for example:
looker.examplepetstore.com.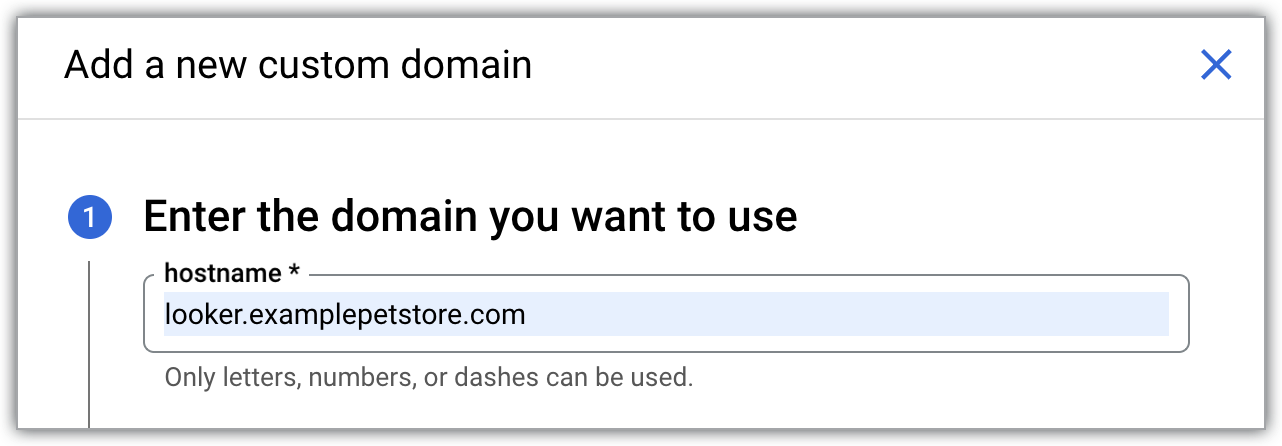
Click DONE on the Add a new custom domain panel to return to the CUSTOM DOMAIN tab.
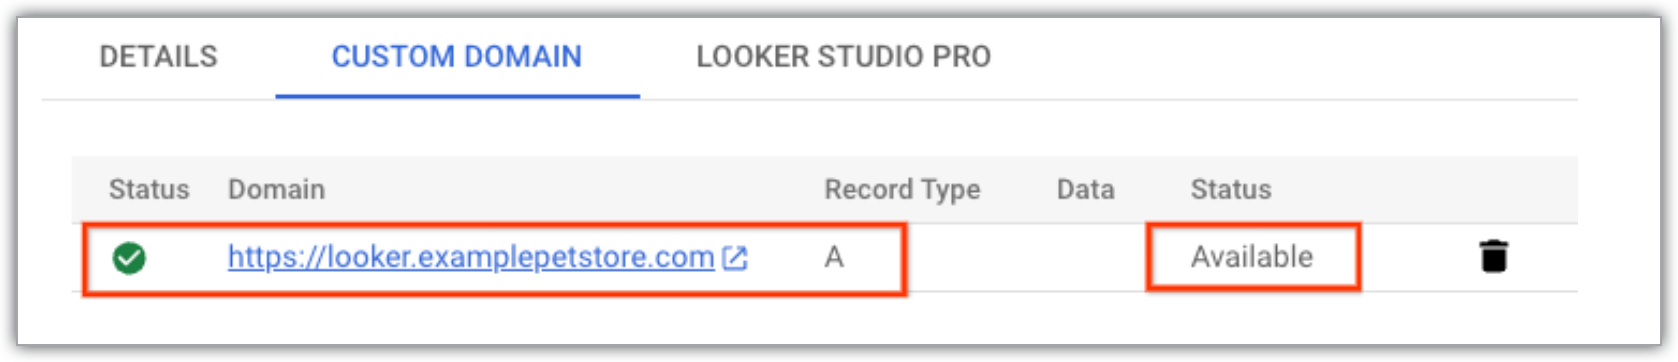
Once your custom domain is set up, it is displayed in the Domain column on the CUSTOM DOMAIN tab of the Looker (Google Cloud core) instance details page in the Google Cloud console.
After your custom domain has been created, you can view information about it, or delete it.
Access the custom domain
When traffic to a private connections (PSA) Looker (Google Cloud core) instance originates from a different region than the instance, you can use one or more private IP reverse proxy servers and a load balancer to provide secure access to the instance.
Before you begin
To get the permissions that you need to set up access to a private connections custom domain, ask your administrator to grant you the following IAM roles on the project the instance resides in:
-
Looker Admin (
roles/looker.admin) -
Compute Instance Admin (v1) (
roles/compute.instanceAdmin.v1) -
DNS Admin (
roles/dns.admin) -
Compute Load Balancer Admin (
roles/compute.loadBalancerAdmin) -
Compute Network Admin (
roles/compute.networkAdmin) -
Compute Security Admin (
roles/compute.securityAdmin) -
Use Google OAuth:
OAuth Config Editor (
roles/oauthconfig.editor)
For more information about granting roles, see Manage access to projects, folders, and organizations.
You might also be able to get the required permissions through custom roles or other predefined roles.
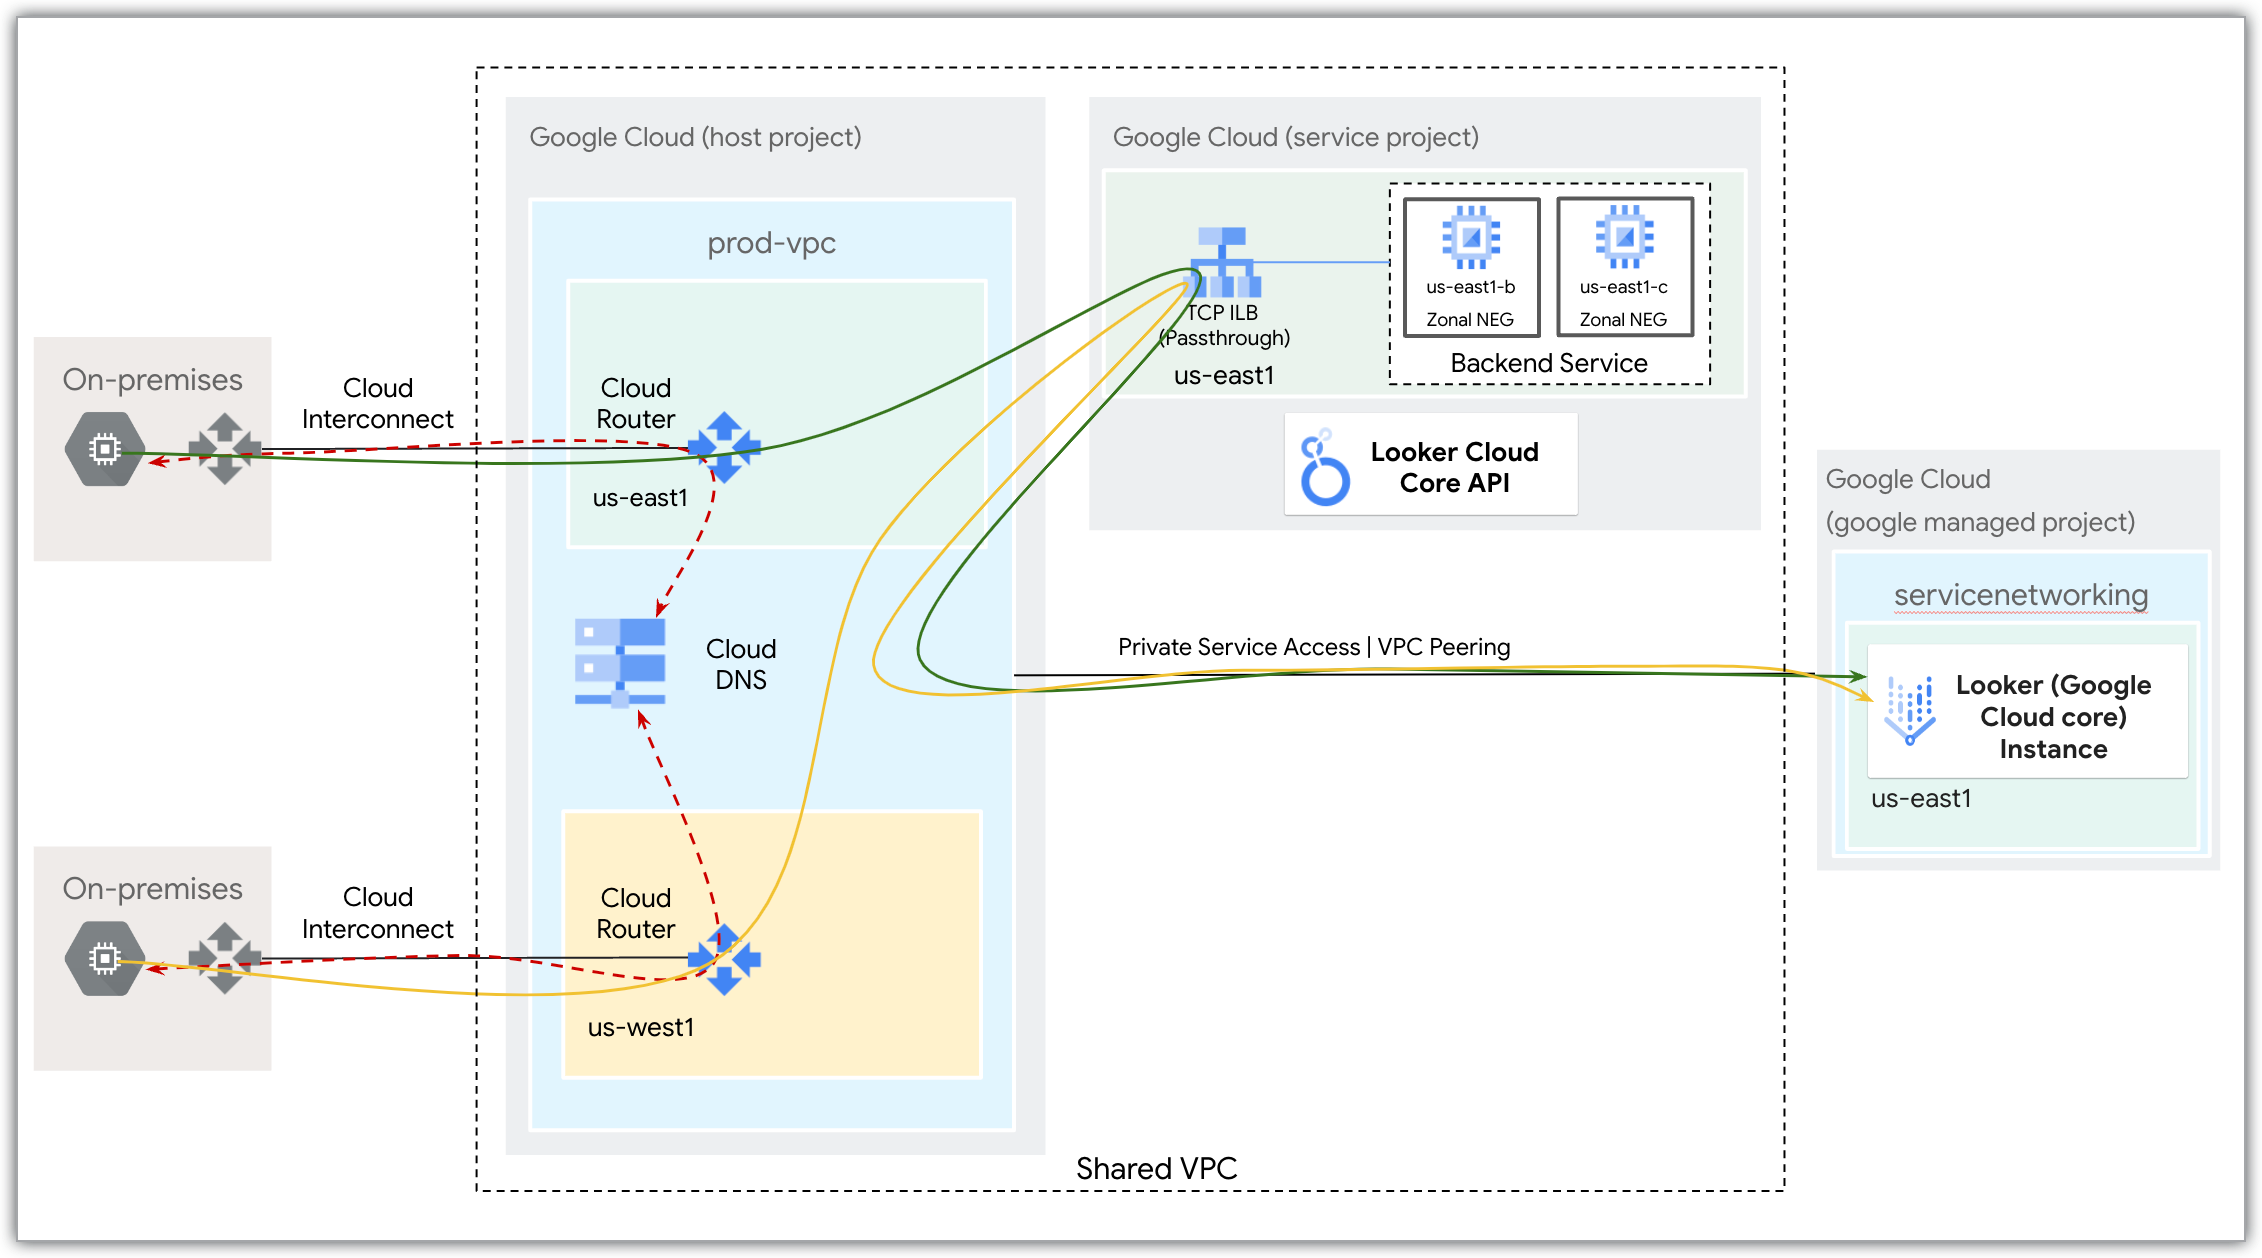
Networking overview
The following sections show how to create a redundant NGINX or Apache proxy server setup, with a load balancer, to route traffic from any region or from on premises to the custom domain. The following diagram represents this topology:
Create VMs, a private zone, and an A record
Complete the steps in the following sections.
Create VMs
Create two private IP only VM instances with a RHEL operating system. The VMs will act as your proxy servers. They should be located within the same region as the Looker (Google Cloud core) instance, but in different zones from each other.
Create a private zone
Create a Cloud DNS private zone that is visible to the VPC in which the Looker (Google Cloud core) instance is located. The Cloud DNS private zone will be used by the VPC and the on-premises hosts for DNS resolution to reach the Looker (Google Cloud core) UI. The name of the zone should match the custom domain.
  gcloud dns managed-zones create NAME \
  --description=DESCRIPTION \
  --dns-name=DNS_SUFFIX \
  --networks=VPC_NETWORK_LIST \
  --labels=LABELS \
  --visibility=private
Replace the following:
NAME: A name for your zone.DESCRIPTION: A description for your zone.DNS_SUFFIX: The DNS suffix for your zone, such asexamplepetstore.com.VPC_NETWORK_LIST: A comma-delimited list of VPC networks that are authorized to query the zone. Make sure to include the VPC that contains your Looker (Google Cloud core) instance.LABELS: An optional comma-delimited list of key-value pairs such asdept=marketingorproject=project1; for more information, see the SDK documentation.
Once the zone is set up, if you navigate to the zone on the Cloud DNS zones page of the Google Cloud console, you can see that it's private, it's named after the custom domain, and it has record sets for the custom domain.

Add the Cloud DNS A record
Complete the following steps to add the Cloud DNS A record:
Since you will be using a load balancer, the A record in the Cloud DNS private zone will map to the load balancer IP address.
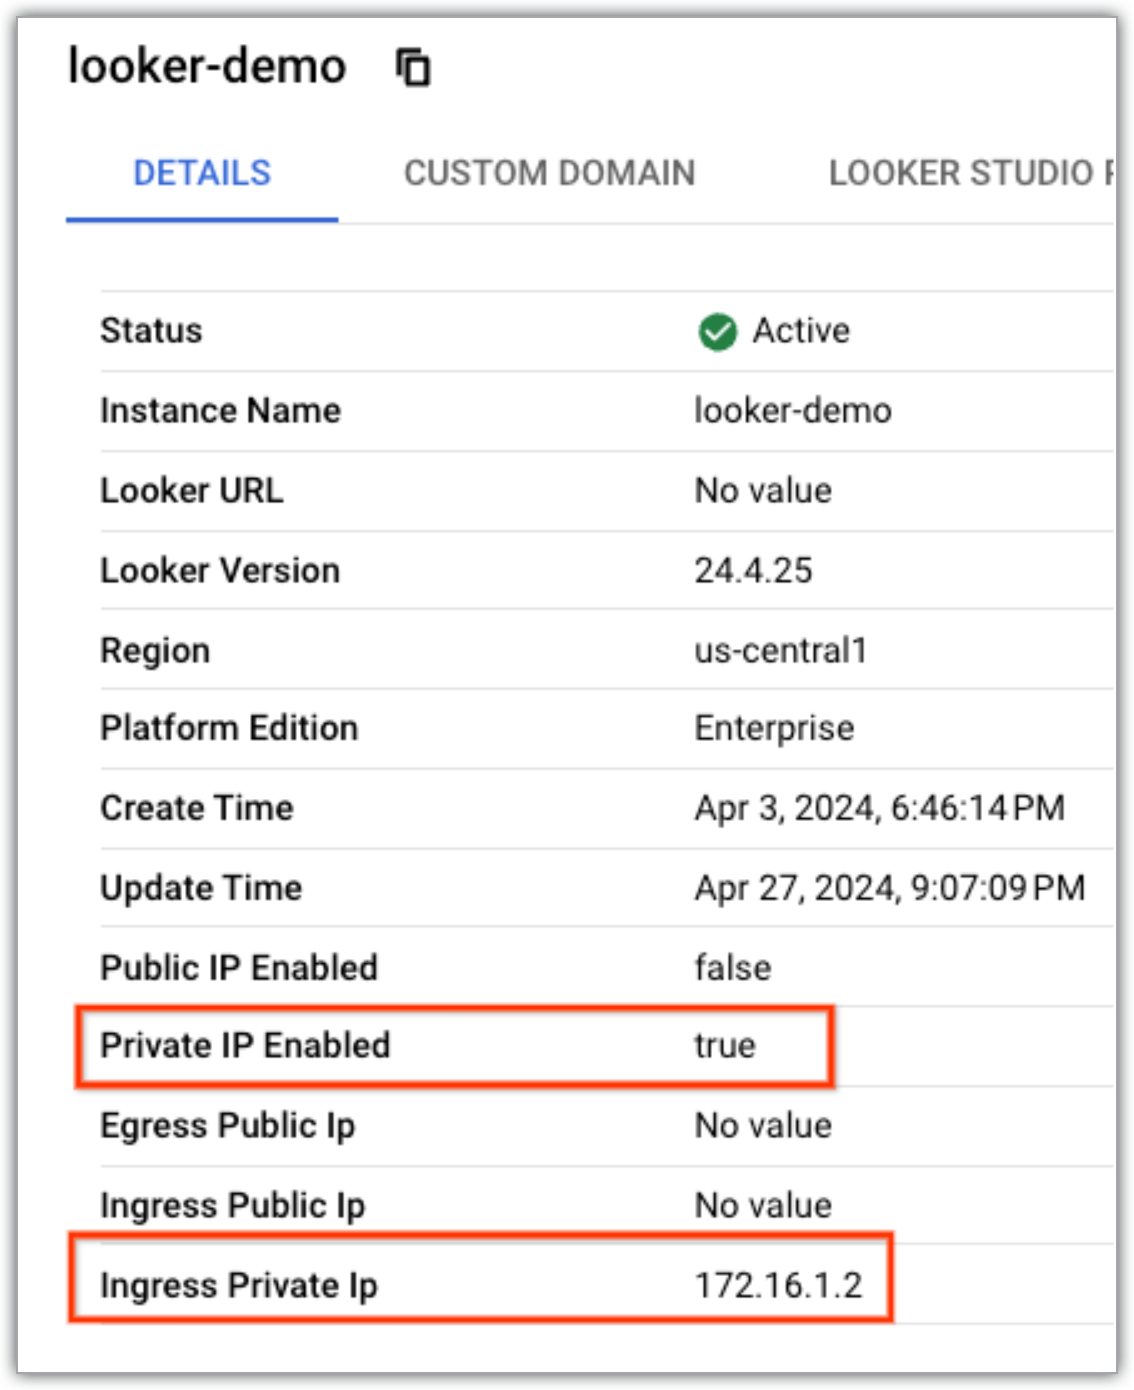
Add a DNS A record for the custom domain in the private zone, consisting of the ingress IP address of the Looker (Google Cloud core) instance. The A record uses the Fully Qualified Domain Name (FQDN), the same as what you configured as the Looker (Google Cloud core) custom domain.
The complete setup should show the A record for the custom domain when you view the private zone details on the Cloud DNS zones page of the Google Cloud console.

To make a VPC network's name resolution services available to on-premises networks that are connected to the VPC network by using Cloud VPN tunnels, Cloud Interconnect VLAN attachments, or Router appliances, you can use an inbound server policy.
Once your domain's DNS records are updated and your domain has been verified in the Google Cloud console, the status of the custom domain that is mapped to the instance will be updated from Unverified to Available on the Custom Domain tab of the Instances page.
Configure the reverse proxy servers
You can use any web server that can be configured as a reverse proxy server. Select one of the following options to see examples of how to set up reverse proxy servers using NGINX or Apache:
NGINX
The following example uses NGINX release 1.22.1 and Red Hat Enterprise Linux release 8.9 (Ootpa). To check what versions of NGNIX and Red Hat your VMs are using, run the following commands for each VM.
First, connect to the VM.
Install NGINX using the following command:
sudo yum install nginx -y
To find the NGINX version the VM is running, run the following command:
sudo nginx -v
This should return something similar to the following:
nginx version: nginx/1.22.1To check which NGINX release the VM is running, run the following:
sudo rpm -qi nginx | grep Release
This should return something similar to the following:
Release : 1.module+el8.8.0+20355+6d9c8a63.1To check what version of Red Hat your VMs are using, run the following command:
sudo cat /etc/redhat-release
To set up each proxy server, use the following instructions for each of the two VMs that you created.
- Connect to the VM.
Edit the
/etc/nginx/nginx.conffile to contain the following configuration:events { worker_connections 1024; } http { log_format main '$remote_addr - $remote_user [$time_local] "$request" ' '$status $body_bytes_sent "$http_referer" ' '"$http_user_agent" "$http_x_forwarded_for"'; log_format debug '$http_x_forwarded_for - $remote_user [$time_local] ' '"$request_method $scheme://$host$request_uri $server_protocol" ' '$status $body_bytes_sent "$http_referer" ' '"$http_user_agent" $request_time'; access_log /var/log/nginx/access.log debug; sendfile on; tcp_nopush on; keepalive_timeout 65; types_hash_max_size 4096; include /etc/nginx/mime.types; default_type application/octet-stream; server { listen 443 ssl; # listen [::]:443 ssl; include snippets/self-signed.conf; # include snippets/ssl-params.conf; server_name CUSTOM_DOMAIN; location / { proxy_pass https://INGRESS_PRIVATE_IP/$request_uri; proxy_set_header Host $server_name; proxy_http_version 1.1; } } server { listen 80; # listen [::]:80; server_name CUSTOM_DOMAIN; return 302 https://$server_name$request_uri; } }Replace the following:
CUSTOM_DOMAIN: The custom domain of your Looker (Google Cloud core) instanceINGRESS_PRIVATE_IP: The ingress IP for your Looker (Google Cloud core) instance
Additionally, consider the following:
- This is an IPv4-only configuration. If you require the proxy to also listen on its IPv6 address, uncomment the
listen [::]:443 sslline in the file. - The access log level is set to
debug; make sure to adjust it to the level used in your specific environment. - If you implement the
ssl-params.conffile, which is referenced later in these steps, uncommentinclude snippets/ssl-params.conf.
Create a valid TLS certificate that references the Looker (Google Cloud core) custom domain URL. This certificate will be the one that the proxy presents to clients that are trying to access Looker (Google Cloud core). The Certificate Authority (CA) used to sign the certificate must be trusted by your clients; you can also use an internal private CA to sign this TLS certificate. (Alternatively, you can also use a self-managed SSL certificate.)
In this example, assume the certificate has already been created using the Let's Encrypt free service, without setting up automatic renewal through Certbot. Once the certificate has been created, save the relevant files in thecertsandprivatedirectories on each proxy VM:/etc/pki/tls/certs/custom-domain.custom-domain.com.fullchain.pem; /etc/pki/tls/private/custom-domain.custom-domain.com.key.pem;
Replace custom-domain.custom-domain.com with your custom domain.
If the
certsandprivatedirectories don't exist in your installation, you can either create them or use other folders.To make sure that NGINX picks up the certificate files, create the directory
/etc/nginx/snippets:sudo mkdir /etc/nginx/snippets
Create the configuration file,
/etc/nginx/snippets/self-signed.conf:sudo touch /etc/nginx/snippets/self-signed.conf
Edit the configuration file to add the paths to the certificate files that you saved:
ssl_certificate /etc/pki/tls/certs/custom-domain.custom-domain.com.fullchain.pem;
ssl_certificate_key /etc/pki/tls/private/custom-domain.custom-domain.com.key.pem;
Replace custom-domain.custom-domain.com with your custom domain.
To confirm that the configuration file contains the reference to the files that were mentioned in the previous step, run the following command:
sudo more /etc/nginx/snippets/self-signed.conf
It should return the file paths that you added.
Optionally, create the
ssl-params.confNGINX file, which can be used to store parameters that can be reused in future NGINX configurations.For reference, the contents of the file should look similar to the following:
ssl_protocols TLSv1.3;
ssl_prefer_server_ciphers on;
ssl_dhparam /etc/nginx/dhparam.pem;
ssl_ciphers EECDH+AESGCM:EDH+AESGCM;
ssl_ecdh_curve secp384r1;
ssl_session_timeout  10m;
ssl_session_cache shared:SSL:10m;
ssl_session_tickets off;
ssl_stapling on;
ssl_stapling_verify on;
resolver 127.0.0.53 valid=300s;
resolver_timeout 5s;
# Disable strict transport security for now. You can uncomment the following
# line if you understand the implications.
#add_header Strict-Transport-Security "max-age=63072000; includeSubDomains; preload";
add_header X-Frame-Options DENY;
add_header X-Content-Type-Options nosniff;
add_header X-XSS-Protection "1; mode=block";
To configure SELinux to allow NGINX to forward traffic to the Looker (Google Cloud core) ingress IP, set the
httpd_can_network_connectSELinux boolean parameter to 1:sudo setsebool -P httpd_can_network_connect 1
You can now restart the NGINX process using the following command:
sudo systemctl restart nginx
Verify that NGINX has correctly restarted using the following command:
sudo systemctl status nginx
It should return an output that is similar to the following:
nginx.service - The nginx HTTP and reverse proxy server
  Loaded: loaded (/usr/lib/systemd/system/nginx.service; disabled; vendor preset: disabled)
  Active: active (running) since Tue 2024-05-14 11:58:00 UTC; 9min ago
  Process: 144044 ExecStart=/usr/sbin/nginx (code=exited, status=0/SUCCESS)
  Process: 144042 ExecStartPre=/usr/sbin/nginx -t (code=exited, status=0/SUCCESS)
  Process: 144039 ExecStartPre=/usr/bin/rm -f /run/nginx.pid (code=exited, status=0/SUCCESS)
Main PID: 144045 (nginx)
    Tasks: 2 (limit: 11040)
  Memory: 2.6M
  CGroup: /system.slice/nginx.service
          ├─144045 nginx: master process /usr/sbin/nginx
          └─144046 nginx: worker process
May 14 11:58:00 proxy-three-eu-w4 systemd[1]: nginx.service: Succeeded.
May 14 11:58:00 proxy-three-eu-w4 systemd[1]: Stopped The nginx HTTP and reverse proxy server.
May 14 11:58:00 proxy-three-eu-w4 systemd[1]: Starting The nginx HTTP and reverse proxy server...
May 14 11:58:00 proxy-three-eu-w4 nginx[144042]: nginx: the configuration file /etc/nginx/nginx.conf syntax is ok
May 14 11:58:00 proxy-three-eu-w4 nginx[144042]: nginx: configuration file /etc/nginx/nginx.conf test is successful
May 14 11:58:00 proxy-three-eu-w4 systemd[1]: Started The nginx HTTP and reverse proxy server.
Apache
Complete these steps for each VM.
First, connect to the VM.
Install Apache:
sudo yum install httpd -y
The following example uses Red Hat Enterprise Linux release 7.9. To check what versions of Red Hat your VMs are using, run the following command:
cat /etc/redhat-release
This should return the following:
Red Hat Enterprise Linux Server release 7.9 (Maipo)The following example uses Apache release 2.4.6. To check what versions of Apache your VMs are using, run the following commands for each VM:
sudo httpd -version
This should return the following:
Server version: Apache/2.4.6 (Red Hat Enterprise Linux)
Server built:   date
For more information about the Apache server, run the following command:
sudo rpm -qi httpd
This should return an output similar to the following:
Name : httpd Version : 2.4.6 Release : 99.el7_9.1 Architecture: x86_64 Install Date: Tue May 7 15:48:59 2024 Group : System Environment/Daemons Size : 3899819 License : ASL 2.0 Signature : RSA/SHA256, Fri Apr 28 17:09:45 2023, Key ID 199e2f91fd431d51 Source RPM : httpd-2.4.6-99.el7_9.1.src.rpm Build Date : Fri Apr 28 16:56:11 2023 Build Host : x86-vm-40.build.eng.bos.redhat.com Relocations : (not relocatable) Packager : Red Hat, Inc.
Create the configuration file
/etc/httpd/conf.d/ssl.confon the proxy VM, and add the following configuration to the file:ServerName custom domain of Looker (Google Cloud core) # SSL Engine Switch: # Enable/Disable SSL for this virtual host. SSLEngine on # SSL Protocol support: # List the enable protocol levels with which clients will be able to # connect. Disable SSLv2 access by default: SSLProtocol all -SSLv2 -SSLv3 # SSL Cipher Suite: # List the ciphers that the client is permitted to negotiate. # See the mod_ssl documentation for a complete list. SSLCipherSuite HIGH:3DES:!aNULL:!MD5:!SEED:!IDEA # Server Certificate: # Point SSLCertificateFile at a PEM encoded certificate. If # the certificate is encrypted, then you will be prompted for a # pass phrase. Note that a kill -HUP will prompt again. A new # certificate can be generated using the genkey(1) command. # SSLCertificateFile /etc/pki/tls/certs/localhost.crt SSLCertificateFile "/etc/pki/tls/certs/custom domain of Looker (Google Cloud core).crt" # Server Private Key: # If the key is not combined with the certificate, use this # directive to point at the key file. Keep in mind that if # you've both a RSA and a DSA private key you can configure # both in parallel (to also allow the use of DSA ciphers, etc.) # SSLCertificateKeyFile /etc/pki/tls/private/localhost.key SSLCertificateKeyFile "/etc/pki/tls/private/custom domain of Looker (Google Cloud core).key" SSLProxyEngine On SSLProxyCheckPeerCN off SSLProxyCheckPeerName off ProxyPreserveHost On RewriteEngine On AllowEncodedSlashes NoDecode ProxyPass / https://private IP of Looker (Google Cloud core)>:443/ RewriteCond %{REQUEST_URI} ^/render/ RewriteRule ^(.*)$ https://private IP of Looker (Google Cloud core)>:443/$1 [P] RewriteRule ^(.*)$ https://private IP of Looker (Google Cloud core)>:443/$1 [P,NE] ProxyPassReverse / https://private IP of Looker (Google Cloud core):443/Replace the following:
custom domain of Looker (Google Cloud core): The custom domain of your Looker (Google Cloud core) instance.private IP of Looker (Google Cloud core): The private IP of your Looker (Google Cloud core) instance.
Confirm that the TLS certificate files are available in the directories referenced in the
/etc/httpd/conf.d/ssl.conffile:SSLCertificateFile "/etc/pki/tls/certs/custom domain of Looker (Google Cloud core).crt" SSLCertificateKeyFile "/etc/pki/tls/private/custom domain of Looker (Google Cloud core).key"
Check if
mod_sslis installed:sudo yum list installed | grep mod_ssl
If
mod_sslis not installed, install it with the following command:sudo yum install mod_ssl
Once
mod_sslis installed, you must enable it by adding the following line to the Apache configuration file,/etc/httpd/conf/httpd.conf:LoadModule ssl_module modules/mod_ssl.so
In the Apache configuration file,
/etc/httpd/conf/httpd.conf, replaceListen 80withListen 443.Execute the following command to allow the Apache proxy VM to forward traffic to Looker (Google Cloud core):
/usr/sbin/setsebool -P httpd_can_network_connect 1
Finally, restart Apache to apply the changes:
sudo systemctl restart httpd
Verify that the rewrite module is loaded and ready on Apache using this command:
sudo httpd -M | grep rewrite
It should return an output that is similar to the following:
rewrite_module (shared)Finally start or restart the Apache process, in order to make sure all the configuration changes are picked up:
sudo systemctl restart httpd
Verify that the Apache process has correctly restarted using the following command:
sudo systemctl status httpd
It should return an output that is similar to the following:
httpd.service - The Apache HTTP Server
Loaded: loaded (/usr/lib/systemd/system/httpd.service; disabled; vendor preset: disabled)
Active: active (running) since Tue 2024-05-14 15:41:57 UTC; 1s ago
  Docs: man:httpd(8)
        man:apachectl(8)
Main PID: 1400 (httpd)
Status: "Processing requests..."
CGroup: /system.slice/httpd.service
        ├─1400 /usr/sbin/httpd -DFOREGROUND
        ├─1401 /usr/sbin/httpd -DFOREGROUND
        ├─1402 /usr/sbin/httpd -DFOREGROUND
        ├─1403 /usr/sbin/httpd -DFOREGROUND
        ├─1404 /usr/sbin/httpd -DFOREGROUND
        └─1405 /usr/sbin/httpd -DFOREGROUND
May 14 15:41:57 proxy-ingress-apache systemd[1]: Starting The Apache HTTP Server...
May 14 15:41:57 proxy-ingress-apache systemd[1]: Started The Apache HTTP Server.
Create and configure the load balancer
This examples uses zonal network endpoint groups (NEGs) with GCE_VM_IP endpoints as backends of the internal passthrough Network Load Balancer. If you prefer to use instance group based backends, follow the documentation available on the Set up an internal passthrough Network Load Balancer with VM instance group backends documentation page.
Create one separate zonal NEG for each compute zone where you plan to deploy proxy servers. For example, if you want to deploy proxy servers in each of the three compute zones of the region where Looker (Google Cloud core) is deployed, then create three zonal NEGs. See the Quotas and limits documentation page to check how many endpoints are supported per zonal NEG.
To create a zonal NEG, use the following
gcloudcommand:gcloud compute network-endpoint-groups create NEG_NAME --network-endpoint-type=gce-vm-ip \ --zone=PROXY_INSTANCE_ZONE --network=PROXY_INSTANCE_VPC \ --subnet=PROXY_INSTANCE_SUBNET
Replace the following:
NEG_NAME: The name of the NEG you are creating.PROXY_INSTANCE_ZONE: The zone that the proxy server is located in.PROXY_INSTANCE_VPC: The VPC that contains the proxy server.PROXY_INSTANCE_SUBNET: The subnet in which the proxy server is located.
Repeat this step for any additional zone where you will deploy a proxy server VM.
Add each proxy server to the NEG in the same zone:
gcloud compute network-endpoint-groups update NEG_NAME --zone=PROXY_INSTANCE_ZONE \
--add-endpoint='instance=PROXY_INSTANCE_NAME'
Replace the following:
PROXY_INSTANCE_ZONE: The zone that the proxy server is located in.NEG_NAME: The name of the NEG in the same zone as the proxy server.PROXY_INSTANCE_NAME: The name of the proxy server.
Repeat this step until each of the proxy server VM is added to a NEG as an endpoint.
Create a regional health check that will be used by the internal load balancer. Use the
compute health-checks createcommand:gcloud compute health-checks create PROTOCOL NAME \ --region=REGION \ --description=DESCRIPTION \ --check-interval=CHECK_INTERVAL \ --timeout=TIMEOUT \ --healthy-threshold=HEALTHY_THRESHOLD \ --unhealthy-threshold=UNHEALTHY_THRESHOLD \ PORT_SPECIFICATION \ ADDITIONAL_FLAGSReplace the following:
PROTOCOL: The protocol used for the health check. Valid options aregrpc,http,https,http2,ssl, andtcp.NAME: The name of the health check. Within a given project, each global health check must have a unique name, and regional health checks must have unique names within a given region.REGION: All load balancers except for regional external Application Load Balancers and regional internal Application Load Balancers use global health checks (--global). Regional internal Application Load Balancers use regional health checks whose region must match the region of the backend service.DESCRIPTION: An optional description.CHECK_INTERVAL: The amount of time from the start of one health check probe system's connection to the start of the next one. Units are seconds. If omitted, Google Cloud uses a value of5s(5 seconds).TIMEOUT: The amount of time that Google Cloud waits for a response to a probe. The value ofTIMEOUTmust be less than or equal to theCHECK_INTERVAL. Units are seconds. If omitted, Google Cloud uses a value of5s(5 seconds).HEALTHY_THRESHOLDandUNHEALTHY_THRESHOLD: Specify the number of sequential probes that must succeed or fail for the VM instance to be considered healthy or unhealthy. If either is omitted, Google Cloud uses a default threshold of2.PORT_SPECIFICATION: Defines the port specification using one of the Port specification flags.ADDITIONAL_FLAGS: Other flags for specifying ports and options specific to thePROTOCOL. See Additional flags for HTTP, HTTPS, and HTTP/2 health checks, Additional flags for SSL and TCP health checks, or Additional flag for gRPC health checks.
-
gcloud compute backend-services create BS_NAME --load-balancing-scheme=INTERNAL \
--protocol=tcp --region=PROXY_INSTANCES_REGION --health-checks=HC_NAME \
--health-checks-region=HC_REGION --session-affinity=CLIENT_IP \
--connection-persistence-on-unhealthy-backends=NEVER_PERSIST
Replace the following:
BS_NAME: The name of the load balancer you are creating.PROXY_INSTANCES_REGION: The region in which the proxy servers are located.HC_NAME: The name of the regional health check you created.HC_REGION: The region in which the health check is located.
Additionally:
- The
--session-affinity=CLIENT_IPflag directs a particular client's request to the same backend proxy instance VM, based on a hash created on both the client IP's address and the destination address. - The
--connection-persistence-on-unhealthy-backends=NEVER_PERSISTflag means that connections won't persist on non-healthy proxy instance VMs.
Add each of the NEGs to the backend service:
gcloud compute backend-services add-backend BS_NAME --region=BS_REGION \
--network-endpoint-group=NEG_NAME --network-endpoint-group-zone=NEG_ZONE
Replace the following:
BS_NAME: The name of the backend service you created.BS_REGION: The region in which the backend service is located; this should be the same as the region in which the proxy servers are located.NEG_NAME: The name of the NEG you are adding.NEG_ZONE: The zone in which the NEG is located.
Repeat this step for the additional NEG you created.
Reserve an internal IP address in the VPC inside the IP range of the subnet where the proxy instances are connected. This will be the Virtual IP address (VIP) of the internal load balancer. Reserving the address will make sure the IP won't be used by any other object. To reserve the internal IP address, use the
compute addresses createcommand:gcloud compute addresses create ADDRESS_NAMES \ --region REGION --subnet SUBNETWORK \ --addresses IP_ADDRESSReplace the following:
ADDRESS_NAMES: The names of one or more[--purpose=SHARED_LOADBALANCER_VIP]addresses that you want to create. In case of multiple addresses, specify all the addresses as a list, separated by spaces—for example,example-address-1 example-address-2 example-address-3REGION: The region for this request.SUBNETWORK: The subnet for this internal IP address.IP_ADDRESS: The IP address to reserve, which must be within the subnet's primary IP range. If unspecified, an IP address is automatically allocated from the subnet.
Create the forwarding rule and associate it with the backend service and the VIP:
gcloud compute forwarding-rules create FW_RULE_NAME --region=BS_REGION \
--load-balancing-scheme=internal --network=PROXY_INSTANCES_VPC_NAME --subnet=RESERVED_IP_ADDRESS_SUBNET \
--address=RESERVED_IP_ADDRESS --ip-protocol=tcp --ports=ALL --backend-service=BS_NAME \
--backend-service-region=BS_REGION --allow-global-access
Replace the following:
FW_RULE_NAME: The name of the forwarding rule you are creating.BS_REGION: The region in which the backend service is locatedPROXY_INSTANCES_VPC_NAME: The name of the VPC in which the proxy server VMs were createdRESERVED_IP_ADDRESS_SUBNET: The subnet in which the VIP is locatedRESERVED_IP_ADDRESS: The VIP address for the load balancerBS_NAME: The name of the backend service
Additionally:
- The
--allow-global-accessflag indicates that the VIP of the load balancer is reachable from any region (not just the BS_REGION). This allows clients in every region to reach the Looker (Google Cloud core) instance.
Create firewall rules
For health checks to work, create ingress firewall rules applicable to the proxy VM being load balanced to allow traffic from health check prober IP ranges.
Additionally, create an ingress firewall rule to allow traffic from on premises or multicloud environments to gain access the load balancer backend service.
Update the DNS A record
Change the A record of the Looker (Google Cloud core) custom domain to point to the VIP of the load balancer. The Cloud DNS private zone you created manages the custom domain and is used by the VPC where the proxy instances are located.
Update the OAuth credentials
- Access your OAuth client by navigating in the Google Cloud console to APIs & Services > Credentials and selecting the OAuth client ID for the OAuth client that is used by your Looker (Google Cloud core) instance.
Click the Add URI button to update the Authorized JavaScript origins field in your OAuth client to include the same DNS name that your organization will use to access Looker (Google Cloud core). So if your custom domain is
looker.examplepetstore.com, you enterlooker.examplepetstore.comas the URI.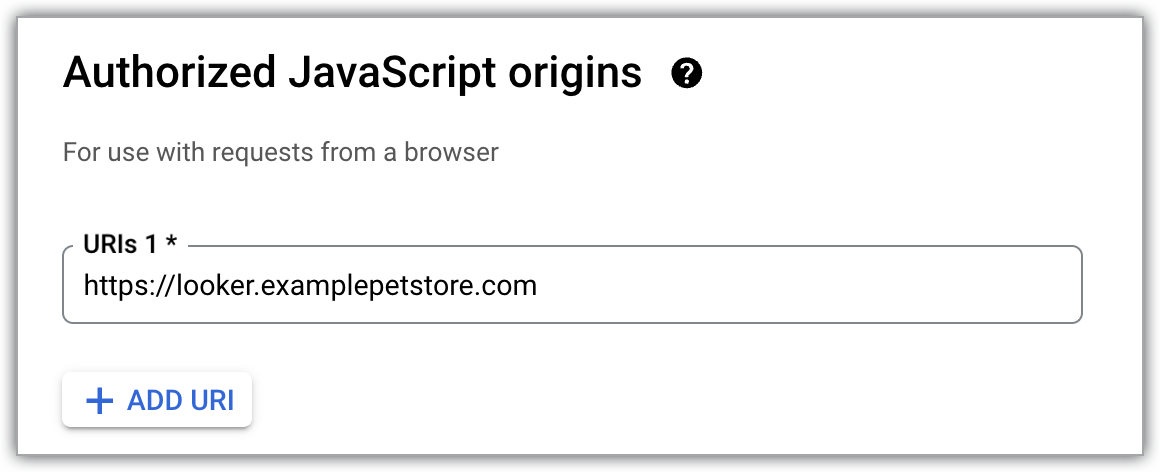
Update or add the custom domain to the list of the Authorized redirect URIs for the OAuth credentials you used when creating the Looker (Google Cloud core) instance. Add
/oauth2callbackto the end of the URI. So if your custom domain islooker.examplepetstore.com, you enterlooker.examplepetstore.com/oauth2callback.
Adding users
Once the preceding steps are completed, the custom domain URL is accessible to users.
Ensure that the user authentication method is completely set up for the Looker (Google Cloud core) instance before adding users to the instance.
Troubleshooting
If you are using Chrome to access the Looker (Google Cloud core) custom domain and you receive a Chrome error such as
NET::ERR_CERT_COMMON_NAME_INVALIDor an HSTS policy error, you can fix it with the following steps:- Open
chrome://net-internals/#hsts - Input the custom domain to query the HSTS/PKP set. Any policies for the custom domain will appear under Found:.
- Under Delete domain security policies, enter the custom domain in the Domain field.
- Click Delete to delete the policies.
- Open
To troubleshoot certificate errors, see the Troubleshoot SSL certificates documentation page. For Google-managed certificates, be sure to explicitly authorize the Certificate Authority that you want to allow to issue your Google-managed certificate.
What's next
- Connect Looker (Google Cloud core) to your database
- Prepare your Looker (Google Cloud core) instance for users
- Manage users within Looker (Google Cloud core)