서명된 삽입 URL을 생성하려면 대시보드의 점 3개 대시보드 메뉴 또는 Look이나 Explore의 Explore 작업 톱니바퀴 메뉴에서 삽입 URL 가져오기 옵션을 선택한 다음 서명된 삽입 탭을 클릭하세요.
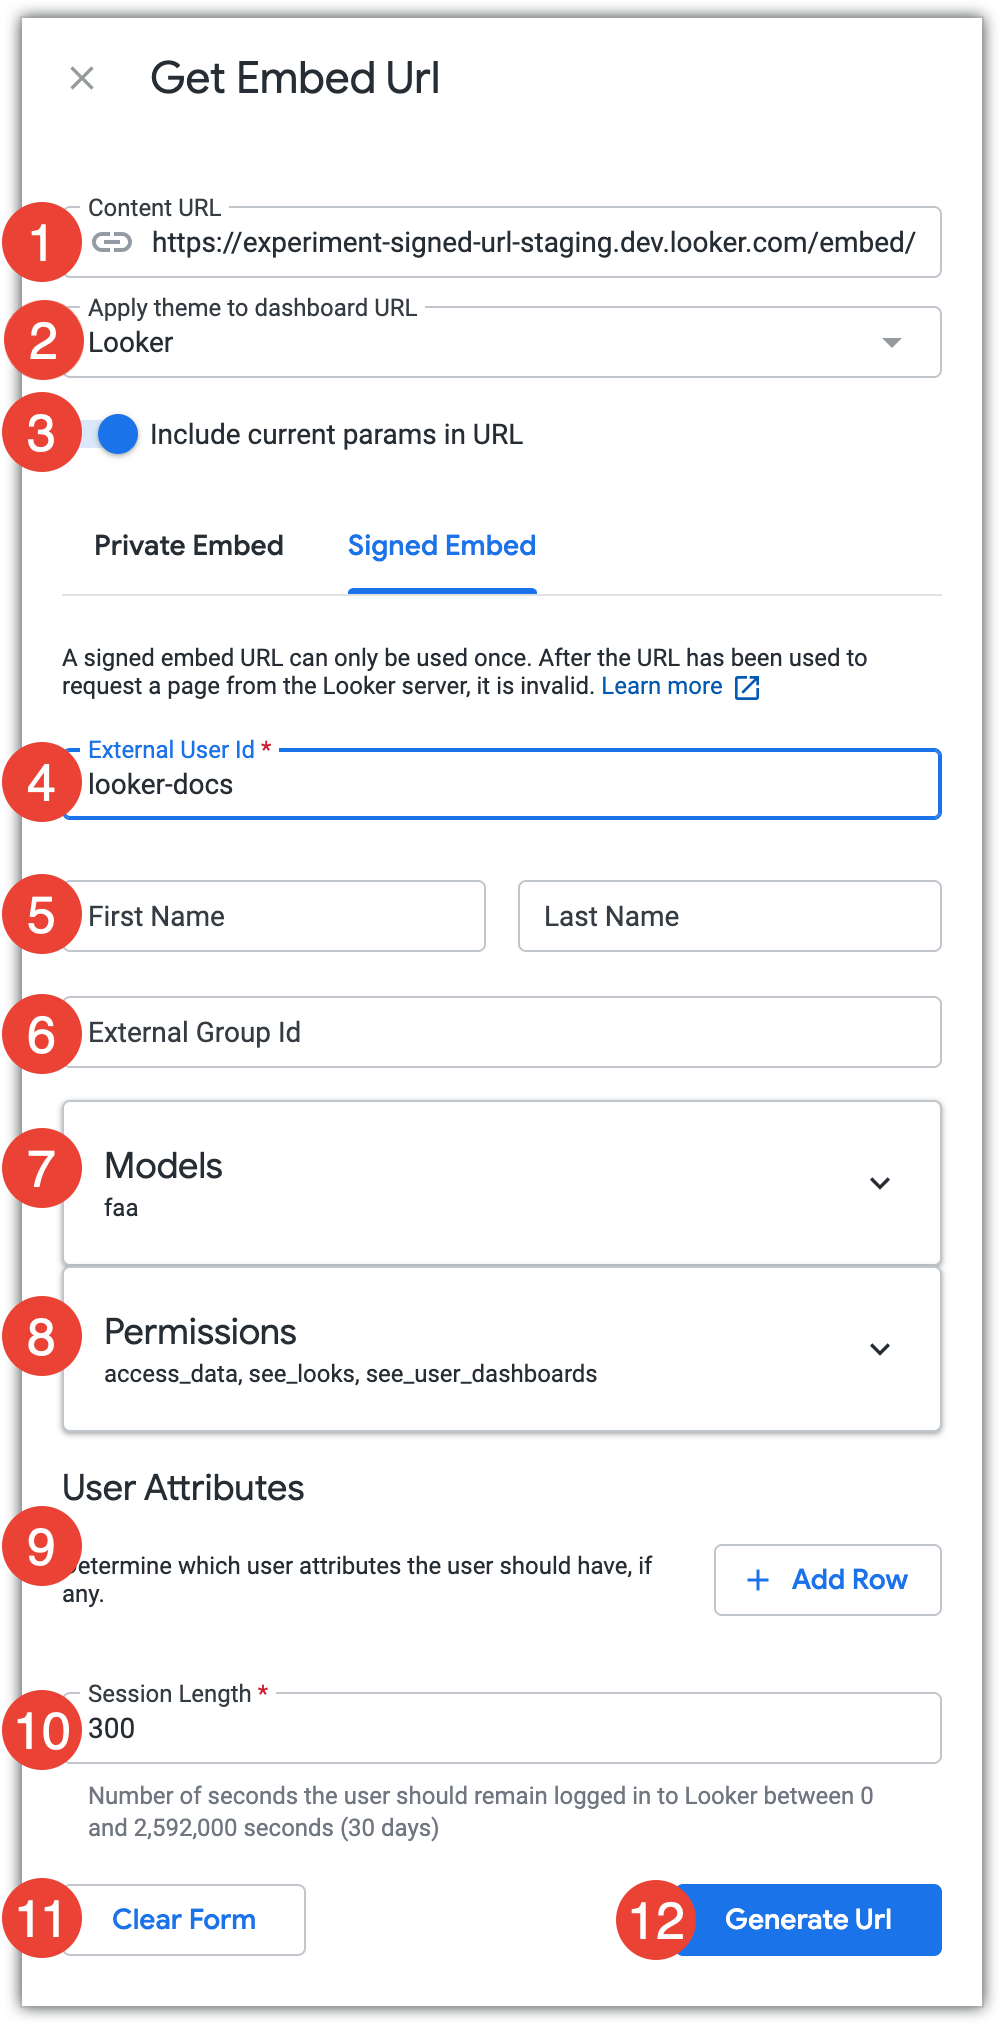
콘텐츠 URL 필드에는
/embed경로를 포함하여 전체 콘텐츠 URL이 표시됩니다.대시보드/Explore/Look URL에 테마 적용 필드를 사용하면 대시보드, Explore, Look 삽입 URL을 생성 중이고 인스턴스에 커스텀 테마가사용 설정된 경우 삽입 URL에 추가할 테마를 선택할 수 있습니다. 삽입된 대시보드 또는 Explore가 표시되면 테마가 적용됩니다.
URL에 현재 매개변수 포함 스위치를 사용하면 필터 값과 같은 현재 매개변수를 삽입 URL에 적용할지 여부를 선택할 수 있습니다. 사용 설정하면 삽입된 콘텐츠를 볼 때 해당 매개변수가 적용됩니다.
사용자의 고유 식별자를 입력합니다. 고유한 문자열이면 사용자에게 어떤 문자열이라도 할당할 수 있습니다. 자세한 내용은
external_user_id매개변수 정의를 참조하세요.선택사항: 사용자의 이름과 성을 입력합니다. 이 필드 중 하나 또는 둘 다 비워 두면 마지막 요청 값이 유지됩니다. 이전에 값을 설정한 적이 없으면 각 필드에 "삽입" 값이 할당됩니다.
선택사항: 외부 그룹 ID를 입력합니다. 이는 Looker를 삽입 중인 애플리케이션에 사용자가 속하는 그룹에 대한 고유 식별자입니다. 콘텐츠를 저장하고 외부 그룹 ID를 공유할 권한이 있는 사용자가 공유 Looker 폴더("Group")에서 콘텐츠를 저장하고 수정할 수 있습니다. 외부 그룹 ID는 삽입 사용자의 외부 그룹을 만들기 위해 사용할 수 있는 유일한 방법입니다. Looker UI 내에서 외부 삽입 사용자 그룹을 구성할 수 있는 방법은 없습니다.
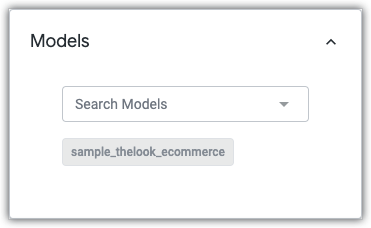
대시보드, Look 또는 Explore의 기반이 되는 모델이 모델 필드에 나열됩니다. 사용자에게 해당 모델에 대한 액세스 권한이 부여됩니다. 사용자에게 추가 모델에 대한 액세스 권한을 부여하려면 모델 검색 드롭다운 필드에서 모델 필드를 클릭하여 확장한 후 사용자에게 액세스 권한을 부여하려는 추가 모델을 선택합니다.
사용자가 삽입된 콘텐츠를 보기 위해 필요한 최소 권한은 기본적으로 선택됩니다. 사용자에게 추가 권한을 부여하려면 권한 필드를 클릭하여 확장한 후 사용자에게 부여하려는 추가 권한을 선택합니다.

사용자에게 하나 이상의 사용자 속성을 부여하려면 행 추가를 클릭합니다. 키 드롭다운 필드에서 사용자에게 필요한 사용자 속성을 선택한 다음 값 필드에 해당 사용자 속성의 사용자 값을 입력합니다. 행 추가를 클릭하여 사용자 속성을 추가하거나 휴지통 아이콘을 클릭하여 사용자 속성을 삭제할 수 있습니다. 동일한 키 값으로 여러 사용자 속성을 추가할 수 없습니다.

세션 길이 필드에 서명된 삽입 URL 세션이 무효화될 때까지 경과되는 시간(초)을 입력합니다.
모든 값을 기본 설정으로 되돌리려면 양식 지우기를 클릭합니다. 삽입 URL 가져오기 창에서 나가면 모든 값이 재설정됩니다.
URL 생성을 클릭합니다.
Looker에서 지정된 매개변수를 사용하여 서명된 삽입 URL, 서명된 SDK 호출, 서명된 삽입 SDK 호출을 생성합니다.

- 생성된 서명된 삽입 URL을 클립보드에 복사하려면 링크 복사를 클릭합니다.
- 코드 보기를 클릭하여 코드 창을 열어서 SDK 호출 또는 삽입 SDK 호출을 볼 수 있습니다.
- 코드 창 내에서 생성된 SDK 호출 또는 삽입 SDK 호출 결과를 클립보드에 복사하려면 클립보드에 복사를 클릭합니다.