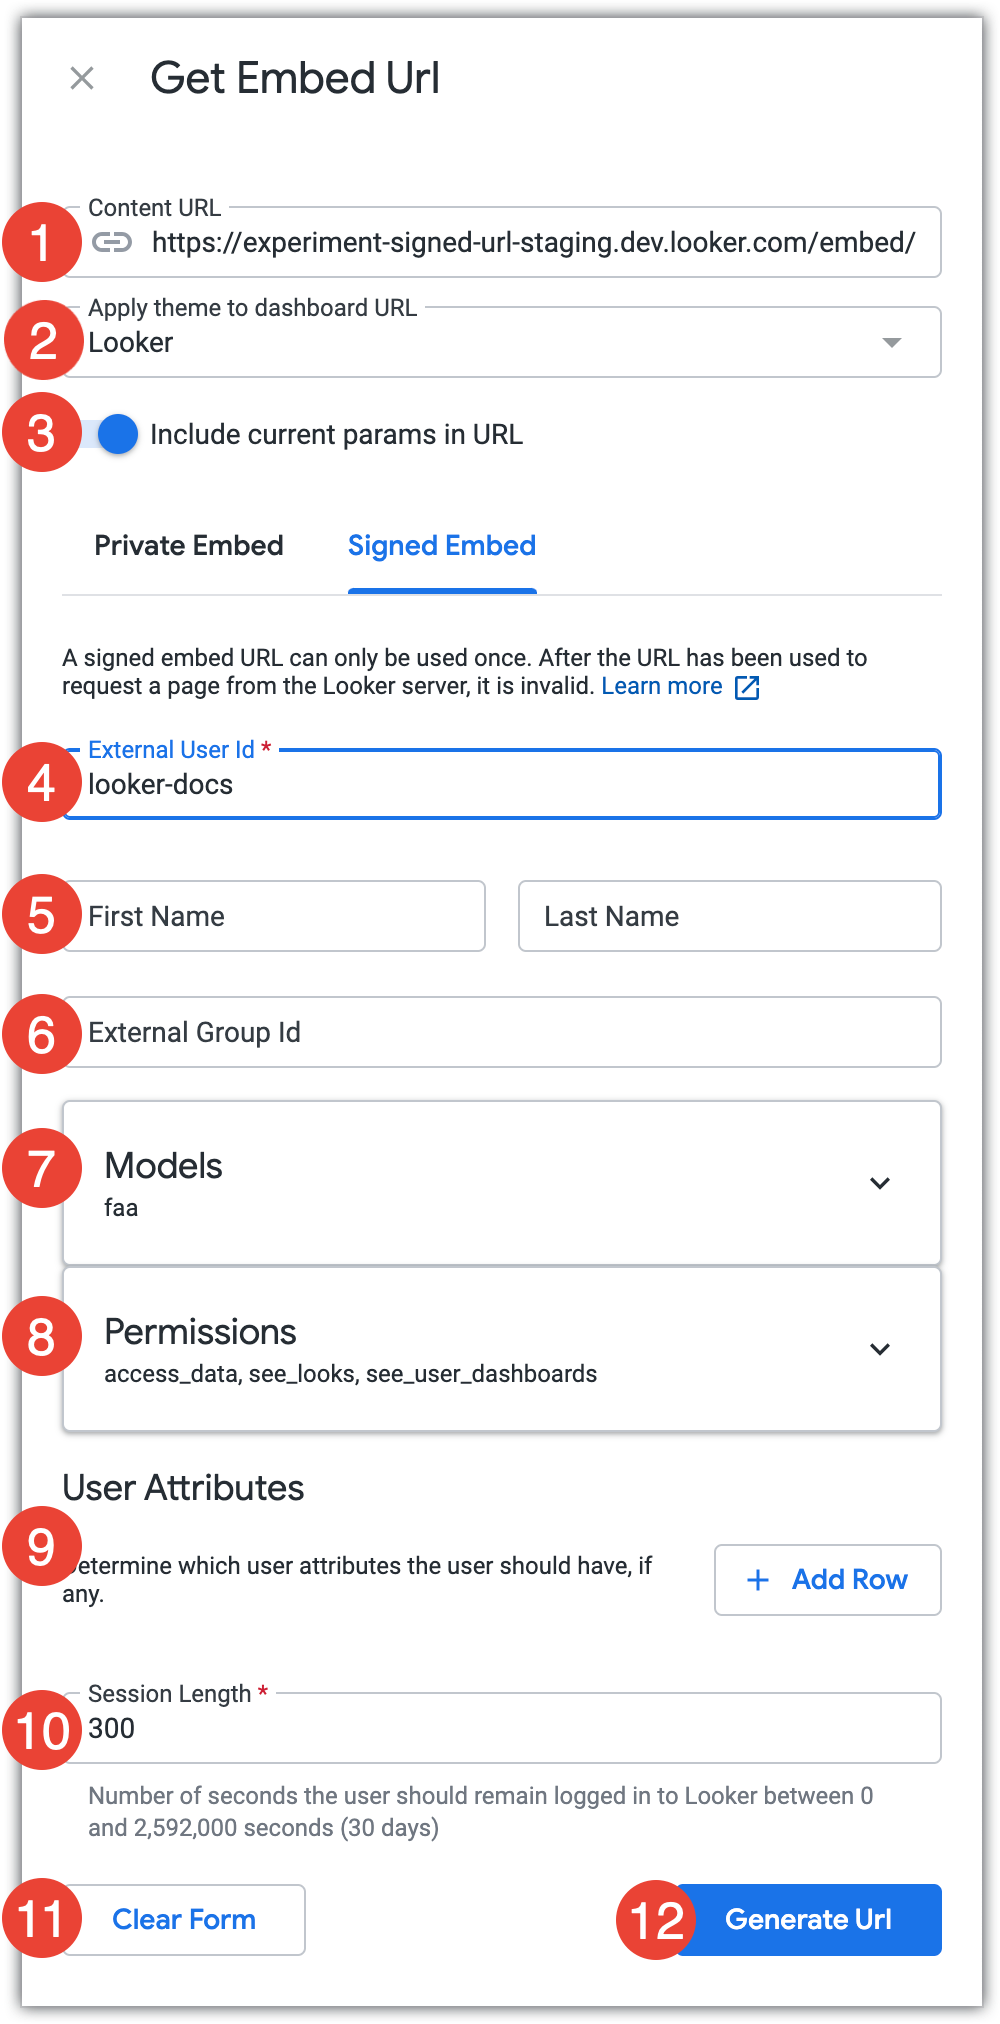
Il campo URL dei contenuti mostra l'URL completo dei contenuti, incluso il percorso /embed.
Il campo Applica tema all'URL di dashboard/esplorazione/look ti consente di selezionare un tema da aggiungere all'URL di incorporamento se stai generando un URL di incorporamento di una dashboard, un'esplorazione o un look e la tua istanza ha attivato i temi personalizzati. Il tema verrà applicato quando viene visualizzata la dashboard o l'esplorazione incorporata.
L'opzione Includi i parametri attuali nell'URL ti consente di scegliere se applicare i parametri attuali, ad esempio i valori del filtro, all'URL di incorporamento. Se abilitati, questi parametri verranno applicati quando i contenuti incorporati vengono visualizzati.
Inserisci un identificatore univoco per l'utente. Puoi assegnare all'utente qualsiasi stringa, purché sia univoca. Per ulteriori informazioni, consulta la definizione del parametro external_user_id.
(Facoltativo) Inserisci il nome e il cognome dell'utente. Se uno o entrambi questi campi vengono lasciati vuoti, manterranno il valore dell'ultima richiesta. Se non è stato impostato alcun valore, a ogni campo verrà assegnato il valore "Incorpora".
(Facoltativo) Inserisci un ID gruppo esterno. Si tratta di un identificatore univoco del gruppo a cui appartiene l'utente nell'applicazione in cui è incorporato Looker.
Gli utenti che dispongono dell'autorizzazione per salvare i contenuti e condividono un ID gruppo esterno potranno salvare e modificare i contenuti in una cartella di Looker condivisa denominata "Gruppo". Un ID gruppo esterno è l'unico metodo disponibile per creare gruppi esterni di utenti di incorporamento. Non è possibile configurare gruppi di utenti di incorporamento esterni dall'interfaccia utente di Looker.
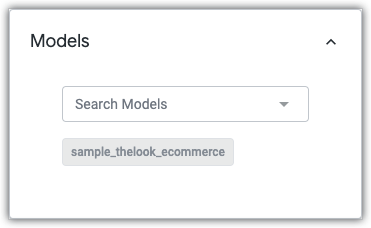
Il modello su cui si basa la dashboard, il look o l'esplorazione è elencato nel campo Modelli. All'utente verrà concesso l'accesso al modello. Per concedere all'utente l'accesso ad altri modelli, fai clic sul campo Modelli nel campo a discesa Cerca modelli per espanderlo e seleziona i modelli aggiuntivi a cui vuoi concedere l'accesso all'utente.
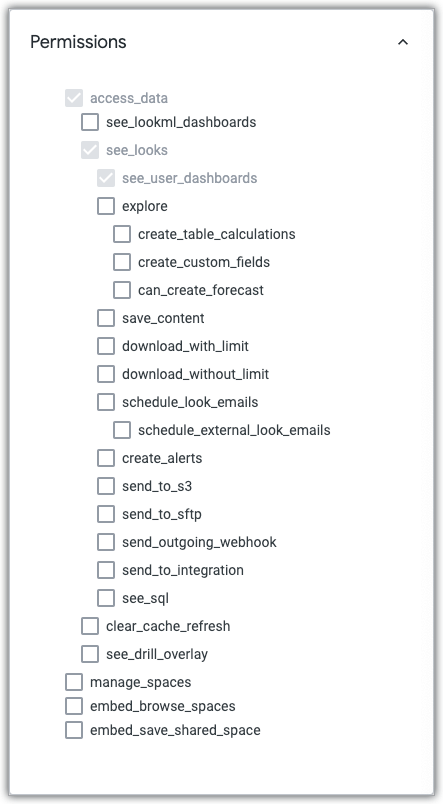
Per impostazione predefinita, verranno selezionate le autorizzazioni minime richieste dall'utente per visualizzare i contenuti incorporati. Per concedere all'utente autorizzazioni aggiuntive, fai clic sul campo Autorizzazioni per espanderlo e seleziona le autorizzazioni aggiuntive che vuoi concedere all'utente.
Per concedere all'utente uno o più attributi utente, fai clic su Aggiungi riga. Seleziona l'attributo utente che vuoi che l'utente abbia nel campo del menu a discesa Chiave e poi inserisci il valore dell'utente per quell'attributo nel campo Valore. Puoi aggiungere altri attributi utente facendo clic su Aggiungi riga oppure puoi rimuovere un attributo utente facendo clic sull'icona del cestino. Non puoi aggiungere più attributi utente con lo stesso valore Key.
Nel campo Durata sessione, inserisci il numero di secondi che possono trascorrere prima che la sessione dell'URL di incorporamento firmato venga invalidata.
Per ripristinare tutti i valori alle impostazioni predefinite, fai clic su Cancella modulo. Tutti i valori verranno reimpostati anche se esci dalla finestra Genera URL di incorporamento.
Fai clic su Genera URL.
Utilizzando i parametri specificati, Looker genera un URL di incorporamento firmato, una chiamata all'SDK firmata e una chiamata all'SDK incorporato firmata.
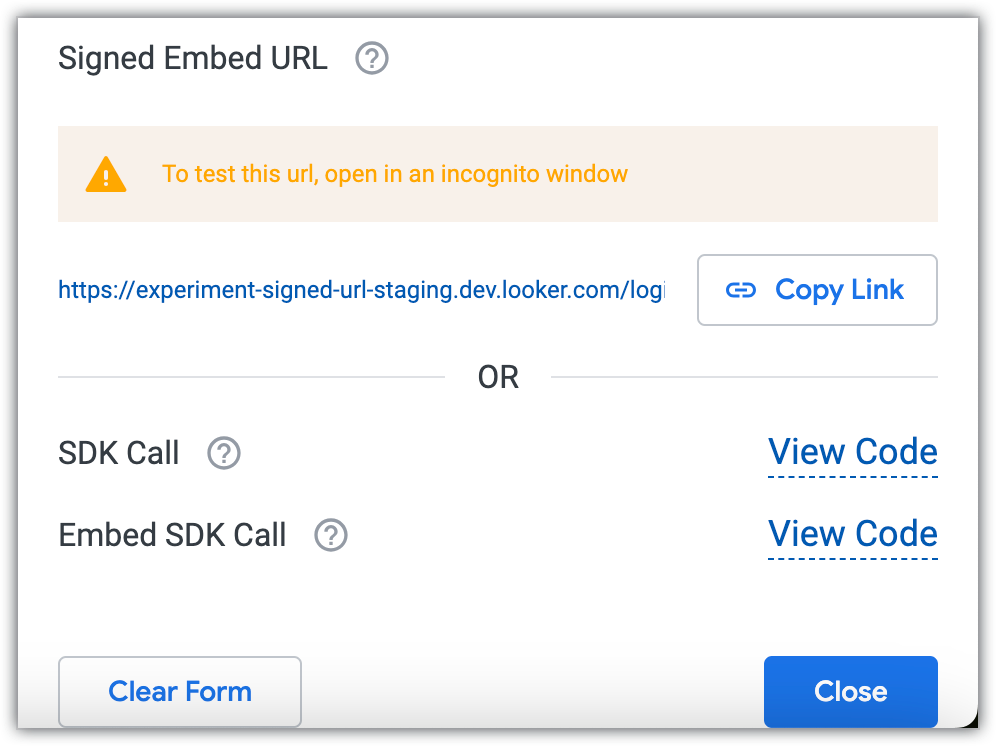
Per copiare l'URL di incorporamento firmato generato negli appunti, fai clic su Copia link.
Puoi visualizzare la chiamata all'SDK o all'SDK Embed facendo clic su Visualizza codice, che aprirà una finestra di codice.
Dalla finestra di codice, per copiare la chiamata SDK generata o i risultati della chiamata Incorpora SDK negli appunti, fai clic su Copia negli appunti.
[[["Facile da capire","easyToUnderstand","thumb-up"],["Il problema è stato risolto","solvedMyProblem","thumb-up"],["Altra","otherUp","thumb-up"]],[["Difficile da capire","hardToUnderstand","thumb-down"],["Informazioni o codice di esempio errati","incorrectInformationOrSampleCode","thumb-down"],["Mancano le informazioni o gli esempi di cui ho bisogno","missingTheInformationSamplesINeed","thumb-down"],["Problema di traduzione","translationIssue","thumb-down"],["Altra","otherDown","thumb-down"]],["Ultimo aggiornamento 2025-07-31 UTC."],[],[],null,["# Getting a signed embed URL\n\nTo generate a [signed embed URL](/looker/docs/single-sign-on-embedding), select the **Get embed URL** option from the [three-dot dashboard menu](/looker/docs/viewing-dashboards#three-dot_dashboard_menu) on a dashboard, or from the [Explore actions gear menu](/looker/docs/viewing-looks#the_look_explore_actions_gear_menu) on a Look or Explore, and then click the **Signed Embed** tab.\n| **Note:** You must have the [`manage_embed_settings` permission](/looker/docs/admin-panel-users-roles#manage_embed_settings) to generate a signed embed URL.\n\n1. The **Content URL** field shows the full content URL, including the `/embed` path.\n\n2. The **Apply theme to dashboard/explore/look URL** field lets you select a theme to be added to the embed URL if you are generating a dashboard, an Explore, or a Look embed URL and your instance has [custom themes](/looker/docs/themes-for-embedded-dashboards-and-explores) enabled. The theme will be applied when the embedded dashboard or Explore is viewed.\n\n3. The **Include current params in URL** switch lets you choose whether to apply current parameters, such as filter values, to the embed URL. If enabled, those parameters will be applied when the embedded content is viewed.\n\n4. Enter a unique identifier for the user. You can assign the user any string, as long as it is unique. See the [`external_user_id` parameter definition](/looker/docs/single-sign-on-embedding#external_user_id) for more information.\n\n5. Optional: Enter the user's first name and last name. If one or both of these fields are left blank, they will retain the value from the last request. If no value has ever been set, each field will be assigned the value \"Embed\".\n\n6. Optional: Enter an **External Group ID**. This is a unique identifier for the group that the user belongs to in the application that is embedding Looker.\n Users who have permission to save content, and share an external group ID, will be able to save and edit content in a shared Looker folder called \"Group\". An external group ID is the only available method for creating external groups of embed users. There is no way to configure external embed user groups from within the Looker UI.\n\n7. The [model](/looker/docs/lookml-terms-and-concepts#model) on which the dashboard, Look, or Explore is based is listed in the **Models** field. The user will be granted access to that model. To grant the user access to additional models, from the **Search Models** drop-down field, click the **Models** field to expand it, and then select the additional models to which you want to grant the user access.\n\n8. The minimum [permissions](/looker/docs/single-sign-on-embedding#permissions) that are required by the user to view the embedded content will be selected by default. To grant the user additional permissions, click the **Permissions** field to expand it, and then select any additional permissions that you want to grant to the user.\n\n9. To grant the user one or more [user attributes](/looker/docs/admin-panel-users-user-attributes), click **Add Row** . Select the user attribute that you want the user to have in the **Key** drop-down field, and then enter the user's value for that user attribute in the **Value** field. You can add additional user attributes by clicking **Add Row** , or you can remove a user attribute by clicking the trash can icon. You cannot add multiple user attributes with the same **Key** value.\n\n10. In the **Session Length** field, enter the number of seconds that can elapse before the signed embed URL session should be invalidated.\n\n11. To return all values to default settings, click **Clear Form** . All values will also reset if you navigate away from the **Get Embed URL** window.\n\n12. Click **Generate URL**.\n\nUsing the parameters that you specified, Looker will generate a signed embed URL, a signed [SDK](/looker/docs/api-sdk) call, and a signed [embed SDK](/looker/docs/embed-sdk-intro) call.\n\n- To copy the generated signed embed URL to the clipboard, click **Copy Link**.\n- You can view either the [SDK](/looker/docs/api-sdk) call or the [embed SDK](/looker/docs/embed-sdk-intro) call by clicking **View Code**, which will open a code window.\n- From within the code window, to copy the generated SDK call or Embed SDK call results to your clipboard, click **Copy to Clipboard**."]]