使用已簽署的嵌入功能將 Looker 嵌入 iframe 時,部分瀏覽器預設會採用禁止第三方 Cookie 的 Cookie 政策。如果嵌入的 iframe 是從與載入嵌入應用程式的網域不同的網域載入,系統就會拒絕第三方 Cookie。一般來說,只要要求並使用自訂網域,即可解決這項限制。不過,在某些情況下,無法使用自訂網域。在這些情況下,您可以使用 Looker 無 Cookie 嵌入功能。
無 Cookie 嵌入功能如何運作?
如果未封鎖第三方 Cookie,使用者首次登入 Looker 時,系統會建立工作階段 Cookie。這個 Cookie 會隨著每個使用者要求一併傳送,Looker 伺服器會使用這個 Cookie,判斷發出要求的使用者身分。封鎖 Cookie 後,系統不會在要求中傳送 Cookie,因此 Looker 伺服器無法識別與要求相關聯的使用者。
為解決這個問題,Looker 無 Cookie 嵌入功能會將權杖與每個要求建立關聯,以便在 Looker 伺服器中重新建立使用者工作階段。嵌入應用程式有責任取得這些權杖,並提供給在嵌入式 iframe 中執行的 Looker 執行個體。本文件其餘部分會說明如何取得及提供這些權杖。
如要使用任一 API,嵌入應用程式必須能夠透過管理員權限驗證 Looker API。嵌入網域也必須列在嵌入網域許可清單中,或者,如果使用 Looker 23.8 以上版本,嵌入網域可以在取得無 Cookie 工作階段時一併加入。
建立 Looker 嵌入 iframe
下圖說明建立嵌入 iframe 的程序。系統可能會同時或在日後產生多個 iframe。正確導入後,iframe 會自動加入第一個 iframe 建立的會期。Looker 嵌入 SDK 會自動加入現有工作階段,簡化這個程序。
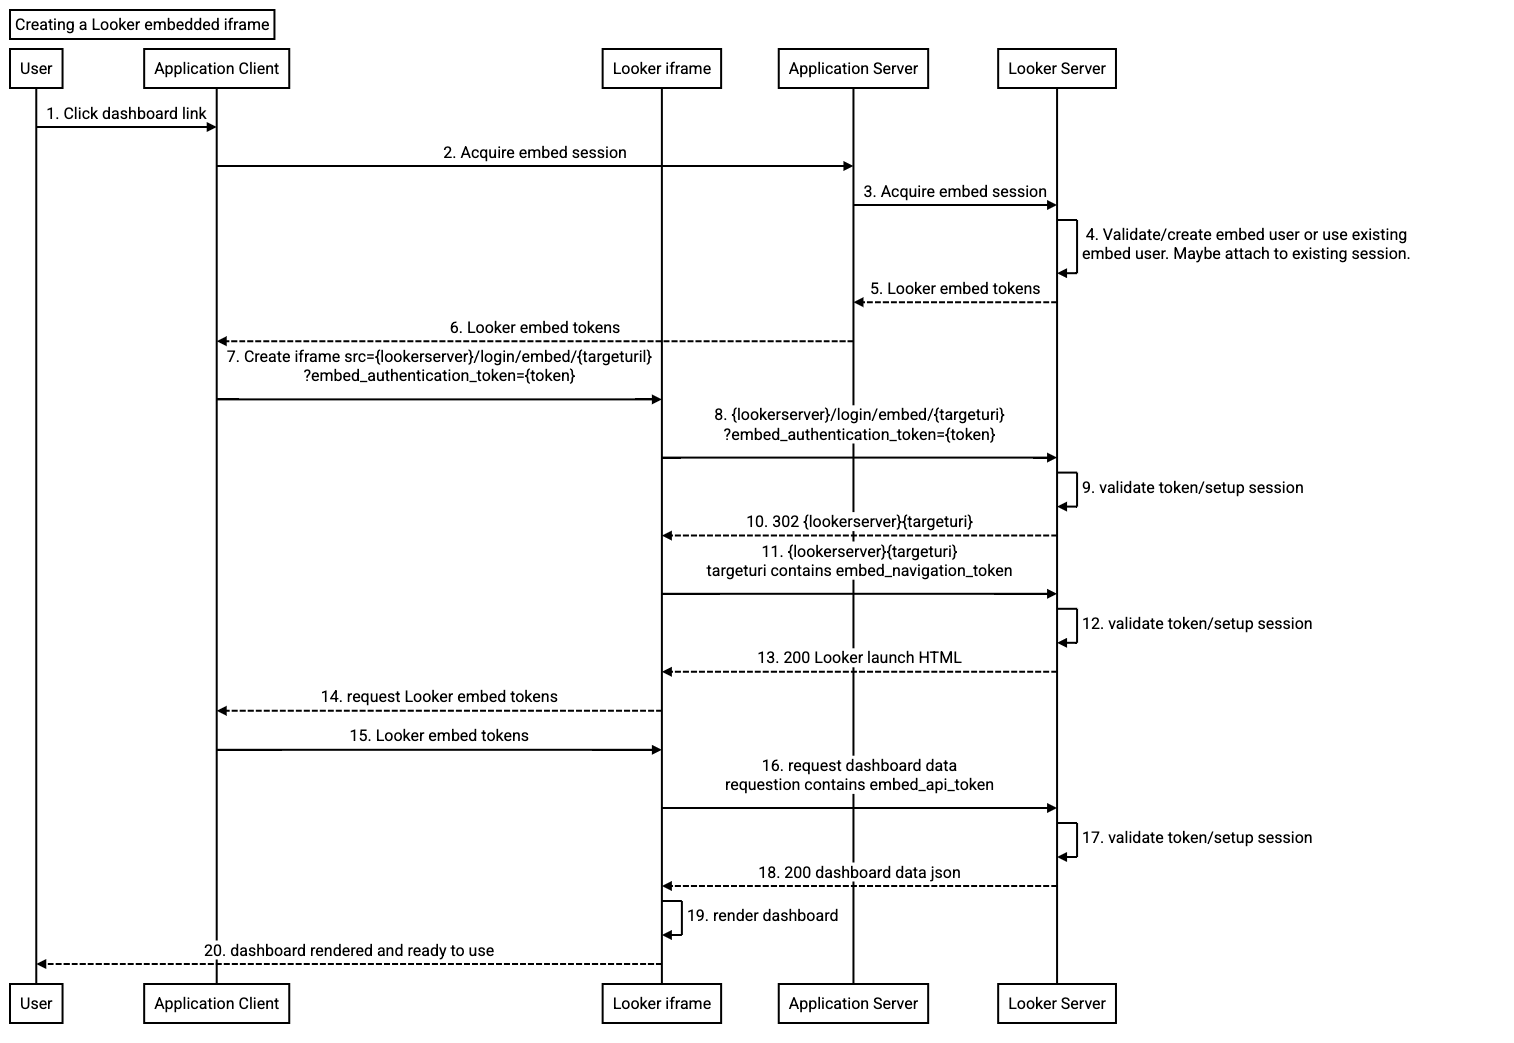
- 使用者在嵌入應用程式中執行動作,導致 Looker iframe 建立。
- 嵌入應用程式用戶端會取得 Looker 工作階段。您可以使用 Looker Embed SDK 啟動這個工作階段,但必須提供端點網址或回呼函式。如果使用回呼函式,系統會呼叫嵌入式應用程式伺服器,取得 Looker 嵌入式工作階段。否則,Embed SDK 會呼叫提供的端點網址。
- 嵌入應用程式伺服器會使用 Looker API 取得嵌入工作階段。這個 API 呼叫與 Looker 簽署的嵌入簽署程序類似,因為它會接受嵌入使用者定義做為輸入內容。如果呼叫使用者已有 Looker 嵌入工作階段,則呼叫中應包含相關聯的工作階段參照權杖。本文的「取得工作階段」一節會詳細說明。
- 取得嵌入工作階段端點的處理方式與已簽署的
/login/embed/(signed url)端點類似,因為它會將 Looker 嵌入使用者定義視為要求主體,而非 URL。取得嵌入工作階段端點程序會驗證,然後建立或更新嵌入使用者。也可以接受現有的工作階段參照權杖。這點非常重要,因為這樣一來,多個 Looker 嵌入式 iframe 就能共用同一個工作階段。如果提供工作階段參照符記,且工作階段尚未過期,系統就不會更新嵌入使用者。這項功能支援的用途是:使用已簽署的嵌入網址建立一個 iframe,並使用未簽署的嵌入網址建立其他 iframe。在這種情況下,沒有已簽署嵌入網址的 iframe 會沿用第一個工作階段的 Cookie。 - Looker API 呼叫會傳回四個權杖,每個權杖都有存留時間 (TTL):
- 授權權杖 (存留時間 = 30 秒)
- 導覽權杖 (TTL = 10 分鐘)
- API 權杖 (TTL = 10 分鐘)
- 工作階段參考符記 (TTL = 工作階段的剩餘生命週期)
- 嵌入式應用程式伺服器必須追蹤 Looker 資料傳回的資料,並將這些資料與呼叫使用者和呼叫使用者瀏覽器的使用者代理程式建立關聯。如需相關建議,請參閱本文的「產生權杖」一節。這項呼叫會傳回授權權杖、導覽權杖和 API 權杖,以及所有相關聯的 TTL。工作階段參照權杖應受到保護,且不得在呼叫瀏覽器中公開。
權杖傳回瀏覽器後,必須建構 Looker 嵌入登入網址。Looker Embed SDK 會自動建構嵌入登入網址。如要使用
windows.postMessageAPI 建構嵌入登入網址,請參閱本文的「使用 Lookerwindows.postMessageAPI」一節中的範例。登入網址不含已簽署的嵌入使用者詳細資料。其中包含目標 URI,包括導覽權杖和授權權杖 (做為查詢參數)。授權權杖必須在 30 秒內使用,且只能使用一次。如需其他 iframe,必須再次取得嵌入工作階段。不過,如果提供工作階段參考符記,授權符記就會與相同工作階段建立關聯。
Looker 嵌入登入端點會判斷登入是否適用於無 Cookie 嵌入,這會以授權權杖是否存在表示。如果授權權杖有效,系統會檢查下列項目:
- 相關聯的工作階段仍有效。
- 相關聯的嵌入使用者仍有效。
- 與要求相關聯的瀏覽器使用者代理程式,與工作階段相關聯的瀏覽器代理程式相符。
如果上一個步驟的檢查通過,系統會使用網址中包含的目標 URI 重新導向要求。這與 Looker 簽署嵌入登入的程序相同。
這項要求是啟動 Looker 資訊主頁的重新導向。這項要求會將導覽權杖做為參數。
執行端點前,Looker 伺服器會先在要求中尋找導覽權杖。如果伺服器找到權杖,會檢查下列事項:
- 相關聯的工作階段仍有效。
- 與要求相關聯的瀏覽器使用者代理程式,與工作階段相關聯的瀏覽器代理程式相符。
如果有效,系統會為要求還原工作階段,並執行資訊主頁要求。
系統會將載入資訊主頁的 HTML 傳回 iframe。
在 iframe 中執行的 Looker UI 會判斷資訊主頁 HTML 是無 Cookie 的嵌入回應。此時,Looker UI 會傳送訊息給嵌入應用程式,要求在步驟 6 中擷取的權杖。然後等待接收權杖。如果權杖未送達,系統會顯示訊息。
嵌入應用程式會將權杖傳送至 Looker 嵌入 iframe。
收到權杖後,在 iframe 中執行的 Looker UI 會開始處理程序,以轉譯要求物件。在此期間,使用者介面會向 Looker 伺服器發出 API 呼叫。系統會自動將步驟 15 中收到的 API 權杖,以標頭形式插入所有 API 要求。
執行任何端點前,Looker 伺服器會先在要求中尋找 API 權杖。如果伺服器找到權杖,會檢查下列項目:
- 相關聯的工作階段仍有效。
- 與要求相關聯的瀏覽器使用者代理程式,與工作階段相關聯的瀏覽器代理程式相符。
如果工作階段有效,系統會為要求還原工作階段,並執行 API 要求。
系統會傳回資訊主頁資料。
系統會顯示資訊主頁。
使用者可以控管資訊主頁。
產生新權杖
下圖顯示新權杖的產生順序。
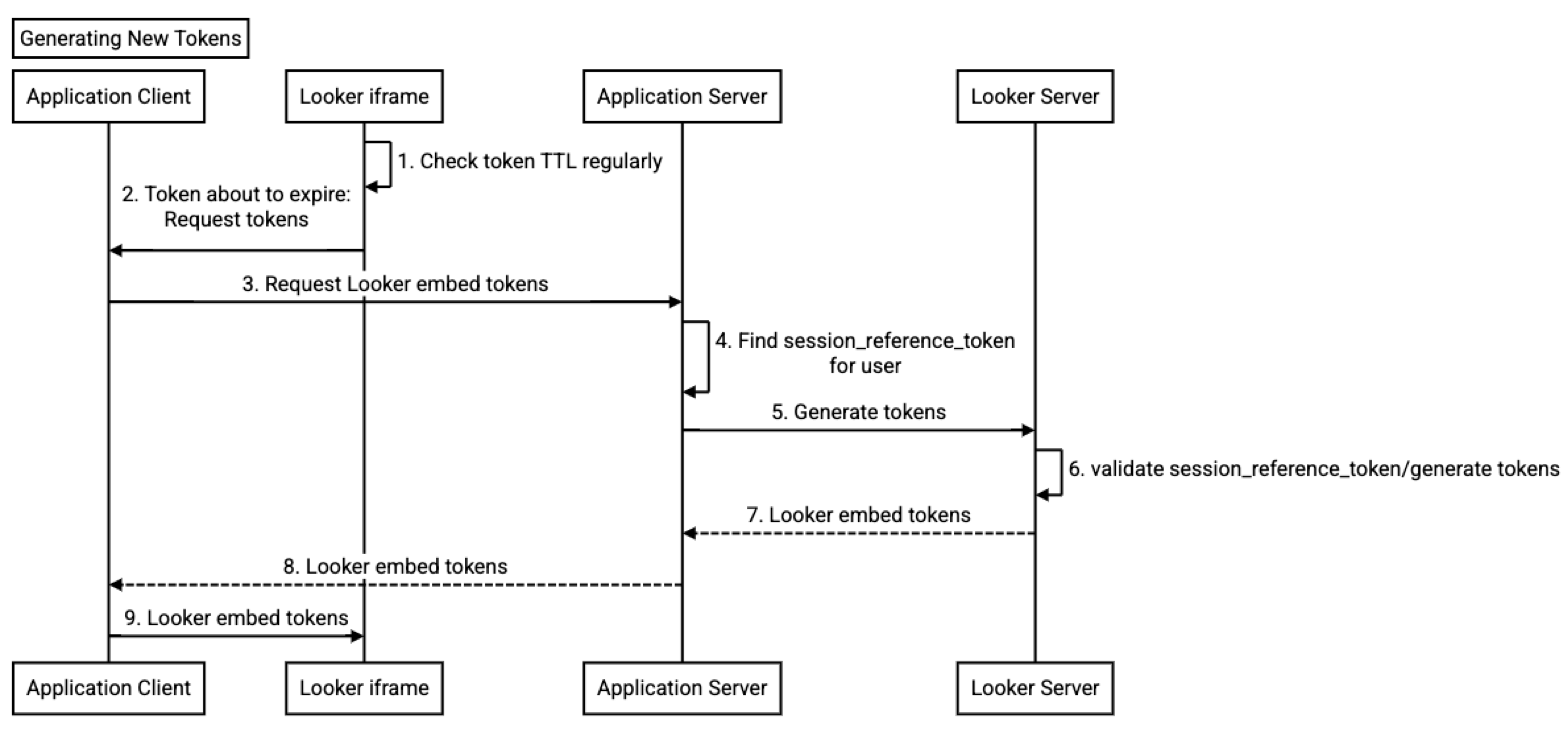
- 在嵌入式 iframe 中執行的 Looker UI 會監控嵌入權杖的 TTL。
- 權杖即將到期時,Looker UI 會將權杖重新整理訊息傳送至嵌入應用程式用戶端。
- 嵌入應用程式用戶端接著會向嵌入應用程式伺服器中實作的端點要求新權杖。Looker 嵌入 SDK 會自動要求新權杖,但必須提供端點網址或回呼函式。如果使用回呼函式,系統會呼叫嵌入式應用程式伺服器來產生新權杖。否則,Embed SDK 會呼叫提供的端點網址。
- 嵌入應用程式會找出與嵌入工作階段相關聯的
session_reference_token。Looker Embed SDK Git 存放區提供的範例使用工作階段 Cookie,但您也可以使用分散式伺服器端快取 (例如 Redis)。 - 嵌入應用程式伺服器會呼叫 Looker 伺服器,要求產生權杖。除了發出要求瀏覽器的使用者代理程式外,這項要求也需要最近的 API 和導覽權杖。
- Looker 伺服器會驗證使用者代理程式、工作階段參照權杖、導覽權杖和 API 權杖。如果要求有效,系統就會產生新權杖。
- 權杖會傳回給呼叫的嵌入應用程式伺服器。
- 內嵌應用程式伺服器會從回應中移除工作階段參照權杖,並將其餘回應傳回內嵌應用程式用戶端。
- 嵌入應用程式用戶端會將新產生的權杖傳送至 Looker UI。Looker 嵌入 SDK 會自動執行這項作業。嵌入使用
windows.postMessageAPI 的應用程式用戶端時,必須負責傳送權杖。Looker UI 收到權杖後,就會用於後續的 API 呼叫和網頁導覽。
實作 Looker 無 Cookie 嵌入
如要導入 Looker 無 Cookie 嵌入功能,可以使用 Looker Embed SDK 或 windows.postMessage API。您可以使用 Looker 嵌入 SDK 方法,但我們也提供使用 windows.postMessage API 的範例。如需這兩種實作方式的詳細說明,請參閱 Looker Embed SDK README 檔案。Embed SDK Git 存放區也包含可運作的實作項目。
設定 Looker 執行個體
無 Cookie 嵌入功能與 Looker 已簽署嵌入功能有共通之處。如要使用無 Cookie 嵌入功能,管理員必須啟用「嵌入 SSO 驗證」。不過,與 Looker 簽署嵌入不同,無 Cookie 嵌入不會使用「嵌入密鑰」設定。無 Cookie 嵌入功能會使用 JSON Web Token (JWT),也就是「嵌入 JWT 密鑰」設定。您可以在「管理」選單的「平台」部分,前往「嵌入」頁面設定或重設這項設定。
設定 JWT 密碼是非必要步驟,因為系統會在首次嘗試建立無 Cookie 內嵌工作階段時建立 JWT。請避免重設這個權杖,否則所有有效的不含 Cookie 嵌入工作階段都會失效。
與嵌入密鑰不同,嵌入 JWT 密鑰不會公開,因為只會在 Looker 伺服器內部使用。
應用程式用戶端實作
本節提供範例,說明如何在應用程式用戶端中導入無 Cookie 嵌入功能,並包含下列小節:
安裝或更新 Looker 嵌入 SDK
如要使用無 Cookie 嵌入功能,必須使用下列 Looker SDK 版本:
@looker/embed-sdk >= 2.0.0
@looker/sdk >= 22.16.0
使用 Looker 嵌入 SDK
Embed SDK 已新增初始化方法,可啟動無 Cookie 工作階段。這個方法接受兩個網址字串或兩個回呼函式。網址字串應參照嵌入應用程式伺服器中的端點。如要瞭解應用程式伺服器上這些端點的實作詳細資料,請參閱本文的「應用程式伺服器實作」一節。
getEmbedSDK().initCookieless(
  runtimeConfig.lookerHost,
  '/acquire-embed-session',
  '/generate-embed-tokens'
)
下列範例說明如何使用回呼。只有在嵌入用戶端應用程式需要瞭解 Looker 嵌入工作階段的狀態時,才應使用回呼。您也可以使用 session:status 事件,因此不需要搭配 Embed SDK 使用回呼。
const acquireEmbedSessionCallback =
  async (): Promise<LookerEmbedCookielessSessionData> => {
    const resp = await fetch('/acquire-embed-session')
    if (!resp.ok) {
      console.error('acquire-embed-session failed', { resp })
      throw new Error(
        `acquire-embed-session failed: ${resp.status} ${resp.statusText}`
      )
    }
    return (await resp.json()) as LookerEmbedCookielessSessionData
  }

const generateEmbedTokensCallback =
  async ({ api_token, navigation_token }): Promise<LookerEmbedCookielessSessionData> => {
    const resp = await fetch('/generate-embed-tokens', {
      method: 'PUT',
      headers: { 'content-type': 'application/json' },
      body: JSON.stringify({ api_token, navigation_token }),
    })
    if (!resp.ok) {
      console.error('generate-embed-tokens failed', { resp })
      throw new Error(
        `generate-embed-tokens failed: ${resp.status} ${resp.statusText}`
      )
    }
    return (await resp.json()) as LookerEmbedCookielessSessionData
  }

getEmbedSDK().initCookieless(
  runtimeConfig.lookerHost,
  acquireEmbedSessionCallback,
  generateEmbedTokensCallback
)
使用 Looker windows.postMessage API
如要查看使用 windows.postMessage API 的詳細範例,請參閱 Embed SDK Git 存放區中的 message_example.ts 和 message_utils.ts 檔案。如要瞭解範例的重點,請參閱這篇文章。
以下範例說明如何建構 iframe 的網址。回呼函式與先前看到的 acquireEmbedSessionCallback 範例相同。
  private async getCookielessLoginUrl(): Promise<string> {
    const { authentication_token, navigation_token } =
      await this.embedEnvironment.acquireSession()
    const url = this.embedUrl.startsWith('/embed')
      ? this.embedUrl
      : `/embed${this.embedUrl}`
    const embedUrl = new URL(url, this.frameOrigin)
    if (!embedUrl.searchParams.has('embed_domain')) {
      embedUrl.searchParams.set('embed_domain', window.location.origin)
    }
    embedUrl.searchParams.set('embed_navigation_token', navigation_token)
    const targetUri = encodeURIComponent(
      `${embedUrl.pathname}${embedUrl.search}${embedUrl.hash}`
    )
    return `${embedUrl.origin}/login/embed/${targetUri}?embed_authentication_token=${authentication_token}`
  }
以下範例說明如何監聽權杖要求、產生新權杖,並將權杖傳送至 Looker。回呼函式與先前的 generateEmbedTokensCallback 範例相同。
      this.on(
        'session:tokens:request',
        this.sessionTokensRequestHandler.bind(this)
      )

  private connected = false

  private async sessionTokensRequestHandler(_data: any) {
    const contentWindow = this.getContentWindow()
    if (contentWindow) {
      if (!this.connected) {
        // When not connected the newly acquired tokens can be used.
        const sessionTokens = this.embedEnvironment.applicationTokens
        if (sessionTokens) {
          this.connected = true
          this.send('session:tokens', this.embedEnvironment.applicationTokens)
        }
      } else {
        // If connected, the embedded Looker application has decided that
        // it needs new tokens. Generate new tokens.
        const sessionTokens = await this.embedEnvironment.generateTokens()
        this.send('session:tokens', sessionTokens)
      }
    }
  }

  send(messageType: string, data: any = {}) {
    const contentWindow = this.getContentWindow()
    if (contentWindow) {
      const message: any = {
        type: messageType,
        ...data,
      }
      contentWindow.postMessage(JSON.stringify(message), this.frameOrigin)
    }
    return this
  }
導入應用程式伺服器
本節提供在應用程式伺服器中實作無 Cookie 嵌入功能的範例,並包含下列小節:
基本導入
嵌入應用程式必須實作兩個伺服器端點,用來叫用 Looker 端點。確保工作階段參考權杖安全無虞。這些端點包括:
- 取得工作階段:如果工作階段參照權杖已存在且仍有效,要求工作階段會加入現有工作階段。建立 iframe 時,系統會呼叫「取得工作階段」。
- 產生權杖 - Looker 會定期觸發對這個端點的呼叫。
取得工作階段
這個 TypeScript 範例使用工作階段儲存或還原工作階段參考權杖。端點不一定要以 TypeScript 實作。
  app.get(
    '/acquire-embed-session',
    async function (req: Request, res: Response) {
      try {
        const current_session_reference_token =
          req.session && req.session.session_reference_token
        const response = await acquireEmbedSession(
          req.headers['user-agent']!,
          user,
          current_session_reference_token
        )
        const {
          authentication_token,
          authentication_token_ttl,
          navigation_token,
          navigation_token_ttl,
          session_reference_token,
          session_reference_token_ttl,
          api_token,
          api_token_ttl,
        } = response
        req.session!.session_reference_token = session_reference_token
        res.json({
          api_token,
          api_token_ttl,
          authentication_token,
          authentication_token_ttl,
          navigation_token,
          navigation_token_ttl,
          session_reference_token_ttl,
        })
      } catch (err: any) {
        res.status(400).send({ message: err.message })
      }
    }
  )

async function acquireEmbedSession(
  userAgent: string,
  user: LookerEmbedUser,
  session_reference_token: string
) {
  await acquireLookerSession()
    try {
    const request = {
      ...user,
      session_reference_token: session_reference_token,
    }
    const sdk = new Looker40SDK(lookerSession)
    const response = await sdk.ok(
      sdk.acquire_embed_cookieless_session(request, {
        headers: {
          'User-Agent': userAgent,
        },
      })
    )
    return response
  } catch (error) {
    console.error('embed session acquire failed', { error })
    throw error
  }
}
從 Looker 23.8 開始,取得無 Cookie 工作階段時,可以加入嵌入網域。這是使用 Looker 「管理」>「嵌入」面板新增嵌入網域的替代方法。Looker 會將嵌入網域儲存在 Looker 內部資料庫,因此不會顯示在「管理」>「嵌入」面板。嵌入網域會改為與無 Cookie 工作階段建立關聯,且只會在工作階段期間存在。如果您決定使用這項功能,請詳閱安全性最佳做法。
產生權杖
這個 TypeScript 範例使用工作階段儲存或還原工作階段參考權杖。端點不一定要以 TypeScript 實作。
請務必瞭解如何處理無效權杖造成的 400 回應。雖然不應傳回 400 回應,但如果發生這種情況,最佳做法是終止 Looker 嵌入工作階段。如要終止 Looker 嵌入工作階段,您可以毀損嵌入 iframe,或在 session:tokens 訊息中將 session_reference_token_ttl 值設為零。如果將 session_reference_token_ttl 值設為零,Looker iframe 會顯示工作階段過期對話方塊。
嵌入工作階段過期時,系統不會傳回 400 回應。如果嵌入工作階段已過期,系統會傳回 200 回應,且 session_reference_token_ttl 值設為零。
  app.put(
    '/generate-embed-tokens',
    async function (req: Request, res: Response) {
      try {
        const session_reference_token = req.session!.session_reference_token
        const { api_token, navigation_token } = req.body as any
        const tokens = await generateEmbedTokens(
          req.headers['user-agent']!,
          session_reference_token,
          api_token,
          navigation_token
        )
        res.json(tokens)
      } catch (err: any) {
        res.status(400).send({ message: err.message })
      }
    }
  )
}
async function generateEmbedTokens(
  userAgent: string,
  session_reference_token: string,
  api_token: string,
  navigation_token: string
) {
  if (!session_reference_token) {
    console.error('embed session generate tokens failed')
    // missing session reference  treat as expired session
    return {
      session_reference_token_ttl: 0,
    }
  }
  await acquireLookerSession()
  try {
    const sdk = new Looker40SDK(lookerSession)
    const response = await sdk.ok(
      sdk.generate_tokens_for_cookieless_session(
        {
          api_token,
          navigation_token,
          session_reference_token: session_reference_token || '',
        },
        {
          headers: {
            'User-Agent': userAgent,
          },
        }
      )
    )
    return {
      api_token: response.api_token,
      api_token_ttl: response.api_token_ttl,
      navigation_token: response.navigation_token,
      navigation_token_ttl: response.navigation_token_ttl,
      session_reference_token_ttl: response.session_reference_token_ttl,
    }
  } catch (error: any) {
    if (error.message?.includes('Invalid input tokens provided')) {
      // The Looker UI does not know how to handle bad
      // tokens. This shouldn't happen but if it does expire the
      // session. If the token is bad there is not much that that
      // the Looker UI can do.
      return {
        session_reference_token_ttl: 0,
      }
    }
    console.error('embed session generate tokens failed', { error })
    throw error
  }
實作的考量
嵌入應用程式必須追蹤工作階段參照權杖,並確保權杖安全無虞。這個權杖應與嵌入式應用程式使用者建立關聯。您可以透過下列任一方式儲存嵌入應用程式權杖:
- 在內嵌應用程式使用者工作階段中
- 在叢集環境中可用的伺服器端快取中
- 在與使用者相關聯的資料庫表格中
如果工作階段是以 Cookie 形式儲存,Cookie 應經過加密。嵌入式 SDK 存放區中的範例會使用工作階段 Cookie 儲存工作階段參考權杖。
Looker 嵌入工作階段到期時,嵌入的 iframe 中會顯示對話方塊。此時使用者無法在內嵌執行個體中執行任何操作。發生這種情況時,系統會產生 session:status 事件,讓嵌入應用程式偵測嵌入式 Looker 應用程式的目前狀態,並採取某種動作。
嵌入應用程式可以檢查 generate_tokens 端點傳回的 session_reference_token_ttl 值是否為零,判斷嵌入工作階段是否已過期。如果值為零,表示嵌入工作階段已過期。建議在初始化無 Cookie 嵌入時,使用回呼函式產生權杖。接著,回呼函式可以判斷嵌入工作階段是否已過期,並毀損嵌入的 iframe,做為使用預設嵌入工作階段過期對話方塊的替代方案。
執行 Looker 無 Cookie 嵌入範例
嵌入 SDK 存放區包含以 TypeScript 撰寫的節點 Express 伺服器和用戶端,可實作嵌入應用程式。先前顯示的範例就是取自這個實作方式。以下假設您的 Looker 執行個體已設定為使用無 Cookie 嵌入功能,如先前所述。
您可以按照下列方式執行伺服器:
- 複製 Embed SDK 存放區 -
git clone git@github.com:looker-open-source/embed-sdk.git - 變更目錄:
cd embed-sdk - 安裝依附元件 -
npm install - 按照本文「設定伺服器」一節的說明設定伺服器。
- 執行伺服器 -
npm run server
設定伺服器
在複製的存放區根目錄中建立 .env 檔案 (這會包含在 .gitignore 中)。
格式如下:
LOOKER_WEB_URL=your-looker-instance-url.com
LOOKER_API_URL=https://your-looker-instance-url.com
LOOKER_DEMO_HOST=localhost
LOOKER_DEMO_PORT=8080
LOOKER_EMBED_SECRET=embed-secret-from-embed-admin-page
LOOKER_CLIENT_ID=client-id-from-user-admin-page
LOOKER_CLIENT_SECRET=client-secret-from-user-admin-page
LOOKER_DASHBOARD_ID=id-of-dashboard
LOOKER_LOOK_ID=id-of-look
LOOKER_EXPLORE_ID=id-of-explore
LOOKER_EXTENSION_ID=id-of-extension
LOOKER_VERIFY_SSL=true
LOOKER_REPORT_ID=id-of-report
LOOKER_QUERY_VISUALIZATION_ID=id-of-query-visualization