This document shows you how to deploy the architecture in Set up an embedded finance solution using Google Cloud and Cloudentity. The deployment results in a working example of embedded finance APIs on Google Cloud.
The example deployment demonstrates how financial institutions can expose data and services to third parties through APIs that first require the end user owning the data to authenticate and give consent in a secure way. The deployment is based on open source code that's available in the GitHub repository ce-apigee-integration.
The example deployment uses the Australian standards for open banking Consumer Data Standards APIs. You can adapt the example deployment to support other open banking and embedded finance API standards.
A successful deployment requires inbound internet connectivity to Apigee and Cloudentity, and outbound connectivity between Apigee and Cloudentity.
Architecture
The following diagram shows the deployment architecture that you create in this document:
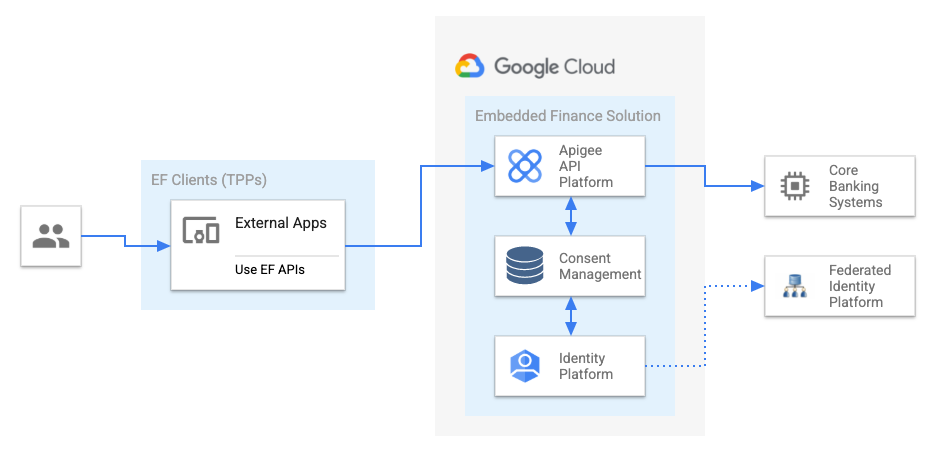
The diagram shows a consumer interacting with a third party embedded finance application. The application makes secure requests to a financial provider's APIs which are managed and published by Apigee. Apigee coordinates user authorization and consent activity with Cloudentity, and also proxies communication to the financial provider's backend APIs and systems. For more details, see the accompanying reference architecture.
Objectives
- Create a Cloudentity client application with auto configurations enabled.
- Run the setup script to deploy example applications, providers, and certificates.
- Test the deployment.
- Examine the configuration.
Costs
Cloudentity offers free software as a service (SaaS) tenants for trial use that you can use to test this deployment. In addition to a Cloudentity SaaS instance, this deployment uses the following billable components of Google Cloud:
To generate a cost estimate based on your projected usage, use the Google Cloud pricing calculator.
Before you begin
-
In the Google Cloud console, on the project selector page, select or create a Google Cloud project.
-
Make sure that billing is enabled for your Google Cloud project.
If you don't already have an Apigee organization, provision an evaluation organization.
- To successfully run the Apigee provisioning
wizard, you need the permissions of the Apigee Organization Admin
(
roles/apigee.admin) role. - For demonstration purposes, you can choose the default networking options that are offered in the provisioning wizard.
- When you provision your organization, make sure that you select Enable internet access and select the Use Wildcard DNS service option.
- After your organization is provisioned, make a note of the resulting hostname. You can also get the hostname by going to the Apigee > Environments page in the Google Cloud console.
- To successfully run the Apigee provisioning
wizard, you need the permissions of the Apigee Organization Admin
(
If you don't already have one, get a free Cloudentity SaaS tenant. After you create a tenant, contact Cloudentity to unlock access to the administrator workspace which is disabled by default.
The sample deployment configures Cloudentity's built-in demo identity provider.
Make sure the Apigee instance has connectivity to external API targets. Connectivity is configured by default on an evaluation instance, but it might be restricted if you're using a pre-existing instance with VPC Service Controls applied. For more information, see Using VPC Service Controls with Apigee and Apigee hybrid.
Enable Cloudentity auto configurations
In the Cloudentity administrator workspace that you want to use for this deployment, create a client application.
In the client application that you created, do the following:
- On the OAuth tab, configure options:
- Set Grant Types to Client credentials.
- Set Token Endpoint Authentication Method to Client Secret Basic.
Make a note of the following values:
- Your CLIENT ID and CLIENT SECRET.
- Your domain, which is similar to
my-tenant-domain.us.authz.cloudentity.io. - Your tenant ID, in the Profile.
You use the values to set environment variables in the next section.
- On the OAuth tab, configure options:
Prepare your Google Cloud environment
In the Google Cloud console, activate Cloud Shell.
At the bottom of the Google Cloud console, a Cloud Shell session starts and displays a command-line prompt. Cloud Shell is a shell environment with the Google Cloud CLI already installed and with values already set for your current project. It can take a few seconds for the session to initialize.
Cloud Shell has the gcloud CLI and jq installed by default. You use both tools in this deployment.
In Cloud Shell, install apigeecli, a tool to manage Apigee entities:
- Download the appropriate binary for your platform from the
apigeecli releases.
For Cloud Shell, select the
Linux_x86_64binary. Extract the downloaded file:
unzip FILENAMEReplace
FILENAMEwith the name of the file that you downloaded.The
unzipcommand creates a directory namedapigeecli_vx.yy_platform.
- Download the appropriate binary for your platform from the
apigeecli releases.
For Cloud Shell, select the
Add the directory to your
PATHenvironment variable:export PATH=FULL_PATH:$PATHReplace
FULL_PATHwith the full path to theapigeecli_vx.yy_platformdirectory.Clone the
ce-apigee-integrationrepository:git clone "https://github.com/cloudentity/ce-apigee-integration"In the cloned repository, go to the
openbanking/deployfolder and then open thece_admin.envfile for editing.In the
ce_admin.envfile, add values for the following environment variables:CLIENT_ID: The Cloudentity administrator client application ID that you noted in the preceding section.CLIENT_SECRET: The Cloudentity administrator client application secret that you noted in the preceding section.DOMAIN: The domain that you noted in the preceding section, in the format ofmy-demo-tenant.us.authz.cloudentity.io.TENANT_ID: The tenant ID that you noted in the preceding section, in the format ofmy-demo-tenant.WORKSPACE_ID: The workspace ID that you want to use, without spaces. In this deployment, you create a workspace (effectively an authorization server) within your Cloudentity tenant with this name.GCP_PROJECT_ID: The Google Cloud project ID that's associated with the Apigee instance that you're using for this deployment.GCP_REGION: The Google Cloud region where you plan to deploy the applications (such as the consent page and demo client).APIGEE_X_ENDPOINT: The Apigee hostname that you noted at the start of this deployment, withouthttps://. You can also get the hostname by going to the Apigee > Environments page in the Google Cloud console.APIGEE_X_ENV: Optional: only edit if you aren't using an evaluation environment. Replace it with your own environment name.
Run the setup script
In Cloud Shell, initialize the environment variables for the setup script:
cd ce-apigee-integration/openbanking/deploy && source environment-variables.shRun the setup script:
cd openbanking
deploy/setup-ce.sh full-deploy
The script takes some time to complete. When it's complete, the output is similar to the following, where DEMO_APP_URL is the URL where you can access the demo app:
=================================================
The demo client application has now been deployed.
You can test this solution by accessing the
demo client application at:
  DEMO_APP_URL
=================================================
Done.
Make a note of the
DEMO_APP_URLvalue to use in testing the deployment.
The configuration script performs the following tasks for you:
- Creates a new workspace that contains an OAuth authorization server within Cloudentity. The workspace adheres to CDR Security Profile requirements.
- Creates and configures OAuth client applications that are used by the demo consent application and by the Financroo demo data recipient application that represents open banking ecosystem actors.
- Creates a demo bank identity provider (IdP) that represents the bank user login, which is attached to the Cloudentity workspace as the identity provider.
- Creates an OAuth client application that will be used by the Apigee proxies to securely interact with the Cloudentity workspace.
- Sets the open banking compliant certificates and authentication methods in Cloudentity OAuth server.
- Adds Apigee artifacts that implement banking data APIs that return demo data.
- Deploys the demo consent application as a Cloud Run service. To gather and store consent that consumers provide, the application uses bank APIs exposed by Apigee and consent APIs exposed by Cloudentity.
- Deploys the demo data recipient client application as a Cloud Run service. To test this solution, the deployment uses Cloudentity's Financroo data recipient app. The application can interact with bank APIs to use consumer data after obtaining their consent as prescribed by the open banking standard.
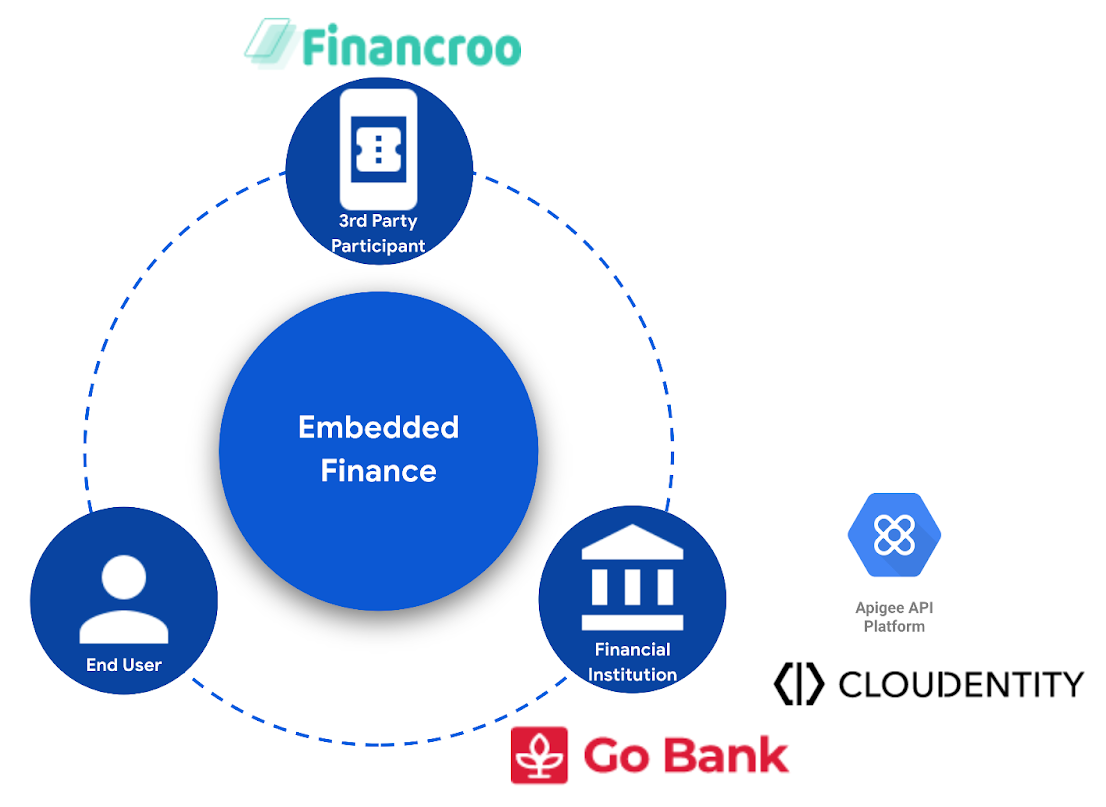
The following diagram shows the interaction between the components that the script deployed:
The following sequence diagram shows the interactions between components involved in the entire exchange based on various open banking guidelines:
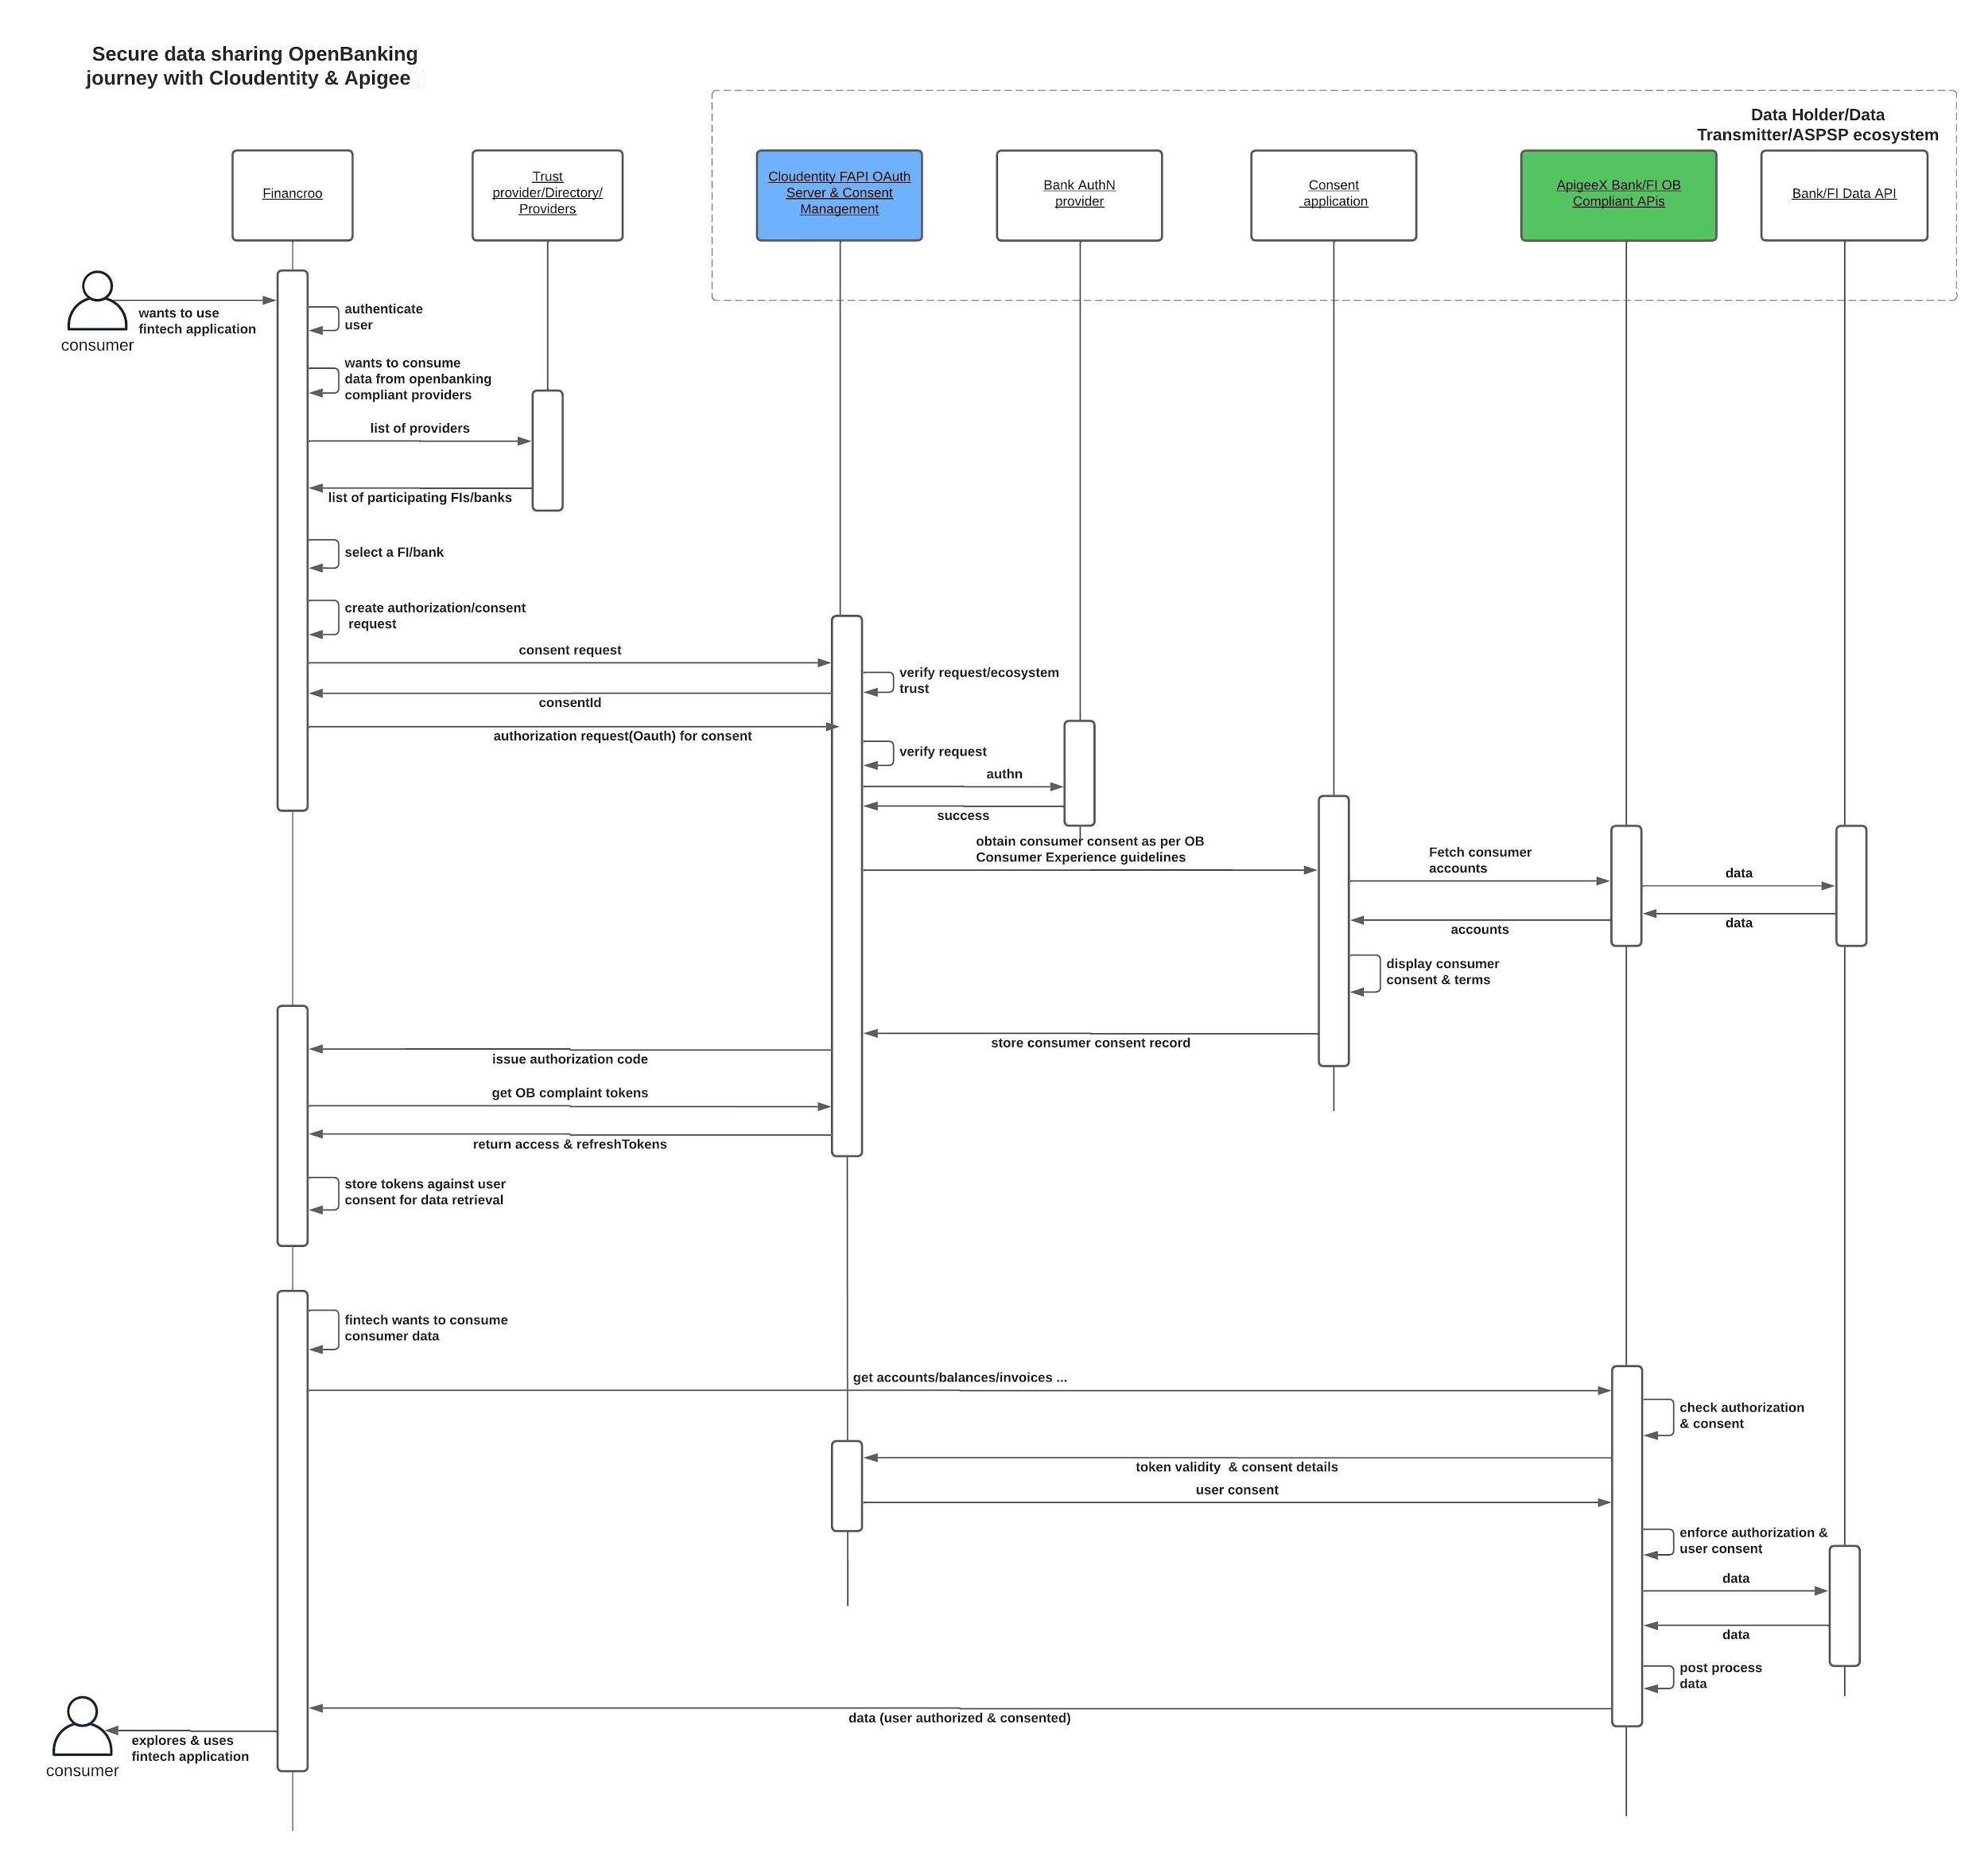
The diagram shows the following sequence:
- A user interacts with the application.
- The application requests access to the user's data from the open banking provider.
- The user is directed to the consent management platform to grant permission for the data being requested, and is prompted to sign in through the bank's IdP.
- After the user logs in and grants permission for the data being requested, an access token is issued. The application can use the token to access the user's data through the open banking API.
- The application requests data from the API, which is managed by Apigee.
- When Apigee receives the API request, it validates the access token and checks whether the user's consent is valid.
- If the Apigee check is successful, it forwards the request to the backend API.
- Apigee performs any post processing and then returns the data to the application, which renders the result for the user.
Note that each geography has subtle variants of the consumer consent journeys. The diagram only represents one of those variants. You might not visually see all these detailed call flows originating from the UI, because most of the flow happens automatically, without direct user interaction.
Test the Deployment
To test the deployment, you can use the fictional fintech demo application (Financroo) that the configuration script deployed in the previous section. The Financroo application will request access to an end user's data that's held by a demo bank.
For the demo bank to allow the data access request by the Financroo app, the end user must sign in and give consent, and specifically select which of their accounts are to be included. Cloudentity and Apigee work in conjunction to orchestrate this authorization flow based on FAPI specifications and to ensure that any data access is provided within the scope of the consent given by the end user.
To test the deployment, do the following:
- In your web browser, go to DEMO_APP_URL, which is the URL that you noted after the setup script finished running. The Financroo client application is displayed.
To sign in to the Financroo application, use these credentials:
- Login:
test - Password:
p@ssw0rd!
The Financroo application serves the login with an inbuilt authorization server.
- Login:
On the Connect your accounts page that's displayed, select Go Bank. The Go Bank identity provider page is displayed. This provider is the demo IdP that the setup script configured for you.
On the Go Bank identity provider page, sign in using these credentials:
- User ID:
user - Password:
p@ssw0rd!
The Go Bank page displays the consent application that's hosted in Google Cloud.
- User ID:
On the Go Bank page, select one or more bank accounts, and then click I Agree.
The consent application gets the list of accounts that are associated with the demo user by issuing a request to an internal API. The internal API is exposed by Apigee and the internal API fetches accounts that are associated with a given user ID.
After consent is collected and submitted to Cloudentity, the following automatic processes run:
- Cloudentity mints an access token and you're redirected back to the Financroo client app.
- Financroo requests Go Bank accounts, balances, and transactions through APIs that are exposed by Apigee. The request includes the access token that was obtained in the previous step.
- Apigee checks with Cloudentity to ensure that consumer consent is in place and that it allows the requested operation. If so, it returns the requested data to Financroo.
- If the request is successful, the Financroo accounts overview page is displayed.
Examine the Configuration
This section describes the various artifacts involved in the flow in more detail.
Apigee
To understand how Apigee manages requests, you can start a debugging session:
In the Google Cloud console, go to the Apigee page.
In the Apigee menu, click Proxy Development > API proxies. A list of all deployed API proxies is displayed.
On the API Proxies page, click CE-banking-api-accounts, which is the API proxy that manages requests to get a list of accounts.
The proxy endpoints are the following:
/ce/internal/accounts: The endpoint that's used by the consent screen application to get the list of accounts that are associated with an end user. It's protected by an OAuth 2.0client.credentialsflow. The consent application needs to acquire an access token by exchanging its client ID and client secret, and then it includes the token when it makes a request to this endpoint./ce/banking/accounts: The endpoint that's available to any external client application, such as the Financroo demo application. This endpoint only returns the list of accounts that are selected by the end user when the user gives consent.
On the Debug tab, click Start Debug Session.
On the Environment list, select the environment that the proxy is deployed to.
Click Start. Apigee displays debugging information on requests made to this API proxy.
In a separate browser window, go back to the Financroo client application. If you're already connected to Go Bank, click Disconnect, and then click Connect your bank. Doing so triggers the authentication, authorization, and consent flow again.
Provide the end user user ID and password (
userandp@ssw0rd!), select any or all of the listed accounts, and then click I Agree.Go back to the Apigee page in the Google Cloud console. The Apigee debug trace should show that multiple requests have been processed.
- The first request corresponds to the request to get the list of accounts
that the consent screen application made to the internal endpoint. To
see the body of the request, click the request in the Debug session
pane. The body of the request includes the
customer_idvalue for theend_useridentity (as it's known by the bank's internal systems). - The remaining requests were made by the Financroo demo client
application. To view details about the requests, click any of them.
Notice that the
customer_idvalue is never included in the request. This information is never shared with the client application, because it's private to the end user and the bank.
- The first request corresponds to the request to get the list of accounts
that the consent screen application made to the internal endpoint. To
see the body of the request, click the request in the Debug session
pane. The body of the request includes the
To see the different steps that the API proxy executed and how the internal variables change, click through the rows in the Gantt view. For example, to view the step where the access token provided by the consent screen is verified, click the row named
OA-VerifyAccessToken.Click any other execution step, and note the FlowCallout named
FC-CheckOperationIsAllowedForGetAccountsBasicwhich executes a shared flow that verifies that the request is allowed. This shared flow is reused by all banking APIs.
The shared flow goes through the following process:
- It performs a basic validation of the access token that's included in the request. For example, it evaluates whether the token was issued by the Cloudentity instance that's associated with this deployment and whether it's expired.
- It then contacts the Cloudentity instance to perform further in-depth validation. For example, it evaluates whether the consent has been revoked through any channel, and which accounts are included in the consent.
- It finally extracts all the relevant consent information that's returned by Cloudentity, including the list of accounts that the end user selected when they granted consent. To improve response time on subsequent requests, Apigee caches that information for the duration of the access token.
The demo response that the API proxy provides will only return information about a static set of accounts. If the consent is revoked by a different channel, for example by internet banking, a webhook in Cloudentity invokes an endpoint in Apigee to invalidate the cached information.
Cloudentity
To enable the integration in Cloudentity, the setup script automatically created and configured settings. To view what was configured in Cloudentity to enable the integration, do the following:
- Sign in to the Cloudentity administrator portal.
- Select the workspace based on the
WORKSPACE_IDvalue that you entered in the script environment variables. Within Cloudentity, you can choose a specific workspace type based on different open banking regulations. This deployment used a workspace of type CDR. - Go to Auth settings. The OAuth settings show that the authorization server is configured for CDR security profile requirements. The authorization server is also configured to release claims and tokens as recommended.
To see the Financroo demo application configurations, in the navigation pane, click Applications > Clients. The configuration shows that the Financroo application is registered as an OAuth client that's subscribed to get consumer data permission scopes. This application uses the recommended OAuth TLS Client authentication method and grant types.
The application is also configured to get consumer data permission scopes. To ensure that user consent is captured, mapped, and stored in Cloudentity, user consent is mapped to one of the data scope APIs at consent time. The account permissions that are listed by the demo consent application are logical names for the scopes that are mandated by the CDR standard. They include permissions like list accounts and list transactions.
In the Applications > Clients section, you can also see that an Apigee trusted client application is provisioned within Cloudentity. The trusted client allows Apigee to inspect and verify access tokens and consumer consents issued by Cloudentity before it releases consumer data.
Go to Extensions > Webhooks, and then click the
/ce/consent/eventsentry. The entry shows that a webhook is configured to invoke an endpoint in Apigee any time that consent is created, updated, or revoked. When invoked, the endpoint in Apigee invalidates any stored information about the consent, if it exists.
Clean up
When you're finished exploring the deployed solution, to avoid incurring charges to your Google Cloud account for the resources used in this procedure, either delete the project that contains the resources, or keep the project and delete the individual resources.
Delete the project
The simplest way to eliminate billing is to delete the project that you created for the deployment:
- In the Google Cloud console, go to the Manage resources page.
- In the project list, select the project that you want to delete, and then click Delete.
- In the dialog, type the project ID, and then click Shut down to delete the project.
Delete the individual resources
Alternatively, if you want to keep the Google Cloud project but not the deployed artifacts, you can delete the individual resources that the deployment created:
In Cloud Shell, go to the sample repository
openbankingdirectory, and run the following command:deploy/undeploy_consent_mgmt_solution.sh \ CONFIGURATION_FILE_PATHReplace CONFIGURATION_FILE_PATH with the path to your environment configuration file.
To remove the CDR workspace in Cloudentity, run the following from the sample repository
openbankingdirectory:deploy/setup-ce.sh delete-workspace
What's next
Learn more about the Google Cloud products used in this reference architecture:
For an introduction to embedded finance, its relationship to open banking, and the importance of consent management, see Managing Consent in Embedded Finance.
Explore other Google Cloud solutions for financial services.
For more reference architectures, diagrams, and best practices, explore the Cloud Architecture Center.
Contributors
Authors:
- Renjith Babu | VP of Solution Architecture (Cloudentity)
- Debora Elkin | Technical Solutions Architect
Other contributors:
- David Rush | Customer Engineer and Apigee Specialist for Financial Services
- Christin Brown | Global Technical Solutions Director
To see nonpublic LinkedIn profiles, sign in to LinkedIn.