This document describes how you deploy the architecture in Use a CI/CD pipeline for data-processing workflows.
This deployment is intended for data scientists and analysts who build recurrent running data-processing jobs to help structure their research and development (R&D) to systematically and automatically maintain data-processing workloads.
Data scientists and analysts can adapt the methodologies from CI/CD practices to help to ensure high quality, maintainability, and adaptability of the data processes and workflows. The methods that you can apply are as follows:
- Version control of source code.
- Automatic building, testing, and deployment of apps.
- Environment isolation and separation from production.
- Replicable procedures for environment setup.
Architecture
The following diagram shows a detailed view of the CI/CD pipeline steps for both the test pipeline and the production pipeline.

In the preceding diagram, the test pipeline begins when a developer commits code changes to the Cloud Source Repositories and ends when the data-processing workflow integration test passes. At that point, the pipeline publishes a message to Pub/Sub which contains a reference to the latest self-executing Java Archive (JAR) file (obtained from the Airflow variables) in the message’s data field.
In the preceding diagram, the production pipeline begins when a message is published to a Pub/Sub topic and ends when the production workflow DAG file is deployed to Cloud Composer.
In this deployment guide, you use the following Google Cloud products:
- Cloud Build to create a CI/CD pipeline for building, deploying, and testing a data-processing workflow, and the data processing itself. Cloud Build is a managed service that runs your build on Google Cloud. A build is a series of build steps where each step is run in a Docker container.
- Cloud Composer to define and run the steps of the workflow, such as starting the data processing, testing and verifying results. Cloud Composer is a managed Apache Airflow service, which offers an environment where you can create, schedule, monitor, and manage complex workflows, such as the data-processing workflow in this deployment.
- Dataflow to run the Apache Beam WordCount example as a sample data process.
Objectives
- Configure the Cloud Composer environment.
- Create Cloud Storage buckets for your data.
- Create the build, test, and production pipelines.
- Configure the build trigger.
Cost optimization
In this document, you use the following billable components of Google Cloud:
Before you begin
In the Google Cloud console, on the project selector page, select or create a Google Cloud project.
Make sure that billing is enabled for your Google Cloud project. Learn how to check if billing is enabled on a project.
Sample code
The sample code for this deployment is in two folders:
- The
env-setupfolder contains shell scripts for the initial setup of the Google Cloud environment. The
source-codefolder contains code that is developed over time, needs to be source controlled, and triggers automatic build and test processes. This folder contains the following subfolders:- The
data-processing-codefolder contains the Apache Beam process source code. - The
workflow-dagfolder contains the composer DAG definitions for the data-processing workflows with the steps to design, implement, and test the Dataflow process. - The
build-pipelinefolder contains two Cloud Build configurations—one for the test pipeline and the other for the production pipeline. This folder also contains a support script for the pipelines.
- The
For this deployment, the source code files for data processing and for DAG workflow are in different folders in the same source code repository. In a production environment, the source code files are usually in their own source code repositories and are managed by different teams.
Integration and unit tests
In addition to the integration test that verifies the data-processing workflow from end to end, there are two unit tests in this deployment. The unit tests are automatic tests on the data-processing code and the data-processing workflow code. The test on the data-processing code is written in Java and runs automatically during the Maven build process. The test on the data-processing workflow code is written in Python and runs as an independent build step.
Set up your environment
In this deployment, you run all commands in Cloud Shell. Cloud Shell appears as a window at the bottom of the Google Cloud console.
In the Google Cloud console, open Cloud Shell:
Clone the sample code repository:
git clone https://github.com/GoogleCloudPlatform/ci-cd-for-data-processing-workflow.gitRun a script to set environment variables:
cd ~/ci-cd-for-data-processing-workflow/env-setup
source set_env.sh
The script sets the following environment variables:
- Your Google Cloud project ID
- Your region and zone
- The name of your Cloud Storage buckets that are used by the build pipeline and the data-processing workflow.
Because environment variables aren't retained between sessions, if your Cloud Shell session shuts down or disconnects while you're working through this deployment, you need to reset the environment variables.
Create the Cloud Composer environment
In this deployment, you set up a Cloud Composer environment.
In Cloud Shell, add the Cloud Composer v2 API Service Agent Extension (
roles/composer.ServiceAgentV2Ext) role to the Cloud Composer Service Agent account:gcloud projects add-iam-policy-binding $GCP_PROJECT_ID \ --member serviceAccount:service-$PROJECT_NUMBER@cloudcomposer-accounts.iam.gserviceaccount.com \ --role roles/composer.ServiceAgentV2ExtIn Cloud Shell, create the Cloud Composer environment:
gcloud composer environments create $COMPOSER_ENV_NAME \ --location $COMPOSER_REGION \ --image-version composer-2.0.14-airflow-2.2.5Run a script to set the variables in the Cloud Composer environment. The variables are needed for the data-processing DAGs.
cd ~/ci-cd-for-data-processing-workflow/env-setup
chmod +x set_composer_variables.sh
./set_composer_variables.sh
The script sets the following environment variables:
- Your Google Cloud project ID
- Your region and zone
- The name of your Cloud Storage buckets that are used by the build pipeline and the data-processing workflow.
Extract the Cloud Composer environment properties
Cloud Composer uses a Cloud Storage bucket to store DAGs. Moving a DAG definition file to the bucket triggers Cloud Composer to automatically read the files. You created the Cloud Storage bucket for Cloud Composer when you created the Cloud Composer environment. In the following procedure, you extract the URL for the buckets, and then configure your CI/CD pipeline to automatically deploy DAG definitions to the Cloud Storage bucket.
In Cloud Shell, export the URL for the bucket as an environment variable:
export COMPOSER_DAG_BUCKET=$(gcloud composer environments describe $COMPOSER_ENV_NAME \
    --location $COMPOSER_REGION \
    --format="get(config.dagGcsPrefix)")
Export the name of the service account that Cloud Composer uses in order to have access to the Cloud Storage buckets:
export COMPOSER_SERVICE_ACCOUNT=$(gcloud composer environments describe $COMPOSER_ENV_NAME \
    --location $COMPOSER_REGION \
    --format="get(config.nodeConfig.serviceAccount)")
Create the Cloud Storage buckets
In this section you create a set of Cloud Storage buckets to store the following:
- Artifacts of the intermediate steps of the build process.
- The input and output files for the data-processing workflow.
- The staging location for the Dataflow jobs to store their binary files.
To create the Cloud Storage buckets, complete the following step:
In Cloud Shell, create Cloud Storage buckets and give the Cloud Composer service account permission to run the data-processing workflows:
cd ~/ci-cd-for-data-processing-workflow/env-setup
chmod +x create_buckets.sh
./create_buckets.sh
Create the Pub/Sub topic
In this section, you create a Pub/Sub topic to receive messages sent from the data-processing workflow integration test in order to automatically trigger the production build pipeline.
In the Google Cloud console, go to the Pub/Sub topics page.
Click Create Topic.
To configure the topic, complete the following steps:
- For the Topic ID, enter
integration-test-complete-topic. - Confirm the Add a default subscription option is checked.
- Leave the remaining options clear.
- For Encryption, select Google-managed encryption key.
- Click Create Topic.
- For the Topic ID, enter
Push the source code to Cloud Source Repositories
In this deployment, you have one source codebase that you need to put into version control. The following step shows how a codebase is developed and changes over time. Whenever changes are pushed to the repository, the pipeline to build, deploy, and test is triggered.
In Cloud Shell, push the
source-codefolder to Cloud Source Repositories:gcloud source repos create $SOURCE_CODE_REPO cp -r ~/ci-cd-for-data-processing-workflow/source-code ~/$SOURCE_CODE_REPO cd ~/$SOURCE_CODE_REPO git init git remote add google \ https://source.developers.google.com/p/$GCP_PROJECT_ID/r/$SOURCE_CODE_REPO git add . git commit -m 'initial commit' git push google masterThese are standard commands to initialize Git in a new directory and push the content to a remote repository.
Create Cloud Build pipelines
In this section, you create the build pipelines that build, deploy, and test the data-processing workflow.
Grant access to Cloud Build service account
Cloud Build deploys Cloud Composer DAGs and triggers workflows, which are enabled when you add additional access to the Cloud Build service account. For more information about the different roles available when working with Cloud Composer, see the access control documentation.
In Cloud Shell, add the
composer.adminrole to the Cloud Build service account so the Cloud Build job can set Airflow variables in Cloud Composer:gcloud projects add-iam-policy-binding $GCP_PROJECT_ID \ --member=serviceAccount:$PROJECT_NUMBER@cloudbuild.gserviceaccount.com \ --role=roles/composer.adminAdd the
composer.workerrole to the Cloud Build service account so the Cloud Build job can trigger the data workflow in Cloud Composer:gcloud projects add-iam-policy-binding $GCP_PROJECT_ID \ --member=serviceAccount:$PROJECT_NUMBER@cloudbuild.gserviceaccount.com \ --role=roles/composer.worker
Create the build and test pipeline
The build and test pipeline steps are configured in the
YAML configuration file.
In this deployment, you use prebuilt
builder images
for git, maven, gsutil, and gcloud to run the tasks in each build step.
You use configuration variable
substitutions
to define the environment settings at build time. The source code repository
location is defined by variable substitutions, and the locations of
Cloud Storage buckets. The build needs this information to deploy the
JAR file, test files, and the DAG definition.
In Cloud Shell, submit the build pipeline configuration file to create the pipeline in Cloud Build:
cd ~/ci-cd-for-data-processing-workflow/source-code/build-pipeline
gcloud builds submit --config=build_deploy_test.yaml --substitutions=\
REPO_NAME=$SOURCE_CODE_REPO,\
_DATAFLOW_JAR_BUCKET=$DATAFLOW_JAR_BUCKET_TEST,\
_COMPOSER_INPUT_BUCKET=$INPUT_BUCKET_TEST,\
_COMPOSER_REF_BUCKET=$REF_BUCKET_TEST,\
_COMPOSER_DAG_BUCKET=$COMPOSER_DAG_BUCKET,\
_COMPOSER_ENV_NAME=$COMPOSER_ENV_NAME,\
_COMPOSER_REGION=$COMPOSER_REGION,\
_COMPOSER_DAG_NAME_TEST=$COMPOSER_DAG_NAME_TEST
This command instructs Cloud Build to run a build with the following steps:
Build and deploy the WordCount self-executing JAR file.
- Check out the source code.
- Compile the WordCount Beam source code into a self-executing JAR file.
- Store the JAR file on Cloud Storage where it can be picked up by Cloud Composer to run the WordCount processing job.
Deploy and set up the data-processing workflow on Cloud Composer.
- Run the unit test on the custom-operator code used by the workflow DAG.
- Deploy the test input file and the test reference file on Cloud Storage. The test input file is the input for the WordCount processing job. The test reference file is used as a reference to verify the output of the WordCount processing job.
- Set the Cloud Composer variables to point to the newly built JAR file.
- Deploy the workflow DAG definition to the Cloud Composer environment.
To trigger the test-processing workflow, run the data-processing workflow in the test environment.
Verify the build and test pipeline
After you submit the build file, verify the build steps.
In the Google Cloud console, go to the Build History page to view a list of all past and currently running builds.
Click the build that is running.
On the Build details page, verify that the build steps match the previously described steps.
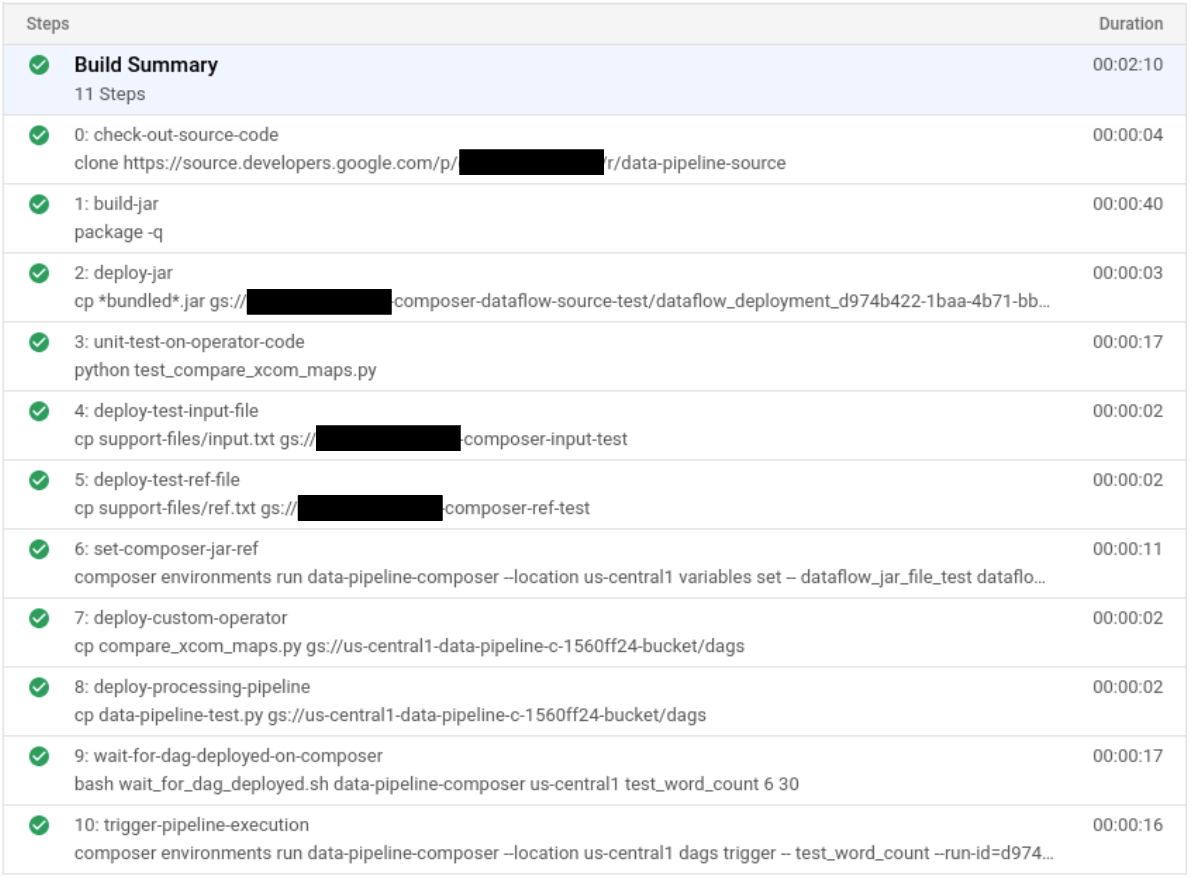
On the Build details page, the Status field of the build says
Build successfulwhen the build finishes.In Cloud Shell, verify that the WordCount sample JAR file was copied into the correct bucket:
gsutil ls gs://$DATAFLOW_JAR_BUCKET_TEST/dataflow_deployment*.jarThe output is similar to the following:
gs://…-composer-dataflow-source-test/dataflow_deployment_e88be61e-50a6-4aa0-beac-38d75871757e.jar
Get the URL to your Cloud Composer web interface. Make a note of the URL because it's used in the next step.
gcloud composer environments describe $COMPOSER_ENV_NAME \
    --location $COMPOSER_REGION \
    --format="get(config.airflowUri)"
Use the URL from the previous step to go to the Cloud Composer UI to verify a successful DAG run. If the Runs column shows no information, wait a few minutes and reload the page.
To verify that the data-processing workflow DAG
test_word_countis deployed and is in running mode, hold the pointer over the light-green circle by Runs and verify that it says Running.To see the running data-processing workflow as a graph, click the light-green circle, and then on the Dag Runs page, click Dag ID:
test_word_count.Reload the Graph View page to update the state of the current DAG run. It usually takes between 3-5 minutes for the workflow to finish. To verify that the DAG run finishes successfully, hold the pointer over each task to verify that the tooltip says State: success. The second to last task, named
do_comparison, is the integration test that verifies the process output against the reference file.
Once the integration test is complete, the last task, named
publish_test_completepublishes a message to theintegration-test-complete-topicPub/Sub topic which will be used to trigger the production build pipeline.To verify that the published message contains the correct reference to the latest JAR file, we can pull the message from the default
integration-test-complete-topic-subPub/Sub subscription.In the Google Cloud console, go to the Subscriptions page.
Click integration-test-complete-topic-sub, select the Message tab and click Pull
The output should be similar to the following:

Create the production pipeline
When the test processing workflow runs successfully, you can promote the current version of the workflow to production. There are several ways to deploy the workflow to production:
- Manually.
- Automatically triggered when all the tests pass in the test or staging environments.
- Automatically triggered by a scheduled job.
In this deployment, you automatically trigger the production build when all the tests pass in the test environment. For more information about automated approaches, see Release Engineering.
Before you implement the automated approach, you verify the production deployment build by doing a manual deployment to production. The production deployment build follows these steps:
- Copy the WordCount JAR file from the test bucket to the production bucket.
- Set the Cloud Composer variables for the production workflow to point to the newly promoted JAR file.
- Deploy the production workflow DAG definition on the Cloud Composer environment and running the workflow.
Variable substitutions define the name of the latest JAR file that is deployed to production with the Cloud Storage buckets used by the production processing workflow. To create the Cloud Build pipeline that deploys the production airflow workflow, complete the following steps:
In Cloud Shell, read the filename of the latest JAR file by printing the Cloud Composer variable for the JAR filename:
export DATAFLOW_JAR_FILE_LATEST=$(gcloud composer environments run $COMPOSER_ENV_NAME \
    --location $COMPOSER_REGION variables get -- \
    dataflow_jar_file_test 2>&1 | grep -i '.jar')
Use the build pipeline configuration file,
deploy_prod.yaml,to create the pipeline in Cloud Build:cd ~/ci-cd-for-data-processing-workflow/source-code/build-pipeline gcloud builds submit --config=deploy_prod.yaml --substitutions=\ REPO_NAME=$SOURCE_CODE_REPO,\ _DATAFLOW_JAR_BUCKET_TEST=$DATAFLOW_JAR_BUCKET_TEST,\ _DATAFLOW_JAR_FILE_LATEST=$DATAFLOW_JAR_FILE_LATEST,\ _DATAFLOW_JAR_BUCKET_PROD=$DATAFLOW_JAR_BUCKET_PROD,\ _COMPOSER_INPUT_BUCKET=$INPUT_BUCKET_PROD,\ _COMPOSER_ENV_NAME=$COMPOSER_ENV_NAME,\ _COMPOSER_REGION=$COMPOSER_REGION,\ _COMPOSER_DAG_BUCKET=$COMPOSER_DAG_BUCKET,\ _COMPOSER_DAG_NAME_PROD=$COMPOSER_DAG_NAME_PROD
Verify the data-processing workflow created by the production pipeline
Get the URL for your Cloud Composer UI:
gcloud composer environments describe $COMPOSER_ENV_NAME \
    --location $COMPOSER_REGION \
    --format="get(config.airflowUri)"
To verify that the production data-processing workflow DAG is deployed, go to the URL that you retrieved in the previous step and verify that
prod_word_countDAG is in the list of DAGs.- On the DAGs page, in the
prod_word_countrow, click Trigger DAG.
- On the DAGs page, in the
To update the DAG run status, click the Airflow logo or reload the page. A light-green circle in the Runs column indicates the DAG is running.
After the run succeeds, hold the pointer over the dark-green circle near the DAG runs column and verify that it says Success.
In Cloud Shell, list the result files in the Cloud Storage bucket:
gsutil ls gs://$RESULT_BUCKET_PRODThe output is similar to the following:
gs://…-composer-result-prod/output-00000-of-00003
gs://…-composer-result-prod/output-00001-of-00003
gs://…-composer-result-prod/output-00002-of-00003
Create Cloud Build triggers
In this section you create the Cloud Build triggers that link the source code changes to the test build process and between the test pipeline and production build pipeline.
Configure the test build pipeline trigger
You set up a Cloud Build trigger that triggers a new build when changes are pushed to the master branch of the source repository.
In the Google Cloud console, go to the Build triggers page.
Click Create trigger.
To configure trigger settings, complete the following steps:
- In the Name field, enter
trigger-build-in-test-environment. - In the Region drop-down, select global (non-regional).
- For Event, click Push to a Branch.
- For Source, select
data-pipeline-source. - In the Branch name field, enter
master. - For Configuration, click Cloud Build configuration file (yaml or json).
- For Location, click Repository.
- In the Cloud Build configuration file location field, enter
build-pipeline/build_deploy_test.yaml.
- In the Name field, enter
In Cloud Shell, run the following command to get all the substitution variables needed for the build. Make a note of these values because they are needed in a later step.
echo "_COMPOSER_DAG_BUCKET : ${COMPOSER_DAG_BUCKET} _COMPOSER_DAG_NAME_TEST : ${COMPOSER_DAG_NAME_TEST} _COMPOSER_ENV_NAME : ${COMPOSER_ENV_NAME} _COMPOSER_INPUT_BUCKET : ${INPUT_BUCKET_TEST} _COMPOSER_REF_BUCKET : ${REF_BUCKET_TEST} _COMPOSER_REGION : ${COMPOSER_REGION} _DATAFLOW_JAR_BUCKET : ${DATAFLOW_JAR_BUCKET_TEST}"On the Trigger settings page, in Advanced, Substitution variables, replace the variables with values from your environment that you got from the previous step. Add the following one at a time and click + Add item for each of the name-value pairs.
_COMPOSER_DAG_BUCKET_COMPOSER_DAG_NAME_TEST_COMPOSER_ENV_NAME_COMPOSER_INPUT_BUCKET_COMPOSER_REF_BUCKET_COMPOSER_REGION_DATAFLOW_JAR_BUCKET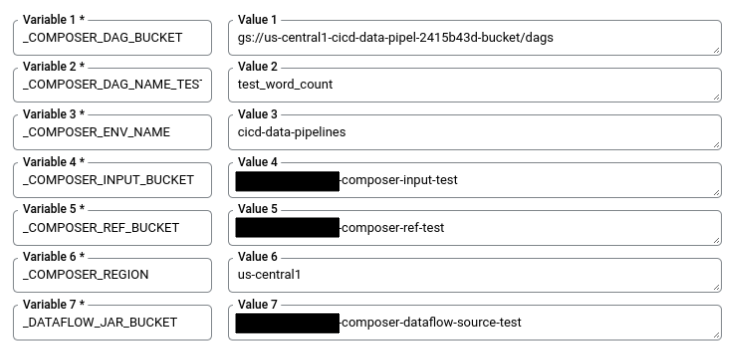
Click Create.
Configure the production build pipeline trigger
You set up a Cloud Build trigger that triggers a production build
when the tests have passed in the test environment and a message is published to
the tests-complete Pub/Sub topic. This trigger includes an
approval step where the build needs to be manually approved before the
production pipeline is run.
In the Google Cloud console, go to the Build triggers page.
Click Create trigger.
To configure trigger settings, complete the following steps:
- In the Name field, enter
trigger-build-in-prod-environment. - In the Region drop-down, select global (non-regional).
- For Event, click Pub/Sub message.
- For Subscription, select integration-test-complete-topic.
- For Source, select
data-pipeline-source. - For Revision, select Branch.
- In the Branch name field, enter
master. - For Configuration, click Cloud Build configuration file (yaml or json).
- For Location, click Repository.
- In the Cloud Build configuration file location field, enter
build-pipeline/deploy_prod.yaml.
- In the Name field, enter
In Cloud Shell, run the following command to get all the substitution variables needed for the build. Make a note of these values because they are needed in a later step.
echo "_COMPOSER_DAG_BUCKET : ${COMPOSER_DAG_BUCKET} _COMPOSER_DAG_NAME_PROD : ${COMPOSER_DAG_NAME_PROD} _COMPOSER_ENV_NAME : ${COMPOSER_ENV_NAME} _COMPOSER_INPUT_BUCKET : ${INPUT_BUCKET_PROD} _COMPOSER_REGION : ${COMPOSER_REGION} _DATAFLOW_JAR_BUCKET_PROD : ${DATAFLOW_JAR_BUCKET_PROD} _DATAFLOW_JAR_BUCKET_TEST : ${DATAFLOW_JAR_BUCKET_TEST}"On the Trigger settings page, in Advanced, Substitution variables, replace the variables with values from your environment that you got from the previous step. Add the following one at a time and click + Add item for each of the name-value pairs.
_COMPOSER_DAG_BUCKET_COMPOSER_DAG_NAME_PROD_COMPOSER_ENV_NAME_COMPOSER_INPUT_BUCKET_COMPOSER_REGION_DATAFLOW_JAR_BUCKET_PROD_DATAFLOW_JAR_BUCKET_TEST_DATAFLOW_JAR_FILE_LATEST = $(body.message.data)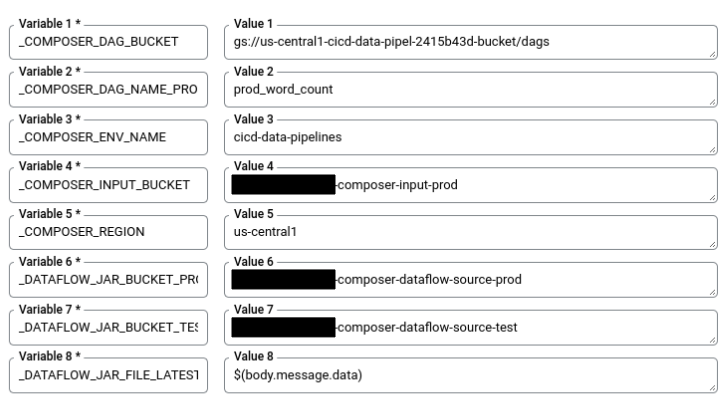
For Approval, select Require approval before build executes.
Click Create.
Test the triggers
To test the trigger, you add a new word to the test input file and make the corresponding adjustment to the test reference file. You verify that the build pipeline is triggered by a commit push to Cloud Source Repositories and that the data-processing workflow runs correctly with the updated test files.
In Cloud Shell, add a test word at the end of the test file:
echo "testword" >> ~/$SOURCE_CODE_REPO/workflow-dag/support-files/input.txtUpdate the test result reference file,
ref.txt, to match the changes done in the test input file:echo "testword: 1" >> ~/$SOURCE_CODE_REPO/workflow-dag/support-files/ref.txtCommit and push changes to Cloud Source Repositories:
cd ~/$SOURCE_CODE_REPO
git add .
git commit -m 'change in test files'
git push google master
In the Google Cloud console, go to the History page.
To verify that a new test build is triggered by the previous push to master branch, on the current running build, the Ref column says master.
In Cloud Shell, get the URL for your Cloud Composer web interface:
gcloud composer environments describe $COMPOSER_ENV_NAME \
    --location $COMPOSER_REGION --format="get(config.airflowUri)"
After the build finishes, go to the URL from the previous command to verify that the
test_word_countDAG is running.Wait until the DAG run finishes, which is indicated when the light green circle in the DAG runs column goes away. It usually takes 3-5 minutes for the process to finish.
In Cloud Shell, download the test result files:
mkdir ~/result-download
cd ~/result-download
gsutil cp gs://$RESULT_BUCKET_TEST/output* .
Verify that the newly added word is in one of the result files:
grep testword output*The output is similar to the following:
output-00000-of-00003:testword: 1
In the Google Cloud console, go to the History page.
Verify that a new production build has been triggered by the completion of the integration test and that the build is awaiting approval.
To run the production build pipeline, select the checkbox next to the build, click Approve, and then click Approve in the confirmation box.
After the build finishes, go to the URL from the previous command and trigger the
prod_word_countDAG manually to run the production pipeline.
Clean up
The following sections explain how you can avoid future charges for your Google Cloud project and the Apache Hive and Dataproc resources that you used in this deployment.
Delete the Google Cloud project
To avoid incurring charges to your Google Cloud account for the resources used in this deployment, you can delete the Google Cloud project.
- In the Google Cloud console, go to the Manage resources page.
- In the project list, select the project that you want to delete, and then click Delete.
- In the dialog, type the project ID, and then click Shut down to delete the project.
Delete the individual resources
If you want to keep the project used for this deployment, run the following steps to delete the resources you created.
To delete the Cloud Build trigger, complete the following steps:
In the Google Cloud console, go to the Triggers page.
Next to the triggers that you created, click Moremore_vert, and then click Delete.
In Cloud Shell, delete the Cloud Composer environment:
gcloud -q composer environments delete $COMPOSER_ENV_NAME \
    --location $COMPOSER_REGION
Delete the Cloud Storage buckets and their files:
gsutil -m rm -r gs://$DATAFLOW_JAR_BUCKET_TEST \
    gs://$INPUT_BUCKET_TEST \
    gs://$REF_BUCKET_TEST \
    gs://$RESULT_BUCKET_TEST \
    gs://$DATAFLOW_STAGING_BUCKET_TEST \
    gs://$DATAFLOW_JAR_BUCKET_PROD \
    gs://$INPUT_BUCKET_PROD \
    gs://$RESULT_BUCKET_PROD \
    gs://$DATAFLOW_STAGING_BUCKET_PROD
To delete the Pub/Sub topic and default subscription, run the following commands in Cloud Shell:
gcloud pubsub topics delete integration-test-complete-topic
gcloud pubsub subscriptions delete integration-test-complete-topic-sub
Delete the repository:
gcloud -q source repos delete $SOURCE_CODE_REPODelete the files and folder you created:
rm -rf ~/ci-cd-for-data-processing-workflow
rm -rf ~/$SOURCE_CODE_REPO
rm -rf ~/result-download
What's next
- Learn more about GitOps-style continuous delivery with Cloud Build.
- Learn how to Use a CI/CD pipeline for data-processing workflows.
- Learn more about Common Dataflow use-case patterns.
- Learn more about Release Engineering.
- For more reference architectures, diagrams, and best practices, explore the Cloud Architecture Center.