This document shows you how to migrate a Microsoft SQL Server instance installed on Amazon Elastic Compute Cloud (Amazon EC2) to a Microsoft SQL Server instance on Compute Engine in Google Cloud. This migration is solely based on built-in database technology provided by Microsoft SQL Server. This method is effectively a zero downtime method that uses an Always On Availability Group. The Always On Availability Group spans AWS and Google Cloud over VPN, and it enables the replication of the Microsoft SQL Server database. This document assumes that you're familiar with network setup, Google Cloud, Compute Engine, AWS, and Microsoft SQL Server.
If you want to perform replication only, you can follow the steps in this tutorial, but stop after you add test data and omit the cutover steps.
Objectives
- Deploy a multi-cloud Microsoft SQL Server Always On Availability Group that spans a Microsoft SQL Server in Amazon EC2 and a Microsoft SQL Server in Google Cloud on Compute Engine.
- Set up a primary Microsoft SQL instance in Amazon EC2.
- Set up the Microsoft SQL Server instance in Google Cloud as secondary to the primary Microsoft SQL Server in AWS (target of data replication).
- Complete the data migration by making the secondary Microsoft SQL Server in Google Cloud the primary Microsoft SQL Server in Google Cloud.
Costs
In this document, you use the following billable components of Google Cloud:
- Compute Engine
- SQL Server VMs
To generate a cost estimate based on your projected usage,
use the pricing calculator.
This tutorial also requires resources on AWS that might incur cost.
Before you begin
-
In the Google Cloud console, on the project selector page, select or create a Google Cloud project.
-
Make sure that billing is enabled for your Google Cloud project.
-
In the Google Cloud console, activate Cloud Shell.
Understanding database migration
Database migration moves the data from a source database to a target database. In general, you can migrate a subset of the data or have a different schema in the source and target database. However, this tutorial addresses homogeneous database migration that requires the migration of the complete database without changes—the target database is a copy of the source database.
Zero downtime database migration
The term zero downtime refers to the fact that during the migration, the clients that access the source database remain fully operational and aren't interrupted. The only downtime occurs when the clients have to reconnect to the target database after the migration is complete. Although this method isn't truly zero downtime, the term refers to this scenario of minimal downtime.
For a general discussion of database migration, see Database Migration - Concepts and Principles (Part 1) and Database Migration - Concepts and Principles (Part 2). These articles provide an overview of the possible complexity of database migration in different scenarios.
Database migration using Microsoft SQL Server technology
Some database migration technologies provide separate components and services. When database migration requires a copy of the source database, you can use built-in Microsoft SQL Server technology.
This tutorial uses Microsoft SQL Server Always On Availability Group technology to connect the source database (primary) to a target database (secondary). This technology provides asynchronous replication from the primary to the secondary database. Because the primary database is in Amazon EC2 and the secondary database is in Google Cloud on Compute Engine, the replication accomplishes the database migration. After all data is migrated through asynchronous replication, the secondary is promoted to primary and the clients can reconnect to the new primary for continued processing.
This approach supports explicit testing by a trial replication into a test target database: you can start the replication, keep it running for a while, and then stop the replication. The test target database is in a consistent state, and you can use it to test the application. After testing is complete, you can delete the test target database, and initiate replication for a live database.
Multi-cloud database migration architecture
The following diagram shows the overall deployment architecture for a multi-cloud database migration:
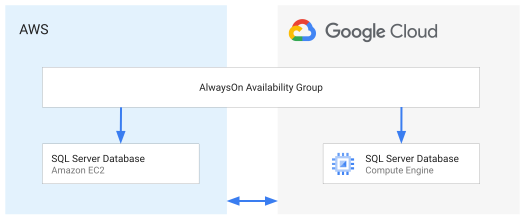
The preceding diagram shows the source (primary) SQL Server Database in AWS as an Amazon EC2 instance. The diagram also shows the target database (secondary) in Google Cloud. The databases are connected by an Always On Availability Group. The network connection between AWS and Google Cloud is assumed to be a secured HA VPN connection.
Setting up a multi-cloud Microsoft SQL Server availability group
In the following sections, you set up a two node Always On Availability Group where the primary node resides in AWS, and the secondary node resides in Google Cloud. This configuration is described earlier in this document in Multi-cloud database migration architecture.
The following tables provide a summary of the nodes and IP addresses that you set up in this tutorial. For every database VM, you allocate two IP addresses in addition to the primary IP address: one IP address for the Windows Server Failover Cluster (WSFC) and one IP address for the Availability Group Listener.
| Provider | Instance | Primary IP | WSFC and Availability Group Listener IPs | WSFC | Availability Group |
|---|---|---|---|---|---|
| AWS | cluster-sql1 |
192.168.1.4 |
192.168.1.5
|
Name: cluster-dbclus
|
Name: cluster-ag
|
| Google Cloud | cluster-sql2 |
10.1.1.4 |
10.1.1.5
|
| Provider | Instance | Primary IP | — |
|---|---|---|---|
AWS |
dc-windows |
192.168.1.100 |
Domain controller |
The instructions use these names and IP addresses as examples. If you want to use your own names and IP addresses, replace the example values in the instructions.
Prerequisites for AWS
On AWS you should have two virtual machines: one that runs the domain controller, and one that runs a SQL Server. The domain controller used as an example in this tutorial has the following configuration:
Domain                    : dbeng.com
Domain controller         : Name: dc-windows
                            Private IP: 192.168.1.100
VPC Subnet                : 192.168.1.0/24
SQL Server service account: dbeng\sql_service
The SQL Server VM used as an example in this tutorial is part of a Windows Active Directory domain in Amazon EC2. The server has two secondary IP addresses to be used by the WSFC and Availability Group Listener. The SQL Server VM has the following configuration:
VM Instance : Name: cluster-sql1
              Private IP: 192.168.1.4
              Secondary Private IPs: 192.168.1.5, 192.168.1.6
VPC Subnet  : 192.168.1.0/24
You can use the service account NT SERVICE\MSSQLSERVER as the SQL Server
service account. During the Always On Availability Group setup, you grant access
to the machine accounts (dbeng\cluster-sql1$, dbeng\cluster-sql2$) instead
of the domain account. The following section provides the commands to configure
the availability group.
Prerequisites for connectivity between AWS and Google Cloud
To connect your AWS project with your Google Cloud project, set up the following network connectivity:
- Set up a Google Virtual Private Cloud and an AWS VPC in your respective projects, and configure a VPN between the VPCs. For information about how to set up a VPN between Google Cloud and AWS, see Multi-cloud VPN and multi-zone subnetworks — network setup for multi-cloud database deployments.
In Cloud Shell, create a subnet in the Google Cloud project where you're creating the SQL Server instance. If you already have a subnet, you can use it, but make sure to set up the firewall rules in the next step.
gcloud compute networks create demo-vpc --subnet-mode custom

gcloud compute networks subnets create demo-subnet1 \
  --network demo-vpc --region us-east4 --range 10.1.1.0/24
This tutorial uses the following values:
- VPC:
demo-vpc - Subnet:
demo-subnet1; 10.1.1.0/24
The subnet appears on the Google Cloud console VPC networks page.
- VPC:
In your Google Cloud project, create a firewall rule to open all traffic between your Google Cloud subnet and your AWS subnet:
gcloud compute firewall-rules create allow-vpn-ports \
  --network demo-vpc --allow tcp:1-65535,udp:1-65535,icmp \
  --source-ranges 10.1.1.0/24,192.168.1.0/24
The firewall rule appears on the Google Cloud console Firewall policies page.
In your AWS project, create a firewall rule in the Security Group to open all traffic between your Google Cloud subnet and your AWS subnet, as shown in the following screenshot:
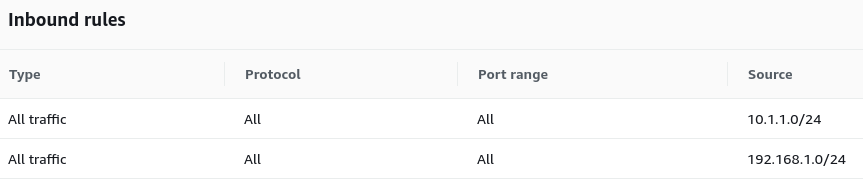
In a production environment, you might consider opening only the required TCP/UDP ports. Opening only the required ports limits potentially harmful traffic and follows a least necessary principle.
Creating an instance in Google Cloud for the Always On Availability Group
This tutorial works with the following Microsoft SQL Server editions and features:
- Edition:
- Microsoft SQL Server 2016 Enterprise Edition, or
- Microsoft SQL Server 2017 Enterprise Edition, or
- Microsoft SQL Server 2019 Enterprise Edition, or
- Microsoft SQL Server 2022 Enterprise Edition, or
- Microsoft SQL Server 2016 Standard Edition, or
- Microsoft SQL Server 2017 Standard Edition, or
- Microsoft SQL Server 2019 Standard Edition, or
- Microsoft SQL Server 2022 Standard Edition
- Feature: Always On Availability Groups
The following instructions use the image for Microsoft SQL Server 2019
Enterprise Edition: sql-ent-2019-win-2019. If you want to install Microsoft
SQL Server 2017, 2016 or 2022 Enterprise Editions, use sql-ent-2017-win-2019,
sql-ent-2016-win-2019, respectively sql-ent-2022-win-2019, instead. For a
list of all images, see the Compute Engine
Operating system details
page.
In the following steps, you create a SQL Server instance in Google Cloud for the availability group. The instance uses the following IP address configuration with Alias IP addresses:
VM Instance: Name: cluster-sql2
             Private IP: 10.1.1.4
             Secondary Private IPs: 10.1.1.5, 10.1.1.6
You create an instance named cluster-sql2 from public SQL Server images, with
a 200-GB boot disk size and an n1-highmem-4 machine type. SQL Server instances
usually require more compute resources than the domain controller instance. If
you need additional compute resources later, you can change the machine type for
these instances. If you need additional storage space, add a disk or resize the
persistent boot disk. In larger availability groups, you can create several
instances.
The following steps also include the --metadata sysprep-specialize-script-ps1
flag that runs a Microsoft PowerShell command during instance creation to
install the Failover-Clustering feature.
In Cloud Shell, create a SQL Server instance in Google Cloud that uses the same operating system version as in AWS:
gcloud compute instances create cluster-sql2 --machine-type n1-highmem-4 \
  --boot-disk-type pd-ssd --boot-disk-size 200GB \
  --image-project windows-sql-cloud --image-family sql-ent-2019-win-2019 \
  --zone us-east4-a \
  --network-interface "subnet=demo-subnet1,private-network-ip=10.1.1.4,aliases=10.1.1.5;10.1.1.6" \
  --can-ip-forward \
  --metadata sysprep-specialize-script-ps1="Install-WindowsFeature Failover-Clustering -IncludeManagementTools;"
Set a Windows username and password before you connect to the instance.
When you use Remote Desktop Protocol (RDP) from your laptop, create a firewall rule that allows access to the instance.
Connect to the Google Cloud instance using RDP and open an elevated PowerShell (run as administrator).
In this tutorial, you configure a local DNS to use the domain controller in AWS (
192.168.1.100) to avoid creating another VM in Google Cloud. For production workloads, we recommend that you use a domain controller (primary or secondary) in Google Cloud to avoid authenticating over the VPN tunnel.In the elevated PowerShell, you should be able to ping the domain controller
192.168.1.100:ping 192.168.1.100If the ping fails, make sure that the firewall and VPN tunnel are configured correctly between AWS and Google Cloud, as described in Prerequisites for connectivity earlier in this document.
Because the server was originally set up with DHCP, change the instance to use static IP addresses:
netsh interface ip set address name=Ethernet static 10.1.1.4 255.255.255.0 10.1.1.1 1After you run the preceding command, you lose your connection. Reconnect in RDP.
Configure local DNS to use the domain controller in AWS and open the local firewall ports for SQL Server. Opening the firewall ports lets the SQL Server connect to remote SQL Servers.
netsh interface ip set dns Ethernet static 192.168.1.100

netsh advfirewall firewall add rule name="Open Port 5022 for Availability Groups" dir=in action=allow protocol=TCP localport=5022

netsh advfirewall firewall add rule name="Open Port 1433 for SQL Server" dir=in action=allow protocol=TCP localport=1433
Add the instance to the Windows domain:
Add-Computer -DomainName "dbeng.com" -Credential "dbeng.com\Administrator" -Restart -ForceThe command prompts you for the domain administrator credentials. When the command finishes running, the instance restarts.
If the command doesn't run, make sure that you're running it as administrator.
Use the
dbeng\Administratoraccount to reconnect to your instance using RDP.Set the SQL Server service account:
- Open SQL Server 2019 Configuration Manager.
- On the SQL Server Services tab, right-click SQL Server (MSSQLSERVER), and then click Properties.
- Set the account and password for
dbeng\sql_service. - Restart SQL Server.
Rename the SQL Server instance to match the computer name and restart SQL Server:
Invoke-Sqlcmd -Query "EXEC sp_dropserver @@SERVERNAME, @droplogins='droplogins'"

Invoke-Sqlcmd -Query "EXEC sp_addserver '$env:COMPUTERNAME', local"

Stop-Service -Name "MSSQLServer" -Force

Start-Service -Name "MSSQLServer"
Next, you configure the instance in AWS.
Configure the instance in AWS
This tutorial assumes that you have already configured the following in AWS:
- The SQL Server instance is part of the Active Directory domain.
- Local DNS is working properly and the name of the remote server in
Google Cloud (
cluster-sql2.dbeng.com)can be translated into an IP address. - Firewall rules are opened between the subnets on AWS and Google Cloud.
To configure cluster-sql1 in AWS, do the following:
- Connect to the AWS instance using RDP (
cluster-sql1). - Open an elevated PowerShell (run as administrator).
Install Windows Failover Clustering if it isn't already installed.
Install-WindowsFeature Failover-Clustering -IncludeManagementToolsThis command requires a restart if the feature wasn't already installed. After the restart, continue with the next step.
Open the local firewall ports for the SQL Server instance in AWS:
netsh advfirewall firewall add rule name="Open Port 5022 for Availability Groups" dir=in action=allow protocol=TCP localport=5022

netsh advfirewall firewall add rule name="Open Port 1433 for SQL Server" dir=in action=allow protocol=TCP localport=1433

netsh advfirewall firewall add rule name="ICMP Allow incoming V4 echo request" protocol="icmpv4:8,any" dir=in action=allow
Rename the SQL Server instance to match the computer name and restart SQL Server:
Invoke-Sqlcmd -Query "EXEC sp_dropserver @@SERVERNAME, @droplogins='droplogins'"

Invoke-Sqlcmd -Query "EXEC sp_addserver '$env:COMPUTERNAME', local"

Stop-Service -Name "MSSQLServer" -Force

Start-Service -Name "MSSQLServer"
Validate that the instance in AWS can connect to the instance in Google Cloud when using the remote instance name. To test the connection, run the following commands from a domain account that has granted connect access to the SQL Server.
Test the network connection:
ping -4 cluster-sql2.dbeng.comThe output looks like the following:
RESULTS:
Pinging cluster-sql2.dbeng.com [10.1.1.4] with 32 bytes of data:
Reply from 10.1.1.4: bytes=32 time=3ms TTL=127
Reply from 10.1.1.4: bytes=32 time=2ms TTL=127
Reply from 10.1.1.4: bytes=32 time=2ms TTL=127
Reply from 10.1.1.4: bytes=32 time=2ms TTL=127
Test the Windows Authentication to the remote server:
sqlcmd -E -S cluster-sql2.dbeng.com -Q "SELECT 'CONNECTED'"The output looks like the following:
RESULTS:
--------------------------------------------------------------------------
CONNECTED

(1 rows affected)
If you're unable to connect, make sure that the DNS is working properly and that firewall rules are open between the AWS and Google Cloud subnets.
Verify Google Cloud instance is ready to join availability group
- Use the
dbeng\Administratoraccount to connect to the Google Cloud instance using RDP (cluster-sql2). - Open an elevated PowerShell (run as administrator).
Validate that the instance in Google Cloud can connect to the instance in AWS when using the instance name. To test the connection, run the following commands from a domain account that has granted connect access to the SQL Server.
Test the network connection:
ping -4 cluster-sql1.dbeng.comThe output looks like the following:
RESULTS:
Pinging CLUSTER-SQL1.dbeng.com [192.168.1.4] with 32 bytes of data:
Reply from 192.168.1.4: bytes=32 time=3ms TTL=127
Reply from 192.168.1.4: bytes=32 time=2ms TTL=127
Reply from 192.168.1.4: bytes=32 time=3ms TTL=127
Reply from 192.168.1.4: bytes=32 time=2ms TTL=127
Test the Windows Authentication to the remote server:
sqlcmd -E -S cluster-sql1 -Q "SELECT 'CONNECTED'"The output looks like the following:
RESULTS:
------------------------------------------------------------
CONNECTED

(1 rows affected)
If you're unable to connect, make sure that the DNS is working properly and that firewall rules are open between the AWS and Google Cloud subnets.
Create folders at
C:\SQLDataandC:\SQLLog. The database data and log files use these folders.New-Item "C:\SQLData" –type directory New-Item "C:\SQLLog" –type directoryCreate a folder at
C:\SQLBackupand a Windows share at\\cluster-sql2\SQLBackupto transfer the backup from the AWS instance. You can use any other network share that is available to both servers.New-Item "C:\SQLBackup" –type directory New-SmbShare -Name "SQLBackup" -Path "C:\SQLBackup" -FullAccess "dbeng.com\cluster-sql1$","dbeng.com\cluster-sql2$","NT SERVICE\MSSQLSERVER","authenticated users","dbeng.com\sql_service"
The instances are now ready for the availability group. Because you only have two instances, in the next section you configure a file share witness to provide a tie-breaking vote and achieve a quorum.
Creating a file share witness
To provide a tie-breaking vote and achieve a quorum for the failover scenario, create a file share that acts as a witness. For the purposes of this tutorial, you create the file share witness on the domain controller VM. In a production environment, you would create the file share witness on any server within your Active Directory domain.
- Use the
dbeng\Administratoraccount to connect to the domain controller VM,dc-windows, using RDP. - Open an elevated PowerShell (run as administrator).
Create the witness folder:
New-Item "C:\QWitness" –type directoryShare the folder:
New-SmbShare -Name "QWitness" -Path "C:\QWitness" -Description "SQL File Share Witness" -FullAccess "dbeng.com\Administrator", "dbeng.com\cluster-sql1$", "dbeng.com\cluster-sql2$"Use the
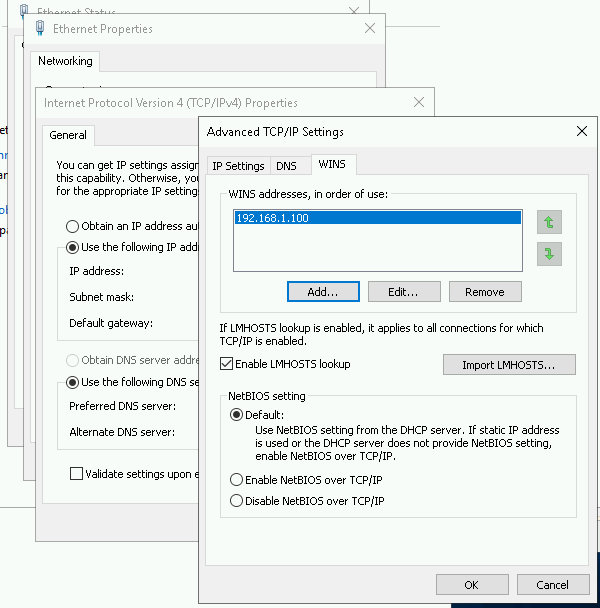
dbeng.com\Administratorto connect to bothcluster-sql1andcluster-sql2using RDP.Verify that you can access the shared directory from both servers:
dir \\dc-windows\QWitnessIf you can't access the shared directory, try changing the network connection on the node to set the WINS server to match the domain server. The network connection change might take a few seconds. The following screenshot shows the updated WINS settings:
Everything is now ready for the availability group. Next, you configure the Failover Clustering.
Configuring Failover Clustering
In this section, you configure the WSFC and enable Always On High Availability for both instances. Run all the following configuration commands from the instance in AWS.
- Connect to the AWS instance (
cluster-sql1) using RDP. - Open an elevated PowerShell (run as administrator).
Set variables that reflect your cluster environment. For this example, set the following variables:
$node1 = "cluster-sql1.dbeng.com"
$node2 = "cluster-sql2.dbeng.com"
$nameWSFC = "cluster-dbclus" #Name of cluster
$ipWSFC1 = "192.168.1.5" #IP address of cluster in subnet 1 (AWS)
$ipWSFC2 = "10.1.1.5"    #IP address of cluster in subnet 2 (Google Cloud)
Create the failover cluster (this command might take a while to run):
New-Cluster -Name $nameWSFC -Node $node1, $node2 -NoStorage -StaticAddress $ipWSFC1, $ipWSFC2

Set-ClusterQuorum -FileShareWitness \\dc-windows\QWitness
Enable Always On High Availability on node 1. If you haven't previously enabled Always On, these commands force SQL Server to restart.
Enable-SqlAlwaysOn -ServerInstance $node1 -ForceEnable Always On High Availability on node 2. These commands stop the SQL Server service before enabling SQL Always On, so you can ignore the error that reads:
Enable-SqlAlwaysOn : StopService failed for Service 'MSSQLSERVER'.Get-Service -ComputerName $node2 -Name "MSSQLServer" | Stop-Service -Force Enable-SqlAlwaysOn -ServerInstance $node2 -Force Get-Service -ComputerName $node2 -Name "MSSQLServer" | Start-ServiceCreate folders at
C:\SQLDataandC:\SQLLog. Use these folders for the TestDB database data and log files. If your server already has a database with this folder structure, you can skip this step. If you're unsure, run the commands and ignore any error messages about preexisting folders.New-Item "C:\SQLData" –type directory New-Item "C:\SQLLog" –type directory
The Failover Cluster Manager is ready. Next, you create the availability group.
Creating the availability group
In this section, you create a test database in AWS (cluster-sql1) and
configure it to work with a new availability group. Alternatively, you can
specify an existing database for the availability group.
- Connect to the AWS instance (
cluster-sql1) using RDP. - Open an elevated PowerShell (run as administrator).
Create a folder at
C:\SQLBackupto store a backup of the database. The backup is required before you can set up the availability group on a new database.New-Item "C:\SQLBackup" –type directoryIf you don't have a database configured already, run SQL Server Management Studio and create a test database in the AWS instance (
cluster-sql1):CREATE DATABASE TestDB ON PRIMARY (NAME = 'TestDB_Data', FILENAME='C:\SQLData\TestDB_Data.mdf', SIZE = 256MB, MAXSIZE = UNLIMITED, FILEGROWTH = 256MB ) LOG ON (NAME = 'TestDB_Log', FILENAME='C:\SQLLog\TestDB_Log.ldf', SIZE = 256MB, MAXSIZE = UNLIMITED, FILEGROWTH = 256MB ) GO USE [TestDB] Exec dbo.sp_changedbowner @loginame = 'sa', @map = false; ALTER DATABASE [TestDB] SET RECOVERY FULL; GO BACKUP DATABASE TestDB to disk = 'C:\SQLBackup\TestDB-backup.bak' WITH INIT GOIn Microsoft SQL Server Management Studio, select Query > SQLCMD Mode.
SQL Server Management Studio provides a wizard to create the availability groups. In this tutorial, you use SQL commands instead, so that it's easier to debug issues that you might encounter while connecting across different cloud providers. If you prefer, you can run the availability group wizard and skip to the later step to verify the availability group is synchronizing.
Run the following queries in SQLCMD Mode. If you're using a preexisting database, replace
TestDBwith the name of your database.Create an endpoint in the first node and grant permission to the endpoint:
:Connect CLUSTER-SQL1
IF NOT EXISTS (SELECT state FROM sys.endpoints WHERE name = N'Hadr_endpoint')
BEGIN
  CREATE ENDPOINT [Hadr_endpoint]
  AS TCP (LISTENER_PORT = 5022)
  FOR DATA_MIRRORING (ROLE = WITNESS, ENCRYPTION = REQUIRED ALGORITHM AES)
END
GO

IF (SELECT state FROM sys.endpoints WHERE name = N'Hadr_endpoint') <> 0
BEGIN
  ALTER ENDPOINT [Hadr_endpoint] STATE = STARTED
END
GO

use [master]
GO

IF SUSER_ID('DBENG\sql_service') IS NULL
  CREATE LOGIN [DBENG\sql_service] FROM WINDOWS
GO

GRANT CONNECT ON ENDPOINT::[Hadr_endpoint] TO [DBENG\sql_service]
GO
Enable the
AlwaysOn_healthextended event session in the first node. The Availability Groups require the extended event session.:Connect CLUSTER-SQL1 IF EXISTS(SELECT * FROM sys.server_event_sessions WHERE name='AlwaysOn_health') BEGIN ALTER EVENT SESSION [AlwaysOn_health] ON SERVER WITH (STARTUP_STATE=ON); END IF NOT EXISTS(SELECT * FROM sys.dm_xe_sessions WHERE name='AlwaysOn_health') BEGIN ALTER EVENT SESSION [AlwaysOn_health] ON SERVER STATE=START; END GOCreate an endpoint in the second node and grant permission to the endpoint:
:Connect CLUSTER-SQL2
IF NOT EXISTS (SELECT state FROM sys.endpoints WHERE name = N'Hadr_endpoint')
BEGIN
  CREATE ENDPOINT [Hadr_endpoint]
    AS TCP (LISTENER_PORT = 5022)
    FOR DATA_MIRRORING (ROLE = WITNESS, ENCRYPTION = REQUIRED ALGORITHM AES)
END
GO

IF (SELECT state FROM sys.endpoints WHERE name = N'Hadr_endpoint') <> 0
BEGIN
  ALTER ENDPOINT [Hadr_endpoint] STATE = STARTED
END
GO

use [master]
GO

IF SUSER_ID('DBENG\sql_service') IS NULL
  CREATE LOGIN [DBENG\sql_service] FROM WINDOWS
GO

GRANT CONNECT ON ENDPOINT::[Hadr_endpoint] TO [DBENG\sql_service]
GO
Enable the
AlwaysOn_healthextended event session in the second node. The Availability Groups require the extended event session.:Connect CLUSTER-SQL2 IF EXISTS(SELECT * FROM sys.server_event_sessions WHERE name='AlwaysOn_health') BEGIN ALTER EVENT SESSION [AlwaysOn_health] ON SERVER WITH (STARTUP_STATE=ON); END IF NOT EXISTS(SELECT * FROM sys.dm_xe_sessions WHERE name='AlwaysOn_health') BEGIN ALTER EVENT SESSION [AlwaysOn_health] ON SERVER STATE=START; END GOCreate the Availability Group in the first node:
:Connect CLUSTER-SQL1
USE [master]
GO

--DROP AVAILABILITY GROUP [cluster-ag];
GO

CREATE AVAILABILITY GROUP [cluster-ag]
WITH (AUTOMATED_BACKUP_PREFERENCE = SECONDARY,
DB_FAILOVER = OFF,
DTC_SUPPORT = NONE)
FOR DATABASE [TestDB]
REPLICA ON N'CLUSTER-SQL1' WITH (ENDPOINT_URL = N'TCP://CLUSTER-SQL1.dbeng.com:5022', FAILOVER_MODE = MANUAL, AVAILABILITY_MODE = ASYNCHRONOUS_COMMIT, BACKUP_PRIORITY = 50, SEEDING_MODE = MANUAL),
  N'CLUSTER-SQL2' WITH (ENDPOINT_URL = N'TCP://cluster-sql2.dbeng.com:5022', FAILOVER_MODE = MANUAL, AVAILABILITY_MODE = ASYNCHRONOUS_COMMIT, BACKUP_PRIORITY = 50, SEEDING_MODE = MANUAL);
GO
Join the second node to the newly created Availability Group:
:Connect CLUSTER-SQL2
ALTER AVAILABILITY GROUP [cluster-ag] JOIN;
GO
Create a database backup in the first node:
:Connect CLUSTER-SQL1
BACKUP DATABASE [TestDB] TO DISK = N'\\CLUSTER-SQL2\SQLBackup\TestDB.bak' WITH COPY_ONLY, FORMAT, INIT, SKIP, REWIND, NOUNLOAD, COMPRESSION, STATS = 5
GO
Restore the database backup on the second node:
:Connect CLUSTER-SQL2
RESTORE DATABASE [TestDB] FROM DISK = N'\\CLUSTER-SQL2\SQLBackup\TestDB.bak' WITH NORECOVERY, NOUNLOAD, STATS = 5
GO
Create a transaction log backup in the first node:
:Connect CLUSTER-SQL1
BACKUP LOG [TestDB] TO DISK = N'\\CLUSTER-SQL2\SQLBackup\TestDB.trn' WITH NOFORMAT, INIT, NOSKIP, REWIND, NOUNLOAD, COMPRESSION, STATS = 5
GO
Restore the transaction log backup in the second node:
:Connect CLUSTER-SQL2
RESTORE LOG [TestDB] FROM  DISK = N'\\CLUSTER-SQL2\SQLBackup\TestDB.trn' WITH NORECOVERY, NOUNLOAD, STATS = 5
GO
To make sure that there are no errors in the synchronization, run the following query and make sure that the column
connected_state_deschas a value ofCONNECTED::Connect CLUSTER-SQL2 select r.replica_server_name, r.endpoint_url, rs.connected_state_desc, rs.last_connect_error_description, rs.last_connect_error_number, rs.last_connect_error_timestamp from sys.dm_hadr_availability_replica_states rs join sys.availability_replicas r on rs.replica_id=r.replica_id where rs.is_local=1If the column
connected_state_deschas the error messageAn error occurred while receiving data: '24(The program issued a command but the command length is incorrect)', run the following command to try to clear the error::Connect CLUSTER-SQL1 IF SUSER_ID('DBENG\CLUSTER-SQL2$') IS NULL CREATE LOGIN [DBENG\CLUSTER-SQL2$] FROM WINDOWS GO GRANT CONNECT ON ENDPOINT::[Hadr_endpoint] TO [DBENG\CLUSTER-SQL2$] GO :Connect CLUSTER-SQL2 IF SUSER_ID('DBENG\CLUSTER-SQL1$') IS NULL CREATE LOGIN [DBENG\CLUSTER-SQL1$] FROM WINDOWS GO GRANT CONNECT ON ENDPOINT::[Hadr_endpoint] TO [DBENG\CLUSTER-SQL1$] GORe-run the previous query to make sure that the synchronization error no longer occurs. You might need to wait a few minutes for the error to clear. If the error persists, see Troubleshoot Always On Availability Groups Configuration (SQL Server).
Finish the availability group setup:
:Connect CLUSTER-SQL2
ALTER DATABASE [TestDB] SET HADR AVAILABILITY GROUP = [cluster-ag]
GO

ALTER DATABASE [TestDB] SET HADR RESUME;
GO
Verify that the availability group is synchronizing:
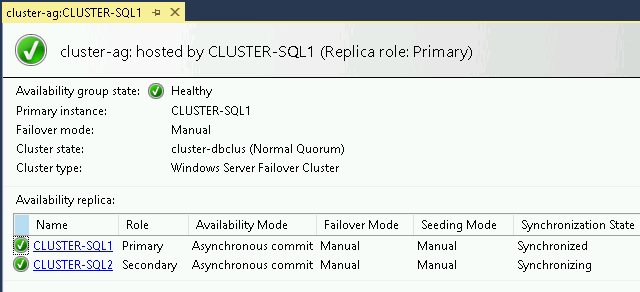
In SQL Server Management Studio, under Always On High Availability > Availability Groups, right-click the availability group and then select Show Dashboard.
Verify that the primary Synchronization State is Synchronized, and the secondary Synchronization State is Synchronizing, as shown in the following screenshot:
To add a listener, under Always On High Availability > Availability Groups >
cluster-ag (Primary)> Availability Group Listeners, right-click the availability group name and then select Add Listener.In the New Availability Group Listener dialog, specify the following parameters for the listener:
- Listener DNS Name:
ag-listener - Port:
1433 - Network Mode:
Static IP
- Listener DNS Name:
Add two subnet and IP address fields. For this example, use the following subnet and IP address pairs. These pairs are the IP addresses that you created in addition to the primary IP address on the SQL Service instance VMs:
- For the first pair, enter the following values:
- Subnet:
192.168.1.0/24 - IPv4 Address:
192.168.1.6
- Subnet:
- For the second pair, enter the following values:
- Subnet:
10.1.1.0/24 - IPv4 Address:
10.1.1.6
- Subnet:
- For the first pair, enter the following values:
When you're finished adding subnet and IP address pairs, click OK.
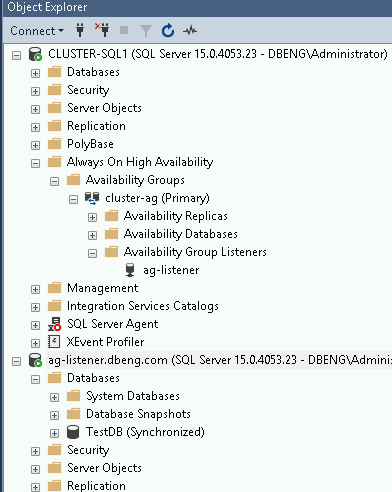
Connect to SQL Server using
ag-listener.dbeng.comas the name of the SQL Server database instead of the name of the instances. This connection points to the currently active instance.- In the Object Explorer, click Connect, and then select Database Engine.
- On the Connect to Server dialog, in the Server name
field, enter the name of the listener
ag-listener.dbeng.com. After you add the server name, click Connect. The Object Explorer shows the new connection, as shown in the following screenshot:
If you're connected to
cluster-sql2using RDP, you can optionally repeat this step to establish the connection.
Adding test data
In this section, you add a test table and some test data to the TestDB database
in cluster-sql1, and then verify data replication.
Create a table named
Personsincluster-sql1::Connect CLUSTER-SQL1 USE TestDB; CREATE TABLE Persons ( PersonID int, LastName varchar(255), FirstName varchar(255), PRIMARY KEY (PersonID) );Insert a few rows:
:Connect CLUSTER-SQL1
USE TestDB;
INSERT INTO Persons (PersonId, LastName, FirstName)
  VALUES (1, 'Velasquez', 'Ava');
INSERT INTO Persons (PersonId, LastName, FirstName)
  VALUES (2, 'Delaxcrux', 'Paige');
If you're using the Enterprise edition, enable read access of the read replica (
cluster-sql2) so that you can verify that replication takes place. The Standard edition doesn't support read-only access to the read replica. If you're using the Standard edition, skip to the next section to execute the cutover to Google Cloud.:Connect CLUSTER-SQL1 ALTER AVAILABILITY GROUP [cluster-ag] MODIFY REPLICA ON N'CLUSTER-SQL2' WITH (SECONDARY_ROLE(ALLOW_CONNECTIONS = ALL)) GOIn the Enterprise edition, query the table in
cluster-sql2to verify that the table contents were replicated::Connect CLUSTER-SQL2 SELECT * FROM TestDB.dbo.Persons;
Now that data is replicated from cluster-sql1 to cluster-sql2 you execute
the cutover. If you only want to perform replication, you can skip the following
sections and not execute the cutover or fallback. If you don't want to keep the
resources that you used to perform replication, you can avoid incurring charges
by following the clean up steps at the end of this tutorial.
Executing the cutover to Google Cloud
To ensure a consistent dataset, any client that writes to cluster-sql1 must
be stopped so that all data can be replicated to cluster-sql2 before you
execute the cutover.
To ensure consistency, all data must be completely replicated. In this section,
you accomplish complete data replication by changing the availability mode to
SYNCHRONOUS_COMMIT. This change ensures a complete replication of
cluster-sql1 to cluster-sql2.
To change the availability mode of both nodes to synchronous commit, run the following SQL command in
cluster-sql1. Setting both nodes to synchronous commit is the only way to ensure that no data is lost.:Connect CLUSTER-SQL1 ALTER AVAILABILITY GROUP [cluster-ag] MODIFY REPLICA ON N'CLUSTER-SQL1' WITH (AVAILABILITY_MODE = SYNCHRONOUS_COMMIT) GO ALTER AVAILABILITY GROUP [cluster-ag] MODIFY REPLICA ON N'CLUSTER-SQL2' WITH (AVAILABILITY_MODE = SYNCHRONOUS_COMMIT) GOCluster-sql2is now ready to become the primary node. Connect tocluster-sql2and make it the primary node::Connect CLUSTER-SQL2 ALTER AVAILABILITY GROUP [cluster-ag] FAILOVER; GOChange the availability mode to asynchronous commit in both nodes. Because
cluster-sql2is the primary node, run the following SQL commands incluster-sql2::Connect CLUSTER-SQL2 ALTER AVAILABILITY GROUP [cluster-ag] MODIFY REPLICA ON N'CLUSTER-SQL1' WITH (AVAILABILITY_MODE = ASYNCHRONOUS_COMMIT) GO ALTER AVAILABILITY GROUP [cluster-ag] MODIFY REPLICA ON N'CLUSTER-SQL2' WITH (AVAILABILITY_MODE = ASYNCHRONOUS_COMMIT) GOYou are now ready to use
cluster-sql2as the main node for the applications.cluster-sql1is the secondary that is asynchronously replicated.Now that
cluster-sql2is the primary node, query the table incluster-sql2to verify that the table contents were replicated::Connect CLUSTER-SQL2 SELECT * FROM TestDB.dbo.Persons;The output matches the test data that you inserted into the table earlier in this tutorial.
To perform further replication verification, you can create a new table and insert a single row on the new primary. When the table and its row appear on the secondary, you know that replication is working.
Fallback
Sometimes you might need to fall back from the new primary to the original
primary. When you completed the
cutover to Google Cloud
earlier in this tutorial, you made the previous primary (cluster-sql1) the
secondary to the new primary (cluster-sql2).
To complete a fallback, follow the process to execute the cutover to Google Cloud, and replace the following values:
- Replace the original primary (
cluster-sql1) with the new primary (cluster-sql2). - Replace the original secondary (
cluster-sql2) with the new secondary (cluster-sql1).
Clean up
To avoid incurring charges to your Google Cloud account for the resources used in this tutorial, either delete the project that contains the resources, or keep the project and delete the individual resources.
To avoid incurring charges to your Google Cloud account for the resources used in this tutorial:
Delete the project in Google Cloud
- In the Google Cloud console, go to the Manage resources page.
- In the project list, select the project that you want to delete, and then click Delete.
- In the dialog, type the project ID, and then click Shut down to delete the project.
Delete the project in AWS
Because you created and used resources in AWS, they continue to incur cost. To ensure no further cost is accumulated, delete those resources on AWS.
What's next
- Explore more documentation and solutions for SQL Server.
- Explore reference architectures, diagrams, and best practices about Google Cloud. Take a look at our Cloud Architecture Center.