This tutorial is intended for enterprise data scientists, researchers, and network administrators. It shows how to secure a user-managed notebooks instance by creating it in a Virtual Private Cloud (VPC) network.
A VPC network is a virtual version of a physical network that is implemented inside of Google's production network. It is a private network, with its own private IP addresses, subnets, and network gateways. In the enterprise, VPC networks are used to protect data and instances by controlling access to them from other networks and from the internet.
The VPC network in this tutorial is a standalone network. However, you can share a VPC network from one project (called a host project) to other projects in your Google Cloud organization. To learn more about which type of VPC network to use, see Single VPC network and Shared VPC.
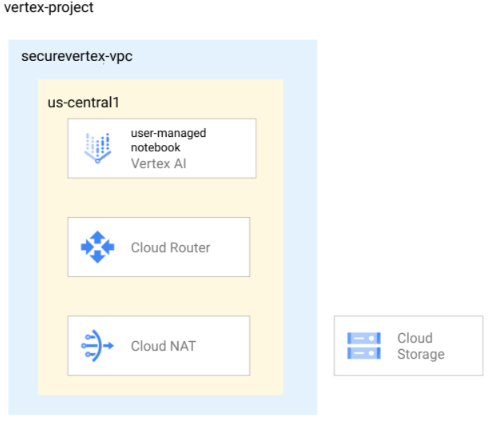
Following network security best practices, the VPC network in this tutorial uses a combination of Cloud Router, Cloud NAT, and Private Google Access to secure the instance in the following ways:
- The user-managed notebooks instance doesn't have an external IP address.
- The instance has outbound internet access through a regional Cloud Router and Cloud NAT gateway so that you can install software packages or other dependencies. Cloud NAT allows outbound connections and the inbound responses to those connections. It does not permit unsolicited inbound requests from the internet.
- The instance uses Private Google Access to reach the external IP addresses of Google APIs and services.
The tutorial also shows how to do the following:
- Create a post-startup script to automatically clone a GitHub repo into the newly created user-managed notebooks instance.
- Use Cloud Monitoring to monitor the user-managed notebooks instance.
- Use the Compute Engine API to start and stop the instance automatically to optimize costs.
Objectives
- Create a VPC network and add a subnet that has Private Google Access enabled.
- Create a Cloud Router and Cloud NAT for the VPC network.
- Create a user-managed notebooks instance in the subnet, using a post-startup script that clones the Google Cloud Generative AI GitHub repository.
- Enable Cloud Monitoring for the instance.
- Create a VM instance schedule and attach it to the instance.
Costs
In this document, you use the following billable components of Google Cloud:
To generate a cost estimate based on your projected usage,
use the pricing calculator.
When you finish the tasks that are described in this document, you can avoid continued billing by deleting the resources that you created. For more information, see Clean up.
Before you begin
-
In the Google Cloud console, go to the project selector page.
-
Select or create a Google Cloud project.
Roles required to select or create a project
- Select a project: Selecting a project doesn't require a specific IAM role—you can select any project that you've been granted a role on.
-
Create a project: To create a project, you need the Project Creator
(
roles/resourcemanager.projectCreator), which contains theresourcemanager.projects.createpermission. Learn how to grant roles.
-
Verify that billing is enabled for your Google Cloud project.
- Open Cloud Shell to execute the commands listed in this tutorial. Cloud Shell is an interactive shell environment for Google Cloud that lets you manage your projects and resources from your web browser. Go to Cloud Shell
- In the Cloud Shell, set the current project to your
Google Cloud project ID and store the same
project ID into the
projectidshell variable:projectid="PROJECT_ID" gcloud config set project ${projectid}
-
Enable the IAM, Compute Engine, Notebooks, Cloud Storage, and Vertex AI APIs.
Roles required to enable APIs
To enable APIs, you need the Service Usage Admin IAM role (
roles/serviceusage.serviceUsageAdmin), which contains theserviceusage.services.enablepermission. Learn how to grant roles. -
Make sure that you have the following role or roles on the project: roles/compute.networkAdmin, roles/compute.securityAdmin, roles/compute.instanceAdmin, roles/notebooks.admin, roles/resourcemanager.projectIamAdmin, roles/iam.serviceAccountAdmin, roles/iam.serviceAccountUser, roles/storage.Admin
Check for the roles
-
In the Google Cloud console, go to the IAM page.
Go to IAM - Select the project.
-
In the Principal column, find all rows that identify you or a group that you're included in. To learn which groups you're included in, contact your administrator.
- For all rows that specify or include you, check the Role column to see whether the list of roles includes the required roles.
Grant the roles
-
In the Google Cloud console, go to the IAM page.
Go to IAM - Select the project.
- Click Grant access.
-
In the New principals field, enter your user identifier. This is typically the email address for a Google Account.
- In the Select a role list, select a role.
- To grant additional roles, click Add another role and add each additional role.
- Click Save.
-
Create and configure a standalone VPC
Create a VPC network named
securevertex-vpc:gcloud compute networks create securevertex-vpc --subnet-mode=customCreate a subnet named
securevertex-subnet-a, with a primary IPv4 range of10.10.10.0/29:gcloud compute networks subnets create securevertex-subnet-a --range=10.10.10.0/29 --network=securevertex-vpc --region=us-central1 --enable-private-ip-google-accessIf desired, you can supply a different value for the
--rangeparameter. However, the minimum prefix length for a single notebook is 29. For more information, see IPv4 subnet ranges.Create a regional Cloud Router named
cloud-router-us-central1:gcloud compute routers create cloud-router-us-central1 --network securevertex-vpc --region us-central1Create a regional Cloud NAT gateway named
cloud-nat-us-central1:gcloud compute routers nats create cloud-nat-us-central1 --router=cloud-router-us-central1 --auto-allocate-nat-external-ips --nat-all-subnet-ip-ranges --region us-central1
Create a Cloud Storage bucket
Create the Cloud Storage bucket:
gcloud storage buckets create --location=us-central1 --uniform-bucket-level-access gs://BUCKET_NAMEReplace BUCKET_NAME with a unique bucket name.
Set the
BUCKET_NAMEshell variable and verify that it was entered correctly:BUCKET_NAME=BUCKET_NAME echo $BUCKET_NAMEReplace BUCKET_NAME with the bucket name.
Create and upload a post-startup script
To create the script, use a text editor such as
viornanoto create a file namedpoststartup.sh.Paste the following shell script into the file:
#! /bin/bash
echo "Current user: id" >> /tmp/notebook_config.log 2>&1
echo "Changing dir to /home/jupyter" >> /tmp/notebook_config.log 2>&1
cd /home/jupyter
echo "Cloning generative-ai from github" >> /tmp/notebook_config.log 2>&1
su - jupyter -c "git clone https://github.com/GoogleCloudPlatform/generative-ai.git" >> /tmp/notebook_config.log 2>&1
echo "Current user: id" >> /tmp/notebook_config.log 2>&1
echo "Installing python packages" >> /tmp/notebook_config.log 2&1
su - jupyter -c "pip install --upgrade --no-warn-conflicts --no-warn-script-location --user \
     google-cloud-bigquery \
     google-cloud-pipeline-components \
     google-cloud-aiplatform \
     seaborn \
     kfp" >> /tmp/notebook_config.log 2>&1
Save the file.
Upload the file to your Cloud Storage bucket:
gcloud storage cp poststartup.sh gs://$BUCKET_NAME
Create a custom service account
When you create a user-managed notebooks instance, we strongly
recommend that you clear the Use Compute Engine default service account
checkbox and specify a custom service account. If your organization doesn't
enforce the iam.automaticIamGrantsForDefaultServiceAccounts
organization policy constraint, the Compute Engine default service account
(and thus anyone you specify as an instance user) is granted the Editor role
(roles/editor) on your project. To turn off this behavior,
see Disable automatic role grants to default service
accounts.
Create a custom service account named
user-managed-notebook-sa:gcloud iam service-accounts create user-managed-notebook-sa \ --display-name="user-managed-notebook-sa"Assign the Storage Object Viewer IAM role to the service account:
gcloud projects add-iam-policy-binding $projectid --member="serviceAccount:user-managed-notebook-sa@$projectid.iam.gserviceaccount.com" --role="roles/storage.objectViewer"Assign the Vertex AI User IAM role to the service account:
gcloud projects add-iam-policy-binding $projectid --member="serviceAccount:user-managed-notebook-sa@$projectid.iam.gserviceaccount.com" --role="roles/aiplatform.user"
Create a user-managed notebooks instance
In the Google Cloud console, go to the User-managed notebooks page.
Click Create new, and then select Advanced Options.
The Create instance page opens.
On the Create instance page, in the Details section, provide the following information for your new instance and then click Continue:
- Name: Provide a name for your new instance, or accept the default.
- Region: Select us-central1.
- Zone: Select us-central1-a.
In the Environment section, provide the following and then click Continue:
- Post-startup script: Click Browse, double-click the
poststartup.shfile, click it one more time, and then click Select.
- Post-startup script: Click Browse, double-click the
In the Machine type section, provide the following and then click Continue:
Shielded VM: Select the following checkboxes:
- Secure Boot
- Virtual Trusted Platform Module (vTPM)
- Integrity monitoring
In the Disks section, make sure that Google-managed encryption key is selected, and then click Continue:
In the Networking section, provide the following and then click Continue:
Networking: Select Network in this project and complete the following steps:
In the Network field, select securevertex-vpc.
In the Subnetwork field, select securevertex-subnet-a.
Clear the Assign external IP address checkbox. Not assigning an external IP address prevents the instance from receiving unsolicited communication from the internet or other VPC networks.
Select the Allow proxy access checkbox.
In the IAM and security section, provide the following and then click Continue:
IAM and security: To grant a single user access to the instance's JupyterLab interface, complete the following steps:
- Select Single user.
- In the User email field, enter the email address for a single
user account. If you're creating the instance for someone else,
the following conditions apply:
- You (the instance creator) don't have access to the instance's JupyterLab interface. But you still control the instance, and you can start, stop, or delete it.
- After you create the instance, you need to grant the user the
Service Account User role
(
roles/iam.serviceAccountUser) on the instance's service account. See Optional: Grant the Service Account User role to the instance user.
- Clear the Use Compute Engine default service account checkbox.
This step is important, because the Compute Engine default
service account (and thus the single user you just specified)
could have the Editor role (
roles/editor) on your project. In the Service account email field, enter
user-managed-notebook-sa@$projectid.iam.gserviceaccount.com. (This is the custom service account email address that you created earlier.) This service account has limited permissions.To learn more about granting access, see Manage access to a user-managed notebooks instance's JupyterLab interface.
Security options: Clear the following checkbox:
- Root access to the instance
Select the following checkbox:
- nbconvert
nbconvertlets users export and download a notebook file as a different file type, such as HTML, PDF, or LaTeX. This setting is required by some of the notebooks in the Google Cloud Generative AI GitHub repo.
Clear the following checkbox:
- File downloading
Select the following checkbox, unless you're in a production environment:
- Terminal access This enables terminal access to your instance from within the JupyterLab user interface.
In the System health section, select Environment auto-upgrade and provide the following:
In Reporting, select the following checkboxes:
- Report system health
- Report custom metrics to Cloud Monitoring
- Install Cloud Monitoring
- Report DNS status for required Google domains
Click Create.
Optional: Grant the Service Account User role to the instance user
If you're creating the user-managed notebooks
instance for another user,
you must grant them the
Service Account User role
(roles/iam.serviceAccountUser) on the user-managed-notebook-sa
custom service account as follows:
gcloud iam service-accounts add-iam-policy-binding \
    user-managed-notebook-sa@PROJECT_ID.iam.gserviceaccount.com \
    --member="user:USER_EMAIL" \
    --role="roles/iam.serviceAccountUser"
Replace the following values:
- PROJECT_ID: the project ID
- USER_EMAIL: the email address for the user
Verify that the user-managed notebooks instance was created
Vertex AI Workbench creates a user-managed notebooks instance based on your specified properties and automatically starts the instance.
When the instance is ready to use, Vertex AI Workbench activates an Open JupyterLab link. This link is accessible only to the single user that you specified at instance creation time.
Open the instance in JupyterLab and verify that the cloned Google Cloud Generative AI GitHub repo is present.
In the Google Cloud console, go to the User-managed notebooks page.
In the list of user-managed notebooks instances, click the Open JupyterLab link for the instance you created.
In the folder list, you'll see a
generative-aifolder. This folder contains the cloned GitHub repo.
Monitor health status through Monitoring
You can monitor the system and application metrics for your user-managed notebooks instances by using the Google Cloud console. To learn more about instance monitoring and about creating custom metrics, see Monitor health status.
In the Google Cloud console, go to the User-managed notebooks page.
Click the name of the user-managed notebooks instance that you want to view the metrics for.
On the Notebook details page, click the Monitoring tab. Review the CPU Utilization and Network Bytes for your notebook instance. To learn how to interpret these metrics, see Review resource metrics.
If you just created the instance, you won't see any data right away. Wait a few minutes and refresh the console tab.
Create a VM instance schedule for your user-managed notebooks instance
Because a user-managed notebooks instance is a Compute Engine VM instance, you can use Compute Engine APIs to create a VM instance schedule for it.
Use a VM instance schedule to start and stop your user-managed notebooks instance. During the hours when the instance is stopped, you pay only for Cloud Storage costs.
You can attach an instance schedule to any VM instance that's in the same region, so you can use the same instance schedule to control all your user-managed notebooks instances in the region.
To learn more about VM instance schedules, see Scheduling a VM instance to start and stop.
Create a custom IAM role
As a security best practice, we recommend creating a custom IAM role that has only the following permissions and assigning it to the Compute Engine default service account:
compute.instances.startcompute.instances.stop
Inside Cloud Shell, create a custom role named
Vm_Schedulerand include the necessary permissions:gcloud iam roles create Vm_Scheduler --project=$projectid \ --title=vm-scheduler-notebooks \ --permissions="compute.instances.start,compute.instances.stop" --stage=gaDescribe the custom role:
gcloud iam roles describe Vm_Scheduler --project=$projectid
Assign the role to the Compute Engine default service account
To give the Compute Engine default service
account permission to start and stop your
user-managed notebooks instances,
you need to assign the Vm_Scheduler custom role to it.
The Compute Engine default service account for your project
has the following
email address: PROJECT_NUMBER-compute@developer.gserviceaccount.com,
where PROJECT_NUMBER is your project number.
Identify your project number and store it in the
project_numbershell variable:project_number=$(gcloud projects describe $projectid --format 'get(projectNumber)') echo $project_numberAssign the custom role to the default service account:
gcloud projects add-iam-policy-binding $projectid --member="serviceAccount:$project_number-compute@developer.gserviceaccount.com" --role="projects/$projectid/roles/Vm_Scheduler"
Create and attach the schedule
To create an instance schedule that starts your user-managed notebooks instance at 7 AM and stops them at 6 PM:
Create a start and stop schedule named
optimize-notebooks:gcloud compute resource-policies create instance-schedule optimize-notebooks \ --region=us-central1 \ --vm-start-schedule='0 7 * * *' \ --vm-stop-schedule='0 18 * * *' \ --timezone=TIME_ZONEReplace TIME_ZONE with the location-based IANA time zone for this instance schedule, for example,
America/Chicago. If omitted, the default valueUTCis used. For more information, see time zone.Identify the name of your user-managed notebooks instance by running the following command and noting the
NAMEvalue that it returns:gcloud compute instances listStore the name in the
notebook_vmshell variable:notebook_vm=NOTEBOOK_VM_NAME echo $notebook_vmReplace NOTEBOOK_VM_NAME with your user-managed notebooks instance name.
Attach the instance schedule to your user-managed notebooks instance:
gcloud compute instances add-resource-policies $notebook_vm \
  --resource-policies=optimize-notebooks \
  --zone=us-central1-a
Describe the instance schedule:
gcloud compute resource-policies describe optimize-notebooks \
  --region=us-central1
You can verify if the instance schedule runs successfully by checking the Compute Engine audit logs for the instance schedule resource policy and the attached VM instance. You might need to wait for up to 15 minutes after the scheduled time for each operation.
Clean up
To avoid incurring charges to your Google Cloud account for the resources used in this tutorial, either delete the project that contains the resources, or keep the project and delete the individual resources.
You can delete the individual resources in the project as follows:
In the Google Cloud console, go to the User-managed notebooks page.
Select your user-managed notebook instance.
Click Delete.
In the Cloud Shell, delete the remaining individual resources by executing the following commands.
gcloud compute routers delete cloud-router-us-central1 --region=us-central1 --quiet

gcloud compute routers nats delete cloud-nat-us-central1 --region=us-central1 --router=cloud-router-us-central1 --quiet

gcloud compute instances remove-resource-policies $notebook_vm \
  --resource-policies=optimize-notebooks \
  --zone=us-central1-a --quiet

gcloud compute resource-policies delete optimize-notebooks --region=us-central1 --quiet

gcloud compute instances delete $notebook_vm --zone=us-central1-a --quiet

gcloud compute networks subnets delete securevertex-subnet-a --region=us-central1 --quiet

gcloud iam service-accounts delete user-managed-notebook-sa@$projectid.iam.gserviceaccount.com --quiet

gcloud projects remove-iam-policy-binding $projectid --member="serviceAccount:$project_number-compute@developer.gserviceaccount.com" --role="projects/$projectid/roles/Vm_Scheduler"

gcloud iam roles delete Vm_Scheduler --project=$projectid

gcloud compute networks delete securevertex-vpc --quiet
What's next
- Work through the Vertex AI create a secure user-managed notebook codelab.
- Learn how to use VPC Service Controls to set up a user-managed notebooks instance within a service perimeter.
- Learn about Best practices and reference architectures for VPC design.