Prerequisites

Before you start this tutorial, you need a Google Cloud account and a Google Cloud project that's enabled for billing. The following steps walk you through creating these prerequisites.

Create a Google Cloud account

If you don't have a Google Cloud account, go to https://console.cloud.google.com/ to create one.

Create a Google Cloud project

If you have a project you want to use for this tutorial, you can skip this step and continue with Find your project ID. Otherwise, create a new project. For more information, see Creating and managing projects.

To learn how to create a new project, choose one of the following options:

Use the console tutorial to create a project

If you use the console tutorial to create a project, then click on the following Go to the Manage Resources page button and follow the Create a project tutorial steps in the console. When you're done, continue with Find your project ID in this tutorial.

Go to the Manage Resources page

Use this tutorial to create a project

To use this tutorial to create a project, run the following steps:

  1. Enter https://console.cloud.google.com/cloud-resource-manager in your browser's address bar.

  2. Click Create project.

Create project dialog

  1. In Project name, enter a name for your project. A project name can contain only letters, numbers, single quotes, hyphens, spaces, and exclamation points, and must be between 4 and 30 characters

  2. (Optional) If you want to change the project ID that is created for you, click Edit and enter a new project ID. You can't modify your project ID after you create your project. Your project ID is a globally unique identifier for your project.

  3. Make a note of the project ID after you enter your project name. You need the project ID later in this tutorial. Your project ID appears under your project name.

  4. If you see Billing account, then select a billing account for your project. For more information, see Enable, disable, or change billing for a project.

  5. If you see Organization, then select the organization resource in which you want to create a project. If you are a free trial user, this list does not appear and you can skip this step.

  6. In Location, click Browse and select the parent organization or folder. The resource you select is the parent of your project. If No organization is an option, you can select it to create your new project as the top level of its own resource hierarchy.

  7. Click Create.

Find your project ID

A project ID is a unique string used to differentiate your project from all others in Google Cloud. You use your project ID in this tutorial to initialize the Vertex AI SDK for Python. If you know your project ID, you can skip this step.

To locate your project ID:

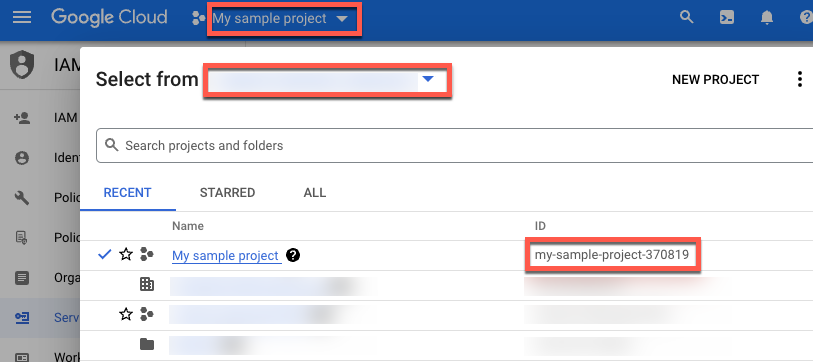
  1. In the Google Cloud console, click the list of projects in the top menu.

  2. In the dialog box that appears, locate your project. If you don't see your project, you might need to choose a different organization.

  3. After you locate your project, make a note of its project ID in the ID column.

Fine your project ID