This section shows you how to create a Jupyter notebook in a Vertex AI Workbench instance. Vertex AI Workbench instances are Jupyter notebook-based development environments for the entire data science workflow. Vertex AI Workbench instances are prepackaged with JupyterLab and have a preinstalled suite of deep learning packages, including support for the TensorFlow and PyTorch frameworks. For more information, see Introduction to Vertex AI Workbench instances.
After you create a notebook in Vertex AI Workbench, you run sequential portions of Python code to do most of the work to generate your predictions.
Before you begin
- Sign in to your Google Cloud account. If you're new to Google Cloud, create an account to evaluate how our products perform in real-world scenarios. New customers also get $300 in free credits to run, test, and deploy workloads.
-
In the Google Cloud console, on the project selector page, select or create a Google Cloud project.
Roles required to select or create a project
- Select a project: Selecting a project doesn't require a specific IAM role—you can select any project that you've been granted a role on.
-
Create a project: To create a project, you need the Project Creator
(
roles/resourcemanager.projectCreator), which contains theresourcemanager.projects.createpermission. Learn how to grant roles.
-
Verify that billing is enabled for your Google Cloud project.
-
Enable the Vertex AI and Notebooks APIs.
Roles required to enable APIs
To enable APIs, you need the Service Usage Admin IAM role (
roles/serviceusage.serviceUsageAdmin), which contains theserviceusage.services.enablepermission. Learn how to grant roles. -
In the Google Cloud console, on the project selector page, select or create a Google Cloud project.
Roles required to select or create a project
- Select a project: Selecting a project doesn't require a specific IAM role—you can select any project that you've been granted a role on.
-
Create a project: To create a project, you need the Project Creator
(
roles/resourcemanager.projectCreator), which contains theresourcemanager.projects.createpermission. Learn how to grant roles.
-
Verify that billing is enabled for your Google Cloud project.
-
Enable the Vertex AI and Notebooks APIs.
Roles required to enable APIs
To enable APIs, you need the Service Usage Admin IAM role (
roles/serviceusage.serviceUsageAdmin), which contains theserviceusage.services.enablepermission. Learn how to grant roles.
Create a Vertex AI Workbench instance
To create a Vertex AI Workbench instance, do the following:
In the Google Cloud console, open your Google Cloud project if it's not already open.
In the Google Cloud console, go to the Vertex AI Workbench Instances page.
If the option to enable the Notebooks API appears, click Enable. It might take a few moments for the enabling process to complete.
Click Create new.
In the New instance dialog, for Name, enter a name for your instance.
For Region, select us-central1 (Iowa).
For Zone, select us-central1-a.
Click Create. If you want to learn more about your instance, after it appears in your list of instances click its name to see its properties.
Prepare your notebook
Your Vertex AI Workbench instance is already authenticated to use your Google Cloud project. However, you must install and initialize the Vertex AI SDK for Python. This section walks you through these steps.
After you create your notebook, you use it to enter and run the sequential snippets of code in this tutorial. Each snippet of code must be run individually and in order.
Create and open your notebook
Your notebook is where you run the code in this tutorial. It's a file with the
extension .ipynb. When you create it, it's untitled. You can
rename it after it's open. To create and open your notebook, do the following:
In the Google Cloud console, go to the Instances page.
Next to your instance's name, click Open JupyterLab.
Your Vertex AI Workbench instance opens the JupyterLab environment.
In JupyterLab, select File > New > Notebook.
Your new notebook file opens and the Select kernel dialog appears.
In the Select kernel dialog, select the Python 3 kernel.
In the left-navigation pane of JupyterLab, find your new notebook, named Untitled.ipynb. To rename it, right-click the notebook name, click Rename, and enter a new name.
Install the Vertex AI SDK for Python
After you open your notebook, you must install the Vertex AI SDK for Python. You use the Vertex AI SDK for Python to make Vertex AI API calls that create your dataset, create your model, train and deploy your model, and make predictions with your model. For more information, see Use the Vertex AI SDK for Python.
When you install Vertex AI SDK for Python, other Google Cloud SDKs on which it's dependent are also installed. Two of those SDKs are used in this tutorial:
Cloud Storage - When you use the Vertex AI SDK for Python to make Vertex AI API calls, Vertex AI stores artifacts in a Cloud Storage bucket. The bucket is referred to as a staging bucket. You specify the staging bucket when you initialize the Vertex AI SDK for Python. For more information, see Python client for Google Cloud storage API.
BigQuery - Vertex AI trains your model using a BigQuery public dataset. The BigQuery SDK must be installed to access and download the dataset used in this tutorial. For more information, see BigQuery API client libraries.
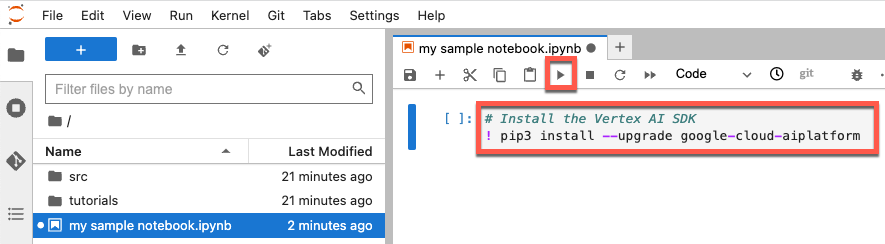
To install the Vertex AI SDK for Python and its dependent SDKs, run the following code.
# Install the Vertex AI SDK
! pip3 install --upgrade --quiet google-cloud-aiplatform
The --quiet flag suppresses output so that only errors display, if there
are any. The exclamation mark (!) indicates that this is a shell command.
Because this is the first code you're running in your new notebook, you
enter it into the blank code cell at the top of your notebook. After you enter
code in a code cell, click Run the selected cells and
advance or use the keyboard shortcut Shift + Enter to run the code.
As you proceed through this tutorial, run code in the empty code cell that automatically appears below the most recently run code. If you want to manually add a new code cell, click the notebook file's Insert a cell below button.

Set your project ID and region
In this step, you set your project ID and your region. You first assign them to
variables so they can be easily referenced later in this tutorial. Next, you use
the gcloud config command to set them for your Google Cloud session.
Later, you use them and your Cloud Storage bucket URI to initialize the
Vertex AI SDK for Python.
Set your project ID
To set your project ID, do the following:
Locate your Google Cloud project ID. For more information, see Find your project ID.
Run the following in a code cell in your notebook. In the code, replace PROJECT_ID with the project ID you just located. The output this command generates is
Updated property [core/project].project_id = "PROJECT_ID" # @param {type:"string"} # Set the project id ! gcloud config set project ${project_id}
Set your region
This tutorial uses the us-central1 region. To set your region, do the
following:
Run the following code to set the
regionvariable that's used by Vertex AI tous-central1. This command doesn't generate output. For more information, see Choose your location.region = "us-central1" # @param {type: "string"}
Create a Cloud Storage bucket
This tutorial requires a Cloud Storage bucket that's used by Vertex AI to stage artifacts. Vertex AI stores the data associated with the dataset you create and model resources in the staging bucket. This data is retained and available across sessions. In this tutorial, Vertex AI also stores your dataset in the staging bucket. You specify your staging bucket when you initialize the Vertex AI SDK for Python.
Every Cloud Storage bucket name must be globally unique. If you choose a name
that's been used, the command to create your bucket fails. The
following code uses a datetime stamp and your project name to create a unique
bucket name. You append the bucket name to gs:// to create the URI for your
Cloud Storage bucket. The echo shell command shows you the URI so you can
verify it created correctly.
To set your bucket's name and URI, run the following code. The last line displays the URI of your Cloud Storage bucket.
bucket_name = "bucket-name-placeholder"  # @param {type:"string"}
bucket_uri = f"gs://{bucket_name}"

from datetime import datetime
timestamp = datetime.now().strftime("%Y%m%d%H%M%S")

if bucket_name == "" or bucket_name is None or bucket_name == "bucket-name-placeholder":
    bucket_name = project_id + "aip-" + timestamp
    bucket_uri = "gs://" + bucket_name
! echo $bucket_uri
To create a bucket using the Cloud Storage client library and the bucket URI, run the following code. This code doesn't generate output.
from google.cloud import storage
client = storage.Client(project=project_id)

# Create a bucket
bucket = client.create_bucket(bucket_name, location=region)
To verify your bucket created successfully, run the following:
print("Bucket {} created.".format(bucket.name))
Initialize the Vertex AI SDK for Python
To initialize the Vertex AI SDK for Python, you first import its library,
aiplatform. Next, you call aiplatform.init and pass in values for the
following parameters:
project- Theprojectspecifies which Google Cloud project to use when you use the Vertex AI SDK for Python to make calls to the Vertex AI API. In this tutorial you specify your Google Cloud project with its name. You can also specify your project with its project number.location- Thelocationspecifies which Google Cloud region to use when you make API calls. If you don't specify a location, the Vertex AI SDK for Python usesus-central1.staging_bucket- Thestaging_bucketspecifies which Cloud Storage bucket is used to stage artifacts when you use the Vertex AI SDK for Python. You specify the bucket with a URI that starts withgs://. In this tutorial, you use the URI created earlier in Create a Cloud Storage bucket.
To set your Google Cloud project, region, and staging bucket, run the following command. This command doesn't generate output.
from google.cloud import aiplatform

# Initialize the Vertex AI SDK
aiplatform.init(project=project_id, location=region, staging_bucket=bucket_uri)
Initialize BigQuery
This tutorial uses a BigQuery public dataset of penguins to train a model. After Vertex AI trains the model, you specify parameters that represent characteristics of penguins, and the model uses those characteristics to predict the species of penguin they represent. For more information about public datasets, see BigQuery public datasets.
Before you use the BigQuery dataset, you must initialize BigQuery with your project ID. To do this, run the following command. This command doesn't generate output.
from google.cloud import bigquery

# Set up BigQuery client
bq_client = bigquery.Client(project=project_id)