로컬 SSD는 캐시 또는 스크래치 처리 공간과 같은 임시 스토리지에 사용할 용도로 설계되었습니다. 로컬 SSD는 VM이 실행되는 실제 머신에 위치하므로 VM 생성 프로세스 중에만 생성될 수 있습니다. 로컬 SSD를 부팅 기기로 사용할 수 없습니다.
3세대 머신 시리즈 이상의 경우 VM을 만들 때 일정량의 로컬 SSD 디스크가 VM에 추가됩니다. 이러한 VM에 로컬 SSD 스토리지를 추가하는 유일한 방법은 다음과 같습니다.
- C4, C4D, C3, C3D의 경우
c3-standard-88-lssd와 같은 특정 머신 유형에서만 로컬 SSD 스토리지를 사용할 수 있습니다. - Z3, A4, A4X, A3, A2 Ultra 머신 시리즈의 경우 모든 머신 유형에 로컬 SSD 스토리지가 제공됩니다.
M3, 1세대 및 2세대 머신 유형의 경우 VM을 만들 때 로컬 SSD 디스크를 지정해야 합니다.
로컬 SSD 디스크를 만든 후 이를 사용하려면 먼저 기기를 포맷하고 마운트해야 합니다.
여러 머신 유형에 사용할 수 있는 로컬 SSD 스토리지 양과 VM에 연결할 수 있는 로컬 SSD 디스크 수에 대한 자세한 내용은 유효한 로컬 SSD 수 선택을 참조하세요.
시작하기 전에
- 로컬 SSD를 사용하기 전에 로컬 SSD 제한사항을 검토합니다.
- 로컬 SSD 디스크의 데이터 지속성 시나리오를 검토합니다.
- GPU가 연결된 가상 머신(VM) 인스턴스에 로컬 SSD를 추가하는 경우 GPU 리전 및 영역별 로컬 SSD 가용성을 참조하세요.
-
아직 인증을 설정하지 않았다면 설정합니다.
인증은 Google Cloud 서비스 및 API에 액세스하기 위해 ID를 확인합니다. 로컬 개발 환경에서 코드 또는 샘플을 실행하려면 다음 옵션 중 하나를 선택하여 Compute Engine에 인증하면 됩니다.
Select the tab for how you plan to use the samples on this page:
Console
When you use the Google Cloud console to access Google Cloud services and APIs, you don't need to set up authentication.
gcloud
-
Google Cloud CLI를 설치합니다. 설치 후 다음 명령어를 실행하여 Google Cloud CLI를 초기화합니다.
gcloud init외부 ID 공급업체(IdP)를 사용하는 경우 먼저 제휴 ID로 gcloud CLI에 로그인해야 합니다.
- Set a default region and zone.
Terraform
로컬 개발 환경에서 이 페이지의 Terraform 샘플을 사용하려면 gcloud CLI를 설치하고 초기화한 후 사용자 인증 정보로 애플리케이션 기본 사용자 인증 정보를 설정합니다.
Google Cloud CLI를 설치합니다.
외부 ID 공급업체(IdP)를 사용하는 경우 먼저 제휴 ID로 gcloud CLI에 로그인해야 합니다.
If you're using a local shell, then create local authentication credentials for your user account:
gcloud auth application-default login
You don't need to do this if you're using Cloud Shell.
If an authentication error is returned, and you are using an external identity provider (IdP), confirm that you have signed in to the gcloud CLI with your federated identity.
자세한 내용은 다음을 참조하세요: Set up authentication for a local development environment.
Go
로컬 개발 환경에서 이 페이지의 Go 샘플을 사용하려면 gcloud CLI를 설치하고 초기화한 후 사용자 인증 정보로 애플리케이션 기본 사용자 인증 정보를 설정합니다.
Google Cloud CLI를 설치합니다.
외부 ID 공급업체(IdP)를 사용하는 경우 먼저 제휴 ID로 gcloud CLI에 로그인해야 합니다.
If you're using a local shell, then create local authentication credentials for your user account:
gcloud auth application-default login
You don't need to do this if you're using Cloud Shell.
If an authentication error is returned, and you are using an external identity provider (IdP), confirm that you have signed in to the gcloud CLI with your federated identity.
자세한 내용은 다음을 참조하세요: Set up authentication for a local development environment.
자바
로컬 개발 환경에서 이 페이지의 Java 샘플을 사용하려면 gcloud CLI를 설치하고 초기화한 후 사용자 인증 정보로 애플리케이션 기본 사용자 인증 정보를 설정합니다.
Google Cloud CLI를 설치합니다.
외부 ID 공급업체(IdP)를 사용하는 경우 먼저 제휴 ID로 gcloud CLI에 로그인해야 합니다.
If you're using a local shell, then create local authentication credentials for your user account:
gcloud auth application-default login
You don't need to do this if you're using Cloud Shell.
If an authentication error is returned, and you are using an external identity provider (IdP), confirm that you have signed in to the gcloud CLI with your federated identity.
자세한 내용은 다음을 참조하세요: Set up authentication for a local development environment.
Python
로컬 개발 환경에서 이 페이지의 Python 샘플을 사용하려면 gcloud CLI를 설치하고 초기화한 후 사용자 인증 정보로 애플리케이션 기본 사용자 인증 정보를 설정합니다.
Google Cloud CLI를 설치합니다.
외부 ID 공급업체(IdP)를 사용하는 경우 먼저 제휴 ID로 gcloud CLI에 로그인해야 합니다.
If you're using a local shell, then create local authentication credentials for your user account:
gcloud auth application-default login
You don't need to do this if you're using Cloud Shell.
If an authentication error is returned, and you are using an external identity provider (IdP), confirm that you have signed in to the gcloud CLI with your federated identity.
자세한 내용은 다음을 참조하세요: Set up authentication for a local development environment.
REST
로컬 개발 환경에서 이 페이지의 REST API 샘플을 사용하려면 gcloud CLI에 제공한 사용자 인증 정보를 사용합니다.
Google Cloud CLI를 설치합니다.
외부 ID 공급업체(IdP)를 사용하는 경우 먼저 제휴 ID로 gcloud CLI에 로그인해야 합니다.
자세한 내용은 Google Cloud 인증 문서의 REST 사용을 위한 인증을 참조하세요.
로컬 SSD를 사용하는 VM 만들기
Google Cloud console, gcloud CLI 또는 Compute Engine API를 사용하여 로컬 SSD 디스크 스토리지가 있는 VM을 만들 수 있습니다.
콘솔
인스턴스 만들기 페이지로 이동
VM의 이름, 리전, 영역을 지정합니다. 선택적으로 태그 또는 라벨을 추가합니다.
머신 구성 섹션에서 대상 머신 유형을 포함하는 머신 계열을 선택합니다.
시리즈 목록에서 시리즈를 선택한 후 머신 유형을 선택합니다.
- C4, C4D, C3, C3D의 경우
-lssd로 끝나는 머신 유형을 선택합니다. - Z3, A4, A4X, A3, A2 Ultra의 경우 모든 머신 유형에 로컬 SSD 스토리지가 제공됩니다.
- M3 또는 1세대 및 2세대 머신 시리즈의 경우 머신 유형을 선택한 후 다음을 수행합니다.
- 고급 옵션 섹션을 펼칩니다.
- 디스크를 확장하고 로컬 SSD 추가를 클릭한 후 다음을 수행합니다.
- 로컬 SSD 구성 페이지에서 디스크 인터페이스 유형을 선택합니다.
- 디스크 용량 목록에서 원하는 디스크 수를 선택합니다.
- 저장을 클릭합니다.
- C4, C4D, C3, C3D의 경우
VM 만들기 프로세스를 계속 진행합니다.
로컬 SSD 디스크로 VM을 만든 후 디스크를 사용하려면 먼저 각 기기를 포맷하고 마운트해야 합니다.
gcloud
Z3, A4, A4X, A3, A2 울트라 머신 시리즈의 경우 연결된 로컬 SSD 디스크가 있는 VM을 만들려면 다음 인스턴스 만들기 안내에 따라 해당 계열에 사용 가능한 모든 머신 유형을 사용하는 VM을 만듭니다.
C4, C4D, C3, C3D 머신 시리즈의 경우 연결된 로컬 SSD 디스크가 연결된 VM을 만들려면 인스턴스 만들기 안내를 따르되 로컬 SSD 디스크(
-lssd)를 포함하는 인스턴스 유형을 지정합니다.예를 들어 다음과 같이 NVMe 디스크 인터페이스를 사용하는 두 개의 로컬 SSD 파티션이 있는 C3 VM을 만들 수 있습니다.
gcloud compute instances create example-c3-instance \
   --zone ZONE \
   --machine-type c3-standard-8-lssd \
   --image-project IMAGE_PROJECT \
   --image-family IMAGE_FAMILY
M3, 1세대 및 2세대 머신 시리즈의 경우 연결된 로컬 SSD 디스크가 있는 VM을 만들려면 다음 인스턴스 만들기 안내를 따르되
--local-ssd플래그를 사용하여 로컬 SSD 디스크를 만들고 연결합니다. 여러 개의 로컬 SSD 디스크를 만들려면--local-ssd플래그를 더 추가합니다. 원하는 경우--local-ssd플래그마다 인터페이스 값과 기기 이름을 설정할 수도 있습니다.예를 들어 4개의 로컬 SSD 디스크가 있는 M3 VM을 만들고 다음과 같이 디스크 인터페이스 유형을 지정할 수 있습니다.
gcloud compute instances create VM_NAME \
   --machine-type m3-ultramem-64 \
   --zone ZONE \
   --local-ssd interface=INTERFACE_TYPE,device-name=DEVICE-NAME \
   --local-ssd interface=INTERFACE_TYPE,device-name=DEVICE-NAME \
   --local-ssd interface=INTERFACE_TYPE,device-name=DEVICE-NAME \
   --local-ssd interface=INTERFACE_TYPE \
   --image-project IMAGE_PROJECT \
   --image-family IMAGE_FAMILY
다음을 바꿉니다.
- VM_NAME: 새 VM의 이름입니다.
- ZONE: VM을 만들 영역입니다. gcloud CLI
compute/zone속성 또는 환경 변수CLOUDSDK_COMPUTE_ZONE을 구성한 경우 이 플래그는 선택사항입니다. - INTERFACE_TYPE: 로컬 SSD 기기에 사용하려는 디스크 인터페이스 유형입니다. M3 VM을 만들거나 부팅 디스크 이미지에 최적화된 NVMe 드라이버가 포함된 경우
nvme를 지정합니다. 다른 이미지에는scsi를 지정합니다. - DEVICE-NAME: (선택사항) 게스트 운영체제 심볼릭 링크(symlink)에서 사용할 디스크 이름을 나타내는 이름입니다.
- IMAGE_FAMILY: 부팅 디스크에 설치하려는 사용 가능한 이미지 계열 중 하나입니다.
- IMAGE_PROJECT: 이미지 계열이 속하는 이미지 프로젝트입니다.
필요한 경우 서로 다른 파티션에
nvme및scsi조합을 사용하여 로컬 SSD를 1세대 또는 2세대 VM에 연결할 수 있습니다.nvme기기 성능은 인스턴스의 부팅 디스크 이미지에 따라 달라집니다. 3세대 VM은 NVMe 디스크 인터페이스만 지원합니다.로컬 SSD로 VM을 만든 후 이를 사용하려면 먼저 기기를 포맷하고 마운트해야 합니다.
Terraform
연결된 로컬 SSD 디스크가 있는 VM을 만들려면
google_compute_instance리소스를 사용하면 됩니다.Terraform 구성을 적용하거나 삭제하는 방법은 기본 Terraform 명령어를 참조하세요.
Terraform 코드를 생성하려면 Google Cloud 콘솔에서 상응하는 코드 구성요소를 사용하면 됩니다.- Google Cloud 콘솔에서 VM 인스턴스 페이지로 이동합니다.
- 인스턴스 만들기를 클릭합니다.
- 원하는 매개변수를 지정합니다.
- 페이지 상단 또는 하단에서 상응하는 코드를 클릭한 후 Terraform 탭을 클릭하여 Terraform 코드를 확인합니다.
Go
Go
이 샘플을 사용해 보기 전에 Compute Engine 빠른 시작: 클라이언트 라이브러리 사용의 Go 설정 안내를 따르세요. 자세한 내용은 Compute Engine Go API 참고 문서를 확인하세요.
Compute Engine에 인증하려면 애플리케이션 기본 사용자 인증 정보를 설정합니다. 자세한 내용은 로컬 개발 환경의 인증 설정을 참조하세요.
자바
Java
이 샘플을 사용해 보기 전에 Compute Engine 빠른 시작: 클라이언트 라이브러리 사용의 Java 설정 안내를 따르세요. 자세한 내용은 Compute Engine Java API 참고 문서를 확인하세요.
Compute Engine에 인증하려면 애플리케이션 기본 사용자 인증 정보를 설정합니다. 자세한 내용은 로컬 개발 환경의 인증 설정을 참조하세요.
Python
Python
이 샘플을 사용해 보기 전에 Compute Engine 빠른 시작: 클라이언트 라이브러리 사용의 Python 설정 안내를 따르세요. 자세한 내용은 Compute Engine Python API 참고 문서를 확인하세요.
Compute Engine에 인증하려면 애플리케이션 기본 사용자 인증 정보를 설정합니다. 자세한 내용은 로컬 개발 환경의 인증 설정을 참조하세요.
REST
instances.insert method를 사용하여 이미지 계열 또는 특정 버전의 운영체제 이미지로부터 VM을 만듭니다.- Z3, A4, A4X, A3, A2 울트라 머신 시리즈의 경우 연결된 로컬 SSD 디스크가 있는 VM을 만들려면 이 계열에 사용 가능한 머신 유형 중 하나를 사용하는 VM을 만듭니다.
C4, C4D, C3, C3D 머신 시리즈의 경우 연결된 로컬 SSD 디스크가 연결된 VM을 만들려면 로컬 SSD 디스크(
-lssd)가 포함된 인스턴스 유형을 지정합니다.다음은 Ubuntu 부팅 디스크 1개와 로컬 SSD 디스크 2개가 있는 C3 VM을 만드는 샘플 요청 페이로드입니다.
{
 "machineType":"zones/us-central1-c/machineTypes/c3-standard-8-lssd",
 "name":"c3-with-local-ssd",
 "disks":[
    {
       "type":"PERSISTENT",
       "initializeParams":{
          "sourceImage":"projects/ubuntu-os-cloud/global/images/family/ubuntu-2204-lts"
       },
       "boot":true
    }
 ],
 "networkInterfaces":[
    {
       "network":"global/networks/default"
}
 ]
}
M3와 1세대 및 2세대 머신 시리즈의 경우 연결된 로컬 SSD 디스크가 있는 VM을 만들려면
initializeParams속성을 사용하여 VM을 만드는 동안 로컬 SSD 기기를 추가할 수 있습니다. 다음 속성도 지정해야 합니다.diskType: 로컬 SSD로 설정autoDelete: true로 설정type:SCRATCH로 설정
다음 속성은 로컬 SSD 기기에 사용할 수 없습니다.
diskNamesourceImage속성diskSizeGb
다음은 부팅 디스크 1개 및 로컬 SSD 디스크 4개가 있는 M3 VM을 만드는 샘플 요청 페이로드입니다.
{
 "machineType":"zones/us-central1-f/machineTypes/m3-ultramem-64",
 "name":"local-ssd-instance",
 "disks":[
    {
     "type":"PERSISTENT",
     "initializeParams":{
        "sourceImage":"projects/ubuntu-os-cloud/global/images/family/ubuntu-2204-lts"
     },
     "boot":true
    },
    {
       "type":"SCRATCH",
       "initializeParams":{
          "diskType":"zones/us-central1-f/diskTypes/local-ssd"
       },
       "autoDelete":true,
       "interface": "NVME"
    },
    {
       "type":"SCRATCH",
       "initializeParams":{
          "diskType":"zones/us-central1-f/diskTypes/local-ssd"
       },
       "autoDelete":true,
       "interface": "NVME"
    },
    {
       "type":"SCRATCH",
       "initializeParams":{
          "diskType":"zones/us-central1-f/diskTypes/local-ssd"
       },
       "autoDelete":true,
       "interface": "NVME"
    },
    {
       "type":"SCRATCH",
       "initializeParams":{
          "diskType":"zones/us-central1-f/diskTypes/local-ssd"
       },
       "autoDelete":true,
       "interface": "NVME"
    },
 ],
 "networkInterfaces":[
    {
       "network":"global/networks/default"
    }
 ]
}
로컬 SSD 디스크를 만든 후 이를 사용하려면 먼저 각 기기를 포맷하고 마운트해야 합니다.
REST를 사용하여 인스턴스를 만드는 방법에 대한 자세한 내용은 Compute Engine API를 참조하세요.
로컬 SSD 기기 포맷 및 마운트
각 로컬 SSD 디스크를 개별로 포맷하고 마운트하거나 여러 로컬 SSD 디스크를 단일 논리 볼륨에 결합할 수 있습니다.
개별 로컬 SSD 파티션 포맷 및 마운트
로컬 SSD를 인스턴스에 연결하는 가장 쉬운 방법은 각 기기를 단일 파티션으로 포맷하고 마운트하는 것입니다. 또는 여러 파티션을 단일 논리 볼륨으로 결합할 수 있습니다.
Linux 인스턴스
Linux 인스턴스에서 새 로컬 SSD를 포맷하고 마운트하세요. 필요한 모든 파티션 형식 및 구성을 사용할 수 있습니다. 이 예시에서는 단일
ext4파티션을 만듭니다.VM 인스턴스 페이지로 이동합니다.
새 로컬 SSD가 연결된 인스턴스 옆에 있는 SSH 버튼을 클릭합니다. 브라우저에서 해당 인스턴스에 대한 터미널 연결이 열립니다.
터미널에서
find명령어를 사용하여 마운트할 로컬 SSD를 식별합니다.$ find /dev/ | grep google-local-nvme-ssdSCSI 모드의 로컬 SSD에는
google-local-ssd-0와 같은 표준 이름이 사용되며 NVMe 모드의 로컬 SSD에는 다음 출력과 같이google-local-nvme-ssd-0과 같은 이름이 사용됩니다.$ find /dev/ | grep google-local-nvme-ssd /dev/disk/by-id/google-local-nvme-ssd-0
ext4 파일 시스템으로 로컬 SSD를 포맷합니다. 이 명령어는 로컬 SSD에서 기존 데이터를 모두 삭제합니다.
$ sudo mkfs.ext4 -F /dev/disk/by-id/[SSD_NAME][SSD_NAME]을 포맷할 로컬 SSD의 ID로 바꿉니다. 예를 들어 인스턴스의 첫 번째 NVMe 로컬 SSD를 포맷하려면google-local-nvme-ssd-0을 지정합니다.mkdir명령어를 사용하여 기기를 마운트할 수 있는 디렉터리를 만듭니다.$ sudo mkdir -p /mnt/disks/[MNT_DIR][MNT_DIR]을 로컬 SSD 디스크를 마운트하려는 디렉터리 경로로 바꿉니다.로컬 SSD를 VM에 마운트합니다.
$ sudo mount /dev/disk/by-id/[SSD_NAME] /mnt/disks/[MNT_DIR]다음을 바꿉니다.
[SSD_NAME]: 마운트하려는 로컬 SSD의 ID입니다.[MNT_DIR]: 로컬 SSD를 마운트하려는 디렉터리입니다.
기기의 읽기 및 쓰기 액세스 권한을 구성합니다. 이 예시에서는 모든 사용자에게 기기에 대한 쓰기 액세스 권한을 부여합니다.
$ sudo chmod a+w /mnt/disks/[MNT_DIR][MNT_DIR]을 로컬 SSD를 마운트한 디렉터리로 바꿉니다.
원하는 경우 인스턴스가 다시 시작될 때 기기가 자동으로 다시 마운트되도록 로컬 SSD를
/etc/fstab파일에 추가할 수 있습니다. 이 항목은 인스턴스가 중지되는 경우 로컬 SSD의 데이터를 보존하지 않습니다. 자세한 내용은 로컬 SSD 데이터 지속성을 참조하세요.항목
/etc/fstab파일을 지정할 때는 로컬 SSD가 없더라도 인스턴스가 계속 부팅할 수 있도록nofail옵션을 포함해야 합니다. 예를 들어 부팅 디스크의 스냅샷을 만들고 로컬 SSD 디스크가 연결되지 않은 상태에서 새 인스턴스를 만들 경우 인스턴스가 시작 프로세스를 계속 수행할 수 있으며 무기한 중지되지 않습니다./etc/fstab항목을 만듭니다.blkid명령어를 사용하여 기기의 파일 시스템에 해당하는 UUID를 찾고 이 UUID가 마운트 옵션에 포함되도록/etc/fstab파일을 수정합니다. 명령어 하나로 이 단계를 완료할 수 있습니다.예를 들어 NVMe 모드의 로컬 SSD의 경우 다음 명령어를 사용하세요.
$ echo UUID=`sudo blkid -s UUID -o value /dev/disk/by-id/google-local-nvme-ssd-0` /mnt/disks/[MNT_DIR] ext4 discard,defaults,nofail 0 2 | sudo tee -a /etc/fstabSCSI와 같은 비NVMe 모드의 로컬 SSD의 경우 다음 명령어를 사용합니다.
$ echo UUID=`sudo blkid -s UUID -o value /dev/disk/by-id/google-local-ssd-0` /mnt/disks/[MNT_DIR] ext4 discard,defaults,nofail 0 2 | sudo tee -a /etc/fstab[MNT_DIR]을 로컬 SSD를 마운트한 디렉터리로 바꿉니다.cat명령어를 사용하여/etc/fstab항목이 올바른지 확인합니다.$ cat /etc/fstab
이 인스턴스의 부팅 디스크에서 스냅샷을 만들고 사용하여 로컬 SSD가 없는 별도의 인스턴스를 만들 경우,
/etc/fstab파일을 수정하고 이 로컬 SSD의 항목을 삭제합니다.nofail옵션이 있더라도/etc/fstab파일을 인스턴스에 연결된 파티션과 동기화된 상태로 유지하고 부팅 디스크의 스냅샷을 만들기 전에 이러한 항목을 삭제합니다.Windows 인스턴스
Windows 디스크 관리 도구를 사용하여 Windows 인스턴스에서 로컬 SSD를 포맷하고 마운트합니다.
RDP를 통해 인스턴스에 연결합니다. 이 예시에서는 VM 인스턴스 페이지로 이동하여 로컬 SSD가 연결된 인스턴스 옆에 있는 RDP 버튼을 클릭합니다. 사용자 이름과 비밀번호를 입력하면 서버의 데스크톱 인터페이스가 포함된 창이 열립니다.
Windows 시작 버튼을 마우스 오른쪽 버튼으로 클릭하고 디스크 관리를 선택합니다.

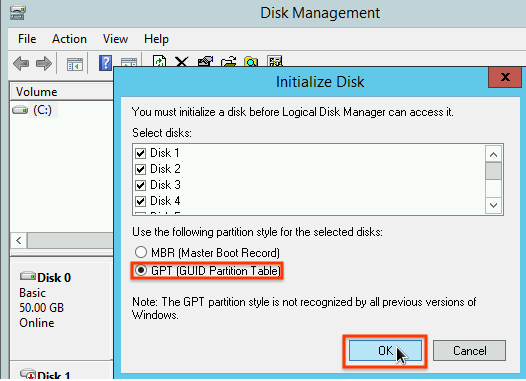
로컬 SSD를 아직 초기화하지 않았으면 새 파티션의 파티션 나누기 스키마를 선택하라는 메시지가 표시됩니다. GPT를 선택하고 확인을 클릭합니다.

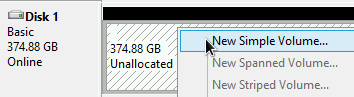
로컬 SSD가 초기화된 후 할당되지 않은 디스크 공간을 마우스 오른쪽 버튼으로 클릭하고 새 단순 볼륨을 선택합니다.
단순 볼륨 만들기 마법사의 안내에 따라 새 볼륨을 구성합니다. 파티션 형식은 원하는 것을 사용하면 되지만 이 예시에서는
NTFS를 선택합니다. 또한 빠른 포맷 실행을 선택해 포맷 프로세스 속도를 높입니다.
마법사를 완료하고 볼륨 포맷을 마친 후에 새 로컬 SSD가
Healthy상태인지 확인합니다.
작업이 끝났습니다. 이제 로컬 SSD에 파일을 쓸 수 있습니다.
로컬 SSD 파티션 여러 개를 포맷하고 단일 논리 볼륨에 마운트
영구 SSD와 달리 로컬 SSD는 인스턴스에 연결하는 기기마다 용량이 375GB로 고정되어 있습니다. 로컬 SSD 파티션 여러 개를 단일 논리 볼륨에 결합하려면 이러한 파티션에 볼륨 관리를 직접 정의해야 합니다.
Linux 인스턴스
mdadm을 사용하여 RAID 0 배열을 만듭니다. 이 예시에서는 단일ext4파일 시스템으로 배열을 포맷하지만 원하는 파일 시스템을 적용할 수 있습니다.VM 인스턴스 페이지로 이동합니다.
새 로컬 SSD가 연결된 인스턴스 옆에 있는 SSH 버튼을 클릭합니다. 브라우저에서 해당 인스턴스에 대한 터미널 연결이 열립니다.
터미널에서
mdadm도구를 설치합니다.mdadm의 설치 프로세스에는 스크립트를 중단하는 사용자 프롬프트가 포함되어 있으므로 이 프로세스를 수동으로 실행합니다.Debian 및 Ubuntu:
$ sudo apt update && sudo apt install mdadm --no-install-recommendsCentOS 및 RHEL:
$ sudo yum install mdadm -ySLES 및 openSUSE:
$ sudo zypper install -y mdadmfind명령어를 사용하여 함께 마운트할 모든 로컬 SSD를 식별합니다.이 예시에서는 인스턴스에 NVMe 모드의 로컬 SSD 파티션이 8개 있습니다.
$  find /dev/ | grep google-local-nvme-ssd

 /dev/disk/by-id/google-local-nvme-ssd-7
 /dev/disk/by-id/google-local-nvme-ssd-6
 /dev/disk/by-id/google-local-nvme-ssd-5
 /dev/disk/by-id/google-local-nvme-ssd-4
 /dev/disk/by-id/google-local-nvme-ssd-3
 /dev/disk/by-id/google-local-nvme-ssd-2
 /dev/disk/by-id/google-local-nvme-ssd-1
 /dev/disk/by-id/google-local-nvme-ssd-0
find는 순서를 보장하지 않습니다. 출력 줄 수가 예상 SSD 파티션 수와 일치하는 한 기기가 다른 순서로 나열되어도 괜찮습니다. SCSI 모드의 로컬 SSD에는google-local-ssd와 같은 표준 이름이 사용되며 NVMe 모드의 로컬 SSD에는google-local-nvme-ssd과 같은 이름이 사용됩니다.mdadm을 사용하여 여러 로컬 SSD 기기를/dev/md0이라는 이름의 단일 배열로 결합합니다. 이 예시에서는 NVMe 모드의 로컬 SSD 기기 8개를 병합합니다. SCSI 모드의 로컬 SSD 기기인 경우find명령어로 얻은 이름을 지정합니다.$ sudo mdadm --create /dev/md0 --level=0 --raid-devices=8 \ /dev/disk/by-id/google-local-nvme-ssd-0 \ /dev/disk/by-id/google-local-nvme-ssd-1 \ /dev/disk/by-id/google-local-nvme-ssd-2 \ /dev/disk/by-id/google-local-nvme-ssd-3 \ /dev/disk/by-id/google-local-nvme-ssd-4 \ /dev/disk/by-id/google-local-nvme-ssd-5 \ /dev/disk/by-id/google-local-nvme-ssd-6 \ /dev/disk/by-id/google-local-nvme-ssd-7 mdadm: Defaulting to version 1.2 metadata mdadm: array /dev/md0 started.
mdadm --detail을 사용하여 배열의 세부정보를 확인할 수 있습니다.--prefer=by-id플래그를 추가하면/dev/disk/by-id경로를 사용하는 기기가 나열됩니다.sudo mdadm --detail --prefer=by-id /dev/md0
배열의 각 기기에서 다음과 같이 출력되어야 합니다.
 ...
 Number   Major   Minor   RaidDevice State
    0      259      0         0      active sync   /dev/disk/by-id/google-local-nvme-ssd-0
 ...
ext4 파일 시스템으로 전체
/dev/md0배열을 포맷합니다.$ sudo mkfs.ext4 -F /dev/md0/dev/md0을 마운트할 수 있는 디렉터리를 만듭니다. 이 예시에서는/mnt/disks/ssd-array디렉터리를 만듭니다.$ sudo mkdir -p /mnt/disks/[MNT_DIR][MNT_DIR]을 로컬 SSD 배열을 마운트하려는 디렉터리로 바꿉니다./dev/md0배열을/mnt/disks/ssd-array디렉터리에 마운트합니다.$ sudo mount /dev/md0 /mnt/disks/[MNT_DIR][MNT_DIR]을 로컬 SSD 배열을 마운트하려는 디렉터리로 바꿉니다.기기의 읽기 및 쓰기 액세스 권한을 구성합니다. 이 예시에서는 모든 사용자에게 기기에 대한 쓰기 액세스 권한을 부여합니다.
$ sudo chmod a+w /mnt/disks/[MNT_DIR][MNT_DIR]을 로컬 SSD 배열을 마운트한 디렉터리로 바꿉니다.
원하는 경우 인스턴스가 다시 시작될 때 기기가 자동으로 다시 마운트되도록 로컬 SSD를
/etc/fstab파일에 추가할 수 있습니다. 이 항목은 인스턴스가 중지되는 경우 로컬 SSD의 데이터를 보존하지 않습니다. 자세한 내용은 로컬 SSD 데이터 지속성을 참조하세요.항목
/etc/fstab파일을 지정할 때는 로컬 SSD가 없더라도 인스턴스가 계속 부팅할 수 있도록nofail옵션을 포함해야 합니다. 예를 들어 부팅 디스크의 스냅샷을 만들고 로컬 SSD가 연결되지 않은 상태에서 새 인스턴스를 만들 경우 인스턴스가 시작 프로세스를 계속 수행할 수 있으며 무기한 중지되지 않습니다./etc/fstab항목을 만듭니다.blkid명령어를 사용하여 기기의 파일 시스템에 해당하는 UUID를 찾고 이 UUID가 마운트 옵션에 포함되도록/etc/fstab파일을 수정합니다. 로컬 SSD를 사용할 수 없는 경우에도 시스템이 부팅되도록nofail옵션을 지정합니다. 이 단계는 단일 명령어로 완료할 수 있습니다. 예를 들면 다음과 같습니다.$ echo UUID=`sudo blkid -s UUID -o value /dev/md0` /mnt/disks/[MNT_DIR] ext4 discard,defaults,nofail 0 2 | sudo tee -a /etc/fstab[MNT_DIR]을 로컬 SSD 배열을 마운트한 디렉터리로 바꿉니다.UUID 대신
/etc/fstab파일에/dev/md0과 같은 기기 이름을 사용하는 경우 부팅 시 배열이 자동으로 재조합되도록/etc/mdadm/mdadm.conf파일을 수정해야 합니다. 이렇게 하려면 다음 두 단계를 완료해야 합니다.- 부팅 시 디스크 배열이 자동으로 스캔되고 재조합되는지 확인합니다.
$ sudo mdadm --detail --scan | sudo tee -a /etc/mdadm/mdadm.conf - 초기 부팅 프로세스 중에 배열을 사용할 수 있도록
initramfs를 업데이트합니다.$ sudo update-initramfs -u
- 부팅 시 디스크 배열이 자동으로 스캔되고 재조합되는지 확인합니다.
cat명령어를 사용하여/etc/fstab항목이 올바른지 확인합니다.$ cat /etc/fstab
이 인스턴스의 부팅 디스크에서 스냅샷을 만들고 사용하여 로컬 SSD가 없는 별도의 인스턴스를 만들 경우,
/etc/fstab파일을 수정하고 이 로컬 SSD 배열의 항목을 삭제합니다.nofail옵션이 있더라도/etc/fstab파일을 인스턴스에 연결된 파티션과 동기화된 상태로 유지하고 부팅 디스크의 스냅샷을 만들기 전에 이러한 항목을 삭제합니다.Windows 인스턴스
Windows 디스크 관리 도구를 사용하여 Windows 인스턴스에서 로컬 SSD 배열을 포맷하고 마운트합니다.
RDP를 통해 인스턴스에 연결합니다. 이 예시에서는 VM 인스턴스 페이지로 이동하여 로컬 SSD가 연결된 인스턴스 옆에 있는 RDP 버튼을 클릭합니다. 사용자 이름과 비밀번호를 입력하면 서버의 데스크톱 인터페이스가 포함된 창이 열립니다.
Windows 시작 버튼을 마우스 오른쪽 버튼으로 클릭하고 디스크 관리를 선택합니다.
로컬 SSD를 아직 초기화하지 않았으면 새 파티션의 파티션 나누기 스키마를 선택하라는 메시지가 표시됩니다. GPT를 선택하고 확인을 클릭합니다.
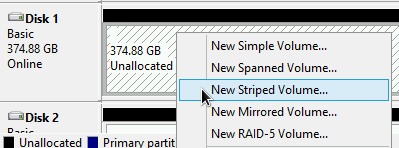
로컬 SSD가 초기화된 후 할당되지 않은 디스크 공간을 마우스 오른쪽 버튼으로 클릭하고 새 스트라이프 볼륨을 선택합니다.
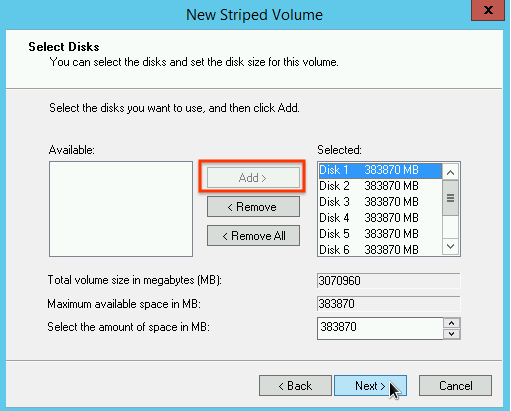
스트라이프 배열에 포함할 로컬 SSD 파티션을 선택합니다. 이 예시에서는 모든 파티션을 선택하여 단일 로컬 SSD 기기로 결합합니다.
새 스트라이프 볼륨 마법사의 안내에 따라 새 볼륨을 구성합니다. 파티션 형식은 원하는 것을 사용하면 되지만 이 예시에서는
NTFS를 선택합니다. 또한 빠른 포맷 실행을 선택해 포맷 프로세스 속도를 높입니다. 마법사를 완료하고 볼륨 포맷을 마친 후에 새 로컬 SSD가
Healthy상태인지 확인합니다.
이제 로컬 SSD에 파일을 쓸 수 있습니다.
다음 단계
- VM의 기기 이름 자세히 알아보기
- 로컬 SSD 디스크 성능을 벤치마킹하는 방법 알아보기
달리 명시되지 않는 한 이 페이지의 콘텐츠에는 Creative Commons Attribution 4.0 라이선스에 따라 라이선스가 부여되며, 코드 샘플에는 Apache 2.0 라이선스에 따라 라이선스가 부여됩니다. 자세한 내용은 Google Developers 사이트 정책을 참조하세요. 자바는 Oracle 및/또는 Oracle 계열사의 등록 상표입니다.
최종 업데이트: 2025-10-30(UTC)
-