连接到 Amazon S3
作为 BigQuery 管理员,您可以创建连接,以使数据分析师能够访问存储在 Amazon Simple Storage Service (Amazon S3) 存储桶中的数据。
BigQuery Omni 通过连接访问 Amazon S3 数据。每个连接都有自己的唯一 Amazon Web Services (AWS) Identity and Access Management (IAM) 用户。您可以通过 AWS IAM 角色向用户授予权限。AWS IAM 角色中的政策决定了 BigQuery 可以在每个连接中访问哪些数据。
查询 Amazon S3 数据并将查询结果从 BigQuery 导出到 Amazon S3 存储桶需要连接。
准备工作
确保您已创建以下资源:
- 一个启用了 BigQuery Connection API 的 Google Cloud 项目。
- 如果您使用的是基于容量的价格模式,请确保已为项目启用 BigQuery Reservation API。如需了解价格,请参阅 BigQuery Omni 价格。
- 一个有权在 AWS 中修改 IAM 政策的 AWS 账号。
所需的角色
如需获得创建连接以访问 Amazon S3 数据所需的权限,请让您的管理员为您授予项目的 BigQuery Connection Admin (roles/bigquery.connectionAdmin) IAM 角色。如需详细了解如何授予角色,请参阅管理对项目、文件夹和组织的访问权限。
为 BigQuery 创建 AWS IAM 政策
请务必遵循 Amazon S3 安全防护最佳实践。建议您执行以下操作:
- 设置阻止通过 HTTP 访问 Amazon S3 存储桶的 AWS 政策。
- 设置阻止公开访问 Amazon S3 存储桶的 AWS 政策。
- 使用 Amazon S3 服务器端加密。
- 只允许向 Google 账号授予所需的最低权限。
- 设置 CloudTrails 并启用 Amazon S3 数据事件。
如需创建 AWS IAM 政策,请使用 AWS 控制台或 Terraform:
AWS 控制台
转到 AWS IAM 控制台。 确保您使用的账号拥有要访问的 Amazon S3 存储桶。
依次选择政策 > 创建政策(在新标签页中打开)。
点击 JSON 并将以下内容粘贴到编辑器中:
{
 "Version": "2012-10-17",
 "Statement": [
    {
     "Effect": "Allow",
     "Action": [
       "s3:ListBucket"
     ],
     "Resource": [
       "arn:aws:s3:::BUCKET_NAME"
      ]
    },
   {
     "Effect": "Allow",
     "Action": [
       "s3:GetObject",
       EXPORT_PERM
     ],
     "Resource": [
       "arn:aws:s3:::BUCKET_NAME",
        "arn:aws:s3:::BUCKET_NAME/*"
      ]
    }
 ]
}
请替换以下内容:
BUCKET_NAME:您希望 BigQuery 访问的 Amazon S3 存储桶。EXPORT_PERM(可选):如果您想将数据导出到 Amazon S3 存储桶,则需要此额外权限。替换为"s3:PutObject"- 如需分离导出访问权限控制,建议您使用单独的 AWS IAM 角色创建另一个连接,并向该角色授予只写权限。如需实现更精细的访问权限控制,您还可以只允许角色访问存储分区的特定路径。
在名称字段中,输入政策名称,例如
bq_omni_read_only。点击创建政策。
您的政策即创建完毕,并使用如下格式的 Amazon 资源名称 (ARN):
arn:aws:iam::AWS_ACCOUNT_ID:policy/POLICY_NAME
请替换以下内容:
AWS_ACCOUNT_ID:连接的 AWS IAM 用户的 ID 号。POLICY_NAME:您选择的政策名称。
AWS CLI
如需创建 AWS IAM 政策,请使用 aws iam create-policy 命令:
  aws iam create-policy \
   --policy-name POLICY_NAME \
   --policy-document '{
     "Version": "2012-10-17",
     "Statement": [
        {
         "Effect": "Allow",
         "Action": [
           "s3:ListBucket"
         ],
         "Resource": [
           "arn:aws:s3:::BUCKET_NAME"
          ]
        },
       {
         "Effect": "Allow",
         "Action": [
           "s3:GetObject",
           EXPORT_PERM
         ],
         "Resource": [
           "arn:aws:s3:::BUCKET_NAME",
            "arn:aws:s3:::BUCKET_NAME/*"
          ]
        }
     ]
    }'
替换以下内容:
POLICY_NAME:您要创建的政策的名称。BUCKET_NAME:您希望 BigQuery 访问的 Amazon S3 存储桶。EXPORT_PERM(可选):如果您想将数据导出到 Amazon S3 存储桶,则需要此额外权限。替换为"s3:PutObject"- 如需分离导出访问权限控制,建议您使用单独的 AWS IAM 角色创建另一个连接,并向该角色授予只写权限。如需实现更精细的访问权限控制,您还可以只允许角色访问存储分区的特定路径。
您的政策即创建完毕,并使用如下格式的 Amazon 资源名称 (ARN):
arn:aws:iam::AWS_ACCOUNT_ID:policy/POLICY_NAME
请替换以下内容:
AWS_ACCOUNT_ID:连接的 AWS IAM 用户的 ID 号。POLICY_NAME:您选择的政策名称。
Terraform
将以下内容添加到 Terraform 配置中,以将政策附加到 Amazon S3 存储桶资源:
  resource "aws_iam_policy" "bigquery-omni-connection-policy" {
    name = "bigquery-omni-connection-policy"

    policy = <<-EOF
            {
              "Version": "2012-10-17",
              "Statement": [
                  {
                      "Sid": "BucketLevelAccess",
                      "Effect": "Allow",
                      "Action": ["s3:ListBucket"],
                      "Resource": ["arn:aws:s3:::BUCKET_NAME"]
                  },
                  {
                      "Sid": "ObjectLevelAccess",
                      "Effect": "Allow",
                      "Action": ["s3:GetObject",EXPORT_PERM],
                      "Resource": [
                          "arn:aws:s3:::BUCKET_NAME",
                          "arn:aws:s3:::BUCKET_NAME/*"
                          ]
                  }
              ]
            }
            EOF
  }
替换以下内容:
BUCKET_NAME:您希望 BigQuery 访问的 Amazon S3 存储桶。EXPORT_PERM(可选):如果您想将数据导出到 Amazon S3 存储桶,则需要此额外权限。替换为"s3:PutObject"- 如需分离导出访问权限控制,建议您使用单独的 AWS IAM 角色创建另一个连接,并向该角色授予只写权限。如需实现更精细的访问权限控制,您还可以只允许角色访问存储桶的特定路径。
为 BigQuery 创建 AWS IAM 角色
接下来,创建一个角色,以允许从 BigQuery 中访问 Amazon S3 存储桶。此角色使用您在上一部分中创建的政策。
如需创建 AWS IAM 角色,请使用 AWS 控制台或 Terraform:
AWS 控制台
转到 AWS IAM 控制台。 确保您使用的账号拥有要访问的 Amazon S3 存储桶。
依次选择角色 > 创建角色。
对于 Select type of trusted entity(选择可信实体的类型),选择 Web Identity(Web 身份)。
对于 Identity Provider(身份提供方),选择 Google。
对于 Audience(受众群体),输入
00000作为占位值。您稍后会替换该值。点击 Next: Permissions。
如需为角色授予访问 Amazon S3 数据的权限,请将 IAM 政策附加到该角色。搜索您在上一部分中创建的政策,然后点击切换按钮。
点击 Next: Tags。
点击下一步:检查。 输入角色的名称,例如
BQ_Read_Only。点击 Create role。
AWS CLI
使用以下命令创建 IAM 角色并将政策分配给创建的角色:
  aws iam create-role \
   --role-name bigquery-omni-connection \
   --max-session-duration 43200 \
   --assume-role-policy-document '{
     "Version": "2012-10-17",
     "Statement": [
        {
            "Effect": "Allow",
            "Principal": {
                "Federated": "accounts.google.com"
            },
            "Action": "sts:AssumeRoleWithWebIdentity",
            "Condition": {
                "StringEquals": {
                    "accounts.google.com:sub": "00000"
                }
            }
        }
    ]
}'
Terraform
将以下内容添加到 Terraform 配置中,以创建 IAM 角色并将政策分配给创建的角色:
  resource "aws_iam_role" "bigquery-omni-connection-role" {
    name                 = "bigquery-omni-connection"
    max_session_duration = 43200

    assume_role_policy = <<-EOF
    {
      "Version": "2012-10-17",
      "Statement": [
        {
          "Effect": "Allow",
          "Principal": {
            "Federated": "accounts.google.com"
          },
          "Action": "sts:AssumeRoleWithWebIdentity",
          "Condition": {
            "StringEquals": {
              "accounts.google.com:sub": "00000"
            }
          }
        }
      ]
    }
    EOF
  }

  resource "aws_iam_role_policy_attachment" "bigquery-omni-connection-role-attach" {
    role       = aws_iam_role.bigquery-omni-connection-role.name
    policy_arn = aws_iam_policy.bigquery-omni-connection-policy.arn
  }

  output "bigquery_omni_role" {
    value = aws_iam_role.bigquery-omni-connection-role.arn
  }
然后,将政策附加到角色:
  aws iam attach-role-policy \
    --role-name bigquery-omni-connection \
    --policy-arn arn:aws:iam::AWS_ACCOUNT_ID:policy/POLICY_NAME
替换以下内容:
AWS_ACCOUNT_ID:连接的 AWS IAM 用户的 ID 号。POLICY_NAME:您选择的政策名称。
创建连接
如需连接到 Amazon S3 存储桶,请使用Google Cloud 控制台、bq 命令行工具或客户端库:
控制台
转到 BigQuery 页面。
在浏览器窗格中,点击 添加数据。
系统随即会打开添加数据对话框。
在过滤条件窗格中的数据源类型部分,选择存储空间/数据湖。
或者,在搜索数据源字段中,您可以输入
aws或Amazon S3。在精选数据源部分中,点击 Amazon S3。
点击 Amazon S3 Omni:BigQuery 联合解决方案卡片。
在创建表对话框的连接 ID 字段中,选择创建新的 S3 连接。
在外部数据源窗格中,输入以下信息:
- 对于连接类型,选择 AWS 上的 BigLake(通过 BigQuery Omni)。
- 对于连接 ID,输入连接资源的标识符。可使用字母、数字、短划线和下划线。
- 对于区域,选择您要在其中创建连接的位置。
- 可选:对于易记名称,输入方便用户使用的连接名称,例如
My connection resource。易记名称可以是任何容易辨识的值,让您以后在需要修改连接资源时能够轻松识别。 - 可选:对于说明,输入此连接资源的说明。
- 对于 AWS 角色 ID,输入您创建的完整 IAM 角色 ID,格式为:
arn:aws:iam::AWS_ACCOUNT_ID:role/ROLE_NAME
点击创建连接。
点击转到连接。
在连接信息窗格中,复制 BigQuery Google 身份。这是特定于每个连接的 Google 主账号。示例:
BigQuery Google identity: IDENTITY_ID
Terraform
  resource "google_bigquery_connection" "connection" {
    connection_id = "bigquery-omni-aws-connection"
    friendly_name = "bigquery-omni-aws-connection"
    description   = "Created by Terraform"

    location      = "AWS_LOCATION"
    aws {
      access_role {
        # This must be constructed as a string instead of referencing the
        # AWS resources directly to avoid a resource dependency cycle
        # in Terraform.
        iam_role_id = "arn:aws:iam::AWS_ACCOUNT:role/IAM_ROLE_NAME"
      }
    }
  }
替换以下内容:
AWS_LOCATION: Google Cloud中的 Amazon S3 位置AWS_ACCOUNT:您的 AWS 账号 ID。IAM_ROLE_NAME:此角色允许从 BigQuery 访问 Amazon S3 存储桶。使用为 BigQuery 创建 AWS IAM 角色中aws_iam_role资源的name参数值。
bq
bq mk --connection --connection_type='AWS' \
--iam_role_id=arn:aws:iam::AWS_ACCOUNT_ID:role/ROLE_NAME \
--location=AWS_LOCATION \
CONNECTION_ID
请替换以下内容:
AWS_ACCOUNT_ID:连接的 AWS IAM 用户的 ID 号ROLE_NAME:您选择的角色政策名称AWS_LOCATION: Google Cloud中的 Amazon S3 位置CONNECTION_ID:您为此连接资源提供的 ID。
命令行会显示以下输出:
Identity: IDENTITY_ID
输出包含以下内容:
IDENTITY_ID:由 Google Cloud控制且特定于每个连接的 Google 主账号。
记下 IDENTITY_ID 值。
Java
试用此示例之前,请按照 BigQuery 快速入门:使用客户端库中的 Java 设置说明进行操作。 如需了解详情,请参阅 BigQuery Java API 参考文档。
如需向 BigQuery 进行身份验证,请设置应用默认凭证。如需了解详情,请参阅为客户端库设置身份验证。
为 AWS 角色添加信任关系
BigQuery Omni 提供了两种从 Amazon S3 安全访问数据的方法。您可以向 Google Cloud 服务账号授予对 AWS 角色的访问权限,或者如果您的 AWS 账号具有用于 accounts.google.com 的自定义身份提供方,则必须将 Google Cloud 服务账号作为受众群体添加到该提供方:
为 AWS 角色添加信任政策
信任关系可让连接担任相应角色并访问角色政策中指定的 Amazon S3 数据。
如需添加信任关系,请使用 AWS 控制台或 Terraform:
AWS 控制台
转到 AWS IAM 控制台。 确保您使用的账号拥有要访问的 Amazon S3 存储桶。
选择 Roles。
选择您创建的
ROLE_NAME。点击修改,然后执行以下操作:
将 Maximum session duration(会话时长上限)设置为 12 小时。由于每个查询最多可运行 6 小时,因此该时长允许额外重试一次。如果将会话时长增加到 12 小时以上,则不允许进行额外的重试。如需了解详情,请参阅查询/多语句查询执行时间限制。
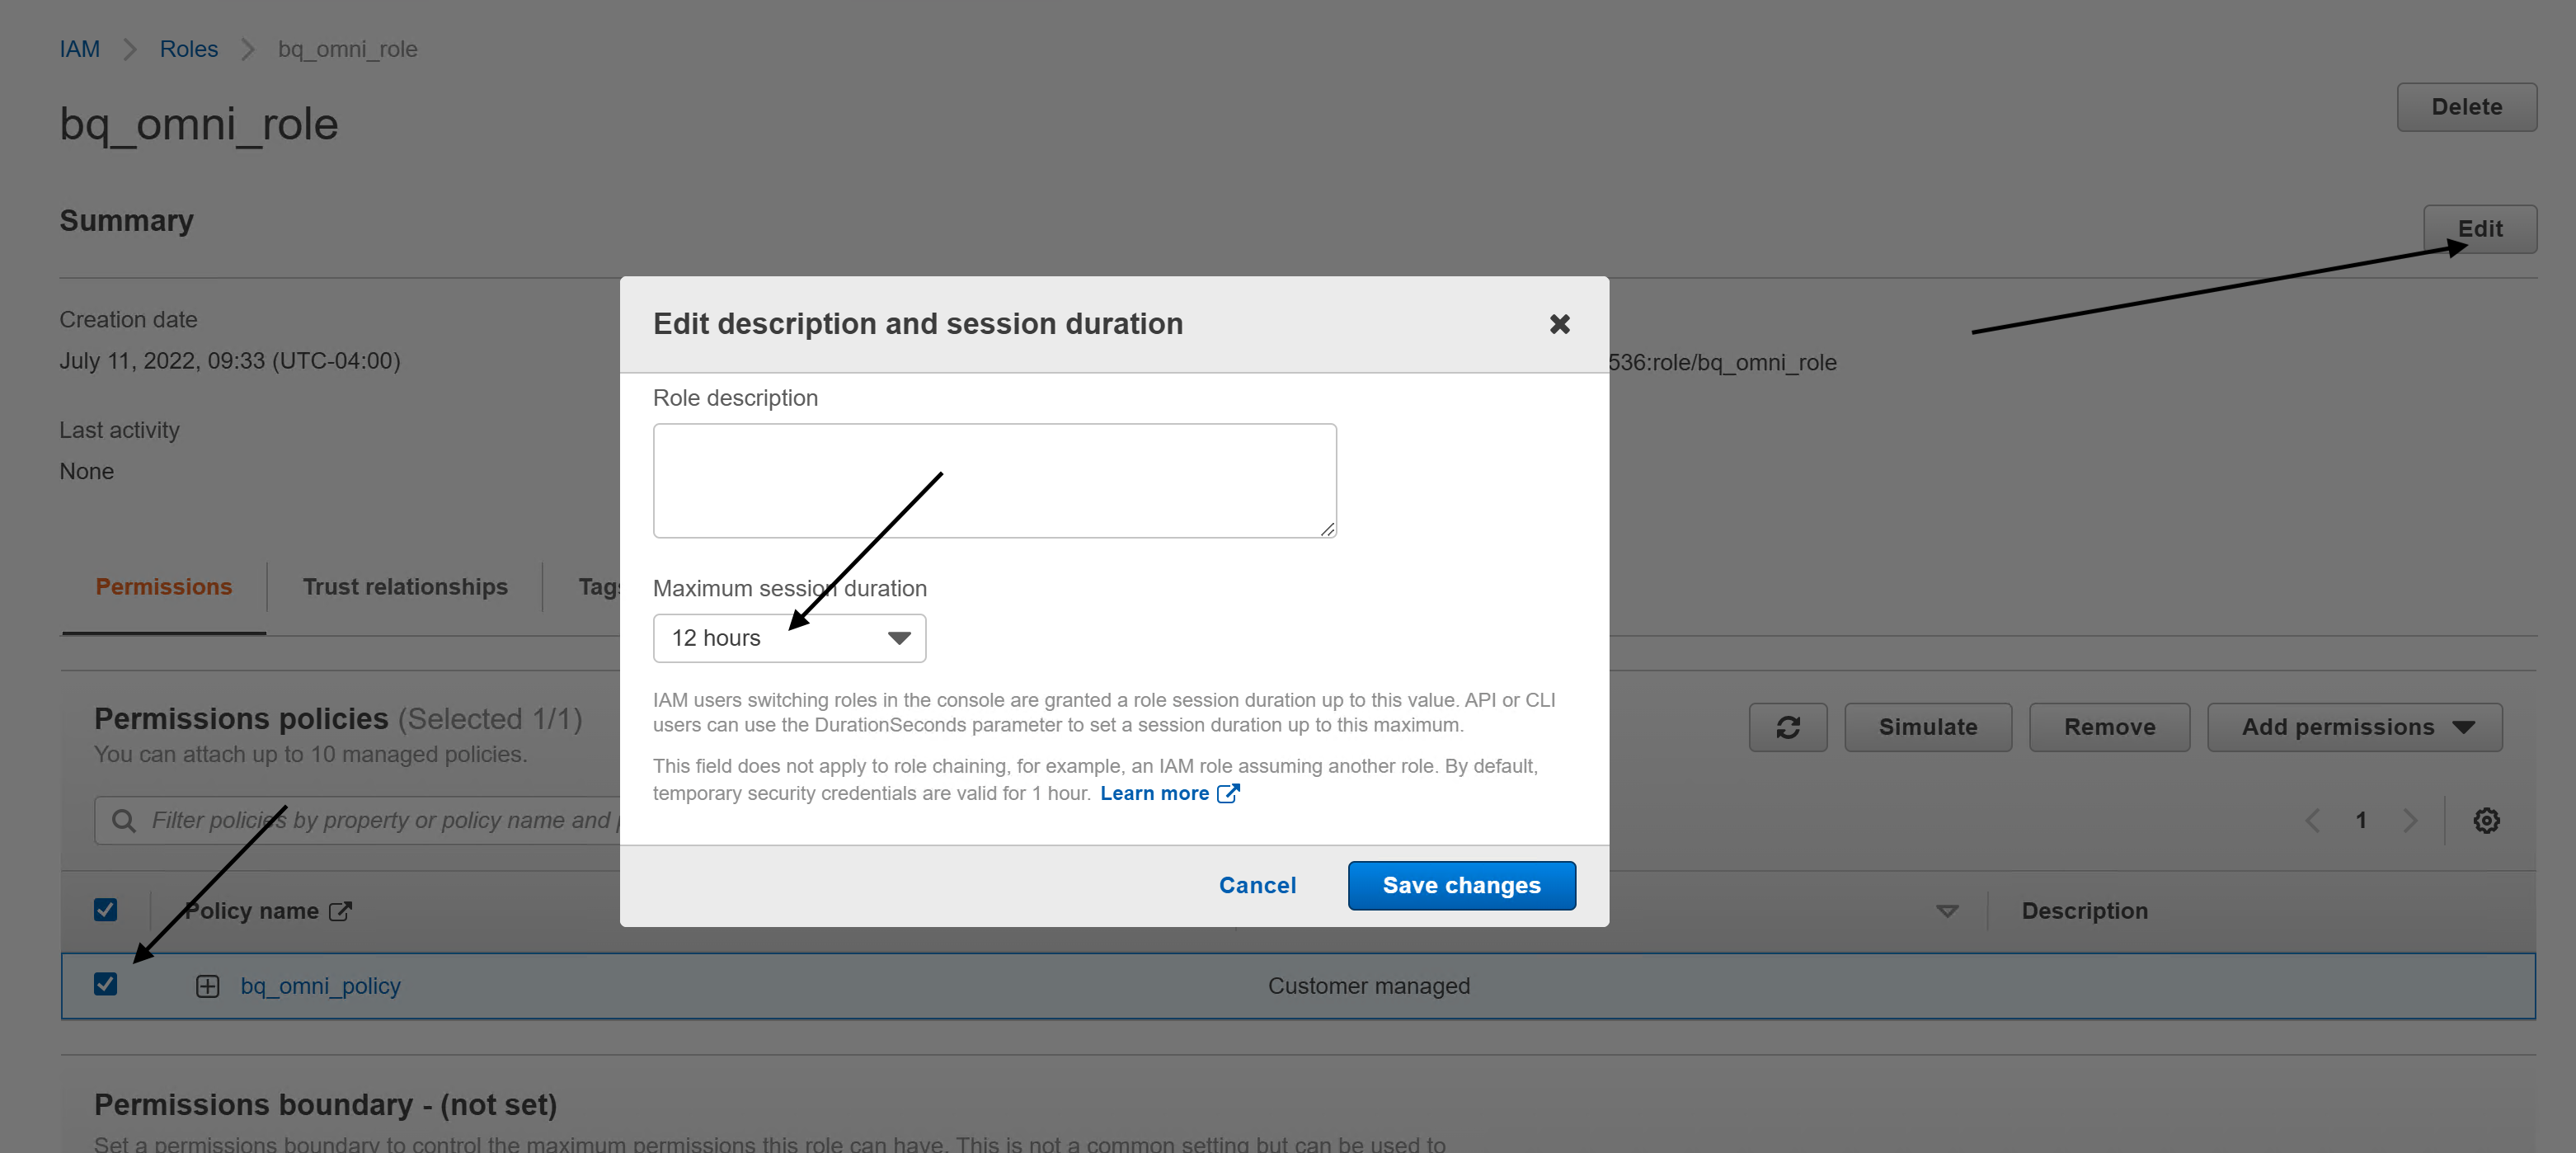
点击保存更改。
选择 Trust Relationships,然后点击 Edit trust relationship。将政策内容替换为以下内容:
{
  "Version": "2012-10-17",
  "Statement": [
    {
      "Effect": "Allow",
      "Principal": {
        "Federated": "accounts.google.com"
      },
      "Action": "sts:AssumeRoleWithWebIdentity",
      "Condition": {
        "StringEquals": {
          "accounts.google.com:sub": "IDENTITY_ID"
        }
      }
    }
  ]
}
将
IDENTITY_ID替换为 BigQuery Google 身份值,您可以针对创建的连接在 Google Cloud 控制台中找到该值。点击 Update Trust Policy。
AWS CLI
如需创建与 BigQuery 连接的信任关系,请使用 aws iam update-assume-role-policy 命令:
  aws iam update-assume-role-policy \
    --role-name bigquery-omni-connection \
    --policy-document '{
      "Version": "2012-10-17",
      "Statement": [
        {
          "Effect": "Allow",
          "Principal": {
            "Federated": "accounts.google.com"
          },
          "Action": "sts:AssumeRoleWithWebIdentity",
          "Condition": {
            "StringEquals": {
              "accounts.google.com:sub": "IDENTITY_ID"
            }
          }
        }
      ]
    }'
替换以下内容:
IDENTITY_ID:BigQuery Google 身份值,您可以针对创建的连接在 Google Cloud 控制台中找到该值。
Terraform
更新 Terraform 配置中的 aws_iam_role 资源以添加信任关系:
    resource "aws_iam_role" "bigquery-omni-connection-role" {
      name                 = "bigquery-omni-connection"
      max_session_duration = 43200

      assume_role_policy = <<-EOF
          {
            "Version": "2012-10-17",
            "Statement": [
              {
                "Effect": "Allow",
                "Principal": {
                  "Federated": "accounts.google.com"
                },
                "Action": "sts:AssumeRoleWithWebIdentity",
                "Condition": {
                  "StringEquals": {
                    "accounts.google.com:sub": "${google_bigquery_connection.connection.aws[0].access_role[0].identity}"
                  }
                }
              }
            ]
          }
          EOF
    }
连接现在可以使用了。
配置自定义 AWS 身份提供方
如果您的 AWS 账号具有用于 accounts.google.com 的自定义身份提供方,则需要将 IDENTITY_ID 作为受众群体添加到该提供方。您可以通过执行以下操作来实现此目的:
转到 AWS IAM 控制台。 确保您使用的账号拥有要访问的 Amazon S3 存储桶。
前往 IAM > 身份提供方。
选择 accounts.google.comaccounts.google.com 的身份提供方。
点击添加受众群体,然后添加 IDENTITY_ID 作为受众群体。
连接现在可以使用了。
与用户共享连接
您可以授予以下角色,以使用户可以查询数据并管理连接:
roles/bigquery.connectionUser:允许用户使用连接与外部数据源建立连接,并对其运行查询。roles/bigquery.connectionAdmin:允许用户管理连接。
如需详细了解 BigQuery 中的 IAM 角色和权限,请参阅预定义的角色和权限。
从下列选项中选择一项:
控制台
前往 BigQuery 页面。
连接列在项目的连接组中。
在左侧窗格中,点击 探索器:

如果您没有看到左侧窗格,请点击 展开左侧窗格以打开该窗格。
点击您的项目,点击连接,然后选择一个连接。
在详细信息窗格中,点击共享以共享连接。之后,执行以下操作:
在连接权限对话框中,通过添加或修改主账号与其他主账号共享连接。
点击保存。
bq
您不能使用 bq 命令行工具共享连接。如需共享连接,请使用 Google Cloud 控制台或 BigQuery Connections API 方法共享连接。
API
使用 BigQuery Connections REST API 参考文档部分中的 projects.locations.connections.setIAM 方法,并提供一个 policy 资源实例。
Java
试用此示例之前,请按照 BigQuery 快速入门:使用客户端库中的 Java 设置说明进行操作。 如需了解详情,请参阅 BigQuery Java API 参考文档。
如需向 BigQuery 进行身份验证,请设置应用默认凭证。如需了解详情,请参阅为客户端库设置身份验证。
后续步骤
- 了解不同的连接类型。
- 了解如何管理连接。
- 了解 BigQuery Omni。
- 搭配使用 BigQuery Omni 和 AWS 实验。
- 了解 BigLake 表。
- 了解如何查询 Amazon S3 数据。
- 了解如何将查询结果导出到 Amazon S3 存储桶。