Organiza tus páginas con colecciones
Guarda y categoriza el contenido según tus preferencias.
Usa el complemento de JupyterLab de BigQuery
Si deseas solicitar comentarios o asistencia para esta función, envía un correo electrónico a
bigquery-ide-plugin@google.com.
En este documento, se muestra cómo instalar y usar el complemento de JupyterLab de BigQuery para hacer lo siguiente:
Explorar tus datos de BigQuery.
Usa la API de BigQuery DataFrames.
Implementa un notebook de BigQuery DataFrames en Cloud Composer.
El complemento de BigQuery JupyterLab incluye todas la funcionalidad del Complemento de JupyterLab de Dataproc, como crear una plantilla del entorno de ejecución de Dataproc Serverless, iniciar y administrar notebooks, desarrollar con Apache Spark, implementar código y administrar tus recursos.
Instala el complemento de JupyterLab de BigQuery
Para instalar y usar el complemento de BigQuery JupyterLab, sigue estos pasos pasos:
En tu terminal local, verifica que tengas instalado Python 3.8 o una versión posterior en tu sistema:
Actualiza la configuración del proyecto y la región
De forma predeterminada, la sesión se ejecuta en el proyecto y en la región que estableciste cuando ejecutaste gcloud init. Para cambiar la configuración del proyecto y la región de tu sesión, haz lo siguiente:
En el menú de JupyterLab, haz clic en Configuración > Configuración de Google BigQuery.
Debes reiniciar el complemento para que se apliquen los cambios.
Explorar datos
Para trabajar con tus datos de BigQuery en JupyterLab, haz lo siguiente:
En la barra lateral de JupyterLab, abre el panel Explorador de conjuntos de datos. Para ello, haz clic en el ícono de conjuntos de datos.
Para expandir un proyecto, en el panel Explorador de conjuntos de datos, haz clic en la flecha de expansión arrow_right junto al nombre del proyecto.
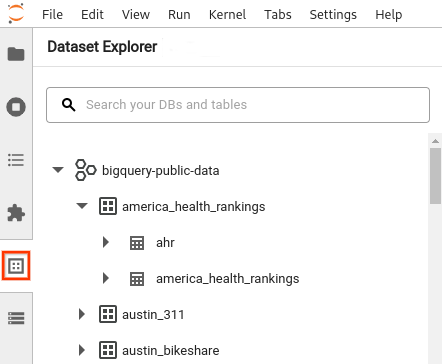
En el panel Explorador de conjuntos de datos muestra todos los conjuntos de datos de un proyecto que se encuentran en la región de BigQuery que configuraste para la sesión. Puedes interactuar con un proyecto y un conjunto de datos de varias maneras:
Para ver información sobre un conjunto de datos, haz clic en el nombre del conjunto de datos.
Para mostrar todas las tablas en un conjunto de datos, haz clic en la flecha de expansión arrow_right junto al conjunto de datos.
Para ver información sobre una tabla, haz clic en el nombre de la tabla.
Para consultar tus datos de BigQuery desde JupyterLab, haz lo siguiente:
Para abrir la página del selector, haz clic en Archivo > Nuevo selector.
En la sección Notebooks de BigQuery, haz clic en la tarjeta BigQuery DataFrames. Se abrirá un notebook nuevo en el que se muestra cómo comenzar a usar BigQuery DataFrames
Los notebooks de BigQuery DataFrames admiten el desarrollo en Python en un kernel de Python local. Las operaciones de BigQuery DataFrames se ejecutan de forma remota en BigQuery, pero el resto del código se ejecuta de forma local en tu máquina. Cuando se ejecuta una operación en BigQuery, aparece un ID de trabajo de consulta y un vínculo al trabajo debajo de la celda de código.
Para ver el trabajo en la consola de Google Cloud, haz clic en Abrir trabajo.
A fin de controlar las fallas de ejecución de notebooks, ingresa un número entero para el Recuento de reintentos y un valor (en minutos) para el Retraso de los reintentos.
Selecciona qué notificaciones de ejecución quieres enviar y, luego, ingresa los destinatarios.
Las notificaciones se envían con la configuración de SMTP de Airflow.
Selecciona un programa para el notebook.
Haz clic en Crear.
Cuando programas de forma correcta tu notebook, aparece en la lista de trabajos programados del entorno de Cloud Composer seleccionado.
[[["Fácil de comprender","easyToUnderstand","thumb-up"],["Resolvió mi problema","solvedMyProblem","thumb-up"],["Otro","otherUp","thumb-up"]],[["Difícil de entender","hardToUnderstand","thumb-down"],["Información o código de muestra incorrectos","incorrectInformationOrSampleCode","thumb-down"],["Faltan la información o los ejemplos que necesito","missingTheInformationSamplesINeed","thumb-down"],["Problema de traducción","translationIssue","thumb-down"],["Otro","otherDown","thumb-down"]],["Última actualización: 2025-09-04 (UTC)"],[[["\u003cp\u003eThe BigQuery JupyterLab plugin allows users to explore BigQuery data, utilize the BigQuery DataFrames API, and deploy notebooks to Cloud Composer.\u003c/p\u003e\n"],["\u003cp\u003eInstallation of the plugin requires Python 3.8 or later, the gcloud CLI, Pipenv, and JupyterLab, with specific commands provided for each step.\u003c/p\u003e\n"],["\u003cp\u003eThe plugin's Dataset Explorer pane enables browsing project datasets, tables, and allows modification of project and region settings within JupyterLab.\u003c/p\u003e\n"],["\u003cp\u003eBigQuery DataFrames notebooks support local Python development with remote execution of operations on BigQuery, and provide job details and links within the notebook interface.\u003c/p\u003e\n"],["\u003cp\u003eUsers can deploy BigQuery DataFrames notebooks to Cloud Composer by creating scheduled jobs, specifying the Cloud Composer environment, setting job parameters, and configuring notifications.\u003c/p\u003e\n"]]],[],null,["# Use the BigQuery JupyterLab plugin\n==================================\n\n|\n| **Preview**\n|\n|\n| This product or feature is subject to the \"Pre-GA Offerings Terms\" in the General Service Terms section\n| of the [Service Specific Terms](/terms/service-terms#1).\n|\n| Pre-GA products and features are available \"as is\" and might have limited support.\n|\n| For more information, see the\n| [launch stage descriptions](/products#product-launch-stages).\n\nTo request feedback or support for this feature, send an email to\n[bigquery-ide-plugin@google.com](mailto:bigquery-ide-plugin@google.com).\n\nThis document shows you how to install and use the BigQuery\nJupyterLab plugin to do the following:\n\n- Explore your BigQuery data.\n- Use the BigQuery DataFrames API.\n- Deploy a BigQuery DataFrames notebook to [Cloud Composer](/composer/docs/concepts/overview).\n\nThe BigQuery JupyterLab plugin includes all the\nfunctionality of the\n[Dataproc JupyterLab plugin](/dataproc-serverless/docs/quickstarts/jupyterlab-sessions),\nsuch as creating a Dataproc Serverless runtime template,\nlaunching and managing notebooks, developing with Apache Spark, deploying your code,\nand managing your resources.\n\nInstall the BigQuery JupyterLab plugin\n--------------------------------------\n\nTo install and use the BigQuery JupyterLab plugin, follow these\nsteps:\n\n1. In your local terminal, check to make sure you have Python 3.8 or later\n installed on your system:\n\n python3 --version\n\n2. [Install the gcloud CLI.](/sdk/docs/install)\n\n3. In your local terminal,\n [initialize the gcloud CLI](/sdk/docs/initializing):\n\n gcloud init\n\n4. Install Pipenv, a Python virtual environment tool:\n\n pip3 install pipenv\n\n5. Create a new virtual environment:\n\n pipenv shell\n\n6. Install JupyterLab in the new virtual environment:\n\n pipenv install jupyterlab\n\n7. Install the BigQuery JupyterLab plugin:\n\n pipenv install bigquery-jupyter-plugin\n\n8. If your installed version of JupyterLab is earlier\n than 4.0.0, then enable the plugin extension:\n\n jupyter server extension enable bigquery_jupyter_plugin\n\n9. Launch JupyterLab:\n\n jupyter lab\n\n JupyterLab opens in your browser.\n\n| **Note:** On macOS, if you receive an `SSL: CERTIFICATE_VERIFY_FAILED` error in your terminal when you launch JupyterLab, update your Python SSL certificate by executing `/Applications/Python 3.11/Install Certificates.command`. This file is located in the Python home directory.\n\nUpdate your project and region settings\n---------------------------------------\n\nBy default, your session runs in the project and region that you set when you\nran `gcloud init`. To change the project and region settings for your\nsession, do the following:\n\n- In the JupyterLab menu, click **Settings \\\u003e Google BigQuery Settings**.\n\nYou must restart the plugin for the changes to take effect.\n\nExplore data\n------------\n\nTo work with your BigQuery data in JupyterLab, do the following:\n\n1. In the JupyterLab sidebar, open the **Dataset Explorer** pane: click the datasets icon.\n2. To expand a project, in the **Dataset Explorer** pane, click the\n arrow_right expander arrow next to the\n project name.\n\n The **Dataset Explorer** pane shows all of the datasets in a project that\n are located in the BigQuery region that you configured for\n the session. You can interact with a project and dataset in various ways:\n - To view information about a dataset, click the name of the dataset.\n - To display all of the tables in a dataset, click the arrow_right expander arrow next to the dataset.\n - To view information about a table, click the name of the table.\n - To change the project or BigQuery region, [update your settings](#configure).\n\nExecute notebooks\n-----------------\n\nTo query your BigQuery data from JupyterLab, do the following:\n\n1. To open the launcher page, click **File \\\u003e New Launcher**.\n2. In the **BigQuery Notebooks** section, click the **BigQuery DataFrames** card. A new notebook opens that shows you how to get started with BigQuery DataFrames.\n\nBigQuery DataFrames notebooks support Python development in a local\nPython kernel. BigQuery DataFrames operations are executed remotely on\nBigQuery, but the rest of code is executed locally on your\nmachine. When an operation is executed in BigQuery, a query job\nID and link to the job appear below the code cell.\n\n- To view the job in the Google Cloud console, click **Open Job**.\n\nDeploy a BigQuery DataFrames notebook\n-------------------------------------\n\nYou can deploy a BigQuery DataFrames notebook to Cloud Composer\nby using a [Dataproc Serverless runtime template](/dataproc-serverless/docs/quickstarts/jupyterlab-sessions#create_a_serverless_runtime_template). You must use\nruntime version 2.1 or later.\n\n1. In your JupyterLab notebook, click calendar_month**Job Scheduler**.\n2. For **Job name**, enter a unique name for your job.\n3. For **Environment**, enter the name of the Cloud Composer environment to which you want to deploy the job.\n4. If your notebook is parameterized, add parameters.\n5. Enter the name of the [Serverless runtime template](/dataproc-serverless/docs/quickstarts/jupyterlab-sessions#create_a_serverless_runtime_template).\n6. To handle notebook execution failures, enter an integer for **Retry count** and a value (in minutes) for **Retry delay**.\n7. Select which execution notifications to send, and then enter the recipients.\n\n Notifications are sent using the Airflow SMTP configuration.\n8. Select a schedule for the notebook.\n\n9. Click **Create**.\n\nWhen you successfully schedule your notebook, it appears on the list of\nscheduled jobs in your selected Cloud Composer environment.\n\nWhat's next\n-----------\n\n- Try the [BigQuery DataFrames quickstart](/bigquery/docs/dataframes-quickstart).\n- Learn more about the [BigQuery DataFrames Python API](/bigquery/docs/reference/bigquery-dataframes).\n- Use the JupyterLab for [serverless batch and notebook sessions](/dataproc-serverless/docs/quickstarts/jupyterlab-sessions) with Dataproc."]]