You can assign static external IP addresses to your virtual machine (VM) and bare metal instances. You can also change, list, and release static IP addresses for your instances. To reserve a static external IP address, see Reserve a static external IP address.
External IP addresses can be static or ephemeral. If an instance requires a fixed external IP address that does not change, do the following:
- Obtain a static external IP address. You can reserve new external IP addresses or promote existing ephemeral external IP addresses.
- Assign the reserved IP address to an existing instance, or assign it when creating a new instance.
If you require a static IP address on your internal Compute Engine network, see instead Reserve a static internal IP address.
For information about reserving a static external IP address or creating a global external IP address, see Reserve a static external IP address.
Before you begin
- Read about IP addresses.
- Read about quotas and limits for static external IP addresses.
- Read about external IP address pricing.
-
If you haven't already, set up authentication.
Authentication verifies your identity for access to Google Cloud services and APIs. To run
code or samples from a local development environment, you can authenticate to
Compute Engine by selecting one of the following options:
Select the tab for how you plan to use the samples on this page:
Console
When you use the Google Cloud console to access Google Cloud services and APIs, you don't need to set up authentication.
gcloud
-
Install the Google Cloud CLI. After installation, initialize the Google Cloud CLI by running the following command:
gcloud initIf you're using an external identity provider (IdP), you must first sign in to the gcloud CLI with your federated identity.
- Set a default region and zone.
Terraform
To use the Terraform samples on this page in a local development environment, install and initialize the gcloud CLI, and then set up Application Default Credentials with your user credentials.
Install the Google Cloud CLI.
If you're using an external identity provider (IdP), you must first sign in to the gcloud CLI with your federated identity.
If you're using a local shell, then create local authentication credentials for your user account:
gcloud auth application-default login
You don't need to do this if you're using Cloud Shell.
If an authentication error is returned, and you are using an external identity provider (IdP), confirm that you have signed in to the gcloud CLI with your federated identity.
For more information, see Set up authentication for a local development environment.
REST
To use the REST API samples on this page in a local development environment, you use the credentials you provide to the gcloud CLI.
Install the Google Cloud CLI.
If you're using an external identity provider (IdP), you must first sign in to the gcloud CLI with your federated identity.
For more information, see Authenticate for using REST in the Google Cloud authentication documentation.
-
Required roles
To get the permissions that you need to configure and manage static IP addresses, ask your administrator to grant you the following IAM roles on your project:
-
To create and update instances:
Compute Instance Admin (v1) (
roles/compute.instanceAdmin.v1)
For more information about granting roles, see Manage access to projects, folders, and organizations.
These predefined roles contain the permissions required to configure and manage static IP addresses. To see the exact permissions that are required, expand the Required permissions section:
Required permissions
The following permissions are required to configure and manage static IP addresses:
-
compute.instances.updateon the instance -
compute.instances.updateNetworkInterfaceon the instance -
compute.instances.addAccessConfigon the instance -
compute.instances.deleteAccessConfigon the instance -
compute.networks.liston the network -
compute.subnetworks.useon the subnet -
compute.subnetworks.liston the subnet -
To create instances:
compute.instances.createon the project- To use a custom image to create the VM:
compute.images.useReadOnlyon the image - To use a snapshot to create the VM:
compute.snapshots.useReadOnlyon the snapshot - To use an instance template to create the VM:
compute.instanceTemplates.useReadOnlyon the instance template - To assign a legacy network to the VM:
compute.networks.useon the project - To specify a static IP address for the VM:
compute.addresses.useon the project - To assign an external IP address to the VM when using a legacy network:
compute.networks.useExternalIpon the project - To specify a subnet for the VM:
compute.subnetworks.useon the project or on the chosen subnet - To assign an external IP address to the VM when using a VPC network:
compute.subnetworks.useExternalIpon the project or on the chosen subnet - To set VM instance metadata for the VM:
compute.instances.setMetadataon the project - To set tags for the VM:
compute.instances.setTagson the VM - To set labels for the VM:
compute.instances.setLabelson the VM - To set a service account for the VM to use:
compute.instances.setServiceAccounton the VM - To create a new disk for the VM:
compute.disks.createon the project - To attach an existing disk in read-only or read-write mode:
compute.disks.useon the disk - To attach an existing disk in read-only mode:
compute.disks.useReadOnlyon the disk
You might also be able to get these permissions with custom roles or other predefined roles.
Limitations
Only one resource at a time can use a static external IP address.
There is no way to check whether an IP address is static or ephemeral after it has been assigned to a resource. You can compare the IP address against the list of static external IP addresses reserved to that project. Use the
gcloud compute addresses listsub-command to see a list of static external IP addresses available to the project.Each VM can have multiple network interfaces, and each interface can have the following IP addresses assigned according to its stack type:
- IPv4-only interfaces:
- An internal IPv4 address (required)
- An external IPv4 address (optional)
- Dual-stack (IPv4 and IPv6) interfaces:
- An internal IPv4 address (required)
- An external IPv4 address (optional)
- A
/96IPv6 address range, either internal or external, but not both (required)
- IPv6-only interfaces:
- A
/96IPv6 address range, either internal or external, but not both (required)
- A
- IPv4-only interfaces:
You can't unassign or change the external IPv6 address of a VM with an IPv6-only network interface. You can, however, promote an ephemeral external IP address of a resource to a static external IP address so that the address remains reserved even after the resource is deleted.
You cannot change the name of a static IP address.
Note: Network interfaces can receive traffic from
multiple
forwarding rules, which might serve other external IP addresses. Any
number of external IP addresses can reference a network interface through
these forwarding rules, but each network interface can be assigned only one
external IPv4 address and one external /96 IPv6 address range.
For more information about load balancing and forwarding rules, read the load balancing documentation.
View available static external IP addresses
To list static external IP addresses that you have reserved for your project, follow these steps.
Console
In the Google Cloud console, go to the IP addresses page.
Click External IP addresses.
gcloud
Use the gcloud compute addresses list command:
To list all IP addresses, use the following command:
gcloud compute addresses list
To list all global IP addresses, use the following command:
gcloud compute addresses list --global
To list all regional IP addresses in a given region, use the following command:
gcloud compute addresses list \
    --regions=REGION
Replace
REGIONwith the region that you want to list addresses for. You can list addresses of multiple regions by specifying comma-separated region names:gcloud compute addresses list \ --regions=REGION1,REGION2,..REGION_n_
API
To list regional IPv4 or IPv6 addresses, call the
addresses.listmethod:GET https://compute.googleapis.com/compute/v1/projects/PROJECT_ID/regions/REGION/addresses
Replace the following:
PROJECT_ID: the project ID for this requestREGION: the name of the region for this request
To list all addresses in all regions, call the
addresses.aggregatedListmethod:GET https://compute.googleapis.com/compute/v1/projects/PROJECT_ID/aggregated/addresses
To list global IPv4 or IPv6 addresses, call the
globalAddresses.listmethod:GET https://compute.googleapis.com/compute/v1/projects/PROJECT_ID/global/addresses
Replace the following:
PROJECT_ID: the project ID for this request
Go
Java
Python
Configure static external IP addresses
The following sections describe how to configure static external IP addresses for your instances.
Create an instance that uses a static external IP address
After you have reserved a static external IP address, you can assign it to an instance.
Console
In the Google Cloud console, go to the Create an instance page.
To assign a static external IP address to the instance, do the following:
In the navigation menu, click Networking.
In the Network interfaces section, specify the network interfaces that you want for the instance by using the following options:
To add a network interface, click Add a network interface. Then, in the Network list, select a network.
To delete a network interface, click Delete.
Select one of the following options:
To assign a static external IPv4 address, do the following:
- Expand a network interface.
- Select the IP address from the External IPv4 address list.
To assign a static external IPv6 address, do the following:
- Expand a network interface that contains a subnet with an external IPv6 address range.
- Select that subnet from the Subnetwork list.
- For IP stack type, select IPv4 and IPv6 (dual-stack) or IPv6 (single-stack).
- Select the newly reserved external IPv6 address from the External IPv6 address list. Alternatively, select Reserve static external IPv6 address and reserve a new static external IPv6 address.
- For Network Service Tier, select Premium.
To finish modifying the network interface, click Done.
Continue with the instance creation process.
gcloud
You can create an instance and assign a static regional external IP address that you have already reserved.
To assign a static external IPv4 address, do the following:
gcloud compute instances create INSTANCE_NAME \
    --zone=ZONE \
    --address=IPV4_ADDRESS
To assign a static external IPv6 address, do the following:
gcloud compute instances create INSTANCE_NAME \
    --zone=ZONE \
    --subnet=SUBNET \
    --stack-type=STACK_TYPE \
    --external-ipv6-address=IPV6_ADDRESS \
    --external-ipv6-prefix-length=96 \
    --ipv6-network-tier=PREMIUM
Replace the following:
INSTANCE_NAME: the name of the compute instance.ZONE: the zone to create the instance inIPV4_ADDRESS: the IPv4 address to assign to the instance. Use the reserved static external IP address, not the address name.SUBNET: a subnet that contains external IPv6 addressesSTACK_TYPE: the stack type for the instance, eitherIPV4_IPV6(dual-stack) orIPV6_ONLYIPV6_ADDRESS: the IPv6 address to assign to the instance. Use the reserved static external IP address, not the address name.
Terraform
You can use the google_compute_instance resource
to assign an external IP address.
REST
To assign a static external IPv4 address to a new compute instance, do the following:
In your request to create a new instance, explicitly provide the
networkInterfaces[].accessConfigs[].natIPproperty and the external IPv4 address that you want to use, for example:{ "name": "INSTANCE_NAME", "machineType": "zones/ZONE/machineTypes/MACHINE_TYPE", "networkInterfaces": [{ "accessConfigs": [{ "type": "ONE_TO_ONE_NAT", "name": "External NAT", "natIP": "IPV4_ADDRESS" }], "network": "global/networks/default" }], "disks": [{ "autoDelete": "true", "boot": "true", "type": "PERSISTENT", "initializeParams": { "sourceImage": "SOURCE_IMAGE" } }] }Replace the following:
INSTANCE_NAME: the name of the compute instanceZONE: the zone to create the instance inMACHINE_TYPE: Optional: a full or partial URL of the machine type resource to use when creating the instance, in the format:zones/ZONE/machineTypes/MACHINE_TYPEIPV4_ADDRESS: the IPv4 address to assign to the instance. Use the reserved static external IP address, not the address name.SOURCE_IMAGE: a specific version of a public image, such asprojects/debian-cloud/global/images/debian-10-buster-v20200309or an image family, such asprojects/debian-cloud/global/images/family/debian-10
To assign a static external IPv6 address to a new instance, do the following:
In your request to create a new instance, explicitly provide the
networkInterfaces[].ipv6AccessConfigs[].externalIpv6property and the external IPv6 address that you want to use, for example:{ "name": "INSTANCE_NAME", "machineType": "zones/ZONE/machineTypes/MACHINE_TYPE", "networkInterfaces": [{ "ipv6AccessConfigs": [{ "externalIpv6": "IPV6_ADDRESS", "externalIpv6PrefixLength": 96, "name": "external-ipv6-access-config", "networkTier": "PREMIUM", "type": "DIRECT_IPV6" }], "stackType": "STACK_TYPE", "subnetwork":"SUBNETWORK" }], "disks": [{ "autoDelete": "true", "boot": "true", "mode": "READ_WRITE", "type": "PERSISTENT", "initializeParams": { "sourceImage": "SOURCE_IMAGE" }, }], }Replace the following:
INSTANCE_NAME: the name of the compute instanceZONE: the zone to create the instance inMACHINE_TYPE: Optional: a full or partial URL of the machine type resource to use when creating the instance, in the format:zones/ZONE/machineTypes/MACHINE_TYPEIPV6_ADDRESS: the IPv6 address to assign to the instance. Use the reserved static external IP address, not the address name.STACK_TYPE: the stack type for the instance, eitherIPV4_IPV6(dual-stack) orIPV6_ONLYSUBNET: a subnet that contains external IPv6 addressesSOURCE_IMAGE: a specific version of a public image, such as"projects/debian-cloud/global/images/debian-10-buster-v20200309"or an image family, such as"projects/debian-cloud/global/images/family/debian-10"
Go
Java
Python
Change or assign an external IP address to an existing instance
You can change or assign an external IP address, either ephemeral or static, to an existing IPv4-only or dual-stack instance. This procedure is not supported for IPv6-only instances.
A compute instance can have multiple interfaces. A single-stack interface can have one external IP address. A dual-stack interface can have one external IPv4 address and one external IPv6 address. If the instance already has an external IP address, you must remove that address first. Then you can assign a new external IP address to the existing instance.
Console
In the Google Cloud console, go to the VM instances page.
Click the name of the instance that you want to assign an external IP to. The Instance details page displays.
From the Instance details page, complete the following steps:
- Click Edit.
- Expand Network interfaces.
- Select the required external IP address to assign to the instance.
If the instance is IPv4-only and you want to assign an IPv6 address,
you must first change the stack type to dual-stack.
- For External IPv4 address, select either Ephemeral or a static external IPv4 address.
- For External IPv6 address, select either Ephemeral (Automatic), Ephemeral (Custom), or a static external IPv6 address.
- Click Done.
Click Save.
gcloud
Optional: Reserve a static external IP address.
If you want to assign a static external IP address, you must reserve an address and make sure that the address is not in use by another resource. If necessary, follow the instructions to reserve a new static external IP address or to unassign a static external IP address.
If you intend to use an ephemeral external IP address, you can skip this step, and Compute Engine randomly assigns an ephemeral external IP address.
Remove any existing IP address assignment, as described in Unassign a static external IP address.
Assign the new external IP address.
To assign an IPv4 address, use the
instances add-access-configsub-command:Note: Don't replaceIP_ADDRESSwith the name of the static IP address. You must use the actual IP address.gcloud compute instances add-access-config INSTANCE_NAME \ --access-config-name="ACCESS_CONFIG_NAME" --address=IP_ADDRESS
Replace the following:
INSTANCE_NAME: the name of the instance.ACCESS_CONFIG_NAME: the name to call this access config. Make sure to include the full name between quotes.IP_ADDRESS: the IP address to add.
If you want Compute Engine to assign an ephemeral external IP address rather than using a static external IP address, omit the
--address IP_ADDRESSproperty:gcloud compute instances add-access-config INSTANCE_NAME \ --access-config-name="ACCESS_CONFIG_NAME"
To change an instance to dual-stack and assign it an IPv6 address, use the
instance network-interfaces updatesub-command:gcloud compute instances network-interfaces update INSTANCE_NAME \ --network-interface=NIC \ --ipv6-network-tier=PREMIUM \ --stack-type=STACK_TYPE \ --external-ipv6-address=IPV6_ADDRESS \ --external-ipv6-prefix-length=96 \ --zone=ZONE
Replace the following:
INSTANCE_NAME: the name of the instance.NIC: the name of the network interface.STACK_TYPE: the stack type for the instance, which must beIPV4_IPV6. You can't change the stack type to IPV6_ONLY.IPV6_ADDRESS: the IPv6 address to assign to the instance. Specify the first IPv6 address in the/96range.ZONE: the zone of the instance.
REST
You can change the external IPv4 or IPv6 address of an instance by adding a new access configuration for that instance.
Remove any existing IP address assignment, as described in Unassign a static external IP address.
Delete the existing access configuration by making a
POSTrequest to theinstances.deleteAccessConfigmethod.POST https://compute.googleapis.com/compute/v1/projects/PROJECT_ID/zones/ZONE/instances/INSTANCE_NAME/deleteAccessConfig
Add a new access configuration to the network interface of the instance by making a
POSTrequest to theinstances.addAccessConfigmethod.For IPv4 addresses, make the following request:
POST https://compute.googleapis.com/compute/v1/projects/PROJECT_ID/zones/ZONE/instances/INSTANCE_NAME/addAccessConfig
{
"natIP": "IPV4_ADDRESS",
"name": "ACCESS_CONFIG_NAME"
}
For IPv6 addresses, update the
stackTypeof the network interface toIPV4_IPV6and update thenetworkInterfaces[].ipv6AccessConfigs[].externalIpv6property and the external IPv6 address that you want to use.For more information, see Assign a static external IP address to a new instance.
Go
Java
Python
Restrict external IP addresses to specific instances
For certain workloads, you might have essential requirements that include security and network restrictions. For example, you might want to restrict external IP addresses so that only specific compute instances can use them. This option can help to prevent data exfiltration or maintain network isolation. Using an Organization Policy, you can restrict external IP addresses to specific instances with constraints to control use of external IP addresses for your instances within an organization or a project.
The constraint for controlling external IP address on instances is:
constraints/compute.vmExternalIpAccess
To use the constraint, you specify a policy with an allowedList of instances
that can have external IP addresses. If you don't specify a policy, all external
IP addresses are allowed for all instances. When the policy is in place, only
the instances that are listed in the allowedValues list can be assigned an
external IP address, either ephemeral or static, and other
Compute Engine instances in the organization or project that are not
explicitly defined in the policy are prohibited from using external IP
addresses.
Instances are identified in the allow and deny lists using the instance's URI:
projects/PROJECT_ID/zones/ZONE/instances/INSTANCE_NAME
Specifications for restricting external IP addresses
- You can apply this list constraint only to instances.
- You cannot apply the constraint retroactively. All instances that have external IP addresses before you enable the policy retain their external IP addresses.
- This constraint accepts either an
allowedListor adeniedListbut not both in the same policy. - It is up to you or an administrator with the required permissions to manage and maintain the instance lifecycle and integrity. The constraint only verifies the instance's URI, and it does not prevent the instances in the allowlist from being altered, deleted, or recreated.
Permissions needed for restricting external IP addresses
To set a constraint on either the project or the organization level, you must
have been granted the orgpolicy.policyAdmin role on the organization.
Set the policy constraint at the organization level
Console
- Go to the Organizational Policies page.
- If necessary, select the required organization from the project drop-down menu.
- Click Define allowed external IPs for VM instances.
- Click Edit to edit the external IP policy. If you can't access the Edit tool, you don't have the correct permissions.
Select Customize to set the org policy for specific instances.
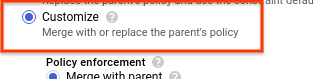
Select the required Policy enforcement and Policy type.
For Policy values, select Custom.
Enter a URI for an instance. The URI must be in the following format:
projects/PROJECT_ID/zones/ZONE/instances/INSTANCE_NAME
Click New policy value and enter URIs for instances as needed.
Click Save to apply the constraint.
gcloud
To set a constraint for external IP access, you first need your organization
ID. You can find the organization ID by running the
organizations list command and
looking for the numeric ID in the response:
gcloud organizations list
The gcloud CLI returns a list of organizations in the following format:
DISPLAY_NAME               ID
example-organization1      29252605212
example-organization2      1234567890
Use the
gcloud resource-manager org-policies set-policy command
to set the policy. You need to provide your policy as a JSON file.
Create a JSON file in the following format:
{
"constraint": "constraints/compute.vmExternalIpAccess",
"listPolicy": {
  "allowedValues": [
     "projects/PROJECT_ID/zones/ZONE/instances/INSTANCE_NAME",
     "projects/PROJECT_ID/zones/ZONE/instances/INSTANCE_NAME",
     "projects/PROJECT_ID/zones/ZONE/instances/INSTANCE_NAME"
  ]
 }
}
Replace the following:
PROJECT_ID: the project ID for this request, such asexample-project. Note that this is different than setting up organization policies, which require the organization numeric ID.ZONE: the zone of the instanceINSTANCE_NAME: the name of the instance
Alternatively, you can specify a deniedValues list to indicate instances
that you explicitly want to prohibit from having an external IP address.
Any instance not on the list would implicitly be allowed to have an
external IP address. You can only specify either allowedValues or
deniedValues but not both.
Then, pass in the file with your request:
gcloud resource-manager org-policies set-policy MY_POLICY.JSON --organization=ORGANIZATION_ID
Replace ORGANIZATION_ID with the numeric ID of the
organization.
If you don't want any instances to have external IP access, you can set a
policy with allValues set to DENY:
{
  "constraint": "constraints/compute.vmExternalIpAccess",
  "listPolicy": {
    "allValues": "DENY"
  }
}
REST
Use the
setOrgPolicy() API
to define your constraint. The instances in the allowedValue list you
specify are allowed to have external IP addresses. Alternatively, you can
specify a deniedValues list to express instances that you explicitly
want to prohibit from having an external IP address. Any instance not on the
list would implicitly be allowed to have an external IP address. You can
only specify either allowedValues or deniedValues but not both.
For example, the following is a request to apply the
compute.vmExternalIpAccess constraint to an organization where instances
from certain projects within the organization are allowed to have
external IP addresses:
POST https://cloudresourcemanager.googleapis.com/v1/organizations/ORGANIZATION_ID:setOrgPolicy
where ORGANIZATION_ID is the numeric ID of the
organization.
Now, in your request body, provide the policy for this constraint:
{
  "policy": {
    "constraint": "constraints/compute.vmExternalIpAccess",
    "listPolicy": {
      "allowedValues": [
        "projects/PROJECT_ID/zones/ZONE/instances/INSTANCE_NAME",
        "projects/PROJECT_ID/zones/ZONE/instances/INSTANCE_NAME",
        "projects/PROJECT_ID/zones/ZONE/instances/INSTANCE_NAME"
        ]
      }
    }
 }
If you don't want any instances to have external IP access, you can set a
policy with allValues set to DENY:
{
  "policy": {
    "constraint": "constraints/compute.vmExternalIpAccess",
    "listPolicy": {
      "allValues": "DENY"
      }
    }
 }
Set the policy at the project level
Setting a policy at the project level overrides the policy at the organization
level. For example, if the organization level has example-vm-1 on the
allowedValues list but the policy at the project level has the same instance
on the deniedValues list, the instance wouldn't be allowed to have an
external IP address.
Console
Follow the same process documented under Set a policy constraint at the organization level but choose your project from the project selector instead of the organization.
gcloud
Use the
gcloud resource-manager org-policies set-policy command
to set the policy. You need to provide your policy as a JSON file. Create a
JSON file in the following format:
{
 "constraint": "constraints/compute.vmExternalIpAccess",
 "listPolicy": {
  "allowedValues": [
   "projects/PROJECT_ID/zones/ZONE/instances/INSTANCE_NAME"
  ]
 }
}
Replace the following:
PROJECT_ID: the project ID for this request, such asexample-project. Note that this is different than setting up organization policies, which require the organization numeric ID.ZONE: the zone of the instance.INSTANCE_NAME: the name of the instance.
Alternatively, you can specify a deniedValues list of instances that you
explicitly want to prohibit from having an external IP address. Any instance
not on the list would implicitly be allowed to have an external IP address.
You can only specify either allowedValues or deniedValues but not both.
Then, pass in the file with your request:
gcloud resource-manager org-policies set-policy MY_POLICY.JSON --project=example-project
REST
Use the
setOrgPolicy API
to define your constraint. The instances in the allowedValue list you
specify are allowed to have external IP addresses. Alternatively, you can
specify a deniedValues list to express instances that you explicitly want
to prohibit from having an external IP address. Any instance not on the
list is implicitly allowed to have an external IP address. You can specify
only allowedValues or deniedValues but not both.
For example, the following is a request to set the
compute.vmExternalIpAccess constraint on a project to allow specific
instances to have external IP addresses:
POST https://cloudresourcemanager.googleapis.com/v1/projects/PROJECT_ID:setOrgPolicy
Replace PROJECT_ID with the project ID for this
request.
The request body contains the policy for this constraint:
{
  "policy": {
    "constraint": "constraints/compute.vmExternalIpAccess",
    "listPolicy": {
      "allowedValues": [
        "projects/PROJECT_ID/zones/ZONE/instances/INSTANCE_NAME"
      ]
    }
  }
}
Best practices for restricting external IP addresses
Avoid using the
deniedValueslist with this constraint. If you define values in thedeniedValueslist, it means that only the instances in thedeniedValueslist are restricted from using external IP addresses. This could be a security concern if you want control over exactly which instances can have external IP addresses. If you want to remove certain instances from theallowedValueslist, update the existing policy to remove the instances from theallowedListrather than putting the instances into thedeniedValueslist at a lower hierarchy.If you want to set a policy over a large part of the resource hierarchy but exempt certain projects, restore the default policy by using the
setOrgPolicymethod by specifying therestoreDefaultobject to allow all instances in the projects to be associated with external IP addresses. The current policies for projects are not affected by the default setting.Use the org policy together with IAM roles to better control your environment. This policy applies to only instances but if you want to better control and restrict external IP addresses on network devices, you can grant the
compute.networkAdminrole to the appropriate parties.Any services and products that are running on Compute Engine within the organization or project with the policy enabled are subject to this org policy. Specifically, services such as Google Kubernetes Engine, Dataflow, Dataproc, and Cloud SQL are affected by this policy. If this is an issue, Google recommends that you set up other services and products in a different project that does not have the organization policy applied, and use Shared VPC, if needed.
Manage static external IP addresses
The following sections describe how to manage static external IP addresses for your instances.
Determine if an internal IP address is ephemeral or static
Static and ephemeral internal IP addresses behave and appear the same in most contexts. However, with static internal IP addresses, you can use the same IP address for the same resource even if you delete and re-create the resource. In general, an ephemeral IP address is released if you stop or delete the resource.
To determine if an address is static or ephemeral, do the following:
In the Google Cloud console, go to the IP addresses page.
Find the address in the list and check the Type column for the type of IP address.
Unassign a static external IP address
Unassigning an IP address removes it from the resource but keeps the IP address reserved. After the IP address is unassigned, you can reassign the IP address to another resource. This procedure is supported for dual-stack instances, but not IPv6-only instances.
You can also unassign the IPv4 or IPv6 address by deleting the instance.
Console
In the Google Cloud console, go to the IP addresses page.
Click External IP addresses.
Select the static IP address that you want to unassign.
Click View actions and select the Reassign to another resource option.
From the Attach to drop-down list, select None.
Click OK.
gcloud
Check if a static IP address is in use by using the
gcloud compute addresses listcommand:gcloud compute addresses list
The output is similar to the following:
NAME                      REGION    ADDRESS                  STATUS
example-address-ipv4      REGION    198.51.100.1             RESERVED
example-address-new-ipv4  REGION    203.0.113.1              IN_USE
example-address-ipv6      REGION    2001:db8:1:1:1:1:1:1     RESERVED
example-address-new-ipv6  REGION    2001:db8:4:4:4:4:4:4     IN_USE
- If the IP address is not in use, the status is
RESERVED. - If the IP address is in use, the status is
IN_USE.
- If the IP address is not in use, the status is
Retrieve the name of the instance that is using the IP address:
gcloud compute addresses describe ADDRESS_NAME \
  --region=REGION
Replace the following:
ADDRESS_NAME: the name of the IPv6 address resource.REGION: the region of the IPv6 address resource.
The output is similar to the following:
address: IP_ADDRESS
addressType: EXTERNAL
...
region: https://www.googleapis.com/compute/v1/projects/PROJECT/regions/REGION
selfLink: https://www.googleapis.com/compute/v1/projects/PROJECT/regions/REGION/addresses/ADDRESS_NAME
status: IN_USE
subnetwork: https://www.googleapis.com/compute/v1/projects/PROJECT/regions/REGION/subnetworks/SUBNET
users:
- https://www.googleapis.com/compute/v1/projects/PROJECT/zones/ZONE/instances/INSTANCE_NAME
The
usersfield displays the name of the instance that is using the IP address.Unassign the IP address from the instance.
To unassign an IPv4 address, delete the instance's access config file:
Get the name of the access config to delete. To get the name, use the
gcloud compute instances describecommand. ReplaceINSTANCE_NAMEwith the name of the instance.gcloud compute instances describe INSTANCE_NAME
The access config appears in the following format:
networkInterfaces: - accessConfigs: - kind: compute#accessConfig name: external-nat natIP: 203.0.113.1 type: ONE_TO_ONE_NATDelete the access config by using the
gcloud compute instances delete-access-configcommand:gcloud compute instances delete-access-config INSTANCE_NAME \ --access-config-name="ACCESS_CONFIG_NAME"
Replace the following:
INSTANCE_NAME: the name of the instance.ACCESS_CONFIG_NAME: the name of the access config to delete. Be sure to include the full name between quotes.
To unassign an IPv6 address range, use the
instance network-interfaces updatecommand:gcloud compute instances network-interfaces update INSTANCE_NAME \ --network-interface=nic0 \ --stack-type=IPV4_ONLY \ --zone=ZONE
Replace the following:
INSTANCE_NAME: the name of the instance that is using the IP address.ZONE: the zone of the instance.
Check that your static external IP address is now available and marked as
RESERVEDinstead ofIN_USE.gcloud compute addresses list \ --filter="ADDRESS_NAME AND region=REGION"
Replace the following:
ADDRESS_NAME: the name of the IP address resource.REGION: the region of the IP address resource.
Now that your static external IP address is available, you can choose to assign it to another instance.
REST
To unassign a static external IPv4 or IPv6 address, perform the following steps:
For IPv4 addresses, delete the access configuration attached to the instance that's using the address.
To check the access configuration details of a instance, make a
GETrequest to theinstances.getmethod.GET https://compute.googleapis.com/compute/v1/projects/PROJECT_ID/zones/ZONE/instances/INSTANCE_NAME
Delete the existing access configuration by making a
POSTrequest to theinstances.deleteAccessConfigmethod.POST https://compute.googleapis.com/compute/v1/projects/PROJECT_ID/zones/ZONE/instances/INSTANCE_NAME/deleteAccessConfig
Replace the following:
PROJECT_ID: the project ID for this requestZONE: the zone where the instance is locatedINSTANCE_NAME: the name of the instance
For IPv6 addresses, update the stack type of the network interface for the instance where the IPv6 address is attached.
Make a
PATCHrequest to theinstances.updateNetworkInterfacemethod.In the request body, update the value of the
stackTypefield toIPV4_ONLY.For example:
PATCH https://compute.googleapis.com/compute/v1/projects/PROJECT_ID/zones/ZONE/instances/INSTANCE_NAME/updateNetworkInterface

{
  "networkInterfaces": [{
    ...
    "stackType" : "IPV4_ONLY"
    ...
    }]
}
Java
Python
Release a static external IP address
If you no longer need a static external IPv4 or IPv6 address, you can release the IP address by deleting the IP address resource. Deleting an instance doesn't automatically release a static external IP address. You must manually release static external IP addresses when you no longer require them.
To release a static external IP address, see Release a static external IP address in the VPC documentation.
What's next
- Learn more about IP addresses.
- Learn more about networks and firewalls.
- Learn how to address Compute Engine instances using internal DNS.
- Review VPC pricing.