Load Salesforce data into BigQuery
You can load data from your Salesforce Sales Account to BigQuery using the BigQuery Data Transfer Service for Salesforce connector. With the BigQuery Data Transfer Service, you can schedule recurring transfer jobs that add your latest data from your Salesforce Sales Account to BigQuery.
Limitations
Salesforce data transfers are subject to the following limitations:
- The Salesforce connector only supports transfers from a Salesforce Sales Account.
- The Salesforce connector only supports fields included in Salesforce Bulk API V1 version 64.0. Some fields that were included in previous versions of the Salesforce Bulk API might not be supported. For more information about these changes to the Salesforce connector, see Salesforce Bulk API.
- The Salesforce connector uses Salesforce Bulk API V1 to connect
to the Salesforce endpoint to retrieve data.
- The Salesforce connector only supports the Salesforce Bulk API V1 to connect to the Salesforce instance, and only supports the transfer of entities which are supported by the Salesforce Bulk API. For more information about what entities are supported, see 'Entity is not supported by the Bulk API' error.
- The Salesforce connector does not support the transfer of
the following objects that have binary fields.
AttachmentContentVersionDocumentStaticResourceScontrolEmailCaptureMailMergeTemplate
- The minimum interval time between recurring data transfers is 15 minutes. The default interval for a recurring transfer is 24 hours.
- Due to Salesforce processing limits, scheduling too many data
transfers at a time can lead to delays or failures. We recommend that you limit
Salesforce data transfers to the following:
- Have no more than 10 assets per transfer configuration.
- Across your different transfer configurations, have no more than 10 simultaneous transfer runs at a time.
- A single transfer configuration can only support one data transfer run at a given
time. In the case where a second data transfer is scheduled to run before the
first transfer is completed, then only the first data transfer completes while
any other data transfers that overlap with the first transfer is skipped.
- To avoid skipped transfers within a single transfer configuration, we recommend that you increase the duration of time between large data transfers by configuring the Repeat frequency.
- If your configured network attachment and virtual machine (VM) instance are located in different regions, there might be cross-region data movement when you transfer data from Salesforce.
Before you begin
The following sections describe the steps that you need to take before you create a Salesforce data transfer.
Create a Salesforce Connected App
You must create a Salesforce Connected App with the following required configurations:
- Configure the Basic Information in the Connected App. The Connected App Name and Contact Email fields are required for a Salesforce transfer.
- Enable OAuth Settings
with the following configurations:
- Select the Enable OAuth Settings checkbox.
- In the Callback URL field, enter the following:
- For a production environment, enter
https://login.salesforce.com/services/oauth2/token. - For a sandbox environment, enter
https://test.salesforce.com/services/oauth2/token.
- For a production environment, enter
- Verify that the Issue JSON Web Token(JWT)-based access tokens for named users checkbox isn't selected.
- In the Selected OAuth Scopes section, select Manage user data via APIs (api).
- Clear the Required Proof Key for Code Exchange (PKCE) Extension for Supported Authorization Flows checkbox.
- Select the Enable Client Credentials Flow, then click OK on the notice that appears.
Once you have configured the Connected App with the required configurations, click Save. You are redirected to the detail page of your newly created Connected App.
Once you have created the Connected App, you must also configure the client credentials flow by doing the following:
- Click Setup.
- In the search bar, search for Connected Apps.
- Click Manage Apps > Connected Apps. If you are using the Salesforce Lightning Experience, click Manage Connected Apps.
- On the Connected App that you have created, click Edit.
- The App details page appears. In the Client Credentials Flow section, enter your username in the Run As field. You can use the finder tool in this field to ensure that you have selected the correct user.
- Click Save.
Required Salesforce information
You must have the following Salesforce information when creating a Salesforce data transfer:
| Parameter Name | Description |
|---|---|
myDomain |
Your My Domain in Salesforce. |
clientId |
Consumer Key of the Salesforce connected application. |
clientSecret |
OAuth Client Secret or Consumer Secret of the Salesforce connected application. |
To obtain your myDomain, clientID, and clientSecret values,
select one of the following options:
Salesforce Classic
Retrieve myDomain details
To find your myDomain, do the following:
- Sign in to the Salesforce platform.
- Click Setup.
- In the search bar, search for My Domain.
- In the search results, click Domain Management > My Domain.
In the My Domain Details section, your myDomain appears as
the prefix in Current My Domain URL. For example, if the My Domain URL is
example.my.salesforce.com, the myDomain value to use is example.
Retrieve ClientId and ClientSecret details
To find your ClientId and ClientSecret values, do the following:
- Sign in to the Salesforce platform.
- Click Setup.
- In the search bar, search for Apps.
- In the Build section in the search results, click Create > Apps.
- Click a Connected App Name.
- In the Connected Apps details page, click Manage Consumer Details.
- Verify your identity using one of the registered methods. You can view the consumer details page for up to five minutes before you're prompted to verify your identity again.
- In the Consumer Details page, the Consumer Key is your
ClientIdvalue. The Customer Secret is yourClientSecretvalue.
Salesforce Lightning Experience
Retrieve myDomain details
To find your myDomain, do the following:
- Sign in to the Salesforce platform.
- Click Setup.

- In the search bar, search for My Domain.
- In the search results, click Company Settings > My Domain.
In the My Domain Details section, your myDomain appears as
the prefix in Current My Domain URL. For example, if the My Domain URL is
example.my.salesforce.com, the myDomain value to use is example.
Retrieve ClientId and ClientSecret details
- Sign in to the Salesforce platform.
- Click Setup.
- In the search bar, search for Apps.
- In the search results, click Apps > App Manager.
- Find a connected app, then click View.
- Click Manage Consumer Details.
- Verify your identity using one of the registered methods. You can view the consumer details page for up to five minutes before you're prompted to verify your identity again.
- In the Consumer Details page, the Consumer Key is your
ClientIdvalue. The Customer Secret is yourClientSecretvalue.
Setup IP allowlist for Salesforce transfers
You must configure your Google Cloud environment and your Salesforce account to add specific IP addresses to the allowlist for data transfers. This ensures that Salesforce only accepts connections from a trusted, static IP address.
To do so, you must first set up and configure your Google Cloud network to use a static IP address:
- Set up a public network address translation (NAT) with a static IP address within your Virtual Private Cloud network. The CloudNAT must be configured within the same region as the destination dataset for this data transfer.
- Set up a network attachment within the same VPC network. This resource is used by the BigQuery Data Transfer Service to access private services.
Next, you must configure the trusted IP ranges in Salesforce. When adding the range of the IP address, use the static IP address from your Google Cloud public NAT for both the beginning and ending IP addresses for the IP range.
Once you have set up the IP ranges, you can now specify the static IP when you set up your transfer configuration by selecting your network attachment in the Network attachment field.
BigQuery prerequisites
- Verify that you have completed all actions required to enable the BigQuery Data Transfer Service.
- Create a BigQuery dataset to store your data.
- If you intend to set up transfer run notifications for Pub/Sub,
ensure that you have the
pubsub.topics.setIamPolicyIdentity and Access Management (IAM) permission. Pub/Sub permissions are not required if you only set up email notifications. For more information, see BigQuery Data Transfer Service run notifications.
Required BigQuery roles
To get the permissions that
you need to create a BigQuery Data Transfer Service data transfer,
ask your administrator to grant you the
BigQuery Admin (roles/bigquery.admin)
IAM role on your project.
For more information about granting roles, see Manage access to projects, folders, and organizations.
This predefined role contains the permissions required to create a BigQuery Data Transfer Service data transfer. To see the exact permissions that are required, expand the Required permissions section:
Required permissions
The following permissions are required to create a BigQuery Data Transfer Service data transfer:
-
BigQuery Data Transfer Service permissions:
-
bigquery.transfers.update -
bigquery.transfers.get
-
-
BigQuery permissions:
-
bigquery.datasets.get -
bigquery.datasets.getIamPolicy -
bigquery.datasets.update -
bigquery.datasets.setIamPolicy -
bigquery.jobs.create
-
You might also be able to get these permissions with custom roles or other predefined roles.
For more information, see Grant bigquery.admin access.
Set up a Salesforce data transfer
Add Salesforce data into BigQuery by setting up a transfer configuration using one of the following options:
Console
Go to the Data transfers page in the Google Cloud console.
Click Create transfer.
In the Source type section, for Source, choose Salesforce.
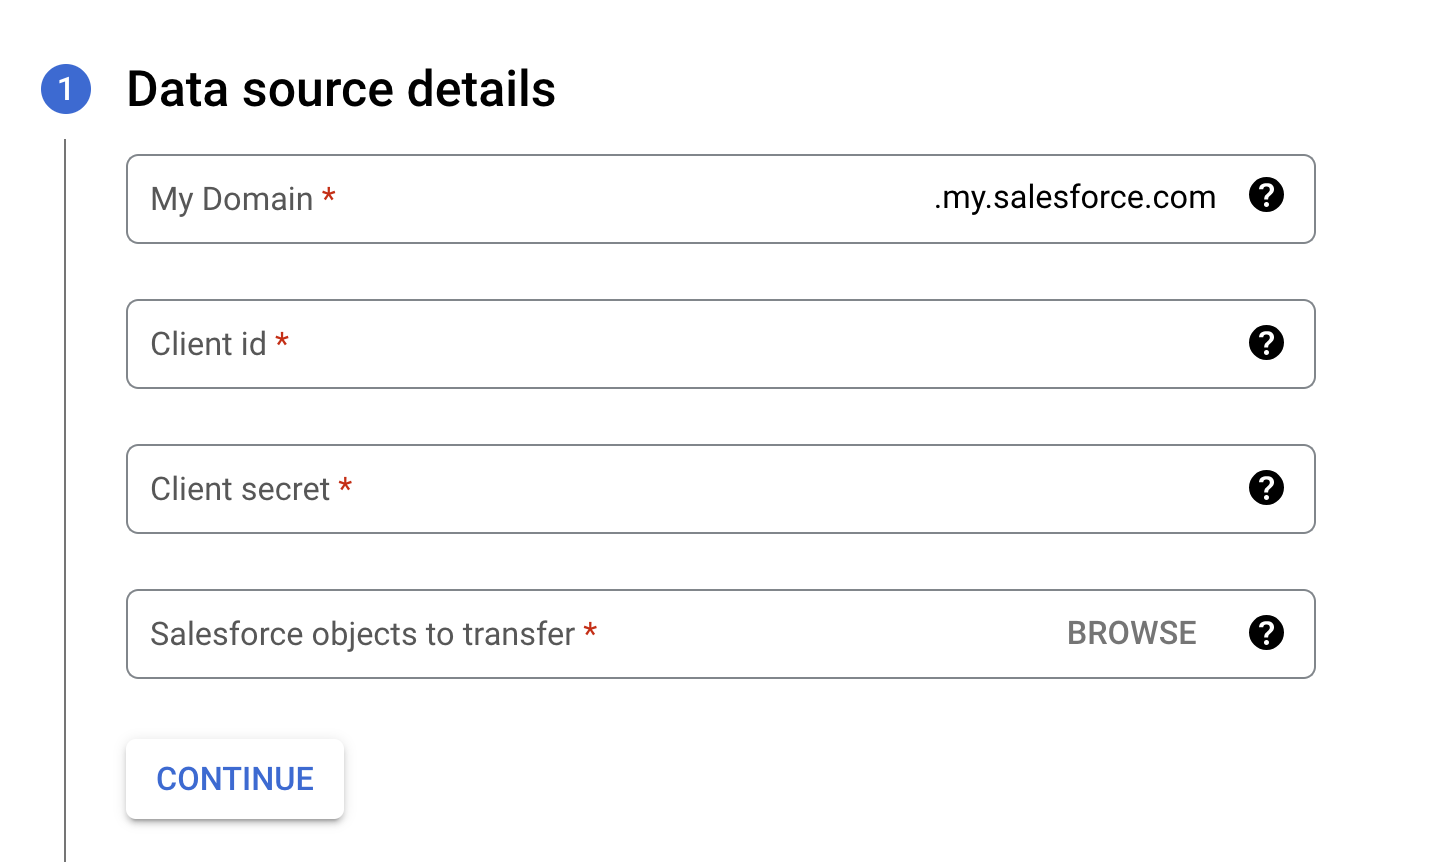
In the Data source details section, do the following:
- For Network attachment, select a network attachment from the list. For more information, see Setup IP allowlist for Salesforce transfers
- For My Domain, enter your Salesforce My Domain.
- For Client ID, enter the Salesforce connected application Consumer Key.
- For Client secret, enter the Salesforce connected application Consumer Secret.
For Salesforce objects to transfer, click Browse to select any objects to be transferred to the BigQuery destination dataset. You can also manually enter any objects to include in the data transfer in this field.
In the Destination settings section, for Dataset, choose the dataset that you created to store your data.
In the Transfer config name section, for Display name, enter a name for the data transfer.
In the Schedule options section:
- In the Repeat frequency list, select an option to specify how often this data transfer runs. To specify a custom repeat frequency, select Custom. If you select On-demand, then this transfer runs when you manually trigger the transfer.
- If applicable, select either Start now or Start at set time, and provide a start date and run time.
Optional: In the Notification options section, do the following:
- To enable email notifications, click the Email notification toggle. When you enable this option, the transfer administrator receives an email notification when a transfer run fails.
- To enable Pub/Sub transfer run notifications for this transfer, click the Pub/Sub notifications toggle. You can select your topic name, or you can click Create a topic to create one.
Click Save.
bq
Enter the bq mk command
and supply the transfer creation flag
--transfer_config:
bq mk
    --transfer_config
    --project_id=PROJECT_ID
    --data_source=DATA_SOURCE
    --display_name=NAME
    --target_dataset=DATASET
    --params='PARAMETERS'
Where:
- PROJECT_ID (optional): your Google Cloud project ID.
If
--project_idisn't supplied to specify a particular project, the default project is used. - DATA_SOURCE: the data source —
salesforce. - NAME: the display name for the data transfer configuration. The transfer name can be any value that lets you identify the transfer if you need to modify it later.
- DATASET: the target dataset for the transfer configuration.
PARAMETERS: the parameters for the created transfer configuration in JSON format. For example:
--params='{"param":"param_value"}'. The following are the parameters for a Salesforce data transfer:connector.authentication.oauth.clientId: The Consumer Key of the Salesforce connected application.connector.authentication.oauth.clientSecret: OAuth Client Secret or Consumer Secret of the Salesforce connected application.connector.authentication.oauth.myDomain: the Salesforce My Domain. For example, if your domain URL isexample.my.salesforce.com, then the value isexample.assets: the path to the Salesforce objects to be transferred to BigQuery.
For example, the following command creates a Salesforce data transfer in the default project with all the required parameters:
bq mk
    --transfer_config
    --target_dataset=mydataset
    --data_source=salesforce
    --display_name='My Transfer'
    --params='{"assets":["Account"],
        "connector.authentication.oauth.clientId": "1234567890",
        "connector.authentication.oauth.clientSecret":"ABC12345",
        "connector.authentication.oauth.myDomain":"MyDomainName",}'
API
Use the projects.locations.transferConfigs.create
method and supply an instance of the TransferConfig
resource.
To manually run a data transfer outside of your regular schedule, you can start a backfill run.
Data type mapping
The following table maps Salesforce data types to the corresponding BigQuery data types:
| Salesforce data type | BigQuery data type |
|---|---|
_bool |
BOOLEAN |
_int |
INTEGER |
_long |
INTEGER |
_double |
FLOAT |
currency |
FLOAT |
percent |
FLOAT |
geolocation (latitude) |
FLOAT |
geolocation (longitude) |
FLOAT |
date |
DATE |
datetime |
TIMESTAMP |
time |
TIME |
picklist |
STRING |
multipicklist |
STRING |
combobox |
STRING |
reference |
STRING |
base64 |
STRING |
textarea |
STRING |
phone |
STRING |
id |
STRING |
url |
STRING |
email |
STRING |
encryptedstring |
STRING |
datacategorygroupreference |
STRING |
location |
STRING |
address |
STRING |
anyType |
STRING |
Pricing
For pricing information about Salesforce transfers, see Data Transfer Service pricing.
Troubleshoot transfer setup
If you are having issues setting up your data transfer, see Salesforce transfer issues.
What's next
- For an overview of the BigQuery Data Transfer Service, see Introduction to BigQuery Data Transfer Service.
- For information on using transfers including getting information about a transfer configuration, listing transfer configurations, and viewing a transfer's run history, see Working with transfers.
- Learn how to load data with cross-cloud operations.