Overview: Migrate data warehouses to BigQuery
This document discusses the general concepts that apply to any data warehousing technology, and it describes a framework that you can use to organize and structure your migration to BigQuery.
Terminology
We use the following terminology when discussing data warehouse migration:
- Use case
-
A use case consists of all the
datasets, data processing, and system and user interactions required in order
to achieve business value, such as tracking sales volumes for a product over
time. In data warehousing, the use case often consists of:
- Data pipelines that ingest raw data from various data sources, such as customer relationship management (CRM) database.
- The data stored in the data warehouse.
- Scripts and procedures to manipulate and further process and analyze the data.
- A business application that reads or interacts with the data.
- Workload
-
A set of use cases that are connected and have shared dependencies. For
example, a use case might have the following relationships and dependencies:
- Purchase reporting can stand alone and is useful for understanding spendings and requesting discounts.
- Sales reporting can stand alone and is useful for planning marketing campaigns.
- Profit and loss reporting, however, is dependent on both purchases and sales, and is useful for determining the company's value.
- Business application
- A system that end users interact with—for example, a visual report or dashboard. A business application can also take the form of an operational data pipeline or feedback loop. For example, after product price changes have been calculated or predicted, an operational data pipeline might update the new product prices in a transactional database.
- Upstream process
- The source systems and the data pipelines that load data into the data warehouse.
- Downstream process
- The scripts, procedures, and business applications that are used to process, query, and visualize the data in the data warehouse.
- Offload migration
-
A migration strategy that aims either to get the use case working for the
end user in the new environment as quickly as possible, or to take advantage
of extra capacity available in the new environment. Use cases are offloaded
by doing the following:
- Copying and then synchronizing the schema and data from the legacy data warehouse.
- Migrating the downstream scripts, procedures, and business applications.
Migration offloading can increase the complexity and work involved in migrating data pipelines.
- Full migration
- A migration approach similar to an offload migration, but instead of copying and then synchronizing the schema and data, you configure the migration to ingest data directly into the new cloud data warehouse from the upstream source systems. In other words, the data pipelines required for the use case are also migrated.
- Enterprise data warehouse (EDW)
- A data warehouse that consists not only of an analytical database, but multiple critical analytical components and procedures. These include data pipelines, queries, and business applications that are required in order to fulfill the organization's workloads.
- Cloud data warehouse (CDW)
- A data warehouse that has the same characteristics as an EDW, but runs on a fully managed service in the cloud—in this case, BigQuery.
- Data pipeline
- A process that connects data systems through a series of functions and tasks that perform various types of data transformation. For details, see What is a data pipeline? in this series.
Why migrate to BigQuery?
Over the past few decades, organizations have mastered the science of data warehousing. They have increasingly applied descriptive analytics to large quantities of stored data, gaining insight into their core business operations. Conventional Business Intelligence (BI), which focuses on querying, reporting, and Online Analytical Processing, might have been a differentiating factor in the past, either making or breaking a company, but it's no longer sufficient.
Today, not only do organizations need to understand past events using descriptive analytics, they need predictive analytics, which often uses machine learning (ML) to extract data patterns and make probabilistic claims about the future. The ultimate goal is to develop prescriptive analytics that combine lessons from the past with predictions about the future to automatically guide real-time actions.
Traditional data warehouse practices capture raw data from various sources, which are often Online Transactional Processing (OLTP) systems. Then, a subset of data is extracted in batches, transformed based on a defined schema, and loaded into the data warehouse. Because traditional data warehouses capture a subset of data in batches and store data based on rigid schemas, they are unsuitable for handling real-time analysis or responding to spontaneous queries. Google designed BigQuery in part in response to these inherent limitations.
Innovative ideas are often slowed by the size and complexity of the IT organization that implements and maintains these traditional data warehouses. It can take years and substantial investment to build a scalable, highly available, and secure data warehouse architecture. BigQuery offers sophisticated software as a service (SaaS) technology that can be used for serverless data warehouse operations. This lets you focus on advancing your core business while delegating infrastructure maintenance and platform development to Google Cloud.
BigQuery offers access to structured data storage, processing, and analytics that's scalable, flexible, and cost effective. These characteristics are essential when your data volumes are growing exponentially—to make storage and processing resources available as needed, as well as to get value from that data. Furthermore, for organizations that are just starting with big data analytics and machine learning, and that want to avoid the potential complexities of on-premises big data systems, BigQuery offers a pay-as-you-go way to experiment with managed services.
With BigQuery, you can find answers to previously intractable problems, apply machine learning to discover emerging data patterns, and test new hypotheses. As a result, you have timely insight into how your business is performing, which enables you to modify processes for better results. In addition, the end user's experience is often enriched with relevant insights gleaned from big data analysis, as we explain later in this series.
What and how to migrate: The migration framework
Undertaking a migration can be a complex and lengthy endeavor. Therefore, we recommend adhering to a framework to organize and structure the migration work in phases:
- Prepare and discover: Prepare for your migration with workload and use case discovery.
- Plan: Prioritize use cases, define measures of success, and plan your migration.
- Execute: Iterate through the steps for migration, from assessment to validation.
Prepare and discover
In the initial phase, the focus is on preparation and discovery. It's about affording yourself and your stakeholders an early opportunity to discover the existing use cases and raise initial concerns. Importantly, you also conduct an initial analysis around the expected benefits. These include performance gains (for example, improved concurrency) and reductions in total cost of ownership (TCO). This phase is crucial in helping you establish the value of the migration.
A data warehouse typically supports a wide range of use cases and has a large number of stakeholders, from data analysts to business decision-makers. We recommend that you involve representatives from these groups to get a good understanding of which use cases exist, whether these use cases perform well, and whether stakeholders are planning new use cases.
The discovery phase process consists of the following tasks:
- Examine the value proposition of BigQuery and compare it to that of your legacy data warehouse.
- Perform an initial TCO analysis.
- Establish which use cases are affected by the migration.
- Model the characteristics of the underlying datasets and data pipelines you want to migrate in order to identify dependencies.
To get insights into the use cases, you can develop a questionnaire to gather information from your subject matter experts (SMEs), end users, and stakeholders. The questionnaire should gather the following information:
- What is the use case's objective? What is the business value?
- What are the non-functional requirements? Data freshness, concurrent usage, and so on.
- Is the use case part of a bigger workload? Is it dependent on other use cases?
- Which datasets, tables, and schemas underpin the use case?
- What do you know about the data pipelines feeding into those datasets?
- Which BI tooling, reports, and dashboards are currently used?
- What are the current technical requirements around operational needs, performance, authentication, and network bandwidth?
The following diagram shows a high-level legacy architecture before the migration. It illustrates the catalog of available data sources, legacy data pipelines, legacy operational pipelines and feedback loops, and legacy BI reports and dashboards that are accessed by your end users.

Plan
The planning phase is about taking the input from the preparation and discovery phase, assessing that input, and then using it to plan for the migration. This phase can be broken down into the following tasks:
Catalog and prioritize use cases
We recommend that you break your migration process into iterations. You catalog both existing and new use cases and assign them a priority. For details, see the Migrate using an iterative approach and Prioritize use cases sections of this document.
Define measures of success
It's helpful to define clear measures of success such as key performance indicators (KPIs), ahead of the migration. Your measures will allow you to assess the migration's success at each iteration. This in turn lets you make improvements to the migration process in later iterations.
Create a definition of "done"
With complex migrations, it isn't necessarily obvious when you've finished migrating a given use case. Therefore, you should outline a formal definition of your intended end state. This definition should be generic enough so that it can be applied to all use cases that you want to migrate. The definition should act as a set of minimum criteria for you to consider the use case to be fully migrated. This definition typically includes checkpoints to make sure that the use case has been integrated, tested, and documented.
Design and propose a proof-of-concept (POC), short-term state, and ideal end state
After you've prioritized your use cases, you can start to think of them over the entire period of the migration. Consider the first use-case migration as a proof of concept (PoC) to validate the initial migration approach. Consider what is achievable within the first few weeks to months as the short-term state. How will your migration plans affect your users? Will they have a hybrid solution, or can you migrate an entire workload for a subset of users first?
Create time and cost estimates
To ensure a successful migration project, it's important to produce realistic time estimates. To achieve this, engage with all the relevant stakeholders to discuss their availability and agree on their level of engagement throughout the project. This will help you estimate labor costs more accurately. To estimate costs relating to projected cloud resource consumption, see Estimating storage and query costs and Introduction to controlling BigQuery costs in the BigQuery documentation.
Identify and engage a migration partner
The BigQuery documentation describes many tools and resources you can use to conduct the migration. However, it can be challenging to perform a large, complex migration on your own if you do not have any prior experience or do not have all the required technical expertise inside your organization. Therefore we recommend that from the outset you identify and engage a migration partner. For more details, see our global partner and consulting service programs.
Migrate using an iterative approach
When migrating a large data warehousing operation to the cloud, it's a good idea to take an iterative approach. Therefore we recommend that you make the transition to BigQuery in iterations. Dividing the migration effort into iterations makes the overall process easier, reduces risk, and provides opportunities for learning and for improving after each iteration.
An iteration consists of all the work required to offload or fully migrate one or more related use cases within a bound period of time. You can think of an iteration as a sprint cycle in the agile methodology, consisting of one or more user stories.
For convenience and ease of tracking, you might consider associating an individual use case with one or more user stories. For example, consider the following user story: "As a pricing analyst, I want to analyze product price changes over the last year so that I can calculate future prices."
The corresponding use case might be:
- Ingesting the data from a transactional database which stores products and prices.
- Transforming the data into a single time series for each product and inputing any missing values.
- Storing the results in one or more tables in the data warehouse.
- Making the results available through a Python notebook (the business application).
The business value of this use case is to support pricing analysis.
As with most use cases, this use case probably will support multiple user stories.
An offloaded use case will likely be followed by a subsequent iteration to fully migrate the use case. Otherwise, you might still have a dependency on the existing, legacy data warehouse, because the data is copied from there. The subsequent full migration is the delta between the offload and a full migration that hasn't been preceded by an offload—in other words, the migration of the data pipeline(s) to extract, transform, and load the data into the data warehouse.
Prioritize use cases
Where you start and end your migration depends on your specific business needs. Deciding the order in which you migrate use cases is important because early success during a migration is crucial to continuing on your cloud adoption path. Experiencing failure at an early stage can become a serious setback to the overall migration effort. You might be on board with the benefits of Google Cloud and BigQuery, but processing all of the datasets and data pipelines that have been created or managed in your legacy data warehouse for different use cases can be complicated and time-consuming.
Although there's no one-size-fits-all answer, there are best practices you can use as you're evaluating your on-premises use cases and business applications. This kind of up-front planning can make the migration process easier and the entire transition to BigQuery smoother.
The following sections explore possible approaches for prioritizing use cases.
Approach: Exploit current opportunities
Look at current opportunities that could help you maximize the return on investment of a specific use case. This approach is especially useful if you're under pressure to justify the business value of migrating to the cloud. It also provides an opportunity to gather additional datapoints to help assess the total migration cost.
Here are some example questions to ask to help you identify which use cases to prioritize:
- Does the use case consist of datasets or data pipelines that are currently limited by the legacy enterprise data warehouse?
- Does your existing enterprise data warehouse require a hardware refresh, or are you anticipating a need to expand your hardware? If so, it can be attractive to offload use cases to BigQuery sooner rather than later.
Identifying opportunities to migrate can create some quick wins that yield tangible, immediate benefits for users and the business.
Approach: Migrate analytical workloads first
Migrate Online Analytical Processing (OLAP) workloads before Online Transaction Processing (OLTP) workloads. A data warehouse is often the only place in the organization where you have all the data to create a single, global view of the organization's operations. Therefore, it's common for organizations to have some data pipelines that feed back into the transactional systems to update status or trigger processes—for example, to buy more stock when a product's inventory is low. OLTP workloads tend to be more complex and have more stringent operational requirements and service-level agreements (SLAs) than OLAP workloads, so it also tends to be easier to migrate OLAP workloads first.
Approach: Focus on the user experience
Identify opportunities for enhancing the user experience by migrating specific datasets and enabling new types of advanced analytics. For example, one way to enhance the user experience is with real-time analytics. You can build sophisticated user experiences around a real-time stream of data when it's fused with historical data. For example:
- A back-office employee who's alerted on their mobile app about low stock.
- An online customer who might benefit from knowing that spending another dollar would put them on the next reward tier.
- A nurse who is alerted about a patient's vital signs on their smartwatch, enabling them to take the best course of action by pulling up the patient's treatment history on their tablet.
You can also enhance the user experience with predictive and prescriptive analytics. For that, you can use BigQuery ML, Vertex AI AutoML tabular, or Google's pre-trained models for image analysis, video analysis, speech recognition, natural language, and translation. Or you can serve your custom-trained model using Vertex AI for use cases tailored to your business needs. This might involve the following:
- Recommending a product based on market trends and user purchase behavior.
- Predicting a flight delay.
- Detecting fraudulent activities.
- Flagging inappropriate content.
- Other innovative ideas that could differentiate your app from the competition.
Approach: Prioritize least-risky use cases
There are a number of questions IT can ask to help evaluate which use cases are the least risky to migrate, which makes them the most attractive to migrate in the early phases of the migration. For example:
- What is the business criticality of this use case?
- Do large numbers of employees or customers depend on the use case?
- What is the target environment (for example, development or production) for the use case?
- What is our IT team's understanding of the use case?
- How many dependencies and integrations does the use case have?
- Does our IT team have proper, up-to-date, thorough documentation for the use case?
- What are the operational requirements (SLAs) for the use case?
- What are the legal or governmental compliance requirements for the use case?
- What are the downtime and latency sensitivities for accessing the underlying dataset?
- Are there line-of-business owners eager and willing to migrate their use case early?
Going through this list of questions can help you rank datasets and data pipelines from lowest to highest risk. Low-risk assets should be migrated first, and higher-risk ones should come later.
Execute
After you've gathered information about your legacy systems, and created a prioritized backlog of use cases, you can group the use cases into workloads and proceed with the migration in iterations.
An iteration can consist of a single use case, a few separate use cases, or a number of use cases pertaining to a single workload. Which of these options you choose for the iteration depends on the interconnectivity of the use cases, any shared dependencies, and the resources you have available to undertake the work.
A migration typically contains the following steps:
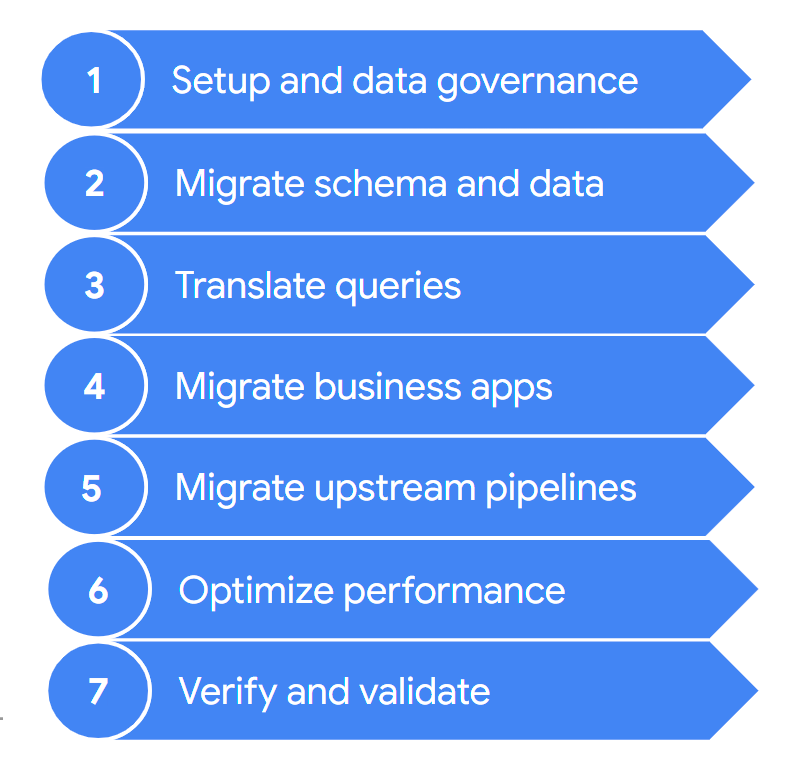
These steps are described in more detail in the following sections. You might not need to go through all of these steps in each iteration. For example, in one iteration you might decide to focus on copying some data from your legacy data warehouse to BigQuery. In contrast, in a subsequent iteration you might focus on modifying the ingestion pipeline from an original data source directly to BigQuery.
1. Setup and data governance
Setup is the foundational work that's required in order to enable the use cases to run on Google Cloud. Setup can include configuration of your Google Cloud projects, network, virtual private cloud (VPC), and data governance. It also includes developing a good understanding of where you are today—what works and what doesn't. This helps you understand the requirements for your migration effort. You can use the BigQuery migration assessment feature to assist you with this step.
Data governance is a principled approach to manage data during its lifecycle, from acquisition to use to disposal. Your data governance program clearly outlines policies, procedures, responsibilities, and controls surrounding data activities. This program helps to ensure that information is collected, maintained, used, and disseminated in way that both meets your organization's data integrity and its security needs. It also helps empower your employees to discover and use the data to its fullest potential.
The data governance documention helps you understand data governance and the controls that you need when migrating your on-premises data warehouse to BigQuery.
2. Migrate schema and data
The data warehouse schema defines how your data is structured and defines the relationships between your data entities. The schema is at the core of your data design, and it influences many processes, both upstream and downstream.
The schema and data transfer documentation provides extensive information on how you can move your data to BigQuery and recommendations for updating your schema to take full advantage of BigQuery's features.
3. Translate queries
Use batch SQL translation to migrate your SQL code in bulk, or interactive SQL translation to translate ad hoc queries.
Some legacy data warehouses include extensions to the SQL standard to enable functionality for their product. BigQuery does not support these proprietary extensions; instead, it conforms to the ANSI/ISO SQL:2011 standard. This means that some of your queries might still need manual refactoring if the SQL translators can't interpret them.
4. Migrate business applications
Business applications can take many forms—from dashboards to custom applications to operational data pipelines that provide feedback loops to transactional systems.
To learn more about the analytics options when working with BigQuery, see Overview of BigQuery analytics. This topic provides an overview of the reporting and analysis tools that you can use to get compelling insights from your data.
The section on feedback loops in the data pipeline documention describes how you can use a data pipeline to create a feedback loop to provision upstream systems.
5. Migrate data pipelines
The data pipelines documention presents procedures, patterns, and technologies to migrate your legacy data pipelines to Google Cloud. It helps you understand what a data pipeline is, what procedures and patterns it can employ, and which migration options and technologies are available in relation to the larger data warehouse migration.
6. Optimize performance
BigQuery processes data efficiently for both small and petabyte-scale datasets. With the help of BigQuery, your data analytics jobs should perform well without modification in your newly migrated data warehouse. If you find that under certain circumstances query performance doesn't match your expectations, see Introduction to optimizing query performance for guidance.
7. Verify and validate
At the end of each iteration, validate that the use-case migration was successful by verifying that:
- The data and schema have been fully migrated.
- Data governance concerns have been fully met and tested.
- Maintenance and monitoring procedures and automation have been established.
- Queries have been correctly translated.
- Migrated data pipelines function as expected.
- Business applications are correctly configured to access the migrated data and queries.
You can get started with the Data validation tool, an open source Python CLI tool that compares data from source and target environments to ensure they match. It supports multiple connection types along with multi-level validation functionality.
It's also a good idea to measure the impact of the use-case migration—for example, in terms of improving performance, reducing cost, or enabling new technical or business opportunities. Then you can more accurately quantify the value of the return on investment and compare the value against your success criteria for the iteration.
After the iteration is validated, you can release the migrated use case to production and give your users access to migrated datasets and business applications.
Finally, take notes and document lessons learned from this iteration, so you can apply these lessons in the next iteration and accelerate the migration.
Summarizing the migration effort
During migration, you run both your legacy data warehouse and BigQuery, as detailed in this document. The reference architecture in the following diagram highlights that both data warehouses offer similar functionality and paths—both can ingest from the source systems, integrate with the business applications, and provide the required user access. Importantly, the diagram also highlights that data is synchronized from your data warehouse to BigQuery. This allows use cases to be offloaded during the entire duration of the migration effort.

Assuming that your intent is to fully migrate from your data warehouse to BigQuery, the end state of the migration looks like the following:

What's next
Perform a BigQuery migration with the following tools:
- Run a migration assessment to assess the feasibility and potential benefits of migrating your data warehouse to BigQuery.
- Use the SQL translation tools, such as the interactive SQL translator, the translation API, and the batch SQL translator to automate the conversion of your SQL queries into GoogleSQL, including Gemini-enhanced SQL customization.
- Once you have migrated your data warehouse to BigQuery, run the data validation tool to validate your newly migrated data.
Learn more about a data warehouse migration with the following resources:
- The Cloud Architecture Center provides migration resources to plan and execute your migration to Google Cloud
- Learn how to migrate schema and data from your data warehouse
- Learn how to migrate data pipelines from your data warehouse
- Learn about data governance in BigQuery
Work with the Professional Services team to help plan and deploy your Google Cloud migration. For more information, see Google Cloud Professional Services
Learn about migrating from specific data warehouses to BigQuery: