Create a VM instance with a custom hostname


When you create a virtual machine (VM) instance, Google Cloud creates an internal DNS name from the VM name. Unless you specify a custom hostname, Google Cloud uses the automatically created internal DNS name as the hostname it provides to the VM.

You can create a VM with a custom hostname by specifying any fully qualified DNS name. Custom hostnames are useful to maintain conventions or to support requirements for applications that expect a particular hostname.

Even when you specify a custom hostname, Google Cloud creates the Compute Engine internal DNS name. You can connect to your VM by using this automatically created internal DNS record. The internal DNS record resolves to the internal DNS name and not the custom hostname. With custom hostnames, you still need to create a corresponding DNS record in the appropriate zone, for example, by using Cloud DNS.

Before you begin

  • If you haven't already, set up authentication. Authentication is the process by which your identity is verified for access to Google Cloud services and APIs. To run code or samples from a local development environment, you can authenticate to Compute Engine as follows.

    Select the tab for how you plan to use the samples on this page:

    Console

    When you use the Google Cloud console to access Google Cloud services and APIs, you don't need to set up authentication.

    gcloud

    1. Install the Google Cloud CLI, then initialize it by running the following command:

      gcloud init
    2. Set a default region and zone.

    Terraform

    To use the Terraform samples on this page from a local development environment, install and initialize the gcloud CLI, and then set up Application Default Credentials with your user credentials.

    1. Install the Google Cloud CLI.
    2. To initialize the gcloud CLI, run the following command:

      gcloud init
    3. Create local authentication credentials for your Google Account:

      gcloud auth application-default login

    For more information, see Set up authentication for a local development environment.

    Go

    To use the Go samples on this page from a local development environment, install and initialize the gcloud CLI, and then set up Application Default Credentials with your user credentials.

    1. Install the Google Cloud CLI.
    2. To initialize the gcloud CLI, run the following command:

      gcloud init
    3. Create local authentication credentials for your Google Account:

      gcloud auth application-default login

    For more information, see Set up authentication for a local development environment.

    Java

    To use the Java samples on this page from a local development environment, install and initialize the gcloud CLI, and then set up Application Default Credentials with your user credentials.

    1. Install the Google Cloud CLI.
    2. To initialize the gcloud CLI, run the following command:

      gcloud init
    3. Create local authentication credentials for your Google Account:

      gcloud auth application-default login

    For more information, see Set up authentication for a local development environment.

    Node.js

    To use the Node.js samples on this page from a local development environment, install and initialize the gcloud CLI, and then set up Application Default Credentials with your user credentials.

    1. Install the Google Cloud CLI.
    2. To initialize the gcloud CLI, run the following command:

      gcloud init
    3. Create local authentication credentials for your Google Account:

      gcloud auth application-default login

    For more information, see Set up authentication for a local development environment.

    Python

    To use the Python samples on this page from a local development environment, install and initialize the gcloud CLI, and then set up Application Default Credentials with your user credentials.

    1. Install the Google Cloud CLI.
    2. To initialize the gcloud CLI, run the following command:

      gcloud init
    3. Create local authentication credentials for your Google Account:

      gcloud auth application-default login

    For more information, see Set up authentication for a local development environment.

    REST

    To use the REST API samples on this page in a local development environment, you use the credentials you provide to the gcloud CLI.

      Install the Google Cloud CLI, then initialize it by running the following command:

      gcloud init

Required roles

To get the permissions that you need to create VM with a custom hostname, ask your administrator to grant you the Compute Instance Admin (v1) (roles/compute.instanceAdmin.v1) IAM role on the project. For more information about granting roles, see Manage access.

This predefined role contains the permissions required to create VM with a custom hostname. To see the exact permissions that are required, expand the Required permissions section:

Required permissions

The following permissions are required to create VM with a custom hostname:

  • compute.instances.create on the project
  • To use a custom image to create the VM: compute.images.useReadOnly on the image
  • To use a snapshot to create the VM: compute.snapshots.useReadOnly on the snapshot
  • To use an instance template to create the VM: compute.instanceTemplates.useReadOnly on the instance template
  • To assign a legacy network to the VM: compute.networks.use on the project
  • To specify a static IP address for the VM: compute.addresses.use on the project
  • To assign an external IP address to the VM when using a legacy network: compute.networks.useExternalIp on the project
  • To specify a subnet for your VM: compute.subnetworks.use on the project or on the chosen subnet
  • To assign an external IP address to the VM when using a VPC network: compute.subnetworks.useExternalIp on the project or on the chosen subnet
  • To set VM instance metadata for the VM: compute.instances.setMetadata on the project
  • To set tags for the VM: compute.instances.setTags on the VM
  • To set labels for the VM: compute.instances.setLabels on the VM
  • To set a service account for the VM to use: compute.instances.setServiceAccount on the VM
  • To create a new disk for the VM: compute.disks.create on the project
  • To attach an existing disk in read-only or read-write mode: compute.disks.use on the disk
  • To attach an existing disk in read-only mode: compute.disks.useReadOnly on the disk

You might also be able to get these permissions with custom roles or other predefined roles.

Limitations

  • You must manually configure the DNS record for your custom hostname. Custom hostnames are not resolved by the automatically created records provided by Compute Engine internal DNS. You can use any of the following to host the DNS record for the custom hostname:

  • You cannot change a custom hostname after you have created the VM.

Naming convention

Custom hostnames must conform to RFC 1035 requirements for valid hostnames. To meet these requirements, custom hostnames must meet the following format specifications:

  • The hostname contains at least two labels described as follows:
    • Each label contains regular expressions that includes only these characters: [a-z]([-a-z0-9]*[a-z0-9])?.
    • Labels are concatenated with a dot.
    • Each label is 1-63 characters long.
  • The hostname does not exceed 253 characters.

Not valid: contains a single label

my-host1234

Valid: contains three labels concatenated with dots

my-host1234.example.com

Create a VM with a custom hostname

Console

  1. In the Google Cloud console, go to the Create an instance page.

    Go to Create an instance

  2. Specify a Name for your VM. For more information, see Resource naming convention.

  3. Expand the Advanced options section, and then do the following:

    1. Expand the Networking section.
    2. In the Hostname field, specify the custom hostname.
  4. Make additional VM customizations, as needed.

  5. To create and start the VM, click Create.

Next step: Configure your DNS records. For more information, see Managing records.

gcloud

Using the Google Cloud CLI, follow the instructions to create an instance from an image or a snapshot, add the --hostname flag, and use the gcloud compute instances create command as follows:

gcloud compute instances create VM_NAME \
    --hostname=HOST_NAME

Replace the following:

  • VM_NAME: the name of the VM
  • HOST_NAME: the fully qualified domain hostname that you want to assign

For example, to create a VM myinstance with the custom hostname test.example.com, run the following command:

gcloud compute instances create myinstance \
    --hostname=test.example.com

Next step: Configure your DNS records. For more information, see Managing records.

Terraform

You can use a Terraform resource to create an instance with a custom hostname by using the hostname argument.


resource "google_compute_instance" "custom_hostname_instance" {
  name         = "custom-hostname-instance-name"
  machine_type = "f1-micro"
  zone         = "us-central1-c"

  # Set a custom hostname below
  hostname = "hashicorptest.com"

  boot_disk {
    initialize_params {
      image = "debian-cloud/debian-11"
    }
  }
  network_interface {
    # A default network is created for all GCP projects
    network = "default"
    access_config {
    }
  }
}
To generate the Terraform code, you can use the Equivalent code component in the Google Cloud console.
  1. In the Google Cloud console, go to the VM instances page.

    Go to VM Instances

  2. Click Create instance.
  3. Specify the parameters you want.
  4. At the top or bottom of the page, click Equivalent code, and then click the Terraform tab to view the Terraform code.

Next step: Configure your DNS records. For more information, see Managing records.

Go

import (
	"context"
	"fmt"
	"io"

	compute "cloud.google.com/go/compute/apiv1"
	computepb "google.golang.org/genproto/googleapis/cloud/compute/v1"
	"google.golang.org/protobuf/proto"
)

// createInstanceWithCustomHostname creates an instance with custom hostname.
func createInstanceWithCustomHostname(w io.Writer, projectID, zone, instanceName, hostname, machineType, sourceImage, networkName string) error {
	// projectID := "your_project_id"
	// zone := "europe-central2-b"
	// instanceName := "your_instance_name"
	// hostname := "host.example.com" // Custom hostnames must conform to RFC 1035 requirements for valid hostnames.
	// machineType := "n1-standard-1"
	// sourceImage := "projects/debian-cloud/global/images/family/debian-10"
	// networkName := "global/networks/default"

	ctx := context.Background()
	instancesClient, err := compute.NewInstancesRESTClient(ctx)
	if err != nil {
		return fmt.Errorf("NewInstancesRESTClient: %w", err)
	}
	defer instancesClient.Close()

	req := &computepb.InsertInstanceRequest{
		Project: projectID,
		Zone:    zone,
		InstanceResource: &computepb.Instance{
			Name: proto.String(instanceName),
			// Custom hostnames are not resolved by the automatically created records
			// provided by Compute Engine internal DNS.
			// You must manually configure the DNS record for your custom hostname.
			Hostname: proto.String(hostname),
			Disks: []*computepb.AttachedDisk{
				{
					// Describe the size and source image of the boot disk to attach to the instance.
					InitializeParams: &computepb.AttachedDiskInitializeParams{
						DiskSizeGb:  proto.Int64(10),
						SourceImage: proto.String(sourceImage),
					},
					AutoDelete: proto.Bool(true),
					Boot:       proto.Bool(true),
					Type:       proto.String(computepb.AttachedDisk_PERSISTENT.String()),
				},
			},
			MachineType: proto.String(fmt.Sprintf("zones/%s/machineTypes/%s", zone, machineType)),
			NetworkInterfaces: []*computepb.NetworkInterface{
				{
					// Use the network interface provided in the networkName argument.
					Name: proto.String(networkName),
				},
			},
		},
	}

	op, err := instancesClient.Insert(ctx, req)
	if err != nil {
		return fmt.Errorf("unable to create instance: %w", err)
	}

	if err = op.Wait(ctx); err != nil {
		return fmt.Errorf("unable to wait for the operation: %w", err)
	}

	fmt.Fprintf(w, "Instance created\n")

	return nil
}

Java


import com.google.cloud.compute.v1.AttachedDisk;
import com.google.cloud.compute.v1.AttachedDiskInitializeParams;
import com.google.cloud.compute.v1.InsertInstanceRequest;
import com.google.cloud.compute.v1.Instance;
import com.google.cloud.compute.v1.InstancesClient;
import com.google.cloud.compute.v1.NetworkInterface;
import com.google.cloud.compute.v1.Operation;
import java.io.IOException;
import java.util.concurrent.ExecutionException;
import java.util.concurrent.TimeUnit;
import java.util.concurrent.TimeoutException;

public class CreateInstanceWithCustomHostname {

  public static void main(String[] args)
      throws IOException, ExecutionException, InterruptedException, TimeoutException {
    // TODO(developer): Replace these variables before running the sample.
    // hostName: Custom hostname of the new VM instance.
    // *    Custom hostnames must conform to RFC 1035 requirements for valid hostnames.
    String project = "your-project-id";
    String zone = "zone-name"; // eg: "us-central1-a"
    String instanceName = "instance-name";
    String hostName = "host.example.com";
    createInstanceWithCustomHostname(project, zone, instanceName, hostName);
  }

  // Creates an instance with custom hostname.
  public static void createInstanceWithCustomHostname(String projectId, String zone,
      String instanceName, String hostName)
      throws IOException, ExecutionException, InterruptedException, TimeoutException {
    //  machineType - Machine type for the VM instance specified in the following format:
    //  *    "zones/{zone}/machineTypes/{type_name}". For example:
    //  *    "zones/europe-west3-c/machineTypes/f1-micro"
    //  *    You can find the list of available machine types by using this gcloud command:
    //  *    $ gcloud compute machine-types list
    //  sourceImage - Path of the disk image you want to use for your boot
    //  *    disk. This image can be one of the public images
    //  *    eg: "projects/...
    //  *    or a private image you have access to.
    //  *    You can check the list of available public images using:
    //  *    $ gcloud compute images list
    //  networkName - Name of the network you want the new instance to use.
    //  *    For example: global/networks/default - if you want to use the default network.
    String machineType = "n1-standard-1";
    String sourceImage = String.format("projects/%s/global/images/family/%s", "debian-cloud",
        "debian-11");
    String networkName = "global/networks/default";

    try (InstancesClient instancesClient = InstancesClient.create()) {
      System.out.printf("Creating the %s instance in %s with hostname %s...", instanceName, zone,
          hostName);

      AttachedDisk disk =
          AttachedDisk.newBuilder()
              .setBoot(true)
              .setAutoDelete(true)
              .setType(AttachedDisk.Type.PERSISTENT.toString())
              .setInitializeParams(
                  // Describe the size and source image of the boot disk to attach to the instance.
                  AttachedDiskInitializeParams.newBuilder()
                      .setSourceImage(sourceImage)
                      .setDiskSizeGb(10).build())
              .build();

      // Use the network interface provided in the networkName argument.
      NetworkInterface networkInterface = NetworkInterface.newBuilder()
          .setName(networkName)
          .build();

      Instance instanceResource = Instance.newBuilder()
          // Custom hostnames are not resolved by the automatically created records
          // provided by Compute Engine internal DNS.
          // You must manually configure the DNS record for your custom hostname.
          .setName(instanceName)
          .setHostname(hostName)
          .addDisks(disk)
          .setMachineType(String.format("zones/%s/machineTypes/%s", zone, machineType))
          .addNetworkInterfaces(networkInterface).build();

      InsertInstanceRequest request = InsertInstanceRequest.newBuilder()
          .setProject(projectId)
          .setZone(zone)
          .setInstanceResource(instanceResource).build();

      // Wait for the create operation to complete.
      Operation response = instancesClient.insertAsync(request).get(3, TimeUnit.MINUTES);
      ;

      if (response.hasError()) {
        System.out.printf("Instance creation failed for instance: %s ; Response: %s ! ! ",
            instanceName, response);
        return;
      }
      System.out.printf("Instance created : %s", instanceName);
      System.out.printf("Operation Status for instance %s is %s: ", instanceName,
          response.getStatus());
    }

  }

}

Node.js

/**
 * TODO(developer): Uncomment and replace these variables before running the sample.
 */
// const projectId = 'YOUR_PROJECT_ID';
// const zone = 'europe-central2-b'
// const instanceName = 'YOUR_INSTANCE_NAME'
// const hostname = 'host.example.com'
// const machineType = 'n1-standard-1';
// const sourceImage = 'projects/debian-cloud/global/images/family/debian-10';
// const networkName = 'global/networks/default';

const compute = require('@google-cloud/compute');

// Create a new instance with the values provided above in the specified project and zone.
async function createInstanceWithCustomHostname() {
  const instancesClient = new compute.InstancesClient();

  console.log(
    `Creating the ${instanceName} instance in ${zone} with hostname ${hostname}...`
  );

  const [response] = await instancesClient.insert({
    instanceResource: {
      name: instanceName,
      // Custom hostnames are not resolved by the automatically created records
      // provided by Compute Engine internal DNS.
      // You must manually configure the DNS record for your custom hostname.
      hostname,
      disks: [
        {
          // Describe the size and source image of the boot disk to attach to the instance.
          initializeParams: {
            diskSizeGb: '10',
            sourceImage,
          },
          autoDelete: true,
          boot: true,
          type: 'PERSISTENT',
        },
      ],
      machineType: `zones/${zone}/machineTypes/${machineType}`,
      networkInterfaces: [
        {
          // Use the network interface provided in the networkName argument.
          name: networkName,
        },
      ],
    },
    project: projectId,
    zone,
  });
  let operation = response.latestResponse;
  const operationsClient = new compute.ZoneOperationsClient();

  // Wait for the create operation to complete.
  while (operation.status !== 'DONE') {
    [operation] = await operationsClient.wait({
      operation: operation.name,
      project: projectId,
      zone: operation.zone.split('/').pop(),
    });
  }

  console.log('Instance created.');
}

createInstanceWithCustomHostname();

Python

from __future__ import annotations

import re
import sys
from typing import Any
import warnings

from google.api_core.extended_operation import ExtendedOperation
from google.cloud import compute_v1


def get_image_from_family(project: str, family: str) -> compute_v1.Image:
    """
    Retrieve the newest image that is part of a given family in a project.

    Args:
        project: project ID or project number of the Cloud project you want to get image from.
        family: name of the image family you want to get image from.

    Returns:
        An Image object.
    """
    image_client = compute_v1.ImagesClient()
    # List of public operating system (OS) images: https://cloud.google.com/compute/docs/images/os-details
    newest_image = image_client.get_from_family(project=project, family=family)
    return newest_image


def disk_from_image(
    disk_type: str,
    disk_size_gb: int,
    boot: bool,
    source_image: str,
    auto_delete: bool = True,
) -> compute_v1.AttachedDisk:
    """
    Create an AttachedDisk object to be used in VM instance creation. Uses an image as the
    source for the new disk.

    Args:
         disk_type: the type of disk you want to create. This value uses the following format:
            "zones/{zone}/diskTypes/(pd-standard|pd-ssd|pd-balanced|pd-extreme)".
            For example: "zones/us-west3-b/diskTypes/pd-ssd"
        disk_size_gb: size of the new disk in gigabytes
        boot: boolean flag indicating whether this disk should be used as a boot disk of an instance
        source_image: source image to use when creating this disk. You must have read access to this disk. This can be one
            of the publicly available images or an image from one of your projects.
            This value uses the following format: "projects/{project_name}/global/images/{image_name}"
        auto_delete: boolean flag indicating whether this disk should be deleted with the VM that uses it

    Returns:
        AttachedDisk object configured to be created using the specified image.
    """
    boot_disk = compute_v1.AttachedDisk()
    initialize_params = compute_v1.AttachedDiskInitializeParams()
    initialize_params.source_image = source_image
    initialize_params.disk_size_gb = disk_size_gb
    initialize_params.disk_type = disk_type
    boot_disk.initialize_params = initialize_params
    # Remember to set auto_delete to True if you want the disk to be deleted when you delete
    # your VM instance.
    boot_disk.auto_delete = auto_delete
    boot_disk.boot = boot
    return boot_disk


def wait_for_extended_operation(
    operation: ExtendedOperation, verbose_name: str = "operation", timeout: int = 300
) -> Any:
    """
    Waits for the extended (long-running) operation to complete.

    If the operation is successful, it will return its result.
    If the operation ends with an error, an exception will be raised.
    If there were any warnings during the execution of the operation
    they will be printed to sys.stderr.

    Args:
        operation: a long-running operation you want to wait on.
        verbose_name: (optional) a more verbose name of the operation,
            used only during error and warning reporting.
        timeout: how long (in seconds) to wait for operation to finish.
            If None, wait indefinitely.

    Returns:
        Whatever the operation.result() returns.

    Raises:
        This method will raise the exception received from `operation.exception()`
        or RuntimeError if there is no exception set, but there is an `error_code`
        set for the `operation`.

        In case of an operation taking longer than `timeout` seconds to complete,
        a `concurrent.futures.TimeoutError` will be raised.
    """
    result = operation.result(timeout=timeout)

    if operation.error_code:
        print(
            f"Error during {verbose_name}: [Code: {operation.error_code}]: {operation.error_message}",
            file=sys.stderr,
            flush=True,
        )
        print(f"Operation ID: {operation.name}", file=sys.stderr, flush=True)
        raise operation.exception() or RuntimeError(operation.error_message)

    if operation.warnings:
        print(f"Warnings during {verbose_name}:\n", file=sys.stderr, flush=True)
        for warning in operation.warnings:
            print(f" - {warning.code}: {warning.message}", file=sys.stderr, flush=True)

    return result


def create_instance(
    project_id: str,
    zone: str,
    instance_name: str,
    disks: list[compute_v1.AttachedDisk],
    machine_type: str = "n1-standard-1",
    network_link: str = "global/networks/default",
    subnetwork_link: str = None,
    internal_ip: str = None,
    external_access: bool = False,
    external_ipv4: str = None,
    accelerators: list[compute_v1.AcceleratorConfig] = None,
    preemptible: bool = False,
    spot: bool = False,
    instance_termination_action: str = "STOP",
    custom_hostname: str = None,
    delete_protection: bool = False,
) -> compute_v1.Instance:
    """
    Send an instance creation request to the Compute Engine API and wait for it to complete.

    Args:
        project_id: project ID or project number of the Cloud project you want to use.
        zone: name of the zone to create the instance in. For example: "us-west3-b"
        instance_name: name of the new virtual machine (VM) instance.
        disks: a list of compute_v1.AttachedDisk objects describing the disks
            you want to attach to your new instance.
        machine_type: machine type of the VM being created. This value uses the
            following format: "zones/{zone}/machineTypes/{type_name}".
            For example: "zones/europe-west3-c/machineTypes/f1-micro"
        network_link: name of the network you want the new instance to use.
            For example: "global/networks/default" represents the network
            named "default", which is created automatically for each project.
        subnetwork_link: name of the subnetwork you want the new instance to use.
            This value uses the following format:
            "regions/{region}/subnetworks/{subnetwork_name}"
        internal_ip: internal IP address you want to assign to the new instance.
            By default, a free address from the pool of available internal IP addresses of
            used subnet will be used.
        external_access: boolean flag indicating if the instance should have an external IPv4
            address assigned.
        external_ipv4: external IPv4 address to be assigned to this instance. If you specify
            an external IP address, it must live in the same region as the zone of the instance.
            This setting requires `external_access` to be set to True to work.
        accelerators: a list of AcceleratorConfig objects describing the accelerators that will
            be attached to the new instance.
        preemptible: boolean value indicating if the new instance should be preemptible
            or not. Preemptible VMs have been deprecated and you should now use Spot VMs.
        spot: boolean value indicating if the new instance should be a Spot VM or not.
        instance_termination_action: What action should be taken once a Spot VM is terminated.
            Possible values: "STOP", "DELETE"
        custom_hostname: Custom hostname of the new VM instance.
            Custom hostnames must conform to RFC 1035 requirements for valid hostnames.
        delete_protection: boolean value indicating if the new virtual machine should be
            protected against deletion or not.
    Returns:
        Instance object.
    """
    instance_client = compute_v1.InstancesClient()

    # Use the network interface provided in the network_link argument.
    network_interface = compute_v1.NetworkInterface()
    network_interface.network = network_link
    if subnetwork_link:
        network_interface.subnetwork = subnetwork_link

    if internal_ip:
        network_interface.network_i_p = internal_ip

    if external_access:
        access = compute_v1.AccessConfig()
        access.type_ = compute_v1.AccessConfig.Type.ONE_TO_ONE_NAT.name
        access.name = "External NAT"
        access.network_tier = access.NetworkTier.PREMIUM.name
        if external_ipv4:
            access.nat_i_p = external_ipv4
        network_interface.access_configs = [access]

    # Collect information into the Instance object.
    instance = compute_v1.Instance()
    instance.network_interfaces = [network_interface]
    instance.name = instance_name
    instance.disks = disks
    if re.match(r"^zones/[a-z\d\-]+/machineTypes/[a-z\d\-]+$", machine_type):
        instance.machine_type = machine_type
    else:
        instance.machine_type = f"zones/{zone}/machineTypes/{machine_type}"

    instance.scheduling = compute_v1.Scheduling()
    if accelerators:
        instance.guest_accelerators = accelerators
        instance.scheduling.on_host_maintenance = (
            compute_v1.Scheduling.OnHostMaintenance.TERMINATE.name
        )

    if preemptible:
        # Set the preemptible setting
        warnings.warn(
            "Preemptible VMs are being replaced by Spot VMs.", DeprecationWarning
        )
        instance.scheduling = compute_v1.Scheduling()
        instance.scheduling.preemptible = True

    if spot:
        # Set the Spot VM setting
        instance.scheduling.provisioning_model = (
            compute_v1.Scheduling.ProvisioningModel.SPOT.name
        )
        instance.scheduling.instance_termination_action = instance_termination_action

    if custom_hostname is not None:
        # Set the custom hostname for the instance
        instance.hostname = custom_hostname

    if delete_protection:
        # Set the delete protection bit
        instance.deletion_protection = True

    # Prepare the request to insert an instance.
    request = compute_v1.InsertInstanceRequest()
    request.zone = zone
    request.project = project_id
    request.instance_resource = instance

    # Wait for the create operation to complete.
    print(f"Creating the {instance_name} instance in {zone}...")

    operation = instance_client.insert(request=request)

    wait_for_extended_operation(operation, "instance creation")

    print(f"Instance {instance_name} created.")
    return instance_client.get(project=project_id, zone=zone, instance=instance_name)


def create_instance_custom_hostname(
    project_id: str, zone: str, instance_name: str, hostname: str
) -> compute_v1.Instance:
    """
    Create a new VM instance with Debian 10 operating system and a custom hostname.

    Args:
        project_id: project ID or project number of the Cloud project you want to use.
        zone: name of the zone to create the instance in. For example: "us-west3-b"
        instance_name: name of the new virtual machine (VM) instance.
        hostname: the hostname you want to use for the new instance.

    Returns:
        Instance object.
    """
    newest_debian = get_image_from_family(project="debian-cloud", family="debian-11")
    disk_type = f"zones/{zone}/diskTypes/pd-standard"
    disks = [disk_from_image(disk_type, 10, True, newest_debian.self_link)]
    instance = create_instance(
        project_id, zone, instance_name, disks, custom_hostname=hostname
    )
    return instance

REST

Follow the API instructions to create an instance from an image or a snapshot, and specify the hostname field in the request body.

POST https://compute.googleapis.com/compute/v1/projects/PROJECT_ID/zones/ZONE/instances

{
 "name": "VM_NAME",
 "hostname": "HOST_NAME",
 ...
}

Replace the following:

  • PROJECT_ID: your project ID
  • ZONE: the zone where you want to create the VM
  • VM_NAME: the name of the VM
  • HOST_NAME: the fully qualified domain hostname that you want to assign

Verify the custom hostname

For Linux VMs, you can verify the hostname by running the hostname -f command on the VM.

You can also verify the custom hostname by using the Google Cloud console or the Google Cloud CLI.

Console

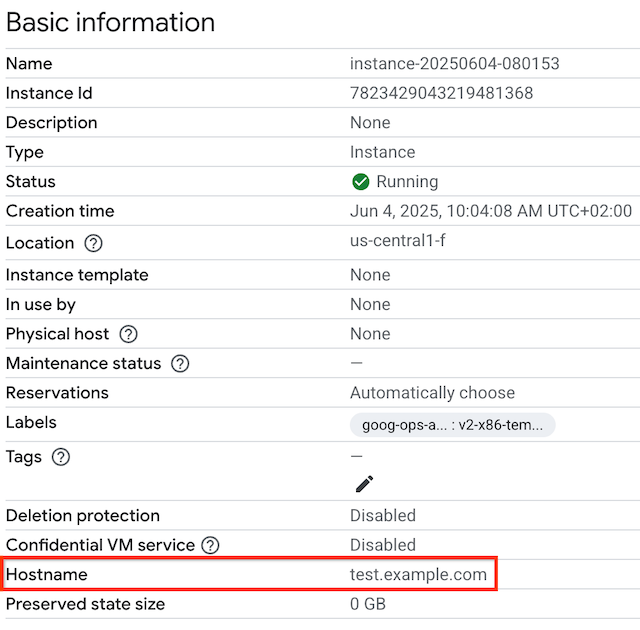
  1. To view the custom hostname for your VM, go to the VM instances page.

    Go to VM instances

  2. Click the instance name to open the VM instance details page.

  3. Review the Hostname section. The Hostname field is visible only if a custom hostname is set.

    VM instances page showing the hostname.

gcloud

To view the custom hostname for your VM using gcloud compute, use the instances describe sub-command with a --format flag to filter the output. Replace VM_NAME with the name of the VM.

gcloud compute instances describe VM_NAME \
    --format='get(hostname)'

For example, to view the custom hostname for a VM named myinstance, run the following command.

gcloud compute instances describe myinstance \
    --format='get(hostname)'

The output might resemble the following:

test.example.com

If a custom hostname is not set, the output for this command is blank.

What's next