Dati di immagini di Hello: esegui il deployment di un modello in un endpoint e invia una previsione
Mantieni tutto organizzato con le raccolte
Salva e classifica i contenuti in base alle tue preferenze.
Al termine dell'addestramento del modello di classificazione delle immagini AutoML, utilizza la
consoleGoogle Cloud per creare un endpoint ed eseguire il deployment del modello
nell'endpoint. Dopo aver eseguito il deployment del modello in questo nuovo endpoint, invia un'immagine
al modello per la previsione delle etichette.
Seleziona il modello AutoML addestrato. Si apre la scheda Valuta,
dove puoi visualizzare le metriche sul rendimento del modello.
Scegli la scheda tabDeployment e test.
Fai clic su Esegui il deployment su endpoint.
Scegli radio_button_checkedCrea nuovo
endpoint, imposta il nome dell'endpoint su hello_automl_image, quindi fai clic su
Continua.
In Impostazioni modello, accetta la divisione del traffico del
100%, inserisci 1 in Numero di nodi di calcolo, quindi fai clic su Fine.
Fai clic su Esegui il deployment per eseguire il deployment del modello nel nuovo endpoint.
La creazione dell'endpoint e il deployment del modello AutoML
nel nuovo endpoint richiedono diversi minuti.
Inviare una previsione al modello
Al termine del processo di creazione dell'endpoint, puoi inviare una singola richiesta di annotazione (previsione) dell'immagine nella console Google Cloud .
Vai alla sezione "Testa il modello" della stessa scheda Deployment e test
che hai utilizzato per creare un endpoint nel passaggio precedente
(Modelli > your_model > tab Deployment e test).
Fai clic su Carica immagine e scegli un'immagine salvata localmente per la previsione e
visualizza l'etichetta prevista.
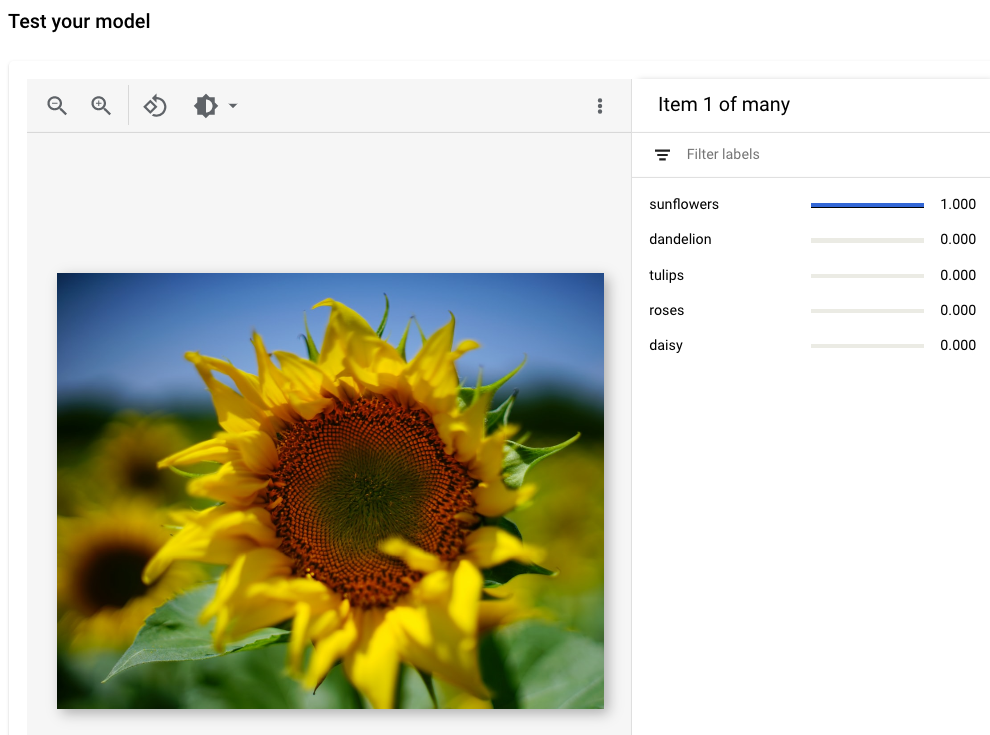
Attribuzione immagine:
Siming Ye, Unsplash (mostrata nella visualizzazione dell'interfaccia utente).
Passaggi successivi
Segui le istruzioni riportate nell'ultima pagina del tutorial per eseguire la pulizia
delle risorse che hai creato.
[[["Facile da capire","easyToUnderstand","thumb-up"],["Il problema è stato risolto","solvedMyProblem","thumb-up"],["Altra","otherUp","thumb-up"]],[["Difficile da capire","hardToUnderstand","thumb-down"],["Informazioni o codice di esempio errati","incorrectInformationOrSampleCode","thumb-down"],["Mancano le informazioni o gli esempi di cui ho bisogno","missingTheInformationSamplesINeed","thumb-down"],["Problema di traduzione","translationIssue","thumb-down"],["Altra","otherDown","thumb-down"]],["Ultimo aggiornamento 2025-09-04 UTC."],[],[],null,["# Hello image data: Deploy a model to an endpoint and send a prediction\n\nAfter your AutoML image classification model is done training, use the\nGoogle Cloud console to create an endpoint and deploy your model to\nthe endpoint. After your model is deployed to this new endpoint, send an image\nto the model for label prediction.\n\nThis tutorial has several pages:\n\n1. [Set up your project and environment.](/vertex-ai/docs/tutorials/image-classification-automl)\n\n2. [Create an image classification dataset, and\n import images.](/vertex-ai/docs/tutorials/image-classification-automl/dataset)\n\n3. [Train an AutoML image classification\n model.](/vertex-ai/docs/tutorials/image-classification-automl/training)\n\n4. [Evaluate and analyze model performance.](/vertex-ai/docs/tutorials/image-classification-automl/error-analysis)\n\n5. Deploy a model to an endpoint, and send a\n prediction.\n\n6. [Clean up your project.](/vertex-ai/docs/tutorials/image-classification-automl/cleanup)\n\nEach page assumes that you have already performed the instructions from the\nprevious pages of the tutorial.\n\nDeploy your model to an endpoint\n--------------------------------\n\nAccess your trained model to deploy it to a new or existing endpoint from\nthe Models page:\n\n1. In the Google Cloud console, in the Vertex AI section, go to\n the **Training** page.\n\n [Go to the Training page](https://console.cloud.google.com/vertex-ai/training)\n2. Select your trained AutoML model. This takes you to the **Evaluate** tab\n where you can view model performance metrics.\n\n3. Choose the tab **Deploy \\& test** tab.\n\n4. Click **Deploy to endpoint**.\n\n5. Choose radio_button_checked**Create new\n endpoint** , set the endpoint name to `hello_automl_image`, then click\n **Continue**.\n\n6. In **Model settings** , accept the **Traffic split** of\n **100%** , enter **1** in **Number of compute nodes** , then click **Done**.\n\n7. Click **Deploy** to deploy your model to your new endpoint.\n\nIt takes several minutes to create the endpoint and deploy the AutoML model\nto the new endpoint.\n\nSend a prediction to your model\n-------------------------------\n\nAfter the endpoint creation process finishes you can send a single image\nannotation (prediction) request in the Google Cloud console.\n\n1. Navigate to the \"Test your model\" section of the same **Deploy \\& test** tab\n you used to create an endpoint in the previous step\n (**Models \\\u003e \u003cvar translate=\"no\"\u003eyour_model\u003c/var\u003e \\\u003e tab Deploy \\& test**).\n\n2. Click **Upload image** and choose a locally saved image for prediction, and\n view its predicted label.\n\n *Image credit* : [Siming Ye, Unsplash](https://unsplash.com/photos/qE-_sYxOMa8) (*shown in UI view*).\n\nWhat's next\n-----------\n\nFollow the [last page of the tutorial](/vertex-ai/docs/tutorials/image-classification-automl/cleanup) to clean up\nresources that you have created."]]