This interactive tutorial shows how to use autohealing to build highly available apps on Compute Engine.
Highly available apps are designed to serve clients with minimal latency and downtime. Availability is compromised when an app crashes or freezes. Clients of a compromised app can experience high latency or downtime.
Autohealing lets you automatically restart apps that are compromised. It promptly detects failed virtual machine (VM) instances and recreates them automatically, so clients can be served again. With autohealing, you no longer need to manually bring an app back to service after a failure.
Objectives
- Configure a health check and an autohealing policy.
- Set up a demo web service on a managed instance group (MIG).
- Simulate health check failures and witness the autohealing recovery process.
Costs
This tutorial uses billable components of Google Cloud including:- Compute Engine
Before you begin
- Select a project: Selecting a project doesn't require a specific IAM role—you can select any project that you've been granted a role on.
-
Create a project: To create a project, you need the Project Creator role
(
roles/resourcemanager.projectCreator), which contains theresourcemanager.projects.createpermission. Learn how to grant roles. - Select a project: Selecting a project doesn't require a specific IAM role—you can select any project that you've been granted a role on.
-
Create a project: To create a project, you need the Project Creator role
(
roles/resourcemanager.projectCreator), which contains theresourcemanager.projects.createpermission. Learn how to grant roles.
In the Google Cloud console, on the project selector page, select or create a Google Cloud project.
Roles required to select or create a project
Verify that billing is enabled for your Google Cloud project.
Enable the Compute Engine API.
Roles required to enable APIs
To enable APIs, you need the Service Usage Admin IAM
role (roles/serviceusage.serviceUsageAdmin), which
contains the serviceusage.services.enable permission. Learn how to grant
roles.
If you prefer to work from the command line, install the Google Cloud CLI.
Install the Google Cloud CLI. After installation, initialize the Google Cloud CLI by running the following command:
gcloud initIf you're using an external identity provider (IdP), you must first sign in to the gcloud CLI with your federated identity.
App architecture
The app includes the following Compute Engine components:
- Health check: An HTTP health check policy used by the autohealer to detect failed VM.
- Firewall rules: Google Cloud firewall rules let you allow or deny traffic to your VMs.
- Managed instance group: A group of VMs running the same demo web service.
- Instance template: A template used to create each VM in the instance group.
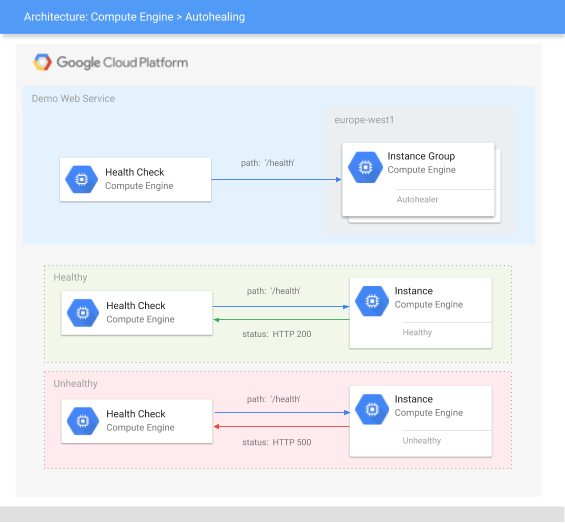
How the health check probes the demo webservice
A health check sends probe requests to a VM using a specified protocol, such as HTTP(S), SSL, or TCP. For more information, see how health checks work and health check categories, protocols, and ports.
The health check in this tutorial is an HTTP health check that probes the HTTP
path /health on port 80. For an HTTP health check, the probe request passes
only if the path returns an HTTP 200 (OK) response. For this tutorial, the
demo web server defines the path /health to return an HTTP 200 (OK) response
when healthy or an HTTP 500 (Internal Server Error) response when unhealthy.
For more information, see
success criteria for HTTP, HTTPS, and HTTP/2.
Create the health check
To set up autohealing, create a custom health check and configure the network firewall to allow health check probes.
In this tutorial, you create a regional health check. For autohealing, you can use either a regional or a global health check. Regional health checks reduce cross-region dependencies and help to achieve data residency. Global health checks are convenient if you want to use the same health check for MIGs in multiple regions.
Console
Create a health check.
In the Google Cloud console, go to the Create health check page.
In the Name field, enter
autohealer-check.Set the Scope to
Regional.In the Region drop-down, select
europe-west1.For Protocol select
HTTP.Set Request path to
/health. This indicates what HTTP path the health check uses. For this tutorial, the demo web server defines the path/healthto return either anHTTP 200 (OK)response when healthy or anHTTP 500 (Internal Server Error)response when unhealthy.Set the Health criteria:
- Set Check interval to
10. This defines the amount of time from the start of one probe to the start of the next one. - Set Timeout to
5. This defines the amount of time that Google Cloud waits for a response to a probe. This value must be less than or equal to the check interval. - Set Healthy threshold to
2. This defines the number of sequential probes that must succeed for the VM to be considered healthy. - Set Unhealthy threshold to
3. This defines the number of sequential probes that must fail for the VM to be considered unhealthy.
- Set Check interval to
Leave default values for the other options.
Click Create at the bottom.
Create a firewall rule to allow health check probes to make HTTP requests.
In the Google Cloud console, go to the Create firewall rule page.
For Name, enter
default-allow-http-health-check.For Network, select
default.For Targets, select
All instances in the network.For Source filter, select
IPv4 ranges.For Source IPv4 ranges, enter
130.211.0.0/22, 35.191.0.0/16.In Protocols and ports, select TCP and enter
80.Leave default values for the other options.
Click Create.
gcloud
Create a health check using the
health-checks create httpcommand.gcloud compute health-checks create http autohealer-check \ --region europe-west1 \ --check-interval 10 \ --timeout 5 \ --healthy-threshold 2 \ --unhealthy-threshold 3 \ --request-path "/health"check-intervaldefines the amount of time from the start of one probe to the start of the next one.timeoutdefines the amount of time that Google Cloud waits for a response to a probe. This value must be less than or equal to the check interval.healthy-thresholddefines the number of sequential probes that must succeed for the VM to be considered healthy.unhealthy-thresholddefines the number of sequential probes that must fail for the VM to be considered unhealthy.request-pathindicates what HTTP path the health check uses. For this tutorial, the demo web server defines the path/healthto return either anHTTP 200 (OK)response when healthy or anHTTP 500 (Internal Server Error)response when unhealthy.
Create a firewall rule to allow health check probes to make HTTP requests.
gcloud compute firewall-rules create default-allow-http-health-check \
    --network default \
    --allow tcp:80 \
    --source-ranges 130.211.0.0/22,35.191.0.0/16
What makes a good autohealing health check
Health checks used for autohealing should be conservative so they don't preemptively delete and recreate your instances. When an autohealer health check is too aggressive, the autohealer might mistake busy instances for failed instances and unnecessarily restart them, reducing availability.
unhealthy-threshold. Should be more than1. Ideally, set this value to3or more. This protects against rare failures like a network packet loss.healthy-threshold. A value of2is sufficient for most apps.timeout. Set this time value to a generous amount (five times or more than the expected response time). This protects against unexpected delays like busy instances or a slow network connection.check-interval. This value should be between 1 second and two times the timeout (not too long nor too short). When a value is too long, a failed instance is not caught soon enough. When a value is too short, the instances and the network can become measurably busy, given the high number of health check probes being sent every second.
Set up the web service
This tutorial uses a web app that is stored on GitHub. If you would like learn more about how the app was implemented, see the GoogleCloudPlatform/python-docs-samples GitHub repository.
To set up the demo web service, create an instance template that launches the demo web server on startup. Then, use this instance template to deploy a managed instance group and enable autohealing.
Console
Create an instance template. Include a startup script that starts up the demo web server.
In the Google Cloud console, go to the Create instance template page.
Set the Name to
webserver-template.In the Location section, from the Region drop-down, select europe-west1.
In the Machine configuration section, for the Machine type drop-down, select e2-medium.
In the Firewall section, select the Allow HTTP traffic checkbox.
Expand the Advanced options section to reveal advanced settings. Several sub-sections appear.
In the Management section, find Automation and enter the following Startup script:
apt-get update
apt-get -y install git python3-pip python3-venv
git clone https://github.com/GoogleCloudPlatform/python-docs-samples.git
python3 -m venv venv
./venv/bin/pip3 install -Ur ./python-docs-samples/compute/managed-instances/demo/requirements.txt
./venv/bin/pip3 install gunicorn
./venv/bin/gunicorn --bind 0.0.0.0:80 app:app --daemon --chdir ./python-docs-samples/compute/managed-instances/demo
Leave default values for the other options.
Click Create.
Deploy the web server as a managed instance group.
In the Google Cloud console, go to the Create instance group page.
Set the Name to
webserver-group.For Instance template, select
webserver-template.For Region, select
europe-west1.For Zone, select
europe-west1-b.In the Autoscaling section, for Autoscaling mode, select Off: do not autoscale.
Scroll back to the Number of instances field and set it to
3.In the Autohealing section, do the following:
- In the Health check drop-down, select
autohealer-check. Set Initial delay to
300.
- In the Health check drop-down, select
Leave default values for the other options.
Click Create.
Create a firewall rule that allows HTTP requests to the web servers.
In the Google Cloud console, go to the Create firewall rule page.
For Name, enter
default-allow-http.For Network, select
default.For Targets, select
Specified target tags.For Target Tags, enter
http-server.For Source filter, select
IPv4 ranges.For Source IPv4 ranges, enter
0.0.0.0/0to allow access for all IP addresses.In Protocols and ports, select TCP and enter
80.Leave default values for the other options.
Click Create.
gcloud
Create an instance template. Include a startup script that starts the demo web server.
gcloud compute instance-templates create webserver-template \
    --instance-template-region europe-west1 \
    --machine-type e2-medium \
    --tags http-server \
    --metadata startup-script='
  apt-get update
  apt-get -y install git python3-pip python3-venv
  git clone https://github.com/GoogleCloudPlatform/python-docs-samples.git
  python3 -m venv venv
  ./venv/bin/pip3 install -Ur ./python-docs-samples/compute/managed-instances/demo/requirements.txt
  ./venv/bin/pip3 install gunicorn
  ./venv/bin/gunicorn --bind 0.0.0.0:80 app:app --daemon --chdir ./python-docs-samples/compute/managed-instances/demo'
Create a managed instance group.
gcloud compute instance-groups managed create webserver-group \ --zone europe-west1-b \ --template projects/PROJECT_ID/regions/europe-west1/instanceTemplates/webserver-template \ --size 3 \ --health-check projects/PROJECT_ID/regions/europe-west1/healthChecks/autohealer-check \ --initial-delay 300Create a firewall rule that allows HTTP requests to the web servers.
gcloud compute firewall-rules create default-allow-http \
    --network default \
    --allow tcp:80 \
    --target-tags http-server
Wait a few minutes for the managed instance group to create and verify its VMs.
Simulate health check failures
To simulate health check failures, the demo web server provides ways for you to force a health check failure.
Console
Navigate to a web server VM.
In the Google Cloud console, go to the VM instances page.
For any
webserver-groupVM, under the External IP column, click the IP address. A new tab opens in your web browser. If the request times out or the web page is not available, wait a minute to let the server finish setting up and try again.
The demo web server displays a page similar to the following:
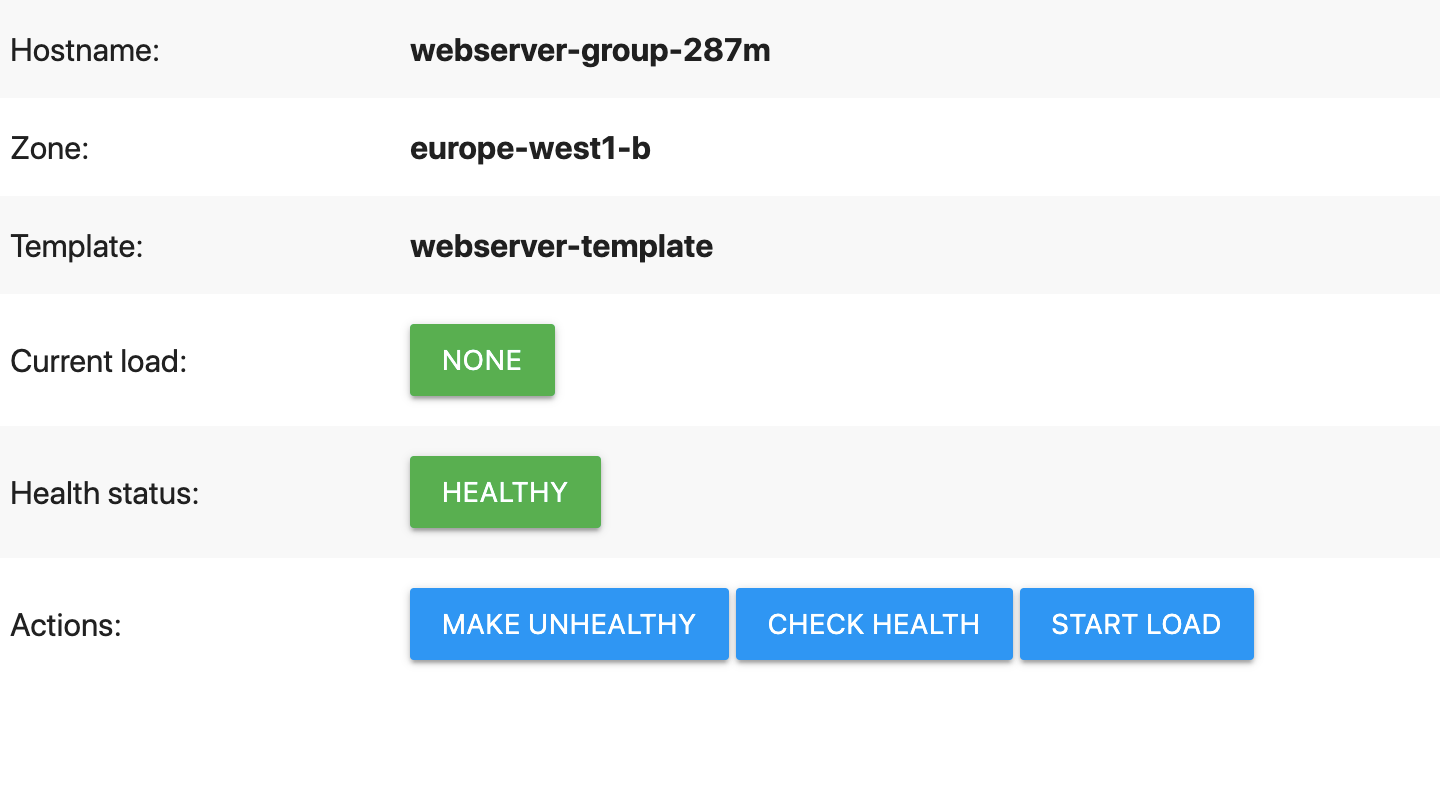
On the demo web page, click Make unhealthy.
This causes the web server to fail the health check. Specifically, the web server makes the
/healthpath return anHTTP 500 (Internal Server Error). You can verify this yourself by quickly clicking the Check health button (this stops working after the autohealer has started rebooting the VM).Wait for the autohealer to take action.
In the Google Cloud console, go to the VM instances page.
Wait for the status of the web server VM to change. The green checkmark next to the VM name should change to a grey square, indicating that the autohealer has started rebooting the unhealthy VM.
Click Refresh at the top of the page periodically to get the most recent status.
The autohealing process is finished when the grey square changes back to a green checkmark, indicating the VM is healthy again.
gcloud
Monitor the status of the managed instance group. (When you have finished, stop by pressing
Ctrl+C.)while : ; do gcloud compute instance-groups managed list-instances webserver-group \ --zone europe-west1-b sleep 5 # Wait for 5 seconds done
  NAME: webserver-group-0zx6
  ZONE: europe-west1-b
  STATUS: RUNNING
  HEALTH_STATE: HEALTHY
  ACTION: NONE
  INSTANCE_TEMPLATE: webserver-template
  VERSION_NAME:
  LAST_ERROR:

  NAME: webserver-group-4qbx
  ZONE: europe-west1-b
  STATUS: RUNNING
  HEALTH_STATE: HEALTHY
  ACTION: NONE
  INSTANCE_TEMPLATE: webserver-template
  VERSION_NAME:
  LAST_ERROR:

  NAME: webserver-group-m5v5
  ZONE: europe-west1-b
  STATUS: RUNNING
  HEALTH_STATE: HEALTHY
  ACTION: NONE
  INSTANCE_TEMPLATE: webserver-template
  VERSION_NAME:
  LAST_ERROR:
All VMs in the group must show
STATUS: RUNNINGandACTION: NONE. If not, wait a few minutes to let the VMs finish setting up and try again.Open a new Cloud Shell session with the Google Cloud CLI installed.
Get the address of a web server VM.
gcloud compute instances list --filter webserver-group
Under the
EXTERNAL_IPcolumn, copy the IP address of any web server VM and save it as a local bash variable.export IP_ADDRESS=EXTERNAL_IP_ADDRESS
Verify the web server has finished setting up. The server returns an
HTTP 200 OKresponse.curl --head $IP_ADDRESS/health
HTTP/1.1 200 OK
Server: gunicorn
...
If you get a
Connection refusederror, wait a minute to let the server finish setting up and try again.Make the web server unhealthy.
curl $IP_ADDRESS/makeUnhealthy > /dev/null
This causes the web server to fail the health check. Specifically, the web server makes the
/healthpath return anHTTP 500 INTERNAL SERVER ERROR. You can verify this yourself by quickly making a request to/health(this stops working after the autohealer has started rebooting the VM).curl --head $IP_ADDRESS/health
HTTP/1.1 500 INTERNAL SERVER ERROR
Server: gunicorn
...
Return to your first shell session to monitor the managed instance group and wait for the autohealer to take action.
When the autohealing process has started, the
STATUSandACTIONcolumns update, indicating that the autohealer has started rebooting the unhealthy VM.NAME: webserver-group-0zx6 ZONE: europe-west1-b STATUS: STOPPING HEALTH_STATE: UNHEALTHY ACTION: RECREATING INSTANCE_TEMPLATE: webserver-template VERSION_NAME: LAST_ERROR: ...
The autohealing process has finished when the VM again reports a
STATUSofRUNNINGand anACTIONofNONE, indicating the VM is successfully restarted.NAME: webserver-group-0zx6 ZONE: europe-west1-b STATUS: RUNNING HEALTH_STATE: HEALTHY ACTION: NONE INSTANCE_TEMPLATE: webserver-template VERSION_NAME: LAST_ERROR: ...
When you have finished monitoring the managed instance group, stop by pressing
Ctrl+C.
Feel free to repeat this exercise. Here are some ideas:
What happens if you make all VMs unhealthy at one time? For more information about autohealing behavior during concurrent failures, see autohealing behavior.
Can you update the health check configuration to heal VMs as fast as possible? (In practice, you should set the health check parameters to use conservative values as explained in this tutorial. Otherwise, you may risk VMs being mistakenly deleted and restarted when there is no real problem.)
The managed instance group has an
initial delayconfiguration setting. Can you determine the minimum delay needed for this demo web server? (In practice, you should set the delay to somewhat longer (10%–20%) than it takes for a VM to boot and start serving app requests. Otherwise, you risk the VM getting stuck in an autohealing boot loop.)
View autohealer history (optional)
To view a history of autohealer operations use the following
gcloud command:
gcloud compute operations list --filter='operationType~compute.instances.repair.*'
For more information, see viewing historical autohealing operations
Clean up
After you finish the tutorial, you can clean up the resources that you created so that they stop using quota and incurring charges. The following sections describe how to delete or turn off these resources.
If you created a separate project for this tutorial, delete the entire project. Otherwise, if the project has resources that you want to keep, only delete the specific resources created in this tutorial.
Deleting the project
- In the Google Cloud console, go to the Manage resources page.
- In the project list, select the project that you want to delete, and then click Delete.
- In the dialog, type the project ID, and then click Shut down to delete the project.
Deleting specific resources
If you can't delete the project used for this tutorial, delete the tutorial resources individually.
Deleting the instance group
console
- In the Google Cloud console, go to the Instance groups page.
-
Select the checkbox for
your
webserver-groupinstance group. - To delete the instance group, click Delete.
gcloud
gcloud compute instance-groups managed delete webserver-group --zone europe-west1-b -q
Deleting the instance template
console
In the Google Cloud console, go to the Instance templates page.
Click the checkbox next to the instance template.
Click Delete at the top of the page. In the new window, click Delete to confirm the deletion.
gcloud
gcloud compute instance-templates delete webserver-template -q \
    --region=europe-west1
Deleting the health check
console
In the Google Cloud console, go to the Health checks page.
Click the checkbox next to the health check.
Click Delete at the top of the page. In the new window, click Delete to confirm the deletion.
gcloud
gcloud compute health-checks delete autohealer-check -q \
    --region=europe-west1
Deleting the firewall rules
console
In the Google Cloud console, go to the Firewall rules page.
Click the checkboxes next to the firewall rules named
default-allow-httpanddefault-allow-http-health-check.Click Delete at the top of the page. In the new window, click Delete to confirm the deletion.
gcloud
gcloud compute firewall-rules delete default-allow-http default-allow-http-health-check -q
What's next
- Try another tutorial:
- Learn more about managed instance groups.
- Learn more about designing robust systems.
- Learn more about building scalable and resilient web apps on Google Cloud.