仮想マシン(VM)インスタンスを作成すると、 Google Cloud は VM 名から内部 DNS 名を作成します。カスタムホスト名を指定しない限り、 Google Cloud は自動的に作成された内部 DNS 名をホスト名として VM に割り当てます。
カスタムホスト名を使用する VM を作成するには、完全修飾 DNS 名を指定します。カスタムホスト名は、命名規則を維持する場合や特定のホスト名を待ち受けるアプリケーションの要件をサポートする場合に役立ちます。
カスタムホスト名を指定しても、 Google Cloud は Compute Engine の内部 DNS 名を作成します。自動的に作成された内部 DNS レコードを使用して VM に接続できます。内部 DNS レコードは、カスタムホスト名ではなく内部 DNS 名に解決されます。カスタムホスト名を使用する場合、該当するゾーンに対応する DNS レコードを作成する必要があります(たとえば、Cloud DNS を使用します)。
始める前に
-
まだ設定していない場合は、認証を設定します。認証では、 Google Cloud サービスと API にアクセスするための ID が確認されます。ローカル開発環境からコードまたはサンプルを実行するには、次のいずれかのオプションを選択して Compute Engine に対する認証を行います。
Select the tab for how you plan to use the samples on this page:
Console
When you use the Google Cloud console to access Google Cloud services and APIs, you don't need to set up authentication.
gcloud
-
Google Cloud CLI をインストールします。 インストール後、次のコマンドを実行して Google Cloud CLI を初期化します。
gcloud init外部 ID プロバイダ(IdP)を使用している場合は、まず連携 ID を使用して gcloud CLI にログインする必要があります。
- Set a default region and zone.
Terraform
ローカル開発環境でこのページの Terraform サンプルを使用するには、gcloud CLI をインストールして初期化し、ユーザー認証情報を使用してアプリケーションのデフォルト認証情報を設定します。
Google Cloud CLI をインストールします。
外部 ID プロバイダ(IdP)を使用している場合は、まず連携 ID を使用して gcloud CLI にログインする必要があります。
If you're using a local shell, then create local authentication credentials for your user account:
gcloud auth application-default login
You don't need to do this if you're using Cloud Shell.
If an authentication error is returned, and you are using an external identity provider (IdP), confirm that you have signed in to the gcloud CLI with your federated identity.
詳細については Set up authentication for a local development environment をご覧ください。
Go
ローカル開発環境でこのページの Go サンプルを使用するには、gcloud CLI をインストールして初期化し、ユーザー認証情報を使用してアプリケーションのデフォルト認証情報を設定します。
Google Cloud CLI をインストールします。
外部 ID プロバイダ(IdP)を使用している場合は、まず連携 ID を使用して gcloud CLI にログインする必要があります。
If you're using a local shell, then create local authentication credentials for your user account:
gcloud auth application-default login
You don't need to do this if you're using Cloud Shell.
If an authentication error is returned, and you are using an external identity provider (IdP), confirm that you have signed in to the gcloud CLI with your federated identity.
詳細については Set up authentication for a local development environment をご覧ください。
Java
ローカル開発環境でこのページの Java サンプルを使用するには、gcloud CLI をインストールして初期化し、ユーザー認証情報を使用してアプリケーションのデフォルト認証情報を設定します。
Google Cloud CLI をインストールします。
外部 ID プロバイダ(IdP)を使用している場合は、まず連携 ID を使用して gcloud CLI にログインする必要があります。
If you're using a local shell, then create local authentication credentials for your user account:
gcloud auth application-default login
You don't need to do this if you're using Cloud Shell.
If an authentication error is returned, and you are using an external identity provider (IdP), confirm that you have signed in to the gcloud CLI with your federated identity.
詳細については Set up authentication for a local development environment をご覧ください。
Node.js
ローカル開発環境でこのページの Node.js サンプルを使用するには、gcloud CLI をインストールして初期化し、ユーザー認証情報を使用してアプリケーションのデフォルト認証情報を設定します。
Google Cloud CLI をインストールします。
外部 ID プロバイダ(IdP)を使用している場合は、まず連携 ID を使用して gcloud CLI にログインする必要があります。
If you're using a local shell, then create local authentication credentials for your user account:
gcloud auth application-default login
You don't need to do this if you're using Cloud Shell.
If an authentication error is returned, and you are using an external identity provider (IdP), confirm that you have signed in to the gcloud CLI with your federated identity.
詳細については Set up authentication for a local development environment をご覧ください。
Python
ローカル開発環境でこのページの Python サンプルを使用するには、gcloud CLI をインストールして初期化し、ユーザー認証情報を使用してアプリケーションのデフォルト認証情報を設定します。
Google Cloud CLI をインストールします。
外部 ID プロバイダ(IdP)を使用している場合は、まず連携 ID を使用して gcloud CLI にログインする必要があります。
If you're using a local shell, then create local authentication credentials for your user account:
gcloud auth application-default login
You don't need to do this if you're using Cloud Shell.
If an authentication error is returned, and you are using an external identity provider (IdP), confirm that you have signed in to the gcloud CLI with your federated identity.
詳細については Set up authentication for a local development environment をご覧ください。
REST
このページの REST API サンプルをローカル開発環境で使用するには、gcloud CLI に指定した認証情報を使用します。
Google Cloud CLI をインストールします。
外部 ID プロバイダ(IdP)を使用している場合は、まず連携 ID を使用して gcloud CLI にログインする必要があります。
詳細については、 Google Cloud 認証ドキュメントの REST を使用して認証するをご覧ください。
必要なロール
カスタムホスト名を持つ VM を作成するために必要な権限を取得するには、プロジェクトに対する Compute インスタンス管理者(v1)(
roles/compute.instanceAdmin.v1)IAM ロールを付与するよう管理者に依頼してください。ロールの付与については、プロジェクト、フォルダ、組織へのアクセス権の管理をご覧ください。この事前定義ロールには、カスタムホスト名を持つ VM を作成するために必要な権限が含まれています。必要とされる正確な権限については、「必要な権限」セクションを開いてご確認ください。
必要な権限
カスタムホスト名を持つ VM を作成するには、次の権限が必要です。
- プロジェクトに対する
compute.instances.create -
カスタム イメージを使用して VM を作成する: イメージに対する
compute.images.useReadOnly -
スナップショットを使用して VM を作成する: スナップショットに対する
compute.snapshots.useReadOnly -
インスタンス テンプレートを使用して VM を作成する: インスタンス テンプレートに対する
compute.instanceTemplates.useReadOnly -
VM のサブネットを指定する: プロジェクトまたは選択したサブネットに対する
compute.subnetworks.use -
VM の静的 IP アドレスを指定する: プロジェクトに対する
compute.addresses.use -
VPC ネットワークの使用時に VM に外部 IP アドレスを割り当てる: プロジェクトまたは選択したサブネットに対する
compute.subnetworks.useExternalIp -
VM にレガシー ネットワークを割り当てる: プロジェクトに対する
compute.networks.use -
レガシー ネットワークを使用する際に VM に外部 IP アドレスを割り当てる: プロジェクトに対する
compute.networks.useExternalIp -
VM の VM インスタンス メタデータを設定する: プロジェクトに対する
compute.instances.setMetadata -
VM にタグを設定する: VM に対する
compute.instances.setTags -
VM にラベルを設定する: VM に対する
compute.instances.setLabels -
VM が使用するサービス アカウントを設定する: VM に対する
compute.instances.setServiceAccount -
VM 用の新しいディスクを作成する: プロジェクトに対する
compute.disks.create -
既存のディスクを読み取り専用モードまたは読み取り / 書き込みモードでアタッチする: ディスクに対する
compute.disks.use -
既存のディスクを読み取り専用モードでアタッチする: ディスクに対する
compute.disks.useReadOnly
カスタムロールや他の事前定義ロールを使用して、これらの権限を取得することもできます。
制限事項
カスタムホスト名の DNS レコードは手動で構成する必要があります。Compute Engine 内部 DNS が提供する自動作成レコードではカスタムホスト名は解決されません。次のいずれかを使用すれば、カスタムホスト名の DNS レコードをホストできます。
他のパブリック DNS ネームサーバー
VM の作成後にカスタムホスト名を変更することはできません。
サポートされているオペレーティング システム
カスタムホスト名は、ゲスト ネットワーキング ソフトウェアに組み込まれるフック スクリプトを使用してゲスト環境で設定されます。ゲスト ネットワーク ソフトウェアに組み込まれるスクリプトがない Linux オペレーティング システムでは、正しいホスト名が設定されない可能性があります。
カスタムホスト名をサポートするオペレーティング システム バージョンの完全なリストについては、オペレーティング システムの詳細でゲスト環境のサポートを確認してください。
命名規則
カスタムホスト名は、有効なホスト名に関する RFC 1035 の要件を満たしている必要があります。これらの要件を満たすには、カスタムホスト名が次の形式仕様を満たす必要があります。
- ホスト名には、次に示すような 2 つ以上のラベルが含まれています。
- 各ラベルには次の文字のみを使用した正規表現が含まれます。
[a-z]([-a-z0-9]*[a-z0-9])?。 - ラベルはドットで連結されます。
- 各ラベルの長さは 1~63 文字です。
- 各ラベルには次の文字のみを使用した正規表現が含まれます。
- ホスト名は 253 文字以内です。
無効: ラベルが 1 つしか含まれていない
my-host1234
有効: ドットで連結された 3 つのラベルが含まれている
my-host1234.example.com
カスタムホスト名で VM を作成する
コンソール
Google Cloud コンソールで [インスタンスの作成] ページに移動します。
VM の名前を指定します。詳しくは、リソースの命名規則をご覧ください。
[詳細オプション] セクションを開き、次の操作を行います。
- [ネットワーキング] セクションを開きます。
- [ホスト名] フィールドに、カスタムホスト名を指定します。
必要に応じて、VM をさらにカスタマイズします。
VM を作成して起動するには、[作成] をクリックします。
次のステップ: DNS レコードを構成する。詳しくはレコードの管理をご覧ください。
gcloud
Google Cloud CLI を使用して、イメージまたはスナップショットからインスタンスを作成するか、
--hostnameフラグを追加して、次のようにgcloud compute instances createコマンドを実行します。gcloud compute instances create VM_NAME \ --hostname=HOST_NAME次のように置き換えます。
VM_NAME: VM の名前HOST_NAME: 割り当てる完全修飾ドメインホスト名
たとえば、カスタムホスト名
test.example.comを指定して VMmyinstanceを作成するには、次のコマンドを実行します。gcloud compute instances create myinstance \ --hostname=test.example.com次のステップ: DNS レコードを構成する。詳しくはレコードの管理をご覧ください。
Terraform
Terraform リソースで
Terraform コードを生成するには、 Google Cloud コンソールの同等のコード コンポーネントを使用します。hostname引数を使用すると、カスタムホスト名を持つインスタンスを作成できます。- Google Cloud コンソールで、[VM インスタンス] ページに移動します。
- [インスタンスを作成] をクリックします。
- 必要なパラメータを指定します。
- ページの上部または下部で [同等のコード] をクリックし、[Terraform] タブをクリックして Terraform コードを表示します。
次のステップ: DNS レコードを構成する。詳しくはレコードの管理をご覧ください。
Go
Java
Node.js
Python
REST
API の手順に沿って、イメージからインスタンスを作成するか、スナップショットから作成して、リクエスト本文で
hostnameフィールドを指定します。POST https://compute.googleapis.com/compute/v1/projects/PROJECT_ID/zones/ZONE/instances { "name": "VM_NAME", "hostname": "HOST_NAME", ... }次のように置き換えます。
カスタムホスト名を確認する
Linux VM の場合、VM で
hostname -fコマンドを実行してホスト名を確認します。Google Cloud コンソールまたは Google Cloud CLI を使用して、カスタムホスト名の確認もできます。
コンソール
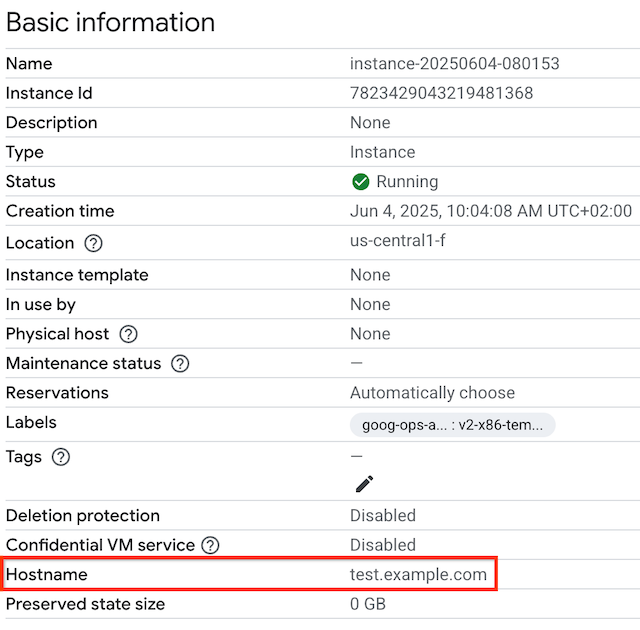
VM のカスタムホスト名を表示するには、[VM インスタンス] ページに移動します。
インスタンス名をクリックして、[VM インスタンスの詳細] ページを開きます。
[ホスト名] セクションを確認します。[ホスト名] フィールドは、カスタムホスト名が設定されている場合にのみ表示されます。
gcloud
gcloud computeを使用して VM のカスタムホスト名を表示するには、--formatフラグを指定してinstances describeサブコマンドを実行し、出力をフィルタリングします。VM_NAMEは VM の名前に置き換えます。gcloud compute instances describe VM_NAME \ --format='get(hostname)'たとえば、
myinstanceという名前の VM のカスタムホスト名を表示するには、次のコマンドを実行します。gcloud compute instances describe myinstance \ --format='get(hostname)'出力は次のようになります。
test.example.com
カスタムホスト名が設定されていない場合、このコマンドの出力は空白になります。
次のステップ
特に記載のない限り、このページのコンテンツはクリエイティブ・コモンズの表示 4.0 ライセンスにより使用許諾されます。コードサンプルは Apache 2.0 ライセンスにより使用許諾されます。詳しくは、Google Developers サイトのポリシーをご覧ください。Java は Oracle および関連会社の登録商標です。
最終更新日 2025-11-10 UTC。
-