VM にローカル SSD を追加する


ローカル SSD は、キャッシュやスクラッチ処理スペースなど、一時的なストレージのユースケース向けに設計されています。ローカル SSD は、VM が実行されている物理マシン上に配置されるため、VM の作成プロセスでのみ作成できます。ローカル SSD を起動デバイスとして使用することはできません。

第 3 世代のマシンシリーズの場合、VM の作成時に一定数のローカル SSD ディスクが VM に追加されます。これらの VM にローカル SSD ストレージを追加する唯一の方法は、次のとおりです。

  • C3 と C3D の場合、ローカル SSD ストレージは c3-standard-88-lssd などの特定のマシンタイプでのみ使用できます。
  • Z3、A3、A2 Ultra マシンシリーズの場合、すべてのマシンタイプにローカル SSD ストレージが付属しています。

M3、第 1 世代、第 2 世代のマシンタイプの場合、VM の作成時にローカル SSD ディスクを指定する必要があります。

ローカル SSD を作成した後は、使用する前に、デバイスをフォーマットしてマウントする必要があります。

さまざまなマシンタイプで使用できるローカル SSD ストレージの容量と、VM にアタッチできるローカル SSD ディスクの数については、有効な数のローカル SSD を選択するをご覧ください。

始める前に

  • ローカル SSD を使用する前に、ローカル SSD の制限を確認します。
  • ローカル SSD ディスクのデータの永続性のシナリオを確認します。
  • GPU がアタッチされた仮想マシン(VM)インスタンスにローカル SSD を追加する場合は、GPU のリージョンとゾーンごとのローカル SSD の可用性をご覧ください。
  • まだ設定していない場合は、認証を設定します。認証とは、Google Cloud サービスと API にアクセスするために ID を確認するプロセスです。ローカル開発環境からコードまたはサンプルを実行するには、次のように Compute Engine に対する認証を行います。

    このページのサンプルをどのように使うかに応じて、タブを選択してください。

    コンソール

    Google Cloud コンソールを使用して Google Cloud サービスと API にアクセスする場合、認証を設定する必要はありません。

    gcloud

    1. Google Cloud CLI をインストールし、次のコマンドを実行して初期化します。

      gcloud init
    2. デフォルトのリージョンとゾーンを設定します

    Terraform

    このページの Terraform サンプルをローカル開発環境から使用するには、gcloud CLI をインストールして初期化し、自身のユーザー認証情報を使用してアプリケーションのデフォルト認証情報を設定してください。

    1. Google Cloud CLI をインストールします。
    2. gcloud CLI を初期化するには:

      gcloud init
    3. Google アカウントのローカル認証情報を作成します。

      gcloud auth application-default login

    詳細については、 ローカル開発環境の認証の設定 をご覧ください。

    Go

    このページの Go サンプルをローカル開発環境から使用するには、gcloud CLI をインストールして初期化し、自身のユーザー認証情報を使用してアプリケーションのデフォルト認証情報を設定してください。

    1. Google Cloud CLI をインストールします。
    2. gcloud CLI を初期化するには:

      gcloud init
    3. Google アカウントのローカル認証情報を作成します。

      gcloud auth application-default login

    詳細については、 ローカル開発環境の認証の設定 をご覧ください。

    Java

    このページの Java サンプルをローカル開発環境から使用するには、gcloud CLI をインストールして初期化し、自身のユーザー認証情報を使用してアプリケーションのデフォルト認証情報を設定してください。

    1. Google Cloud CLI をインストールします。
    2. gcloud CLI を初期化するには:

      gcloud init
    3. Google アカウントのローカル認証情報を作成します。

      gcloud auth application-default login

    詳細については、 ローカル開発環境の認証の設定 をご覧ください。

    Python

    このページの Python サンプルをローカル開発環境から使用するには、gcloud CLI をインストールして初期化し、自身のユーザー認証情報を使用してアプリケーションのデフォルト認証情報を設定してください。

    1. Google Cloud CLI をインストールします。
    2. gcloud CLI を初期化するには:

      gcloud init
    3. Google アカウントのローカル認証情報を作成します。

      gcloud auth application-default login

    詳細については、 ローカル開発環境の認証の設定 をご覧ください。

    REST

    このページの REST API サンプルをローカル開発環境で使用するには、gcloud CLI に指定した認証情報を使用します。

      Google Cloud CLI をインストールし、次のコマンドを実行して初期化します。

      gcloud init

ローカル SSD を持つ VM を作成する

ローカル SSD ディスク ストレージを備えた VM を作成するには、Google Cloud コンソールgcloud CLI、または Compute Engine API を使用します。

コンソール

  1. [インスタンスの作成] ページに移動します。

    [インスタンスの作成] に移動

  2. VM の名前、リージョン、ゾーンを指定します。必要に応じて、タグまたはラベルを追加します。

  3. [マシンの構成] セクションで、ターゲット マシンタイプを含むマシン ファミリーを選択します。

  4. [シリーズ] リストからシリーズを選択し、マシンタイプを選択します。

    • 第 3 世代のマシンシリーズ C3 と C3D の場合は、-lssd で終わるマシンタイプを選択します。
    • Z3、A3、A2 Ultra の場合は、すべてのマシンタイプにローカル SSD ストレージが付属しています。
    • M3、または第 1 世代と第 2 世代のマシンシリーズの場合は、マシンタイプを選択した後に次の操作を行います。
      1. [詳細オプション] セクションを開きます。
      2. [ディスク] を開き、[ローカル SSD を追加] をクリックして、次の操作を行います。
        1. [ローカル SSD の構成] ページで、ディスク インターフェースのタイプを選択します。
        2. [ディスク容量] リストから必要なディスクの数を選択します。
        3. [保存] をクリックします。
  5. VM 作成プロセスを続行します。

  6. ローカル SSD ディスクを使用して VM を作成したら、ディスクを使用する前に各デバイスをフォーマットしてマウントする必要があります。

gcloud

  • Z3、A3、A2 Ultra マシンシリーズの場合、ローカル SSD ディスクがアタッチされた VM を作成するには、インスタンスを作成する手順に沿って、そのシリーズで使用可能なマシンタイプを使用する VM を作成します。

  • C3 または C3D マシンシリーズの場合、ローカル SSD ディスクがアタッチされた VM を作成するには、インスタンスの作成手順に沿って操作しますが、ローカル SSD ディスク(-lssd)を含むインスタンス タイプを指定します。

    たとえば次のように、NVMe ディスク インターフェースを使用する 2 つのローカル SSD パーティションを持つ C3 VM を作成できます。

    gcloud compute instances create example-c3-instance \
       --zone ZONE \
       --machine-type c3-standard-8-lssd \
       --image-project IMAGE_PROJECT \
       --image-family IMAGE_FAMILY
    
  • M3、第 1 世代、第 2 世代のマシンシリーズの場合、ローカル SSD ディスクがアタッチされた VM を作成するには、インスタンスを作成する手順に沿って操作しますが、ローカル SSD ディスクを作成してアタッチするため --local-ssd フラグを使用します。複数のローカル SSD パーティションを作成するには、--local-ssd フラグを追加します。必要に応じて、インターフェースの値と各 --local-ssd フラグのデバイス名を設定することもできます。

    たとえば、4 つのローカル SSD ディスクを持つ M3 VM を作成し、ディスク インターフェース タイプを次のように指定できます。

    gcloud compute instances VM_NAME \
       --machine-type m3-ultramem-64 \
       --zone ZONE \
       --local-ssd interface=INTERFACE_TYPE device-name=DEVICE-NAME \
       --local-ssd interface=INTERFACE_TYPE device-name=DEVICE-NAME \
       --local-ssd interface=INTERFACE_TYPE device-name=DEVICE-NAME \
       --local-ssd interface=INTERFACE_TYPE \
       --image-project IMAGE_PROJECT \
       --image-family IMAGE_FAMILY
    

次のように置き換えます。

  • VM_NAME: 新しい VM の名前
  • ZONE: VM を作成するゾーン。gcloud CLI compute/zone プロパティまたは環境変数 CLOUDSDK_COMPUTE_ZONE を構成している場合、このフラグは省略可能です。
  • INTERFACE_TYPE: ローカル SSD デバイスに使用するディスク インターフェースの種類です。M3 VM を作成する場合、またはブートディスク イメージに最適化された NVMe ドライバがある場合は、nvme を指定します。他のイメージの場合は scsi を指定します。
  • DEVICE-NAME: 省略可。ゲスト オペレーティング システムのシンボリック リンク(symlink)で使用するディスク名を示す名前。
  • IMAGE_FAMILY: ブートディスクにインストールする使用可能なイメージ ファミリーのいずれかです。
  • IMAGE_PROJECT: イメージ ファミリーが属するイメージ プロジェクトです。

必要に応じて、異なるパーティションに nvmescsi を組み合わせて使用し、第 1 世代または第 2 世代の VM にローカル SSD をアタッチできます。nvme デバイスのパフォーマンスは、インスタンスのブートディスク イメージにより異なります。第 3 世代の VM は、NVMe ディスク インターフェースのみをサポートします。

ローカル SSD を使用して VM を作成した後は、使用する前に各デバイスをフォーマットしてマウントする必要があります。

Terraform

ローカル SSD ディスクがアタッチされた VM を作成するには、google_compute_instance リソースを使用します。


# Create a VM with a local SSD for temporary storage use cases

resource "google_compute_instance" "default" {
  name         = "my-vm-instance-with-scratch"
  machine_type = "n2-standard-8"
  zone         = "us-central1-a"

  boot_disk {
    initialize_params {
      image = "debian-cloud/debian-11"
    }
  }

  # Local SSD interface type; NVME for image with optimized NVMe drivers or SCSI
  # Local SSD are 375 GiB in size
  scratch_disk {
    interface = "SCSI"
  }

  network_interface {
    network = "default"
    access_config {}
  }
}

Terraform 構成を適用または削除する方法については、基本的な Terraform コマンドをご覧ください。

Terraform コードを生成するには、Google Cloud コンソールの同等のコード コンポーネントを使用します。
  1. Google Cloud コンソールで [VM インスタンス] ページに移動します。

    [VM インスタンス] に移動

  2. [インスタンスを作成] をクリックします。
  3. 必要なパラメータを指定します。
  4. ページの上部または下部で [同等のコード] をクリックし、[Terraform] タブをクリックして Terraform コードを表示します。

Go

Go

このサンプルを試す前に、Compute Engine クイックスタート: クライアント ライブラリの使用に記載されている Go の設定手順に沿って操作します。詳細については、Compute Engine Go API リファレンス ドキュメントをご覧ください。

Compute Engine に対して認証を行うには、アプリケーションのデフォルト認証情報を設定します。詳細については、ローカル開発環境の認証を設定するをご覧ください。

import (
	"context"
	"fmt"
	"io"

	compute "cloud.google.com/go/compute/apiv1"
	computepb "cloud.google.com/go/compute/apiv1/computepb"
	"google.golang.org/protobuf/proto"
)

// createWithLocalSSD creates a new VM instance with Debian 10 operating system and a local SSD attached.
func createWithLocalSSD(w io.Writer, projectID, zone, instanceName string) error {
	// projectID := "your_project_id"
	// zone := "europe-central2-b"
	// instanceName := "your_instance_name"

	ctx := context.Background()
	instancesClient, err := compute.NewInstancesRESTClient(ctx)
	if err != nil {
		return fmt.Errorf("NewInstancesRESTClient: %w", err)
	}
	defer instancesClient.Close()

	imagesClient, err := compute.NewImagesRESTClient(ctx)
	if err != nil {
		return fmt.Errorf("NewImagesRESTClient: %w", err)
	}
	defer imagesClient.Close()

	// List of public operating system (OS) images: https://cloud.google.com/compute/docs/images/os-details.
	newestDebianReq := &computepb.GetFromFamilyImageRequest{
		Project: "debian-cloud",
		Family:  "debian-10",
	}
	newestDebian, err := imagesClient.GetFromFamily(ctx, newestDebianReq)
	if err != nil {
		return fmt.Errorf("unable to get image from family: %w", err)
	}

	req := &computepb.InsertInstanceRequest{
		Project: projectID,
		Zone:    zone,
		InstanceResource: &computepb.Instance{
			Name: proto.String(instanceName),
			Disks: []*computepb.AttachedDisk{
				{
					InitializeParams: &computepb.AttachedDiskInitializeParams{
						DiskSizeGb:  proto.Int64(10),
						SourceImage: newestDebian.SelfLink,
						DiskType:    proto.String(fmt.Sprintf("zones/%s/diskTypes/pd-standard", zone)),
					},
					AutoDelete: proto.Bool(true),
					Boot:       proto.Bool(true),
					Type:       proto.String(computepb.AttachedDisk_PERSISTENT.String()),
				},
				{
					InitializeParams: &computepb.AttachedDiskInitializeParams{
						DiskType: proto.String(fmt.Sprintf("zones/%s/diskTypes/local-ssd", zone)),
					},
					AutoDelete: proto.Bool(true),
					Type:       proto.String(computepb.AttachedDisk_SCRATCH.String()),
				},
			},
			MachineType: proto.String(fmt.Sprintf("zones/%s/machineTypes/n1-standard-1", zone)),
			NetworkInterfaces: []*computepb.NetworkInterface{
				{
					Name: proto.String("global/networks/default"),
				},
			},
		},
	}

	op, err := instancesClient.Insert(ctx, req)
	if err != nil {
		return fmt.Errorf("unable to create instance: %w", err)
	}

	if err = op.Wait(ctx); err != nil {
		return fmt.Errorf("unable to wait for the operation: %w", err)
	}

	fmt.Fprintf(w, "Instance created\n")

	return nil
}

Java

Java

このサンプルを試す前に、Compute Engine クイックスタート: クライアント ライブラリの使用に記載されている Java の設定手順に沿って操作します。詳細については、Compute Engine Java API リファレンス ドキュメントをご覧ください。

Compute Engine に対して認証を行うには、アプリケーションのデフォルト認証情報を設定します。詳細については、ローカル開発環境の認証を設定するをご覧ください。


import com.google.cloud.compute.v1.AttachedDisk;
import com.google.cloud.compute.v1.AttachedDiskInitializeParams;
import com.google.cloud.compute.v1.Image;
import com.google.cloud.compute.v1.ImagesClient;
import com.google.cloud.compute.v1.Instance;
import com.google.cloud.compute.v1.InstancesClient;
import com.google.cloud.compute.v1.NetworkInterface;
import com.google.cloud.compute.v1.Operation;
import java.io.IOException;
import java.util.ArrayList;
import java.util.List;
import java.util.concurrent.ExecutionException;
import java.util.concurrent.TimeUnit;
import java.util.concurrent.TimeoutException;

public class CreateWithLocalSsd {

  public static void main(String[] args)
      throws IOException, ExecutionException, InterruptedException, TimeoutException {
    // TODO(developer): Replace these variables before running the sample.
    // projectId: project ID or project number of the Cloud project you want to use.
    String projectId = "your-project-id";
    // zone: name of the zone to create the instance in. For example: "us-west3-b"
    String zone = "zone-name";
    // instanceName: name of the new virtual machine (VM) instance.
    String instanceName = "instance-name";

    createWithLocalSsd(projectId, zone, instanceName);
  }

  // Create a new VM instance with Debian 10 operating system and SSD local disk.
  public static void createWithLocalSsd(String projectId, String zone, String instanceName)
      throws IOException, ExecutionException, InterruptedException, TimeoutException {

    int diskSizeGb = 10;
    boolean boot = true;
    boolean autoDelete = true;
    String diskType = String.format("zones/%s/diskTypes/pd-standard", zone);
    // Get the latest debian image.
    Image newestDebian = getImageFromFamily("debian-cloud", "debian-10");
    List<AttachedDisk> disks = new ArrayList<>();

    // Create the disks to be included in the instance.
    disks.add(
        createDiskFromImage(diskType, diskSizeGb, boot, newestDebian.getSelfLink(), autoDelete));
    disks.add(createLocalSsdDisk(zone));

    // Create the instance.
    Instance instance = createInstance(projectId, zone, instanceName, disks);

    if (instance != null) {
      System.out.printf("Instance created with local SSD: %s", instance.getName());
    }

  }

  // Retrieve the newest image that is part of a given family in a project.
  // Args:
  //    projectId: project ID or project number of the Cloud project you want to get image from.
  //    family: name of the image family you want to get image from.
  private static Image getImageFromFamily(String projectId, String family) throws IOException {
    // Initialize client that will be used to send requests. This client only needs to be created
    // once, and can be reused for multiple requests. After completing all of your requests, call
    // the `imagesClient.close()` method on the client to safely
    // clean up any remaining background resources.
    try (ImagesClient imagesClient = ImagesClient.create()) {
      // List of public operating system (OS) images: https://cloud.google.com/compute/docs/images/os-details
      return imagesClient.getFromFamily(projectId, family);
    }
  }

  // Create an AttachedDisk object to be used in VM instance creation. Uses an image as the
  // source for the new disk.
  //
  // Args:
  //    diskType: the type of disk you want to create. This value uses the following format:
  //        "zones/{zone}/diskTypes/(pd-standard|pd-ssd|pd-balanced|pd-extreme)".
  //        For example: "zones/us-west3-b/diskTypes/pd-ssd"
  //
  //    diskSizeGb: size of the new disk in gigabytes.
  //
  //    boot: boolean flag indicating whether this disk should be used as a
  //    boot disk of an instance.
  //
  //    sourceImage: source image to use when creating this disk.
  //    You must have read access to this disk. This can be one of the publicly available images
  //    or an image from one of your projects.
  //    This value uses the following format: "projects/{project_name}/global/images/{image_name}"
  //
  //    autoDelete: boolean flag indicating whether this disk should be deleted
  //    with the VM that uses it.
  private static AttachedDisk createDiskFromImage(String diskType, int diskSizeGb, boolean boot,
      String sourceImage, boolean autoDelete) {

    AttachedDiskInitializeParams attachedDiskInitializeParams =
        AttachedDiskInitializeParams.newBuilder()
            .setSourceImage(sourceImage)
            .setDiskSizeGb(diskSizeGb)
            .setDiskType(diskType)
            .build();

    AttachedDisk bootDisk = AttachedDisk.newBuilder()
        .setInitializeParams(attachedDiskInitializeParams)
        // Remember to set auto_delete to True if you want the disk to be deleted when you delete
        // your VM instance.
        .setAutoDelete(autoDelete)
        .setBoot(boot)
        .build();

    return bootDisk;
  }

  // Create an AttachedDisk object to be used in VM instance creation. The created disk contains
  // no data and requires formatting before it can be used.
  // Args:
  //    zone: The zone in which the local SSD drive will be attached.
  private static AttachedDisk createLocalSsdDisk(String zone) {

    AttachedDiskInitializeParams attachedDiskInitializeParams =
        AttachedDiskInitializeParams.newBuilder()
            .setDiskType(String.format("zones/%s/diskTypes/local-ssd", zone))
            .build();

    AttachedDisk disk = AttachedDisk.newBuilder()
        .setType(AttachedDisk.Type.SCRATCH.name())
        .setInitializeParams(attachedDiskInitializeParams)
        .setAutoDelete(true)
        .build();

    return disk;
  }

  // Send an instance creation request to the Compute Engine API and wait for it to complete.
  // Args:
  //    projectId: project ID or project number of the Cloud project you want to use.
  //    zone: name of the zone to create the instance in. For example: "us-west3-b"
  //    instanceName: name of the new virtual machine (VM) instance.
  //    disks: a list of compute.v1.AttachedDisk objects describing the disks
  //           you want to attach to your new instance.
  private static Instance createInstance(String projectId, String zone, String instanceName,
      List<AttachedDisk> disks)
      throws IOException, ExecutionException, InterruptedException, TimeoutException {
    // Initialize client that will be used to send requests. This client only needs to be created
    // once, and can be reused for multiple requests. After completing all of your requests, call
    // the `instancesClient.close()` method on the client to safely
    // clean up any remaining background resources.
    try (InstancesClient instancesClient = InstancesClient.create()) {

      // machineType: machine type of the VM being created. This value uses the
      // following format: "zones/{zone}/machineTypes/{type_name}".
      // For example: "zones/europe-west3-c/machineTypes/f1-micro"
      String typeName = "n1-standard-1";
      String machineType = String.format("zones/%s/machineTypes/%s", zone, typeName);

      // networkLink: name of the network you want the new instance to use.
      // For example: "global/networks/default" represents the network
      // named "default", which is created automatically for each project.
      String networkLink = "global/networks/default";

      // Collect information into the Instance object.
      Instance instance = Instance.newBuilder()
          .setName(instanceName)
          .setMachineType(machineType)
          .addNetworkInterfaces(NetworkInterface.newBuilder().setName(networkLink).build())
          .addAllDisks(disks)
          .build();

      Operation response = instancesClient.insertAsync(projectId, zone, instance)
          .get(3, TimeUnit.MINUTES);

      if (response.hasError()) {
        throw new Error("Instance creation failed ! ! " + response);
      }
      System.out.println("Operation Status: " + response.getStatus());
      return instancesClient.get(projectId, zone, instanceName);
    }

  }

}

Python

Python

このサンプルを試す前に、Compute Engine クイックスタート: クライアント ライブラリの使用に記載されている Python の設定手順に沿って操作します。詳細については、Compute Engine Python API リファレンス ドキュメントをご覧ください。

Compute Engine に対して認証を行うには、アプリケーションのデフォルト認証情報を設定します。詳細については、ローカル開発環境の認証を設定するをご覧ください。

from __future__ import annotations

import re
import sys
from typing import Any
import warnings

from google.api_core.extended_operation import ExtendedOperation
from google.cloud import compute_v1


def get_image_from_family(project: str, family: str) -> compute_v1.Image:
    """
    Retrieve the newest image that is part of a given family in a project.

    Args:
        project: project ID or project number of the Cloud project you want to get image from.
        family: name of the image family you want to get image from.

    Returns:
        An Image object.
    """
    image_client = compute_v1.ImagesClient()
    # List of public operating system (OS) images: https://cloud.google.com/compute/docs/images/os-details
    newest_image = image_client.get_from_family(project=project, family=family)
    return newest_image


def disk_from_image(
    disk_type: str,
    disk_size_gb: int,
    boot: bool,
    source_image: str,
    auto_delete: bool = True,
) -> compute_v1.AttachedDisk:
    """
    Create an AttachedDisk object to be used in VM instance creation. Uses an image as the
    source for the new disk.

    Args:
         disk_type: the type of disk you want to create. This value uses the following format:
            "zones/{zone}/diskTypes/(pd-standard|pd-ssd|pd-balanced|pd-extreme)".
            For example: "zones/us-west3-b/diskTypes/pd-ssd"
        disk_size_gb: size of the new disk in gigabytes
        boot: boolean flag indicating whether this disk should be used as a boot disk of an instance
        source_image: source image to use when creating this disk. You must have read access to this disk. This can be one
            of the publicly available images or an image from one of your projects.
            This value uses the following format: "projects/{project_name}/global/images/{image_name}"
        auto_delete: boolean flag indicating whether this disk should be deleted with the VM that uses it

    Returns:
        AttachedDisk object configured to be created using the specified image.
    """
    boot_disk = compute_v1.AttachedDisk()
    initialize_params = compute_v1.AttachedDiskInitializeParams()
    initialize_params.source_image = source_image
    initialize_params.disk_size_gb = disk_size_gb
    initialize_params.disk_type = disk_type
    boot_disk.initialize_params = initialize_params
    # Remember to set auto_delete to True if you want the disk to be deleted when you delete
    # your VM instance.
    boot_disk.auto_delete = auto_delete
    boot_disk.boot = boot
    return boot_disk


def local_ssd_disk(zone: str) -> compute_v1.AttachedDisk():
    """
    Create an AttachedDisk object to be used in VM instance creation. The created disk contains
    no data and requires formatting before it can be used.

    Args:
        zone: The zone in which the local SSD drive will be attached.

    Returns:
        AttachedDisk object configured as a local SSD disk.
    """
    disk = compute_v1.AttachedDisk()
    disk.type_ = compute_v1.AttachedDisk.Type.SCRATCH.name
    initialize_params = compute_v1.AttachedDiskInitializeParams()
    initialize_params.disk_type = f"zones/{zone}/diskTypes/local-ssd"
    disk.initialize_params = initialize_params
    disk.auto_delete = True
    return disk


def wait_for_extended_operation(
    operation: ExtendedOperation, verbose_name: str = "operation", timeout: int = 300
) -> Any:
    """
    Waits for the extended (long-running) operation to complete.

    If the operation is successful, it will return its result.
    If the operation ends with an error, an exception will be raised.
    If there were any warnings during the execution of the operation
    they will be printed to sys.stderr.

    Args:
        operation: a long-running operation you want to wait on.
        verbose_name: (optional) a more verbose name of the operation,
            used only during error and warning reporting.
        timeout: how long (in seconds) to wait for operation to finish.
            If None, wait indefinitely.

    Returns:
        Whatever the operation.result() returns.

    Raises:
        This method will raise the exception received from `operation.exception()`
        or RuntimeError if there is no exception set, but there is an `error_code`
        set for the `operation`.

        In case of an operation taking longer than `timeout` seconds to complete,
        a `concurrent.futures.TimeoutError` will be raised.
    """
    result = operation.result(timeout=timeout)

    if operation.error_code:
        print(
            f"Error during {verbose_name}: [Code: {operation.error_code}]: {operation.error_message}",
            file=sys.stderr,
            flush=True,
        )
        print(f"Operation ID: {operation.name}", file=sys.stderr, flush=True)
        raise operation.exception() or RuntimeError(operation.error_message)

    if operation.warnings:
        print(f"Warnings during {verbose_name}:\n", file=sys.stderr, flush=True)
        for warning in operation.warnings:
            print(f" - {warning.code}: {warning.message}", file=sys.stderr, flush=True)

    return result


def create_instance(
    project_id: str,
    zone: str,
    instance_name: str,
    disks: list[compute_v1.AttachedDisk],
    machine_type: str = "n1-standard-1",
    network_link: str = "global/networks/default",
    subnetwork_link: str = None,
    internal_ip: str = None,
    external_access: bool = False,
    external_ipv4: str = None,
    accelerators: list[compute_v1.AcceleratorConfig] = None,
    preemptible: bool = False,
    spot: bool = False,
    instance_termination_action: str = "STOP",
    custom_hostname: str = None,
    delete_protection: bool = False,
) -> compute_v1.Instance:
    """
    Send an instance creation request to the Compute Engine API and wait for it to complete.

    Args:
        project_id: project ID or project number of the Cloud project you want to use.
        zone: name of the zone to create the instance in. For example: "us-west3-b"
        instance_name: name of the new virtual machine (VM) instance.
        disks: a list of compute_v1.AttachedDisk objects describing the disks
            you want to attach to your new instance.
        machine_type: machine type of the VM being created. This value uses the
            following format: "zones/{zone}/machineTypes/{type_name}".
            For example: "zones/europe-west3-c/machineTypes/f1-micro"
        network_link: name of the network you want the new instance to use.
            For example: "global/networks/default" represents the network
            named "default", which is created automatically for each project.
        subnetwork_link: name of the subnetwork you want the new instance to use.
            This value uses the following format:
            "regions/{region}/subnetworks/{subnetwork_name}"
        internal_ip: internal IP address you want to assign to the new instance.
            By default, a free address from the pool of available internal IP addresses of
            used subnet will be used.
        external_access: boolean flag indicating if the instance should have an external IPv4
            address assigned.
        external_ipv4: external IPv4 address to be assigned to this instance. If you specify
            an external IP address, it must live in the same region as the zone of the instance.
            This setting requires `external_access` to be set to True to work.
        accelerators: a list of AcceleratorConfig objects describing the accelerators that will
            be attached to the new instance.
        preemptible: boolean value indicating if the new instance should be preemptible
            or not. Preemptible VMs have been deprecated and you should now use Spot VMs.
        spot: boolean value indicating if the new instance should be a Spot VM or not.
        instance_termination_action: What action should be taken once a Spot VM is terminated.
            Possible values: "STOP", "DELETE"
        custom_hostname: Custom hostname of the new VM instance.
            Custom hostnames must conform to RFC 1035 requirements for valid hostnames.
        delete_protection: boolean value indicating if the new virtual machine should be
            protected against deletion or not.
    Returns:
        Instance object.
    """
    instance_client = compute_v1.InstancesClient()

    # Use the network interface provided in the network_link argument.
    network_interface = compute_v1.NetworkInterface()
    network_interface.network = network_link
    if subnetwork_link:
        network_interface.subnetwork = subnetwork_link

    if internal_ip:
        network_interface.network_i_p = internal_ip

    if external_access:
        access = compute_v1.AccessConfig()
        access.type_ = compute_v1.AccessConfig.Type.ONE_TO_ONE_NAT.name
        access.name = "External NAT"
        access.network_tier = access.NetworkTier.PREMIUM.name
        if external_ipv4:
            access.nat_i_p = external_ipv4
        network_interface.access_configs = [access]

    # Collect information into the Instance object.
    instance = compute_v1.Instance()
    instance.network_interfaces = [network_interface]
    instance.name = instance_name
    instance.disks = disks
    if re.match(r"^zones/[a-z\d\-]+/machineTypes/[a-z\d\-]+$", machine_type):
        instance.machine_type = machine_type
    else:
        instance.machine_type = f"zones/{zone}/machineTypes/{machine_type}"

    instance.scheduling = compute_v1.Scheduling()
    if accelerators:
        instance.guest_accelerators = accelerators
        instance.scheduling.on_host_maintenance = (
            compute_v1.Scheduling.OnHostMaintenance.TERMINATE.name
        )

    if preemptible:
        # Set the preemptible setting
        warnings.warn(
            "Preemptible VMs are being replaced by Spot VMs.", DeprecationWarning
        )
        instance.scheduling = compute_v1.Scheduling()
        instance.scheduling.preemptible = True

    if spot:
        # Set the Spot VM setting
        instance.scheduling.provisioning_model = (
            compute_v1.Scheduling.ProvisioningModel.SPOT.name
        )
        instance.scheduling.instance_termination_action = instance_termination_action

    if custom_hostname is not None:
        # Set the custom hostname for the instance
        instance.hostname = custom_hostname

    if delete_protection:
        # Set the delete protection bit
        instance.deletion_protection = True

    # Prepare the request to insert an instance.
    request = compute_v1.InsertInstanceRequest()
    request.zone = zone
    request.project = project_id
    request.instance_resource = instance

    # Wait for the create operation to complete.
    print(f"Creating the {instance_name} instance in {zone}...")

    operation = instance_client.insert(request=request)

    wait_for_extended_operation(operation, "instance creation")

    print(f"Instance {instance_name} created.")
    return instance_client.get(project=project_id, zone=zone, instance=instance_name)


def create_with_ssd(
    project_id: str, zone: str, instance_name: str
) -> compute_v1.Instance:
    """
    Create a new VM instance with Debian 10 operating system and SSD local disk.

    Args:
        project_id: project ID or project number of the Cloud project you want to use.
        zone: name of the zone to create the instance in. For example: "us-west3-b"
        instance_name: name of the new virtual machine (VM) instance.

    Returns:
        Instance object.
    """
    newest_debian = get_image_from_family(project="debian-cloud", family="debian-10")
    disk_type = f"zones/{zone}/diskTypes/pd-standard"
    disks = [
        disk_from_image(disk_type, 10, True, newest_debian.self_link, True),
        local_ssd_disk(zone),
    ]
    instance = create_instance(project_id, zone, instance_name, disks)
    return instance

REST

instances.insert method を使用して、イメージ ファミリーまたは特定のバージョンのオペレーティング システム イメージから VM を作成します。

  • Z3、A3、A2 Ultra マシンシリーズの場合、ローカル SSD ディスクがアタッチされた VM を作成するには、そのシリーズで使用可能なマシンタイプを使用する VM を作成します。
  • C3 または C3D マシンシリーズの場合、ローカル SSD ディスクがアタッチされた VM を作成するには、ローカル SSD ディスクを含むインスタンス タイプ(-lssd)を指定します。

    Ubuntu ブートディスクと 2 つのローカル SSD ディスクを持つ C3 VM を作成するリクエスト ペイロードの例を次に示します。

    {
     "machineType":"zones/us-central1-c/machineTypes/c3-standard-8-lssd",
     "name":"c3-with-local-ssd",
     "disks":[
        {
           "type":"PERSISTENT",
           "initializeParams":{
              "sourceImage":"projects/ubuntu-os-cloud/global/images/family/ubuntu-2204-lts"
           },
           "boot":true
        }
     ],
     "networkInterfaces":[
        {
           "network":"global/networks/default"
    }
     ]
    }
    
  • M3、第 1 世代、第 2 世代のマシンシリーズの場合、ローカル SSD ディスクがアタッチされた VM を作成するには、VM の作成時に initializeParams プロパティを使用してローカル SSD デバイスを追加できます。次のプロパティも指定する必要があります。

    • diskType: ローカル SSD に設定します。
    • autoDelete: true に設定します。
    • type: SCRATCH に設定します。

    次のプロパティはローカル SSD デバイスでは使用できません。

    • diskName
    • sourceImage プロパティ
    • diskSizeGb

    ブートディスクと 4 つのローカル SSD ディスクを持つ M3 VM を作成するリクエスト ペイロードの例を次に示します。

    {
     "machineType":"zones/us-central1-f/machineTypes/m3-ultramem-64",
     "name":"local-ssd-instance",
     "disks":[
        {
         "type":"PERSISTENT",
         "initializeParams":{
            "sourceImage":"projects/ubuntu-os-cloud/global/images/family/ubuntu-2204-lts"
         },
         "boot":true
        },
        {
           "type":"SCRATCH",
           "initializeParams":{
              "diskType":"zones/us-central1-f/diskTypes/local-ssd"
           },
           "autoDelete":true,
           "interface": "NVME"
        },
        {
           "type":"SCRATCH",
           "initializeParams":{
              "diskType":"zones/us-central1-f/diskTypes/local-ssd"
           },
           "autoDelete":true,
           "interface": "NVME"
        },
        {
           "type":"SCRATCH",
           "initializeParams":{
              "diskType":"zones/us-central1-f/diskTypes/local-ssd"
           },
           "autoDelete":true,
           "interface": "NVME"
        },
        {
           "type":"SCRATCH",
           "initializeParams":{
              "diskType":"zones/us-central1-f/diskTypes/local-ssd"
           },
           "autoDelete":true,
           "interface": "NVME"
        },
     ],
     "networkInterfaces":[
        {
           "network":"global/networks/default"
        }
     ]
    }
    

ローカル SSD を作成した後は、使用する前に、各デバイスをフォーマットしてマウントする必要があります。

REST を使用してインスタンスを作成する方法の詳細については、Compute Engine API をご覧ください。

ローカル SSD デバイスのフォーマットとマウント

各ローカル SSD ディスクを個別にフォーマットしてマウントすることも、複数のローカル SSD ディスクを単一の論理ボリュームに結合することもできます。

ローカル SSD パーティションを個別にフォーマットしてマウントする

ローカル SSD をインスタンスに接続する最も簡単な方法は、各デバイスを単一パーティションでフォーマットしてマウントすることです。または、複数のパーティションを単一の論理ボリュームに組み合わせることもできます。

Linux インスタンス

Linux インスタンスで新しいローカル SSD をフォーマットしてマウントします。必要に応じて任意のパーティション フォーマットと構成を使用できます。この例では、ext4 パーティションを 1 つ作成します。

  1. [VM インスタンス] ページに移動します。

    [VM インスタンス] に移動

  2. 新しいローカル SSD をアタッチしたインスタンスの隣にある [SSH] ボタンをクリックします。ブラウザが開き、インスタンスに対するターミナル接続が表示されます。

  3. ターミナルでは、find コマンドを使用して、マウントするローカル SSD を識別します。

    $ find /dev/ | grep google-local-nvme-ssd
    

    SCSI モードのローカル SSD には、google-local-ssd-0 といった標準の名前が割り当てられています。次の出力に示すように、NVMe モードのローカル SSD には google-local-nvme-ssd-0 のような名前が付けられます。

     $ find /dev/ | grep google-local-nvme-ssd
    
     /dev/disk/by-id/google-local-nvme-ssd-0
    
  4. ローカル SSD を ext4 ファイル システムでフォーマットします。次のコマンドを使用すると、ローカル SSD から既存のデータがすべて削除されます。

    $ sudo mkfs.ext4 -F /dev/disk/by-id/[SSD_NAME]
    

    [SSD_NAME] をフォーマットするローカル SSD の ID に置き換えます。たとえば、インスタンスの最初の NVMe ローカル SSD をフォーマットするには google-local-nvme-ssd-0 を指定します。

  5. デバイスをマウントできるディレクトリを作成するには、mkdir コマンドを使用します。

    $ sudo mkdir -p /mnt/disks/[MNT_DIR]
    

    [MNT_DIR] は、ローカル SSD ディスクをマウントするディレクトリ パスに置き換えます。

  6. ローカル SSD を VM にマウントします。

    $ sudo mount /dev/[SSD_NAME] /mnt/disks/[MNT_DIR]
    

    次のように置き換えます。

    • [SSD_NAME]: マウントするローカル SSD の ID。
    • [MNT_DIR]: ローカル SSD をマウントするディレクトリ。
  7. デバイスに対する読み取りと書き込みのアクセスを構成します。この例では、デバイスへの書き込みアクセス権をすべてのユーザーに付与します。

    $ sudo chmod a+w /mnt/disks/[MNT_DIR]
    

    [MNT_DIR] は、ローカル SSD をマウントしたディレクトリに置き換えます。

ローカル SSD を /etc/fstab ファイルに追加して、インスタンスの再起動時にデバイスが自動的にマウントされるようにすることもできます。このエントリは、インスタンスが停止した場合、ローカル SSD 上のデータを保持しません。完全な詳細は、ローカル SSD データの永続性を参照してください。

/etc/fstab ファイルのエントリを指定する場合は、必ず nofail オプションを含め、ローカル SSD が存在しない場合でも、インスタンスが起動できるようにします。たとえば、ブートディスクのスナップショットを作成し、ローカル SSD をアタッチせずに新しいインスタンスを作成した場合、インスタンスは起動プロセスを続行でき、いつまでも一時停止することはありません。

  1. /etc/fstab エントリを作成します。blkid コマンドを使用して、デバイス上のファイル システムの UUID を検索し、UUID をマウント オプションとともに含めるように /etc/fstab ファイルを編集します。この手順は 1 つのコマンドで完了できます。

    たとえば、NVMe モードのローカル SSD の場合は、次のコマンドを使用します。

    $ echo UUID=`sudo blkid -s UUID -o value /dev/disk/by-id/google-local-nvme-ssd-0` /mnt/disks/[MNT_DIR] ext4 discard,defaults,nofail 0 2 | sudo tee -a /etc/fstab
    

    SCSI などの NVMe 以外のモードのローカル SSD については、次のコマンドを使用します。

    $ echo UUID=`sudo blkid -s UUID -o value /dev/disk/by-id/google-local-ssd-0` /mnt/disks/[MNT_DIR] ext4 discard,defaults,nofail 0 2 | sudo tee -a /etc/fstab
    

    [MNT_DIR] は、ローカル SSD をマウントしたディレクトリに置き換えます。

  2. cat コマンドを使用して、/etc/fstab エントリが正しいことを確認します。

    $ cat /etc/fstab
    

このインスタンスの起動ディスクからスナップショットを作成し、それを使用してローカル SSD がない別のインスタンスを作成する場合は、/etc/fstab ファイルを編集して、このローカル SSD のエントリを削除します。nofail オプションを使用する場合でも、インスタンスにアタッチされているパーティションとの /etc/fstab ファイルの同期を維持し、ブートディスクのスナップショットを作成する前に、これらのエントリを削除します。

Windows インスタンス

Windows のディスク管理ツールを使用して、Windows インスタンス上のローカル SSD をフォーマットしてマウントします。

  1. RDP を使用してインスタンスに接続します。この例では、[VM インスタンス] ページに移動し、ローカル SSD がアタッチされているインスタンスの隣の [RDP] ボタンをクリックします。ユーザー名とパスワードを入力すると、ウィンドウが開き、サーバーに対するデスクトップ インターフェースが表示されます。

  2. Windows [スタート] ボタンを右クリックして [ディスクの管理] を選択します。

    Windows の [スタート] ボタンの右クリック メニューから、Windows ディスク管理ツールを選択します。

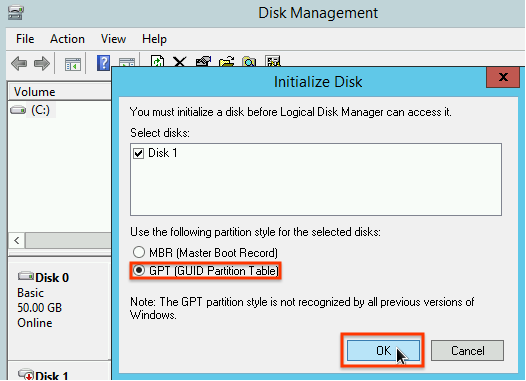
  3. ローカル SSD の初期化をまだ行っていない場合、新しいパーティションのパーティショニング スキームの選択を求められます。[GPT] を選択して、[OK] をクリックします。

    ディスク初期化ウィンドウでパーティション化スキームを選択します。

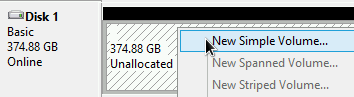
  4. ローカル SSD を初期化した後、未割り当てのディスク スペースを右クリックして、[新しいシンプル ボリューム] を選択します。

    アタッチしたディスクで新しいシンプル ボリュームを作成します。

  5. 新しいシンプル ボリューム ウィザードの指示に従って新しいボリュームを構成します。任意のパーティション形式を使用できますが、この例では NTFS を選択します。[クイック フォーマットする] にもチェックを入れて、フォーマット処理を高速化します。

    [新しいシンプル ボリューム ウィザード] でパーティションのフォーマット タイプを選択します。

  6. ウィザードが完了し、ボリュームのフォーマットが終了後、新しいローカル SSD をチェックして、Healthy のステータスを確認します。

    Windows によって認識されたディスクのリストを表示し、ローカル SSD が [正常] ステータスであることを確認します。

これで、ローカル SSD にファイルを書き込むことができます。

複数のローカル SSD パーティションをフォーマットして単一の論理ボリュームにマウントする

永続 SSD とは異なり、インスタンスにアタッチする各デバイスのローカル SSD の容量は 375 GB の固定です。複数のローカル SSD パーティションを単一の論理ボリュームに組み合わせる場合、これらのパーティション間のボリューム管理をユーザー自身が定義する必要があります。

Linux インスタンス

mdadm を使用して、RAID 0 アレイを作成します。この例では、1 つの ext4 ファイル システムを使用したアレイをフォーマットしますが、任意のファイル システムを適用できます。

  1. [VM インスタンス] ページに移動します。

    [VM インスタンス] に移動

  2. 新しいローカル SSD をアタッチしたインスタンスの隣にある [SSH] ボタンをクリックします。ブラウザが開き、インスタンスに対するターミナル接続が表示されます。

  3. ターミナルで、mdadm ツールをインストールします。mdadm のインストール プロセスには、スクリプトを停止するユーザー プロンプトが含まれているため、このプロセスは手動で実行してください。

    Debian / Ubuntu:

    $ sudo apt update && sudo apt install mdadm --no-install-recommends
    

    CentOS / RHEL:

    $ sudo yum install mdadm -y
    

    SLES / openSUSE:

    $ sudo zypper install -y mdadm
    

  4. find コマンドを使用して、一緒にマウントするすべてのローカル SSD を識別します。

    この例では、インスタンスに NVMe モードのローカル SSD パーティションが 8 個あります。

    $  find /dev/ | grep google-local-nvme-ssd
    
     /dev/disk/by-id/google-local-nvme-ssd-7
     /dev/disk/by-id/google-local-nvme-ssd-6
     /dev/disk/by-id/google-local-nvme-ssd-5
     /dev/disk/by-id/google-local-nvme-ssd-4
     /dev/disk/by-id/google-local-nvme-ssd-3
     /dev/disk/by-id/google-local-nvme-ssd-2
     /dev/disk/by-id/google-local-nvme-ssd-1
     /dev/disk/by-id/google-local-nvme-ssd-0
    

    find は順序を保証するものではありません。出力行の数が予想される SSD パーティションの数と一致している限り、デバイスが異なる順序でリストされていても問題ありません。SCSI モードのローカル SSD には、google-local-ssd といった標準の名前が割り当てられています。NVMe モードのローカル SSD には、google-local-nvme-ssd といった標準の名前が割り当てられています。

  5. mdadm を使用して、複数のローカル SSD デバイスを /dev/md0 という名前の 1 つのアレイに結合します。この例では、NVMe モードの 8 個のローカル SSD デバイスをマージします。SCSI モードのローカル SSD デバイスについては、find コマンドから取得した名前を指定します。

    $ sudo mdadm --create /dev/md0 --level=0 --raid-devices=8 \
     /dev/disk/by-id/google-local-nvme-ssd-0 \
     /dev/disk/by-id/google-local-nvme-ssd-1 \
     /dev/disk/by-id/google-local-nvme-ssd-2 \
     /dev/disk/by-id/google-local-nvme-ssd-3 \
     /dev/disk/by-id/google-local-nvme-ssd-4 \
     /dev/disk/by-id/google-local-nvme-ssd-5 \
     /dev/disk/by-id/google-local-nvme-ssd-6 \
     /dev/disk/by-id/google-local-nvme-ssd-7
    
    mdadm: Defaulting to version 1.2 metadata
    mdadm: array /dev/md0 started.


    アレイの詳細は mdadm --detail で確認できます。--prefer=by-id フラグを追加すると、/dev/disk/by-id パスを使用するデバイスが一覧表示されます。

     sudo mdadm --detail --prefer=by-id /dev/md0
     

    出力は、アレイ内のデバイスごとに次のようになります。

     ...
     Number   Major   Minor   RaidDevice State
        0      259      0         0      active sync   /dev/disk/by-id/google-local-nvme-ssd-0
     ...
     

  6. /dev/md0 アレイ全体を ext4 ファイル システムでフォーマットします。

    $ sudo mkfs.ext4 -F /dev/md0
    
  7. /dev/md0 がマウント可能なディレクトリを作成します。この例では、/mnt/disks/ssd-array ディレクトリを作成します。

    $ sudo mkdir -p /mnt/disks/[MNT_DIR]
    

    [MNT_DIR] は、ローカル SSD アレイをマウントするディレクトリに置き換えます。

  8. /dev/md0 アレイを /mnt/disks/ssd-array ディレクトリにマウントします。

    $ sudo mount /dev/md0 /mnt/disks/[MNT_DIR]
    

    [MNT_DIR] は、ローカル SSD アレイをマウントするディレクトリに置き換えます。

  9. デバイスに対する読み取りと書き込みのアクセスを構成します。この例では、デバイスへの書き込みアクセス権をすべてのユーザーに付与します。

    $ sudo chmod a+w /mnt/disks/[MNT_DIR]
    

    [MNT_DIR] は、ローカル SSD アレイをマウントしたディレクトリに置き換えます。

ローカル SSD を /etc/fstab ファイルに追加して、インスタンスの再起動時にデバイスが自動的にマウントされるようにすることもできます。このエントリは、インスタンスが停止した場合、ローカル SSD 上のデータを保持しません。詳細は、ローカル SSD データの永続性を参照してください。

/etc/fstab ファイルのエントリを指定する場合は、必ず nofail オプションを含め、ローカル SSD が存在しない場合でも、インスタンスが起動できるようにします。たとえば、ブートディスクのスナップショットを取り、どのようなローカル SSD もアタッチしないで新しいインスタンスを作成した場合、インスタンスが起動プロセスを続行することができ、無期限に一時停止することはありません。

  1. /etc/fstab エントリを作成します。blkid コマンドを使用して、デバイス上のファイル システムの UUID を検索し、UUID をマウント オプションとともに含めるように /etc/fstab ファイルを編集します。nofail オプションを指定して、ローカル SSD が利用できない場合でもシステムを起動できるようにします。この手順は 1 つのコマンドで完了できます。次に例を示します。

    $ echo UUID=`sudo blkid -s UUID -o value /dev/md0` /mnt/disks/[MNT_DIR] ext4 discard,defaults,nofail 0 2 | sudo tee -a /etc/fstab
    

    [MNT_DIR] は、ローカル SSD アレイをマウントしたディレクトリに置き換えます。

  2. /etc/fstab ファイルの /dev/md0 のようなデバイス名を使用している場合、UUID ではなく、/etc/mdadm/mdadm.conf ファイルを編集してアレイが起動時に自動的に再構成されるようにします。これは次の 2 つのステップで行います。

    1. 起動時にディスクアレイが自動的にスキャンされ、再構成されるようにします。
      $ sudo mdadm --detail --scan | sudo tee -a /etc/mdadm/mdadm.conf
      
    2. initramfs を更新して、アレイがアーリーブート プロセス中に使用できるようにします。
      $ sudo update-initramfs -u
      
  3. cat コマンドを使用して、/etc/fstab エントリが正しいことを確認します。

    $ cat /etc/fstab
    

このインスタンスのブートディスクからスナップショットを作成し、それを使用してローカル SSD がない別のインスタンスを作成する場合は、/etc/fstab ファイルを編集して、このローカル SSD アレイのエントリを削除します。nofail オプションを使用する場合でも、インスタンスにアタッチされているパーティションとの /etc/fstab ファイルの同期を維持し、ブートディスクのスナップショットを作成する前に、これらのエントリを削除します。

Windows インスタンス

Windows のディスク管理ツールを使用して、Windows インスタンス上のローカル SSD のアレイをフォーマットしてマウントします。

  1. RDP を使用してインスタンスに接続します。この例では、[VM インスタンス] ページに移動し、ローカル SSD がアタッチされているインスタンスの隣の [RDP] ボタンをクリックします。ユーザー名とパスワードを入力すると、ウィンドウが開き、サーバーに対するデスクトップ インターフェースが表示されます。

  2. Windows [スタート] ボタンを右クリックして [ディスクの管理] を選択します。

    Windows の [スタート] ボタンの右クリック メニューから、Windows ディスク管理ツールを選択します。

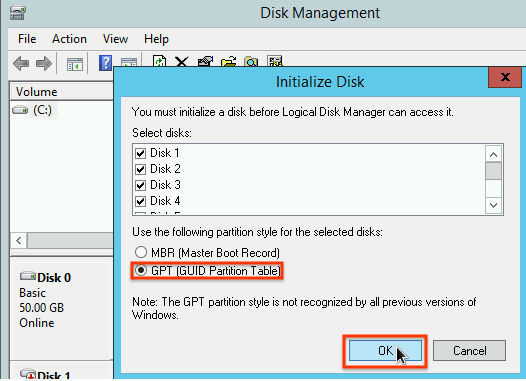
  3. ローカル SSD の初期化をまだ行っていない場合、新しいパーティションのパーティショニング スキームを選択するよう求められます。[GPT] を選択して、[OK] をクリックします。

    ディスク初期化ウィンドウでパーティション化スキームを選択します。

  4. ローカル SSD を初期化した後、未割り当てのディスク スペースを右クリックして、[新しいストライプ ボリューム] を選択します。

    アタッチされたディスクから新しいストライプ ボリュームを作成します。

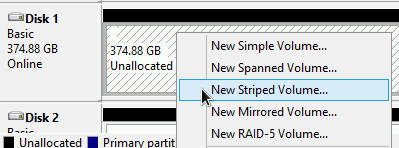
  5. ストライプ アレイに含めるローカル SSD パーティションを選択します。この例では、すべてのパーティションを選択して、1 つのローカル SSD デバイスに結合します。

    アレイに含めるローカル SSD パーティションを選択します。

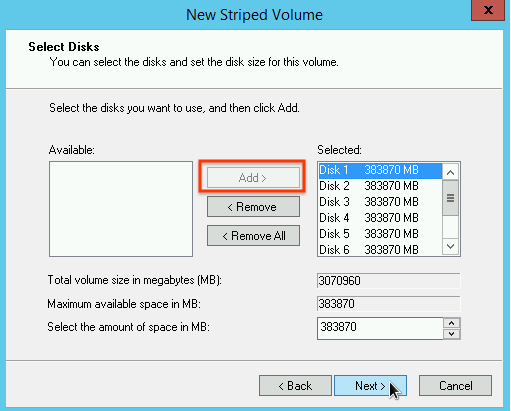
  6. [新しいストライプ ボリューム ウィザード] の指示に従って新しいボリュームを構成します。任意のパーティション形式を使用できますが、この例では NTFS を選択します。[クイック フォーマットする] にもチェックを入れて、フォーマット処理を高速化します。

    [新しいストライプ ボリューム ウィザード] でパーティションのフォーマット タイプを選択します。

  7. ウィザードが完了し、ボリュームのフォーマットが終了後、新しいローカル SSD をチェックして、Healthy のステータスを確認します。

    Windows によって認識されたディスクのリストを表示し、ローカル SSD が [正常] ステータスであることを確認します。

ローカル SSD にファイルを書き込むことができます。

次のステップ