Generate and search multimodal embeddings
This tutorial shows how to generate multimodal embeddings for images and text using BigQuery and Vertex AI, and then use these embeddings to perform a text-to-image semantic search.
This tutorial covers the following tasks:
- Creating a BigQuery object table over image data in a Cloud Storage bucket.
- Exploring the image data by using a Colab Enterprise notebook in BigQuery.
- Creating a BigQuery ML
remote model
that targets the
Vertex AI
multimodalembeddingfoundation model. - Using the remote model with the
ML.GENERATE_EMBEDDINGfunction to generate embeddings from the images in the object table. - Correct any embedding generation errors.
- Optionally, creating a vector index to index the image embeddings.
- Creating a text embedding for a given search string.
- Using the
VECTOR_SEARCHfunction to perform a semantic search for image embeddings that are similar to the text embedding. - Visualizing the results by using a notebook.
This tutorial uses the public domain art images from
The Metropolitan Museum of Art that are available
in the public Cloud Storage
gcs-public-data--met bucket.
Required roles
To run this tutorial, you need the following Identity and Access Management (IAM) roles:
- Create and use BigQuery datasets, connections, models, and notebooks:
BigQuery Studio Admin (
roles/bigquery.studioAdmin). - Grant permissions to the connection's service account: Project IAM Admin
(
roles/resourcemanager.projectIamAdmin).
These predefined roles contain the permissions required to perform the tasks in this document. To see the exact permissions that are required, expand the Required permissions section:
Required permissions
- Create a dataset:
bigquery.datasets.create - Create, delegate, and use a connection:
bigquery.connections.* - Set the default connection:
bigquery.config.* - Set service account permissions:
resourcemanager.projects.getIamPolicyandresourcemanager.projects.setIamPolicy - Create an object table:
bigquery.tables.createandbigquery.tables.update - Create a model and run inference:
bigquery.jobs.createbigquery.models.createbigquery.models.getDatabigquery.models.updateDatabigquery.models.updateMetadata
- Create and use notebooks:
resourcemanager.projects.getresourcemanager.projects.listbigquery.config.getbigquery.jobs.createbigquery.readsessions.createbigquery.readsessions.getDatabigquery.readsessions.updatedataform.locations.getdataform.locations.listdataform.repositories.create
.dataform.repositories.listdataform.collections.createdataform.collections.listaiplatform.notebookRuntimeTemplates.applyaiplatform.notebookRuntimeTemplates.getaiplatform.notebookRuntimeTemplates.listaiplatform.notebookRuntimeTemplates.getIamPolicyaiplatform.notebookRuntimes.assignaiplatform.notebookRuntimes.getaiplatform.notebookRuntimes.listaiplatform.operations.listaiplatform.notebookRuntimeTemplates.apply
You might also be able to get these permissions with custom roles or other predefined roles.
Costs
In this document, you use the following billable components of Google Cloud:
- BigQuery ML: You incur costs for the data that you process in BigQuery.
- Vertex AI: You incur costs for calls to the Vertex AI service that's represented by the remote model.
To generate a cost estimate based on your projected usage,
use the pricing calculator.
For more information about BigQuery pricing, see BigQuery pricing in the BigQuery documentation.
For more information about Vertex AI pricing, see the Vertex AI pricing page.
Before you begin
-
In the Google Cloud console, on the project selector page, select or create a Google Cloud project.
Roles required to select or create a project
- Select a project: Selecting a project doesn't require a specific IAM role—you can select any project that you've been granted a role on.
-
Create a project: To create a project, you need the Project Creator
(
roles/resourcemanager.projectCreator), which contains theresourcemanager.projects.createpermission. Learn how to grant roles.
-
Verify that billing is enabled for your Google Cloud project.
-
Enable the BigQuery, BigQuery Connection, and Vertex AI APIs.
Roles required to enable APIs
To enable APIs, you need the Service Usage Admin IAM role (
roles/serviceusage.serviceUsageAdmin), which contains theserviceusage.services.enablepermission. Learn how to grant roles.
Create a dataset
Create a BigQuery dataset to store your ML model.
Console
In the Google Cloud console, go to the BigQuery page.
In the Explorer pane, click your project name.
Click View actions > Create dataset
On the Create dataset page, do the following:
For Dataset ID, enter
bqml_tutorial.For Location type, select Multi-region, and then select US (multiple regions in United States).
Leave the remaining default settings as they are, and click Create dataset.
bq
To create a new dataset, use the
bq mk command
with the --location flag. For a full list of possible parameters, see the
bq mk --dataset command
reference.
Create a dataset named
bqml_tutorialwith the data location set toUSand a description ofBigQuery ML tutorial dataset:bq --location=US mk -d \ --description "BigQuery ML tutorial dataset." \ bqml_tutorial
Instead of using the
--datasetflag, the command uses the-dshortcut. If you omit-dand--dataset, the command defaults to creating a dataset.Confirm that the dataset was created:
bq ls
API
Call the datasets.insert
method with a defined dataset resource.
{
  "datasetReference": {
     "datasetId": "bqml_tutorial"
  }
}
BigQuery DataFrames
Before trying this sample, follow the BigQuery DataFrames setup instructions in the BigQuery quickstart using BigQuery DataFrames. For more information, see the BigQuery DataFrames reference documentation.
To authenticate to BigQuery, set up Application Default Credentials. For more information, see Set up ADC for a local development environment.
Create the object table
Create an object table over the art images in the public Cloud Storage
gcs-public-data--met bucket.
The object table makes it possible to analyze the images without moving them
from Cloud Storage.
In the Google Cloud console, go to the BigQuery page.
In the query editor, run the following query:
CREATE OR REPLACE EXTERNAL TABLE `bqml_tutorial.met_images`
WITH CONNECTION DEFAULT
OPTIONS
  ( object_metadata = 'SIMPLE',
    uris = ['gs://gcs-public-data--met/*']
  );
Explore the image data
Create a Colab Enterprise notebook in BigQuery to explore the image data.
In the Google Cloud console, go to the BigQuery page.
Set up the notebook:
- Add a code cell to the notebook.
Copy and paste the following code into the code cell:
#@title Set up credentials

from google.colab import auth
auth.authenticate_user()
print('Authenticated')

PROJECT_ID='PROJECT_ID'
from google.cloud import bigquery
client = bigquery.Client(PROJECT_ID)
Replace
PROJECT_IDwith the name of the project that you are using for this tutorial.Run the code cell.
Enable table display:
- Add a code cell to the notebook.
Copy and paste the following code into the code cell:
#@title Enable data table display
%load_ext google.colab.data_table
Run the code cell.
Create a function to display the images:
- Add a code cell to the notebook.
Copy and paste the following code into the code cell:
#@title Util function to display images
import io
from PIL import Image
import matplotlib.pyplot as plt
import tensorflow as tf

def printImages(results):
 image_results_list = list(results)
 amt_of_images = len(image_results_list)

 fig, axes = plt.subplots(nrows=amt_of_images, ncols=2, figsize=(20, 20))
 fig.tight_layout()
 fig.subplots_adjust(hspace=0.5)
 for i in range(amt_of_images):
   gcs_uri = image_results_list[i][0]
   text = image_results_list[i][1]
   f = tf.io.gfile.GFile(gcs_uri, 'rb')
   stream = io.BytesIO(f.read())
   img = Image.open(stream)
   axes[i, 0].axis('off')
   axes[i, 0].imshow(img)
   axes[i, 1].axis('off')
   axes[i, 1].text(0, 0, text, fontsize=10)
 plt.show()
Run the code cell.
Display the images:
- Add a code cell to the notebook.
Copy and paste the following code into the code cell:
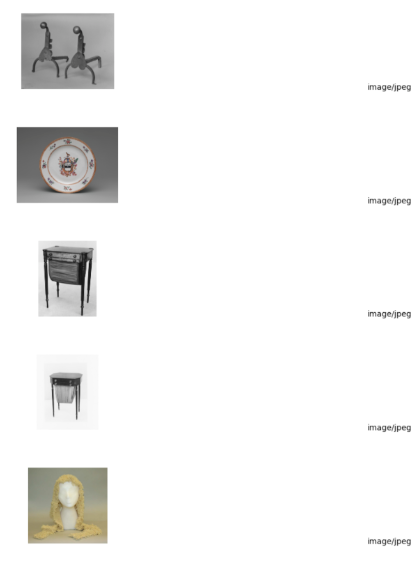
#@title Display Met images

inspect_obj_table_query = """
SELECT uri, content_type
FROM bqml_tutorial.met_images
WHERE content_type = 'image/jpeg'
Order by uri
LIMIT 10;
"""
printImages(client.query(inspect_obj_table_query))
Run the code cell.
The results should look similar to the following:
Save the notebook as
met-image-analysis.
Create the remote model
Create a remote model that represents a hosted Vertex AI multimodal embedding model:
In the Google Cloud console, go to the BigQuery page.
In the query editor, run the following query:
CREATE OR REPLACE MODEL `bqml_tutorial.multimodal_embedding_model`
  REMOTE WITH CONNECTION DEFAULT
  OPTIONS (ENDPOINT = 'multimodalembedding@001');
The query takes several seconds to complete, after which you can access the
multimodal_embedding_modelmodel that appears in thebqml_tutorialdataset. Because the query uses aCREATE MODELstatement to create a model, there are no query results.
Generate image embeddings
Generate embeddings from the images in the object table by using the
ML.GENERATE_EMBEDDING function,
and then write them to a table for
use in a following step. Embedding generation is an expensive operation, so the
query uses a subquery including the LIMIT clause to limit embedding generation to 10,000 images
instead of embedding the full dataset of 601,294 images. This also helps keep
the number of images under the 25,000 limit for the ML.GENERATE_EMBEDDING
function. This query takes approximately 40 minutes to run.
In the Google Cloud console, go to the BigQuery page.
In the query editor, run the following query:
CREATE OR REPLACE TABLE `bqml_tutorial.met_image_embeddings`
AS
SELECT *
FROM
  ML.GENERATE_EMBEDDING(
    MODEL `bqml_tutorial.multimodal_embedding_model`,
    (SELECT * FROM `bqml_tutorial.met_images` WHERE content_type = 'image/jpeg' LIMIT 10000))
Correct any embedding generation errors
Check for and correct any embedding generation errors. Embedding generation can fail because of Generative AI on Vertex AI quotas or service unavailability.
The ML.GENERATE_EMBEDDING function returns error details in the
ml_generate_embedding_status column. This column is empty if embedding
generation was successful, or contains an error message if embedding
generation failed.
In the Google Cloud console, go to the BigQuery page.
In the query editor, run the following query to see if there were any embedding generation failures:
SELECT DISTINCT(ml_generate_embedding_status),
  COUNT(uri) AS num_rows
FROM bqml_tutorial.met_image_embeddings
GROUP BY 1;
If rows with errors are returned, drop any rows where embedding generation failed:
DELETE FROM `bqml_tutorial.met_image_embeddings`
WHERE ml_generate_embedding_status = 'A retryable error occurred: RESOURCE_EXHAUSTED error from remote service/endpoint.';
Create a vector index
You can optionally use the
CREATE VECTOR INDEX statement
to create the met_images_index vector index on the
ml_generate_embedding_result column of the met_images_embeddings table.
A vector index lets you perform a vector search more quickly, with the
trade-off of reducing recall and so returning more approximate results.
In the Google Cloud console, go to the BigQuery page.
In the query editor, run the following query:
CREATE OR REPLACE
  VECTOR INDEX `met_images_index`
ON
  bqml_tutorial.met_image_embeddings(ml_generate_embedding_result)
  OPTIONS (
    index_type = 'IVF',
    distance_type = 'COSINE');
The vector index is created asynchronously. To check if the vector index has been created, query the
INFORMATION_SCHEMA.VECTOR_INDEXESview and confirm that thecoverage_percentagevalue is greater than0, and thelast_refresh_timevalue isn'tNULL:SELECT table_name, index_name, index_status, coverage_percentage, last_refresh_time, disable_reason FROM bqml_tutorial.INFORMATION_SCHEMA.VECTOR_INDEXES WHERE index_name = 'met_images_index';
Generate an embedding for the search text
To search images that correspond to a specified text search string, you must
first create a text embedding for that string. Use the same remote model to
create the text embedding that you used to create the image embeddings,
and then write the text embedding to a table for use in a following step. The
search string is pictures of white or cream colored dress from victorian era.
In the Google Cloud console, go to the BigQuery page.
In the query editor, run the following query:
CREATE OR REPLACE TABLE `bqml_tutorial.search_embedding`
AS
SELECT * FROM ML.GENERATE_EMBEDDING(
  MODEL `bqml_tutorial.multimodal_embedding_model`,
  (
    SELECT 'pictures of white or cream colored dress from victorian era' AS content
  )
);
Perform a text-to-image semantic search
Use the
VECTOR_SEARCH function
to perform a semantic search for images that best correspond to the search
string represented by the text embedding.
In the Google Cloud console, go to the BigQuery page.
In the query editor, run the following query to perform a semantic search and write the results to a table:
CREATE OR REPLACE TABLE `bqml_tutorial.vector_search_results` AS
SELECT base.uri AS gcs_uri, distance
FROM
  VECTOR_SEARCH(
    TABLE `bqml_tutorial.met_image_embeddings`,
    'ml_generate_embedding_result',
    TABLE `bqml_tutorial.search_embedding`,
    'ml_generate_embedding_result',
    top_k => 3);
Visualize the semantic search results
Visualize the semantic search results by using a notebook.
In the Google Cloud console, go to the BigQuery page.
Open the
met-image-analysisnotebook that you created earlier.Visualize the vector search results:
- Add a code cell to the notebook.
Copy and paste the following code into the code cell:
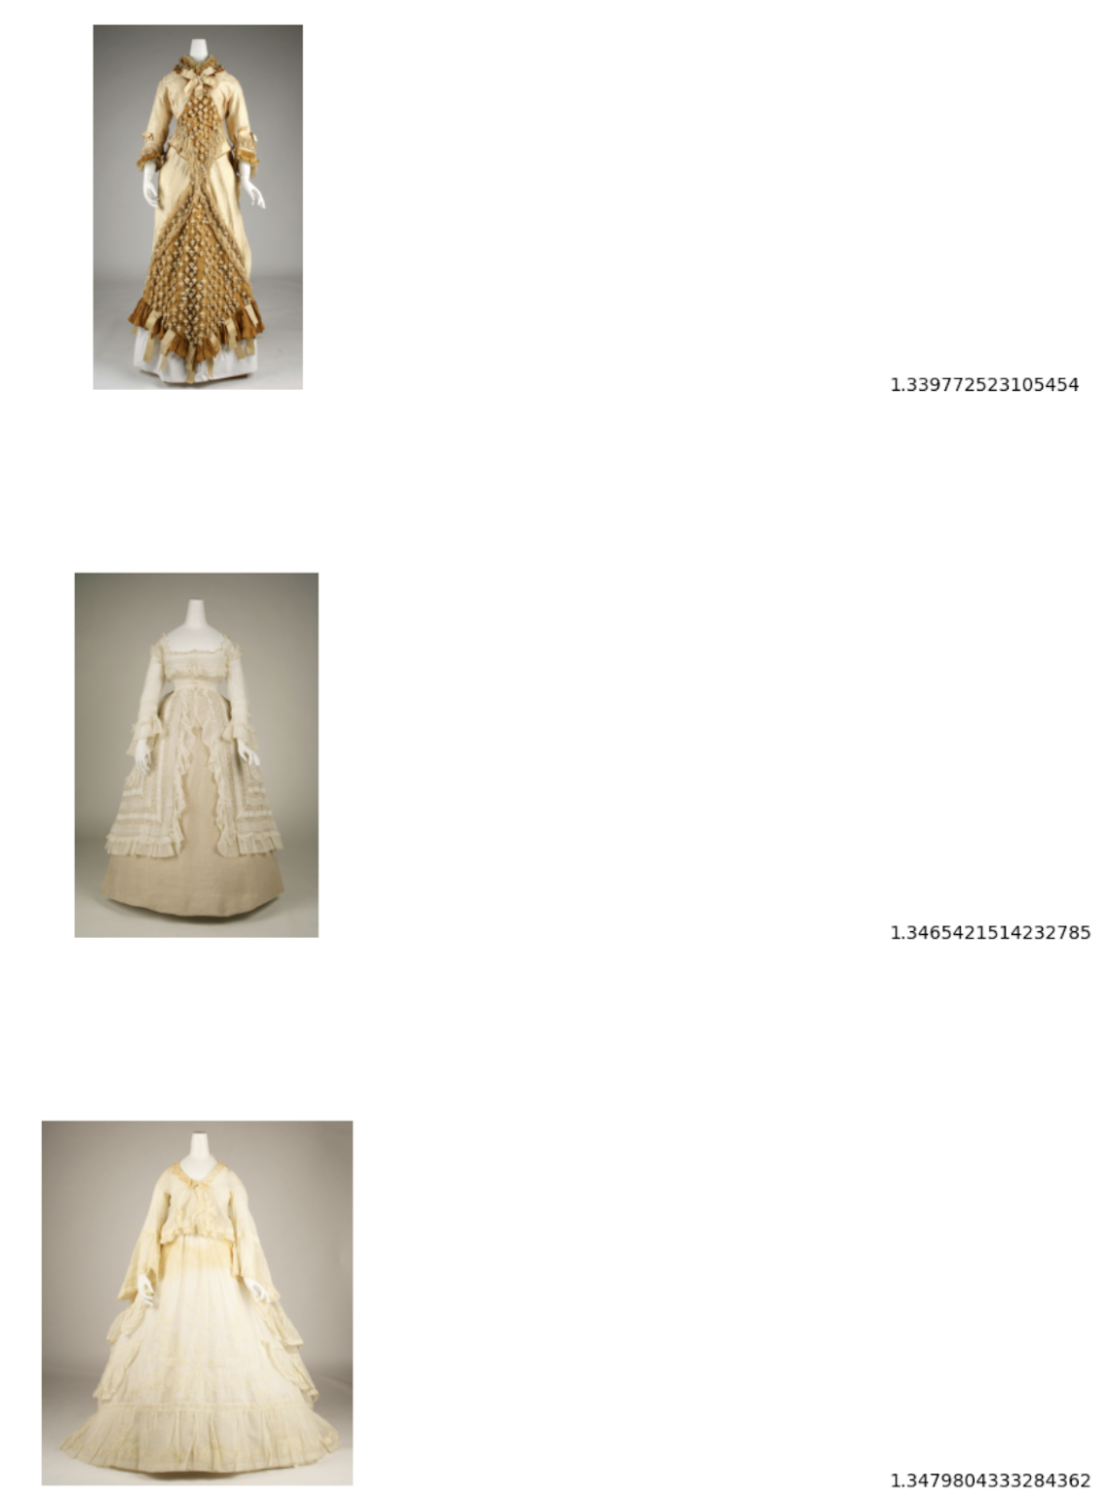
query = """
  SELECT * FROM `bqml_tutorial.vector_search_results`
  ORDER BY distance;
"""

printImages(client.query(query))
Run the code cell.
The results should look similar to the following:
Clean up
- In the Google Cloud console, go to the Manage resources page.
- In the project list, select the project that you want to delete, and then click Delete.
- In the dialog, type the project ID, and then click Shut down to delete the project.