In this tutorial, you register a Vertex AI endpoint as a remote model
in BigQuery. Then, you use the ML.PREDICT function to make
predictions using the remote model.
You can use remote models when a model is too large to import into BigQuery. They are also useful when you want to have a single point of inference for online, batch, and micro-batch use cases.
Objectives
- Import a pretrained TensorFlow model into the Vertex AI Model Registry.
- Deploy the model to a Vertex AI endpoint.
- Create a Cloud resource connection.
- Use the
CREATE MODELstatement to create a remote model in BigQuery. - Use the
ML.PREDICTfunction to make predictions with the remote model.
Costs
In this document, you use the following billable components of Google Cloud:
To generate a cost estimate based on your projected usage,
use the pricing calculator.
When you finish the tasks that are described in this document, you can avoid continued billing by deleting the resources that you created. For more information, see Clean up.
Before you begin
- Sign in to your Google Cloud account. If you're new to Google Cloud, create an account to evaluate how our products perform in real-world scenarios. New customers also get $300 in free credits to run, test, and deploy workloads.
-
In the Google Cloud console, on the project selector page, select or create a Google Cloud project.
Roles required to select or create a project
- Select a project: Selecting a project doesn't require a specific IAM role—you can select any project that you've been granted a role on.
-
Create a project: To create a project, you need the Project Creator
(
roles/resourcemanager.projectCreator), which contains theresourcemanager.projects.createpermission. Learn how to grant roles.
-
Verify that billing is enabled for your Google Cloud project.
-
Enable the BigQuery, Vertex AI, Cloud Storage, and BigQuery Connection APIs.
Roles required to enable APIs
To enable APIs, you need the Service Usage Admin IAM role (
roles/serviceusage.serviceUsageAdmin), which contains theserviceusage.services.enablepermission. Learn how to grant roles. - Ensure that you have the necessary permissions to perform the tasks in this document.
Required roles
If you create a new project, you are the project owner, and you are granted all of the required IAM permissions that you need to complete this tutorial.
If you are using an existing project do the following.
Make sure that you have the following role or roles on the project:
- BigQuery Studio Admin (
roles/bigquery.studioAdmin) - Vertex AI User (
roles/aiplatform.user) - BigQuery Connection Admin (
roles/bigquery.connectionAdmin)
Check for the roles
-
In the Google Cloud console, go to the IAM page.
Go to IAM - Select the project.
-
In the Principal column, find all rows that identify you or a group that you're included in. To learn which groups you're included in, contact your administrator.
- For all rows that specify or include you, check the Role column to see whether the list of roles includes the required roles.
Grant the roles
-
In the Google Cloud console, go to the IAM page.
Go to IAM - Select the project.
- Click Grant access.
-
In the New principals field, enter your user identifier. This is typically the email address for a Google Account.
- In the Select a role list, select a role.
- To grant additional roles, click Add another role and add each additional role.
- Click Save.
For more information about IAM permissions in BigQuery, see BigQuery permissions.
Import the model to the Vertex AI Model Registry
In this tutorial you use a pretrained TensorFlow model that is
available in Cloud Storage at
gs://cloud-samples-data/bigquery/ml/remote_model_tutorial/. The
Cloud Storage bucket is in the US multi-region location.
The model is a TensorFlow model that's named saved_model.pb. It is a
customized sentiment analysis model that was created by fine-tuning a BERT model
with plain text IMDB movie reviews. The model uses text input from the movie
reviews and returns sentiment scores between zero and one. When you import the
model into the Model Registry, you use a prebuilt TensorFlow
container.
Follow these steps to import the model.
In the Google Cloud console, go to the Vertex AI Model Registry page.
Click Import.
For Step one: Name and region, do the following:
Select Import as new model.
For Name, enter
bert_sentiment.For Description, enter
BQML tutorial model.For Region, select
us-central1. You must choose a US-based region because the Cloud Storage bucket is in theUSmulti-region location.Click Continue.
For Step two: Model settings, do the following:
Select Import model artifacts into a new prebuilt container.
In the Prebuilt container settings section, do the following:
For Model framework, choose TensorFlow.
For Model framework version, choose 2.15.
For Accelerator type, choose GPU.
For Model artifact location, enter
gs://cloud-samples-data/bigquery/ml/remote_model_tutorial/.Leave the default values for all remaining options and click Import.
After the import is complete, your model appears on the Model Registry page.
Deploy the model to a Vertex AI endpoint
Follow these steps to deploy the model to an endpoint.
In the Google Cloud console go to the Vertex AI Model Registry page.
In the Name column, click
bert_sentiment.Click the Deploy & Test tab.
Click Deploy to endpoint.
For step one, Define your endpoint, do the following:
Click Create new endpoint.
For Endpoint name, enter
bert sentiment endpoint.Leave the remaining default values and click Continue.
For step two, Model settings, do the following:
In the Compute settings section, for Minimum number of compute nodes, enter
1. This is the number of nodes that need to be available to the model at all times.In the Advanced scaling options section, for Machine type, choose Standard (n1-standard-2). Because you chose GPU as the accelerator type when you imported the model, after you choose the machine type, the accelerator type and accelerator count are set automatically.
Leave the remaining default values and click Deploy.
When the model is deployed to the endpoint, the status changes to
Active.Copy the numeric endpoint ID in the ID column and the value in the Region column. You'll need them later.
Create a dataset
Create a BigQuery dataset to store your ML model.
Console
In the Google Cloud console, go to the BigQuery page.
In the Explorer pane, click your project name.
Click View actions > Create dataset
On the Create dataset page, do the following:
For Dataset ID, enter
bqml_tutorial.For Location type, select Multi-region, and then select US (multiple regions in United States).
Leave the remaining default settings as they are, and click Create dataset.
bq
To create a new dataset, use the
bq mk command
with the --location flag. For a full list of possible parameters, see the
bq mk --dataset command
reference.
Create a dataset named
bqml_tutorialwith the data location set toUSand a description ofBigQuery ML tutorial dataset:bq --location=US mk -d \ --description "BigQuery ML tutorial dataset." \ bqml_tutorial
Instead of using the
--datasetflag, the command uses the-dshortcut. If you omit-dand--dataset, the command defaults to creating a dataset.Confirm that the dataset was created:
bq ls
API
Call the datasets.insert
method with a defined dataset resource.
{
  "datasetReference": {
     "datasetId": "bqml_tutorial"
  }
}
BigQuery DataFrames
Before trying this sample, follow the BigQuery DataFrames setup instructions in the BigQuery quickstart using BigQuery DataFrames. For more information, see the BigQuery DataFrames reference documentation.
To authenticate to BigQuery, set up Application Default Credentials. For more information, see Set up ADC for a local development environment.
Create a BigQuery Cloud resource connection
You must have a Cloud resource connection to connect to a Vertex AI endpoint.
Console
Go to the BigQuery page.
In the Explorer pane, click Add data.
The Add data dialog opens.
In the Filter By pane, in the Data Source Type section, select Databases.
Alternatively, in the Search for data sources field, you can enter
Vertex AI.In the Featured data sources section, click Vertex AI.
Click the Vertex AI Models: BigQuery Federation solution card.
In the Connection type list, select Vertex AI remote models, remote functions and BigLake (Cloud Resource).
In the Connection ID field, enter
bqml_tutorial.Verify that Multi-region—US is selected.
Click Create connection.
At the bottom of the window, click Go to connection. Alternatively, in the Explorer pane, expand External connections, and then click
us.bqml_tutorial.In the Connection info pane, copy the Service account ID. You need this ID when you configure permissions for the connection. When you create a connection resource, BigQuery creates a unique system service account and associates it with the connection.
bq
Create a connection:
bq mk --connection --location=US --project_id=PROJECT_ID \
    --connection_type=CLOUD_RESOURCE bqml_tutorial
Replace
PROJECT_IDwith your Google Cloud project ID. The--project_idparameter overrides the default project.When you create a connection resource, BigQuery creates a unique system service account and associates it with the connection.
Troubleshooting: If you get the following connection error, update the Google Cloud SDK:
Flags parsing error: flag --connection_type=CLOUD_RESOURCE: value should be one of...
Retrieve and copy the service account ID for use in a later step:
bq show --connection PROJECT_ID.us.bqml_tutorial
The output is similar to the following:
name                          properties
1234.REGION.CONNECTION_ID {"serviceAccountId": "connection-1234-9u56h9@gcp-sa-bigquery-condel.iam.gserviceaccount.com"}
Set up connection access
Grant the Vertex AI User role to the Cloud resource connection's service account. You must grant this role in the same project where you created the remote model endpoint.
To grant the role, follow these steps:
Go to the IAM & Admin page.
Click Grant Access.
In the New principals field, enter the Cloud resource connection's service account ID that you copied previously.
In the Select a role field, choose Vertex AI, and then select Vertex AI User.
Click Save.
Create a BigQuery ML remote model
You create a BigQuery ML remote model by using the CREATE MODEL
statement with the REMOTE WITH CONNECTION clause. For more information on
the CREATE MODEL statement, see The CREATE MODEL statement for remote models
over custom models.
You create your model in the US multi-region location. In a
BigQuery multi-region (US, EU) dataset, you can only create a
remote model that connects to an endpoint deployed in a region within the same
multi-region location (US, EU).
When you create the remote model, you need the endpoint ID that was generated
when you deployed the model to Vertex AI. Also, the input and
output field names and types need to be exactly same as the Vertex AI
model's input and output. In this example, the input is a text STRING, and the
output is an ARRAY of type FLOAT64.
Console
In the Google Cloud console, go to the BigQuery page.
For Create new, click SQL query.
In the query editor, enter this
CREATE MODELstatement, and then click Run:CREATE OR REPLACE MODEL `PROJECT_ID.bqml_tutorial.bert_sentiment` INPUT (text STRING) OUTPUT(scores ARRAY<FLOAT64>) REMOTE WITH CONNECTION `PROJECT_ID.us.bqml_tutorial` OPTIONS(ENDPOINT = 'https://us-central1-aiplatform.googleapis.com/v1/projects/PROJECT_ID/locations/us-central1/endpoints/ENDPOINT_ID')
Replace the following:
- PROJECT_ID: your project name.
- ENDPOINT_ID: the endpoint ID that you copied previously.
When the operation is complete, you see a message similar to
Successfully created model named bert_sentiment.Your new model appears in the Resources panel. Models are indicated by the model icon:
 .
.If you select the new model in the Resources panel, information about the model appears below the Query editor.
bq
Create the remote model by entering the following
CREATE MODELstatement:bq query --use_legacy_sql=false \ "CREATE OR REPLACE MODEL `PROJECT_ID.bqml_tutorial.bert_sentiment` INPUT (text STRING) OUTPUT(scores ARRAY<FLOAT64>) REMOTE WITH CONNECTION `PROJECT_ID.us.bqml_tutorial` OPTIONS(ENDPOINT = 'https://us-central1-aiplatform.googleapis.com/v1/projects/PROJECT_ID/locations/us-central1/endpoints/ENDPOINT_ID')"
Replace the following:
- PROJECT_ID: your project name.
- ENDPOINT_ID: the endpoint ID that you copied previously.
After you create the model, verify that the model appears in the dataset:
bq ls -m bqml_tutorial
The output is similar to the following:
Id               Model Type   Labels    Creation Time
---------------- ------------ -------- -----------------
bert_sentiment                         28 Jan 17:39:43
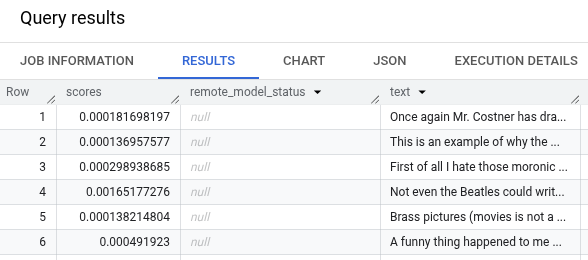
Get predictions using ML.PREDICT
You use the ML.PREDICT function to get sentiment predictions from the remote
model. The input is a text column (review) that contains reviews of movies
from the bigquery-public-data.imdb.reviews table.
In this example, 10,000 records are selected and sent for prediction. The remote model defaults to a batch size of 128 instances for requests.
Console
In the Google Cloud console, go to the BigQuery page.
In the Create new section, click SQL query.
In the query editor, enter this query that uses the
ML.PREDICTfunction, and then click Run.SELECT * FROM ML.PREDICT ( MODEL `PROJECT_ID.bqml_tutorial.bert_sentiment`, ( SELECT review as text FROM `bigquery-public-data.imdb.reviews` LIMIT 10000 ) )
The query results should look similar to the following:
bq
Enter this command to run the query that uses ML.PREDICT.
bq query --use_legacy_sql=false \
'SELECT *
FROM ML.PREDICT (
MODEL `PROJECT_ID.bqml_tutorial.bert_sentiment`,
  (
    SELECT review as text
    FROM `bigquery-public-data.imdb.reviews`
    LIMIT 10000
  )
)'
Clean up
To avoid incurring charges to your Google Cloud account for the resources used in this tutorial, either delete the project that contains the resources, or keep the project and delete the individual resources.
Delete the project
Console
- In the Google Cloud console, go to the Manage resources page.
- In the project list, select the project that you want to delete, and then click Delete.
- In the dialog, type the project ID, and then click Shut down to delete the project.
gcloud
- In the Google Cloud console, go to the Manage resources page.
- In the project list, select the project that you want to delete, and then click Delete.
- In the dialog, type the project ID, and then click Shut down to delete the project.
Delete individual resources
Alternatively, to remove the individual resources used in this tutorial:
What's next
- For an overview of BigQuery ML, see Introduction to AI and ML in BigQuery ML.
- For more information about using the
CREATE MODELstatement for remote models, see The CREATE MODEL statement for remote models over custom models. - For more information on using a BigQuery notebook, see Introduction to notebooks.
- For more information about BigQuery regions and multi-regions, see the Supported locations page.
- To learn more about importing models in Vertex AI Model Registry, see Import models to Vertex AI.
- To learn more about model versioning in Vertex AI Model Registry, see Model versioning with Model Registry.
- For information on using Vertex AI VPC Service Controls, see VPC Service Controls with Vertex AI.