This scenario shows how to export logs from Cloud Logging to Cloud Storage to meet your organization's compliance requirements. Organizations face many such requirements for creating and preserving logging files. For example, where Sarbanes Oxley (SOX) compliance is important, you might want to maintain logs for users, databases, and console activity. For more information on the default and configurable log retention periods, see the Cloud Logging quotas and limits.
In this scenario, the exported logs are delivered to a Cloud Storage bucket that you configure. You grant permissions to limit access to the logs as appropriate. In order to reduce long-term storage costs, you can use the object lifecycle management feature in Cloud Storage to move logs to Nearline or Coldline storage classes and delete them after the required retention period has passed.
This scenario assumes a common n-tier web architecture running on Google Cloud with virtual machines (VMs), databases, and a supporting storage system. For this environment, the following log types are exported: all audit logs, virtual machine–related logs, storage logs, and database logs. You can change the types of logs that are exported by adjusting the logging filters in the example.
Set up the logging export
The following diagram shows the steps for enabling logging export to Cloud Storage.

Set up the logging export bucket in Cloud Storage
Follow the instructions to set up a Cloud Storage bucket that will host your exported logs. For the Default storage class, select Regional, unless you require the Multi-Regional, Nearline, or Coldline storage class.
Configure object lifecycle management for the Cloud Storage bucket
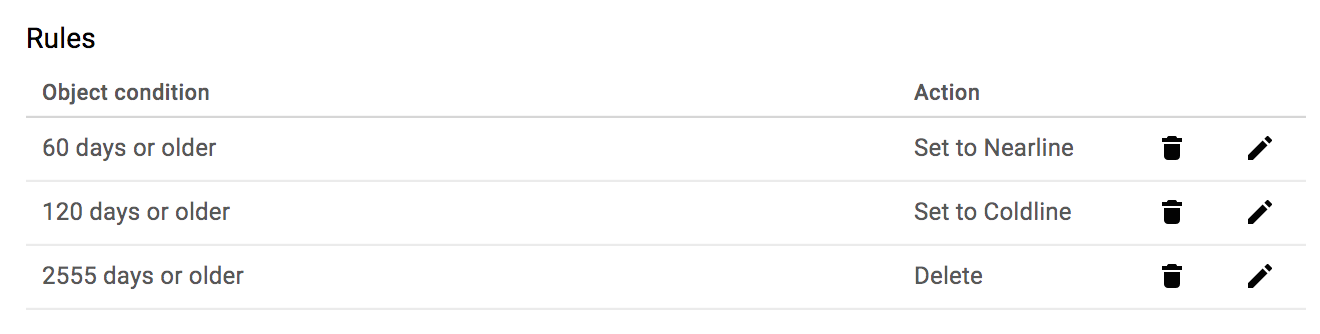
This scenario assumes a retention requirement of 7 years for all logs. In order to minimize storage costs, you can add object lifecycle rules in Cloud Storage to move logs to Nearline or Coldline storage after a given number of days and then delete the logs when you are no longer required to retain them.
Best practice: Moving logs to Nearline or Coldline and then deleting them helps you manage the ongoing operational cost of maintaining the logs.
You can follow the instructions to create lifecycle rules. The following screenshot depicts a cascading set of rules that change the storage class to Nearline after 60 days, change the storage class to Coldline after 120 days, and then delete the logs after 2555 days, which is roughly 7 years.
Turn on audit logging for all services
Data access audit logs—except for BigQuery—are disabled by default. In order to enable all audit logs, follow the instructions to update the Identity and Access Management (IAM) policy with the configuration listed in the audit policy documentation. The steps include the following:
- Downloading the current IAM policy as a file.
- Adding the audit log policy JSON or YAML object to the current policy file.
- Updating the Google Cloud project with the changed policy file.
The following is an example JSON object that enables all audit logs for all services.
"auditConfigs": [
    {
        "service": "allServices",
        "auditLogConfigs": [
            { "logType": "ADMIN_READ" },
            { "logType": "DATA_READ"  },
            { "logType": "DATA_WRITE" },
        ]
    },
]
Configure the logging export
After you set up aggregated exports or logs export, you need to refine the logging filters to export audit logs, virtual machine–related logs, storage logs, and database logs. The following logging filter includes the Admin Activity and Data Access audit logs and the logs for specific resource types.
logName:"/logs/cloudaudit.googleapis.com" OR
resource.type:gce OR
resource.type=gcs_bucket OR
resource.type=cloudsql_database OR
resource.type=bigquery_resource
From the Google Cloud CLI, use the
gcloud logging sinks create
command or the
organizations.sinks.create
API call to create a sink with the appropriate filters. The following example
gcloud command creates a sink called gcp_logging_sink_gcs for the
organization. The sink includes all children projects and specifies filtering to
select individual audit logs.
gcloud logging sinks create gcp_logging_sink_gcs \
    storage.googleapis.com/gcp-logging-export-000100011000 \
    --log-filter='logName: "/logs/cloudaudit.googleapis.com" OR \
    resource.type:\"gce\" OR \
    resource.type=\"gcs_bucket\" OR   \
    resource.type=\"cloudsql_database\" OR  \
    resource.type=\"bigquery_resource\"' \
    --include-children   \
    --organization=324989855333
The command output is similar to the following:
Created [https://logging.googleapis.com/v2/organizations/324989855333/sinks/gcp_logging_sink_gcs].
Please remember to grant `serviceAccount:gcp-logging-sink-gcs@logging-o324989855333.iam.gserviceaccount.com` full-control access to the bucket.
More information about sinks can be found at /logging/docs/export/configure_export
The serviceAccount entry returned from the API call includes the identity
gcp-logging-sink-gcs@logging-o324989855333.iam.gserviceaccount.com. This
identity represents a Google Cloud service account that has been created
for the export. Until you grant this identity write access to the destination,
log entry exports from this sink will fail. For more information, see the next
section or the documentation for
Granting access for a resource.
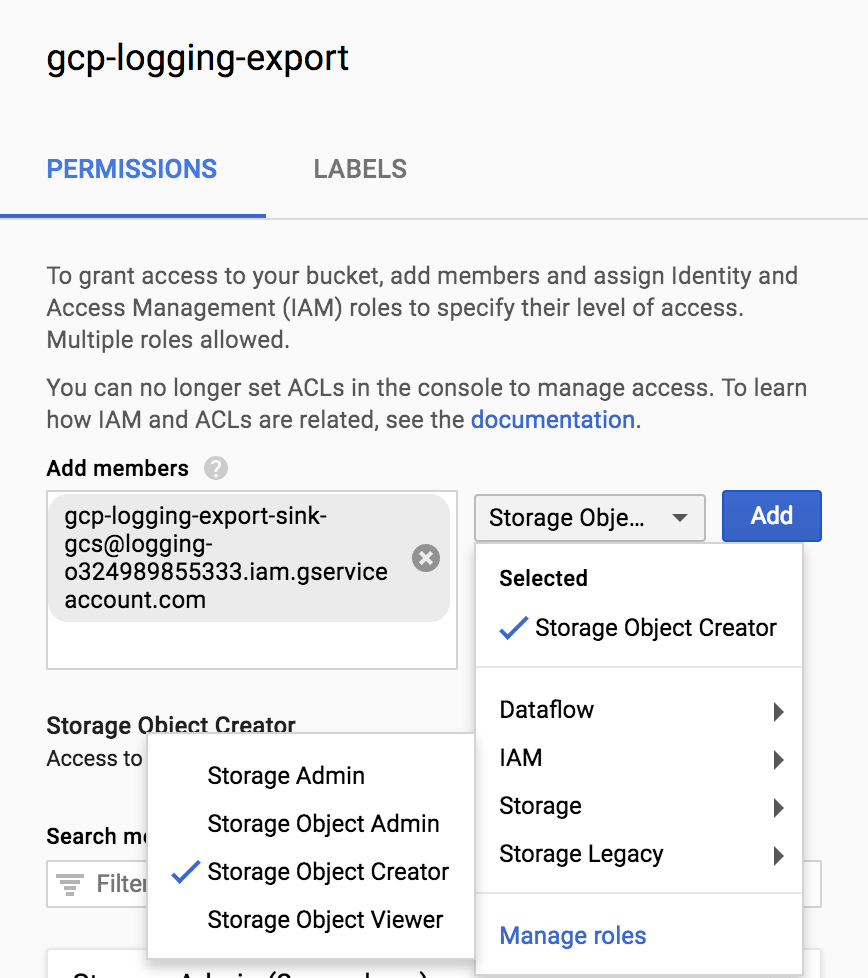
Set IAM policy permissions for the Cloud Storage bucket
By adding the service account
gcp-logging-sink-gcs@logging-o324989855333.iam.gserviceaccount.com to the
gcp-logging-export-000100011000 bucket with Storage Object Creator
permissions, you grant the service account permission to write to the bucket.
Until you add these permissions, the sink export will fail.
To add the permissions to the gcp-logging-export bucket, follow these steps:
In the Google Cloud console, open Storage Browser:
Select the
gcp-logging-exportbucket.Click Show info panel, and then select the Storage Object Creator permissions.
After you create the logging export by using the preceding filter, log files will begin to populate the Cloud Storage buckets in the configured project.
Best practice: You can implement a policy of least permissions based on your needs. You configure the bucket permissions based on specific Google Cloud user accounts, Google Groups, or Google Cloud service accounts. Use IAM permissions to grant access to the Cloud Storage bucket as well as bulk access to a bucket's objects.
For an example set of permissions, you can do the following:
- Remove all nonessential users from the Cloud Storage bucket permissions.
- Add full control for the Cloud Storage admin.
- Grant the export user permissions to write the logging export files.
- Grant other individual users viewing access to the Google Cloud logging exports.
You can update the IAM permissions for the bucket directly in the
Google Cloud console, through the gsutil command-line tool, or through
the IAM API. The following example shows a sample set of permissions
and screenshots associated with a Cloud Storage bucket in the
Google Cloud console.
Role: Storage Admin
- IAM description: Full control of Cloud Storage resources
- Usage: Use this role to grant access to admin users for Cloud Storage resources without granting access to modify the contents stored in Cloud Storage.
Example account:
storage-admin@example.com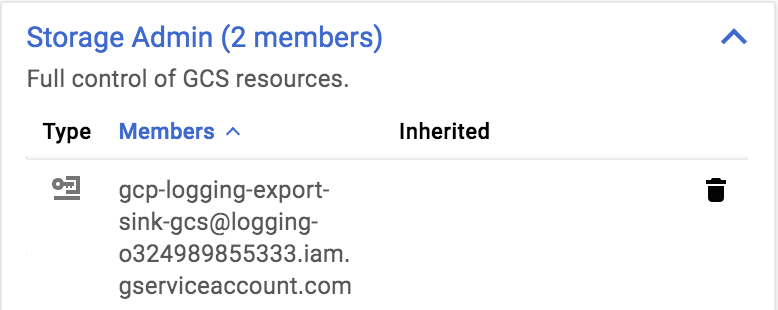
Role: Storage Object Admin
- IAM description: Full control of Cloud Storage objects
- Usage: Use this role to grant full access to admin users for Cloud Storage file objects without granting access to modify the Cloud Storage resource configuration.
Example account:
storage-object-admin@example.com: user1@example.com, user2@example.com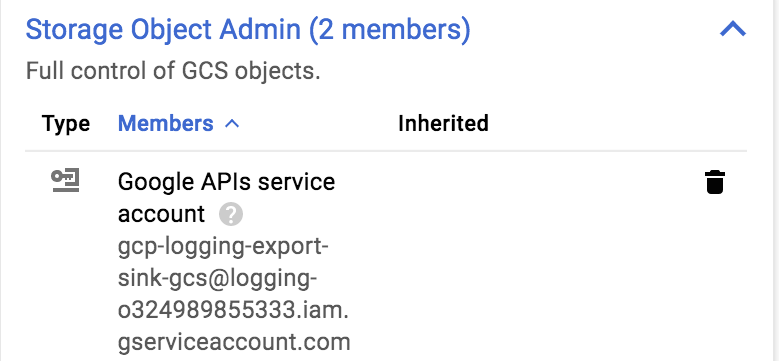
Role: Storage Object Viewer
- IAM description: Read access to Cloud Storage objects
- Usage: Use this role to grant read-only access to the Google Cloud logs for users.
Example account:
storage-viewer@example.com: user3@example.com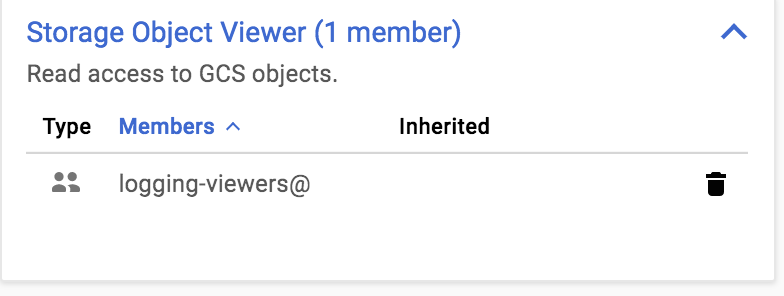
Best practice: If you use Google Workspace or consumer Google Groups, you
can add a Google group such as gcp-logging-export-viewers@example.com with
Storage Object Viewer permissions. You can then add or remove users to the
gcp-logging-export-viewers@example.com group without having to edit the
Cloud Storage bucket permissions for each change in user viewing
permissions.
Using the exported logs
After you create the logging export by using the filter above, log files
begin to populate the Cloud Storage bucket in the configured project.
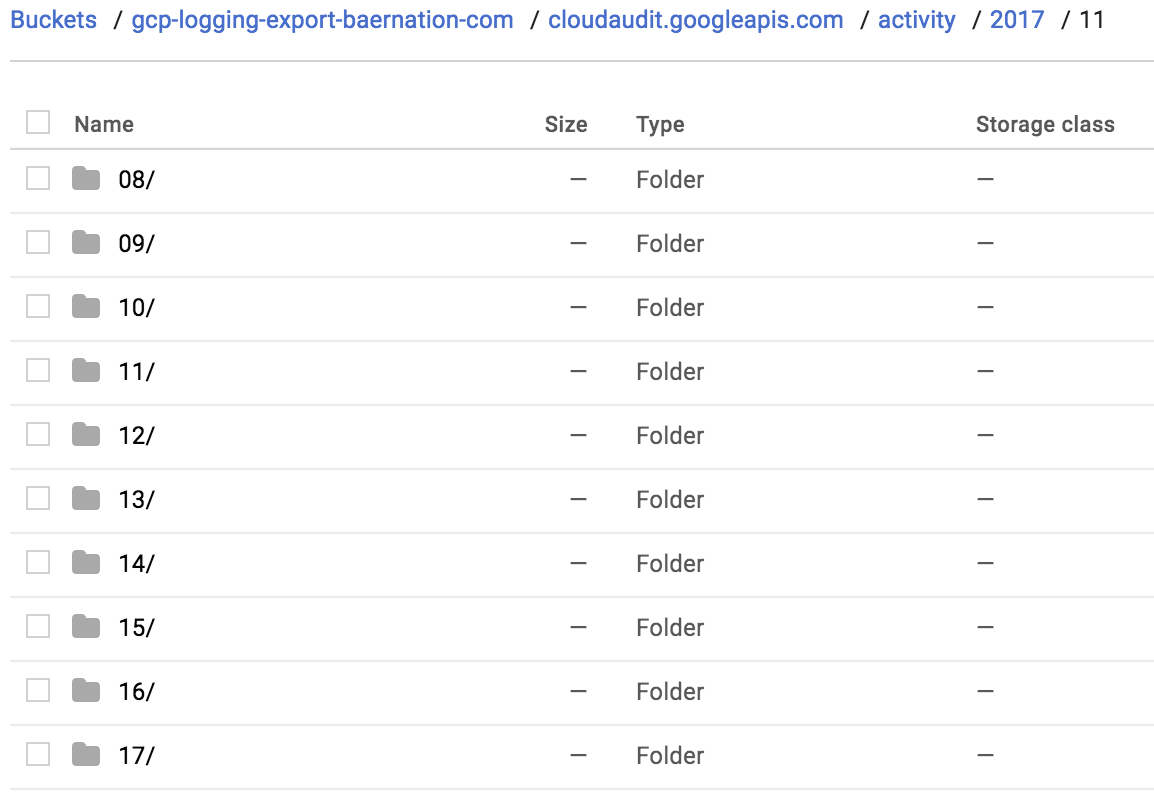
Each log creates a separate folder in the bucket, which is broken down in a
hierarchical structure based on date. You can access the logs through the
Google Cloud console, the gsutil command-line tool, or the IAM API.
The following screenshot shows an example folder structure in the
Google Cloud console.
Each log file consists of JSON data that follows the textPayload,
protoPayload, and jsonPayload log entry formats. Over time, the log files in
the Cloud Storage bucket are subject to the Cloud Storage
lifecycle process, which first moves the logs to Nearline storage, then moves
the logs to Coldline storage, and finally deletes the logs based on your
configuration.
Granting external access
You might want to grant specific users access to exported logs—for example, security analysts, your DevOps team, and auditors.
Logs location strategies
There are several options for granting access to the logs in Cloud Storage.
Create copies of the logs to share.
Manually or programmatically create a copy of an individual log file or set of log files, and place the copies in a separate Cloud Storage bucket. Then use the separate bucket permissions to share the logs with specific users as appropriate.
Advantages: You can limit the amount of data that is exposed to only the copied data.
Disadvantages: You have to create, share, and manage the separate datasets and permissions, which can lead to higher costs.
Grant read-only access to all logs.
Manually or programmatically set viewer permissions to the Cloud Storage logging export bucket, which grants access to all log exports.
Advantages: Access is easy to grant.
Disadvantages: You must grant access to all of the logs rather than specific log files.
User access control strategies
You can use Cloud Storage bucket permissions to share the Cloud Storage bucket of logging exports with specific Google Accounts or Google Groups.
Use a Google Group.
Create a Google Group such as
auditors@example.comwith read-only access to the logging export Cloud Storage bucket. You then manage the list of Google Accounts by adding or removing auditors to the Google group.Advantages: It is easy to manage access through a group; there's a clear user-access purpose.
Disadvantages: It's not possible to tell who has access without looking at the group's membership.
Use individual Google Accounts.
Grant individual Google Account access to the logging export Cloud Storage bucket for each user who requires it.
Advantages: It is easy to add each user manually or programmatically.
Disadvantages: It is not possible to discern audit users from other viewers.
What's next
- Exporting logs to Elastic Cloud
Look at the other export scenarios:
Explore reference architectures, diagrams, and best practices about Google Cloud. Take a look at our Cloud Architecture Center.