Crie uma instância de VM com um nome de anfitrião personalizado


Quando cria uma instância de máquina virtual (VM), o Google Cloud cria um Google Cloud nome DNS interno a partir do nome da VM. A menos que especifique um nome de anfitrião personalizado, Google Cloud usa o nome DNS interno criado automaticamente como o nome de anfitrião que fornece à VM.

Pode criar uma VM com um nome de anfitrião personalizado especificando qualquer nome de DNS totalmente qualificado. Os nomes de anfitriões personalizados são úteis para manter convenções ou para suportar requisitos de aplicações que esperam um nome de anfitrião específico.

Mesmo quando especifica um nome do anfitrião personalizado, Google Cloud cria o nome DNS interno do Compute Engine. Pode estabelecer ligação à sua VM através deste registo de DNS interno criado automaticamente. O registo DNS interno resolve-se para o nome DNS interno e não para o nome do anfitrião personalizado. Com nomes de anfitriões personalizados, continua a ter de criar um registo DNS correspondente na zona adequada, por exemplo, através do Cloud DNS.

Antes de começar

  • Se ainda não o tiver feito, configure a autenticação. A autenticação valida a sua identidade para aceder a Google Cloud serviços e APIs. Para executar código ou exemplos a partir de um ambiente de desenvolvimento local, pode autenticar-se no Compute Engine selecionando uma das seguintes opções:

    Select the tab for how you plan to use the samples on this page:

    Console

    When you use the Google Cloud console to access Google Cloud services and APIs, you don't need to set up authentication.

    gcloud

    1. Instale a CLI Google Cloud. Após a instalação, inicialize a CLI gcloud executando o seguinte comando:

      gcloud init

      Se estiver a usar um fornecedor de identidade (IdP) externo, primeiro tem de iniciar sessão na CLI gcloud com a sua identidade federada.

    2. Set a default region and zone.

    Terraform

    Para usar os exemplos do Terraform nesta página num ambiente de desenvolvimento local, instale e inicialize a CLI gcloud e, em seguida, configure as credenciais predefinidas da aplicação com as suas credenciais de utilizador.

      Instale a CLI Google Cloud.

      Se estiver a usar um fornecedor de identidade (IdP) externo, primeiro tem de iniciar sessão na CLI gcloud com a sua identidade federada.

      If you're using a local shell, then create local authentication credentials for your user account:

      gcloud auth application-default login

      You don't need to do this if you're using Cloud Shell.

      If an authentication error is returned, and you are using an external identity provider (IdP), confirm that you have signed in to the gcloud CLI with your federated identity.

    Para mais informações, consulte Set up authentication for a local development environment.

    Go

    Para usar os Go exemplos nesta página num ambiente de desenvolvimento local, instale e inicialize a CLI gcloud e, em seguida, configure as Credenciais predefinidas da aplicação com as suas credenciais de utilizador.

      Instale a CLI Google Cloud.

      Se estiver a usar um fornecedor de identidade (IdP) externo, primeiro tem de iniciar sessão na CLI gcloud com a sua identidade federada.

      If you're using a local shell, then create local authentication credentials for your user account:

      gcloud auth application-default login

      You don't need to do this if you're using Cloud Shell.

      If an authentication error is returned, and you are using an external identity provider (IdP), confirm that you have signed in to the gcloud CLI with your federated identity.

    Para mais informações, consulte Set up authentication for a local development environment.

    Java

    Para usar os Java exemplos nesta página num ambiente de desenvolvimento local, instale e inicialize a CLI gcloud e, em seguida, configure as Credenciais predefinidas da aplicação com as suas credenciais de utilizador.

      Instale a CLI Google Cloud.

      Se estiver a usar um fornecedor de identidade (IdP) externo, primeiro tem de iniciar sessão na CLI gcloud com a sua identidade federada.

      If you're using a local shell, then create local authentication credentials for your user account:

      gcloud auth application-default login

      You don't need to do this if you're using Cloud Shell.

      If an authentication error is returned, and you are using an external identity provider (IdP), confirm that you have signed in to the gcloud CLI with your federated identity.

    Para mais informações, consulte Set up authentication for a local development environment.

    Node.js

    Para usar os Node.js exemplos nesta página num ambiente de desenvolvimento local, instale e inicialize a CLI gcloud e, em seguida, configure as Credenciais predefinidas da aplicação com as suas credenciais de utilizador.

      Instale a CLI Google Cloud.

      Se estiver a usar um fornecedor de identidade (IdP) externo, primeiro tem de iniciar sessão na CLI gcloud com a sua identidade federada.

      If you're using a local shell, then create local authentication credentials for your user account:

      gcloud auth application-default login

      You don't need to do this if you're using Cloud Shell.

      If an authentication error is returned, and you are using an external identity provider (IdP), confirm that you have signed in to the gcloud CLI with your federated identity.

    Para mais informações, consulte Set up authentication for a local development environment.

    Python

    Para usar os Python exemplos nesta página num ambiente de desenvolvimento local, instale e inicialize a CLI gcloud e, em seguida, configure as Credenciais predefinidas da aplicação com as suas credenciais de utilizador.

      Instale a CLI Google Cloud.

      Se estiver a usar um fornecedor de identidade (IdP) externo, primeiro tem de iniciar sessão na CLI gcloud com a sua identidade federada.

      If you're using a local shell, then create local authentication credentials for your user account:

      gcloud auth application-default login

      You don't need to do this if you're using Cloud Shell.

      If an authentication error is returned, and you are using an external identity provider (IdP), confirm that you have signed in to the gcloud CLI with your federated identity.

    Para mais informações, consulte Set up authentication for a local development environment.

    REST

    Para usar os exemplos da API REST nesta página num ambiente de desenvolvimento local, usa as credenciais que fornece à CLI gcloud.

      Instale a CLI Google Cloud.

      Se estiver a usar um fornecedor de identidade (IdP) externo, primeiro tem de iniciar sessão na CLI gcloud com a sua identidade federada.

    Para mais informações, consulte o artigo Autenticar para usar REST na Google Cloud documentação de autenticação.

Funções necessárias

Para receber as autorizações de que precisa para criar uma VM com um nome de anfitrião personalizado, peça ao seu administrador para lhe conceder a função IAM Administrador de instâncias do Compute (v1) (roles/compute.instanceAdmin.v1) no projeto. Para mais informações sobre a atribuição de funções, consulte o artigo Faça a gestão do acesso a projetos, pastas e organizações.

Esta função predefinida contém as autorizações necessárias para criar uma VM com um nome de anfitrião personalizado. Para ver as autorizações exatas que são necessárias, expanda a secção Autorizações necessárias:

Autorizações necessárias

As seguintes autorizações são necessárias para criar uma VM com um nome de anfitrião personalizado:

  • compute.instances.create no projeto
  • Para usar uma imagem personalizada para criar a VM: compute.images.useReadOnly na imagem
  • Para usar um instantâneo para criar a VM: compute.snapshots.useReadOnly no instantâneo
  • Para usar um modelo de instância para criar a VM: compute.instanceTemplates.useReadOnly no modelo de instância
  • Para especificar uma sub-rede para a sua VM: compute.subnetworks.use no projeto ou na sub-rede escolhida
  • Para especificar um endereço IP estático para a VM: compute.addresses.use no projeto
  • Para atribuir um endereço IP externo à VM quando usar uma rede VPC: compute.subnetworks.useExternalIp no projeto ou na sub-rede escolhida
  • Para atribuir uma rede antiga à VM: compute.networks.use no projeto
  • Para atribuir um endereço IP externo à VM quando usar uma rede antiga: compute.networks.useExternalIp no projeto
  • Para definir os metadados da instância de VM para a VM: compute.instances.setMetadata no projeto
  • Para definir etiquetas para a VM: compute.instances.setTags na VM
  • Para definir etiquetas para a VM: compute.instances.setLabels na VM
  • Para definir uma conta de serviço para a VM usar: compute.instances.setServiceAccount na VM
  • Para criar um novo disco para a VM: compute.disks.create no projeto
  • Para anexar um disco existente no modo de leitura ou leitura/escrita: compute.disks.use no disco
  • Para anexar um disco existente no modo de leitura: compute.disks.useReadOnly no disco

Também pode conseguir estas autorizações com funções personalizadas ou outras funções predefinidas.

Limitações

Sistemas operativos compatíveis

Os nomes de anfitriões personalizados são definidos no ambiente convidado através de scripts de hooks que se integram com o software de rede convidado. Os sistemas operativos Linux que não têm um script para integrar com o software de rede de convidados podem não ter o nome de anfitrião correto.

Para ver a lista completa de versões de sistemas operativos que suportam nomes de anfitriões personalizados, consulte o suporte do ambiente convidado em Detalhes do sistema operativo.

Convenção de nomenclatura

Os nomes de anfitrião personalizados têm de estar em conformidade com os requisitos da RFC 1035 para nomes de anfitrião válidos. Para cumprir estes requisitos, os nomes de anfitrião personalizados têm de cumprir as seguintes especificações de formato:

  • O nome de anfitrião contém, pelo menos, duas etiquetas descritas da seguinte forma:
    • Cada etiqueta contém expressões regulares que incluem apenas estes carateres: [a-z]([-a-z0-9]*[a-z0-9])?.
    • As etiquetas são concatenadas com um ponto.
    • Cada etiqueta tem entre 1 e 63 carateres.
  • O nome do anfitrião não excede os 253 carateres.

Não é válido: contém uma única etiqueta

my-host1234

Válido: contém três etiquetas concatenadas com pontos

my-host1234.example.com

Crie uma VM com um nome de anfitrião personalizado

Consola

  1. Na Google Cloud consola, aceda à página Criar uma instância.

    Aceda a Criar uma instância

  2. Especifique um Nome para a VM. Para mais informações, consulte o artigo Convenção de nomenclatura de recursos.

  3. Expanda a secção Opções avançadas e, de seguida, faça o seguinte:

    1. Expanda a secção Rede.
    2. No campo Nome do anfitrião, especifique o nome do anfitrião personalizado.
  4. Faça personalizações adicionais da VM, conforme necessário.

  5. Para criar e iniciar a VM, clique em Criar.

Passo seguinte: configure os seus registos DNS. Para mais informações, consulte o artigo Gerir registos.

gcloud

Usando a CLI Google Cloud, siga as instruções para criar uma instância a partir de uma imagem ou uma captura de ecrã, adicione a flag --hostname e use o comando gcloud compute instances create da seguinte forma:

gcloud compute instances create VM_NAME \
    --hostname=HOST_NAME

Substitua o seguinte:

  • VM_NAME: o nome da VM
  • HOST_NAME: o nome do anfitrião do domínio totalmente qualificado que quer atribuir

Por exemplo, para criar uma VM myinstance com o nome do anfitrião personalizado test.example.com, execute o seguinte comando:

gcloud compute instances create myinstance \
    --hostname=test.example.com

Passo seguinte: configure os seus registos DNS. Para mais informações, consulte o artigo Gerir registos.

Terraform

Pode usar um recurso do Terraform para criar uma instância com um nome de anfitrião personalizado usando o argumento hostname.


resource "google_compute_instance" "custom_hostname_instance" {
  name         = "custom-hostname-instance-name"
  machine_type = "f1-micro"
  zone         = "us-central1-c"

  # Set a custom hostname below
  hostname = "hashicorptest.com"

  boot_disk {
    initialize_params {
      image = "debian-cloud/debian-11"
    }
  }
  network_interface {
    # A default network is created for all GCP projects
    network = "default"
    access_config {
    }
  }
}
Para gerar o código do Terraform, pode usar o componente Código equivalente na Google Cloud consola.
  1. Na Google Cloud consola, aceda à página Instâncias de VM.

    Aceder a Instâncias de VM

  2. Clique em Criar instância.
  3. Especifique os parâmetros pretendidos.
  4. Na parte superior ou inferior da página, clique em Código equivalente e, de seguida, clique no separador Terraform para ver o código Terraform.

Passo seguinte: configure os seus registos DNS. Para mais informações, consulte o artigo Gerir registos.

Go

import (
	"context"
	"fmt"
	"io"

	compute "cloud.google.com/go/compute/apiv1"
	computepb "cloud.google.com/go/compute/apiv1/computepb"
	"google.golang.org/protobuf/proto"
)

// createInstanceWithCustomHostname creates an instance with custom hostname.
func createInstanceWithCustomHostname(w io.Writer, projectID, zone, instanceName, hostname, machineType, sourceImage, networkName string) error {
	// projectID := "your_project_id"
	// zone := "europe-central2-b"
	// instanceName := "your_instance_name"
	// hostname := "host.example.com" // Custom hostnames must conform to RFC 1035 requirements for valid hostnames.
	// machineType := "n1-standard-1"
	// sourceImage := "projects/debian-cloud/global/images/family/debian-12"
	// networkName := "global/networks/default"

	ctx := context.Background()
	instancesClient, err := compute.NewInstancesRESTClient(ctx)
	if err != nil {
		return fmt.Errorf("NewInstancesRESTClient: %w", err)
	}
	defer instancesClient.Close()

	req := &computepb.InsertInstanceRequest{
		Project: projectID,
		Zone:    zone,
		InstanceResource: &computepb.Instance{
			Name: proto.String(instanceName),
			// Custom hostnames are not resolved by the automatically created records
			// provided by Compute Engine internal DNS.
			// You must manually configure the DNS record for your custom hostname.
			Hostname: proto.String(hostname),
			Disks: []*computepb.AttachedDisk{
				{
					// Describe the size and source image of the boot disk to attach to the instance.
					InitializeParams: &computepb.AttachedDiskInitializeParams{
						DiskSizeGb:  proto.Int64(10),
						SourceImage: proto.String(sourceImage),
					},
					AutoDelete: proto.Bool(true),
					Boot:       proto.Bool(true),
					Type:       proto.String(computepb.AttachedDisk_PERSISTENT.String()),
				},
			},
			MachineType: proto.String(fmt.Sprintf("zones/%s/machineTypes/%s", zone, machineType)),
			NetworkInterfaces: []*computepb.NetworkInterface{
				{
					// Use the network interface provided in the networkName argument.
					Name: proto.String(networkName),
				},
			},
		},
	}

	op, err := instancesClient.Insert(ctx, req)
	if err != nil {
		return fmt.Errorf("unable to create instance: %w", err)
	}

	if err = op.Wait(ctx); err != nil {
		return fmt.Errorf("unable to wait for the operation: %w", err)
	}

	fmt.Fprintf(w, "Instance created\n")

	return nil
}

Java


import com.google.cloud.compute.v1.AttachedDisk;
import com.google.cloud.compute.v1.AttachedDiskInitializeParams;
import com.google.cloud.compute.v1.InsertInstanceRequest;
import com.google.cloud.compute.v1.Instance;
import com.google.cloud.compute.v1.InstancesClient;
import com.google.cloud.compute.v1.NetworkInterface;
import com.google.cloud.compute.v1.Operation;
import java.io.IOException;
import java.util.concurrent.ExecutionException;
import java.util.concurrent.TimeUnit;
import java.util.concurrent.TimeoutException;

public class CreateInstanceWithCustomHostname {

  public static void main(String[] args)
      throws IOException, ExecutionException, InterruptedException, TimeoutException {
    // TODO(developer): Replace these variables before running the sample.
    // hostName: Custom hostname of the new VM instance.
    // *    Custom hostnames must conform to RFC 1035 requirements for valid hostnames.
    String project = "your-project-id";
    String zone = "zone-name"; // eg: "us-central1-a"
    String instanceName = "instance-name";
    String hostName = "host.example.com";
    createInstanceWithCustomHostname(project, zone, instanceName, hostName);
  }

  // Creates an instance with custom hostname.
  public static void createInstanceWithCustomHostname(String projectId, String zone,
      String instanceName, String hostName)
      throws IOException, ExecutionException, InterruptedException, TimeoutException {
    //  machineType - Machine type for the VM instance specified in the following format:
    //  *    "zones/{zone}/machineTypes/{type_name}". For example:
    //  *    "zones/europe-west3-c/machineTypes/f1-micro"
    //  *    You can find the list of available machine types by using this gcloud command:
    //  *    $ gcloud compute machine-types list
    //  sourceImage - Path of the disk image you want to use for your boot
    //  *    disk. This image can be one of the public images
    //  *    eg: "projects/...
    //  *    or a private image you have access to.
    //  *    You can check the list of available public images using:
    //  *    $ gcloud compute images list
    //  networkName - Name of the network you want the new instance to use.
    //  *    For example: global/networks/default - if you want to use the default network.
    String machineType = "n1-standard-1";
    String sourceImage = String.format("projects/%s/global/images/family/%s", "debian-cloud",
        "debian-11");
    String networkName = "global/networks/default";

    try (InstancesClient instancesClient = InstancesClient.create()) {
      System.out.printf("Creating the %s instance in %s with hostname %s...", instanceName, zone,
          hostName);

      AttachedDisk disk =
          AttachedDisk.newBuilder()
              .setBoot(true)
              .setAutoDelete(true)
              .setType(AttachedDisk.Type.PERSISTENT.toString())
              .setInitializeParams(
                  // Describe the size and source image of the boot disk to attach to the instance.
                  AttachedDiskInitializeParams.newBuilder()
                      .setSourceImage(sourceImage)
                      .setDiskSizeGb(10).build())
              .build();

      // Use the network interface provided in the networkName argument.
      NetworkInterface networkInterface = NetworkInterface.newBuilder()
          .setName(networkName)
          .build();

      Instance instanceResource = Instance.newBuilder()
          // Custom hostnames are not resolved by the automatically created records
          // provided by Compute Engine internal DNS.
          // You must manually configure the DNS record for your custom hostname.
          .setName(instanceName)
          .setHostname(hostName)
          .addDisks(disk)
          .setMachineType(String.format("zones/%s/machineTypes/%s", zone, machineType))
          .addNetworkInterfaces(networkInterface).build();

      InsertInstanceRequest request = InsertInstanceRequest.newBuilder()
          .setProject(projectId)
          .setZone(zone)
          .setInstanceResource(instanceResource).build();

      // Wait for the create operation to complete.
      Operation response = instancesClient.insertAsync(request).get(3, TimeUnit.MINUTES);
      ;

      if (response.hasError()) {
        System.out.printf("Instance creation failed for instance: %s ; Response: %s ! ! ",
            instanceName, response);
        return;
      }
      System.out.printf("Instance created : %s", instanceName);
      System.out.printf("Operation Status for instance %s is %s: ", instanceName,
          response.getStatus());
    }

  }

}

Node.js

/**
 * TODO(developer): Uncomment and replace these variables before running the sample.
 */
// const projectId = 'YOUR_PROJECT_ID';
// const zone = 'europe-central2-b'
// const instanceName = 'YOUR_INSTANCE_NAME'
// const hostname = 'host.example.com'
// const machineType = 'n1-standard-1';
// const sourceImage = 'projects/debian-cloud/global/images/family/debian-11';
// const networkName = 'global/networks/default';

const compute = require('@google-cloud/compute');

// Create a new instance with the values provided above in the specified project and zone.
async function createInstanceWithCustomHostname() {
  const instancesClient = new compute.InstancesClient();

  console.log(
    `Creating the ${instanceName} instance in ${zone} with hostname ${hostname}...`
  );

  const [response] = await instancesClient.insert({
    instanceResource: {
      name: instanceName,
      // Custom hostnames are not resolved by the automatically created records
      // provided by Compute Engine internal DNS.
      // You must manually configure the DNS record for your custom hostname.
      hostname,
      disks: [
        {
          // Describe the size and source image of the boot disk to attach to the instance.
          initializeParams: {
            diskSizeGb: '10',
            sourceImage,
          },
          autoDelete: true,
          boot: true,
          type: 'PERSISTENT',
        },
      ],
      machineType: `zones/${zone}/machineTypes/${machineType}`,
      networkInterfaces: [
        {
          // Use the network interface provided in the networkName argument.
          name: networkName,
        },
      ],
    },
    project: projectId,
    zone,
  });
  let operation = response.latestResponse;
  const operationsClient = new compute.ZoneOperationsClient();

  // Wait for the create operation to complete.
  while (operation.status !== 'DONE') {
    [operation] = await operationsClient.wait({
      operation: operation.name,
      project: projectId,
      zone: operation.zone.split('/').pop(),
    });
  }

  console.log('Instance created.');
}

createInstanceWithCustomHostname();

Python

from __future__ import annotations

import re
import sys
from typing import Any
import warnings

from google.api_core.extended_operation import ExtendedOperation
from google.cloud import compute_v1


def get_image_from_family(project: str, family: str) -> compute_v1.Image:
    """
    Retrieve the newest image that is part of a given family in a project.

    Args:
        project: project ID or project number of the Cloud project you want to get image from.
        family: name of the image family you want to get image from.

    Returns:
        An Image object.
    """
    image_client = compute_v1.ImagesClient()
    # List of public operating system (OS) images: https://cloud.google.com/compute/docs/images/os-details
    newest_image = image_client.get_from_family(project=project, family=family)
    return newest_image


def disk_from_image(
    disk_type: str,
    disk_size_gb: int,
    boot: bool,
    source_image: str,
    auto_delete: bool = True,
) -> compute_v1.AttachedDisk:
    """
    Create an AttachedDisk object to be used in VM instance creation. Uses an image as the
    source for the new disk.

    Args:
         disk_type: the type of disk you want to create. This value uses the following format:
            "zones/{zone}/diskTypes/(pd-standard|pd-ssd|pd-balanced|pd-extreme)".
            For example: "zones/us-west3-b/diskTypes/pd-ssd"
        disk_size_gb: size of the new disk in gigabytes
        boot: boolean flag indicating whether this disk should be used as a boot disk of an instance
        source_image: source image to use when creating this disk. You must have read access to this disk. This can be one
            of the publicly available images or an image from one of your projects.
            This value uses the following format: "projects/{project_name}/global/images/{image_name}"
        auto_delete: boolean flag indicating whether this disk should be deleted with the VM that uses it

    Returns:
        AttachedDisk object configured to be created using the specified image.
    """
    boot_disk = compute_v1.AttachedDisk()
    initialize_params = compute_v1.AttachedDiskInitializeParams()
    initialize_params.source_image = source_image
    initialize_params.disk_size_gb = disk_size_gb
    initialize_params.disk_type = disk_type
    boot_disk.initialize_params = initialize_params
    # Remember to set auto_delete to True if you want the disk to be deleted when you delete
    # your VM instance.
    boot_disk.auto_delete = auto_delete
    boot_disk.boot = boot
    return boot_disk


def wait_for_extended_operation(
    operation: ExtendedOperation, verbose_name: str = "operation", timeout: int = 300
) -> Any:
    """
    Waits for the extended (long-running) operation to complete.

    If the operation is successful, it will return its result.
    If the operation ends with an error, an exception will be raised.
    If there were any warnings during the execution of the operation
    they will be printed to sys.stderr.

    Args:
        operation: a long-running operation you want to wait on.
        verbose_name: (optional) a more verbose name of the operation,
            used only during error and warning reporting.
        timeout: how long (in seconds) to wait for operation to finish.
            If None, wait indefinitely.

    Returns:
        Whatever the operation.result() returns.

    Raises:
        This method will raise the exception received from `operation.exception()`
        or RuntimeError if there is no exception set, but there is an `error_code`
        set for the `operation`.

        In case of an operation taking longer than `timeout` seconds to complete,
        a `concurrent.futures.TimeoutError` will be raised.
    """
    result = operation.result(timeout=timeout)

    if operation.error_code:
        print(
            f"Error during {verbose_name}: [Code: {operation.error_code}]: {operation.error_message}",
            file=sys.stderr,
            flush=True,
        )
        print(f"Operation ID: {operation.name}", file=sys.stderr, flush=True)
        raise operation.exception() or RuntimeError(operation.error_message)

    if operation.warnings:
        print(f"Warnings during {verbose_name}:\n", file=sys.stderr, flush=True)
        for warning in operation.warnings:
            print(f" - {warning.code}: {warning.message}", file=sys.stderr, flush=True)

    return result


def create_instance(
    project_id: str,
    zone: str,
    instance_name: str,
    disks: list[compute_v1.AttachedDisk],
    machine_type: str = "n1-standard-1",
    network_link: str = "global/networks/default",
    subnetwork_link: str = None,
    internal_ip: str = None,
    external_access: bool = False,
    external_ipv4: str = None,
    accelerators: list[compute_v1.AcceleratorConfig] = None,
    preemptible: bool = False,
    spot: bool = False,
    instance_termination_action: str = "STOP",
    custom_hostname: str = None,
    delete_protection: bool = False,
) -> compute_v1.Instance:
    """
    Send an instance creation request to the Compute Engine API and wait for it to complete.

    Args:
        project_id: project ID or project number of the Cloud project you want to use.
        zone: name of the zone to create the instance in. For example: "us-west3-b"
        instance_name: name of the new virtual machine (VM) instance.
        disks: a list of compute_v1.AttachedDisk objects describing the disks
            you want to attach to your new instance.
        machine_type: machine type of the VM being created. This value uses the
            following format: "zones/{zone}/machineTypes/{type_name}".
            For example: "zones/europe-west3-c/machineTypes/f1-micro"
        network_link: name of the network you want the new instance to use.
            For example: "global/networks/default" represents the network
            named "default", which is created automatically for each project.
        subnetwork_link: name of the subnetwork you want the new instance to use.
            This value uses the following format:
            "regions/{region}/subnetworks/{subnetwork_name}"
        internal_ip: internal IP address you want to assign to the new instance.
            By default, a free address from the pool of available internal IP addresses of
            used subnet will be used.
        external_access: boolean flag indicating if the instance should have an external IPv4
            address assigned.
        external_ipv4: external IPv4 address to be assigned to this instance. If you specify
            an external IP address, it must live in the same region as the zone of the instance.
            This setting requires `external_access` to be set to True to work.
        accelerators: a list of AcceleratorConfig objects describing the accelerators that will
            be attached to the new instance.
        preemptible: boolean value indicating if the new instance should be preemptible
            or not. Preemptible VMs have been deprecated and you should now use Spot VMs.
        spot: boolean value indicating if the new instance should be a Spot VM or not.
        instance_termination_action: What action should be taken once a Spot VM is terminated.
            Possible values: "STOP", "DELETE"
        custom_hostname: Custom hostname of the new VM instance.
            Custom hostnames must conform to RFC 1035 requirements for valid hostnames.
        delete_protection: boolean value indicating if the new virtual machine should be
            protected against deletion or not.
    Returns:
        Instance object.
    """
    instance_client = compute_v1.InstancesClient()

    # Use the network interface provided in the network_link argument.
    network_interface = compute_v1.NetworkInterface()
    network_interface.network = network_link
    if subnetwork_link:
        network_interface.subnetwork = subnetwork_link

    if internal_ip:
        network_interface.network_i_p = internal_ip

    if external_access:
        access = compute_v1.AccessConfig()
        access.type_ = compute_v1.AccessConfig.Type.ONE_TO_ONE_NAT.name
        access.name = "External NAT"
        access.network_tier = access.NetworkTier.PREMIUM.name
        if external_ipv4:
            access.nat_i_p = external_ipv4
        network_interface.access_configs = [access]

    # Collect information into the Instance object.
    instance = compute_v1.Instance()
    instance.network_interfaces = [network_interface]
    instance.name = instance_name
    instance.disks = disks
    if re.match(r"^zones/[a-z\d\-]+/machineTypes/[a-z\d\-]+$", machine_type):
        instance.machine_type = machine_type
    else:
        instance.machine_type = f"zones/{zone}/machineTypes/{machine_type}"

    instance.scheduling = compute_v1.Scheduling()
    if accelerators:
        instance.guest_accelerators = accelerators
        instance.scheduling.on_host_maintenance = (
            compute_v1.Scheduling.OnHostMaintenance.TERMINATE.name
        )

    if preemptible:
        # Set the preemptible setting
        warnings.warn(
            "Preemptible VMs are being replaced by Spot VMs.", DeprecationWarning
        )
        instance.scheduling = compute_v1.Scheduling()
        instance.scheduling.preemptible = True

    if spot:
        # Set the Spot VM setting
        instance.scheduling.provisioning_model = (
            compute_v1.Scheduling.ProvisioningModel.SPOT.name
        )
        instance.scheduling.instance_termination_action = instance_termination_action

    if custom_hostname is not None:
        # Set the custom hostname for the instance
        instance.hostname = custom_hostname

    if delete_protection:
        # Set the delete protection bit
        instance.deletion_protection = True

    # Prepare the request to insert an instance.
    request = compute_v1.InsertInstanceRequest()
    request.zone = zone
    request.project = project_id
    request.instance_resource = instance

    # Wait for the create operation to complete.
    print(f"Creating the {instance_name} instance in {zone}...")

    operation = instance_client.insert(request=request)

    wait_for_extended_operation(operation, "instance creation")

    print(f"Instance {instance_name} created.")
    return instance_client.get(project=project_id, zone=zone, instance=instance_name)


def create_instance_custom_hostname(
    project_id: str, zone: str, instance_name: str, hostname: str
) -> compute_v1.Instance:
    """
    Create a new VM instance with Debian 10 operating system and a custom hostname.

    Args:
        project_id: project ID or project number of the Cloud project you want to use.
        zone: name of the zone to create the instance in. For example: "us-west3-b"
        instance_name: name of the new virtual machine (VM) instance.
        hostname: the hostname you want to use for the new instance.

    Returns:
        Instance object.
    """
    newest_debian = get_image_from_family(project="debian-cloud", family="debian-11")
    disk_type = f"zones/{zone}/diskTypes/pd-standard"
    disks = [disk_from_image(disk_type, 10, True, newest_debian.self_link)]
    instance = create_instance(
        project_id, zone, instance_name, disks, custom_hostname=hostname
    )
    return instance

REST

Siga as instruções da API para criar uma instância a partir de uma imagem ou de uma captura de ecrã e especifique o campo hostname no corpo do pedido.

POST https://compute.googleapis.com/compute/v1/projects/PROJECT_ID/zones/ZONE/instances

{
 "name": "VM_NAME",
 "hostname": "HOST_NAME",
 ...
}

Substitua o seguinte:

  • PROJECT_ID: o ID do seu projeto
  • ZONE: a zona onde quer criar a MV
  • VM_NAME: o nome da VM
  • HOST_NAME: o nome do anfitrião do domínio totalmente qualificado que quer atribuir

Valide o nome de anfitrião personalizado

Para VMs Linux, pode validar o nome do anfitrião executando o comando hostname -f na VM.

Também pode validar o nome de anfitrião personalizado através da Google Cloud consola ou da CLI do Google Cloud.

Consola

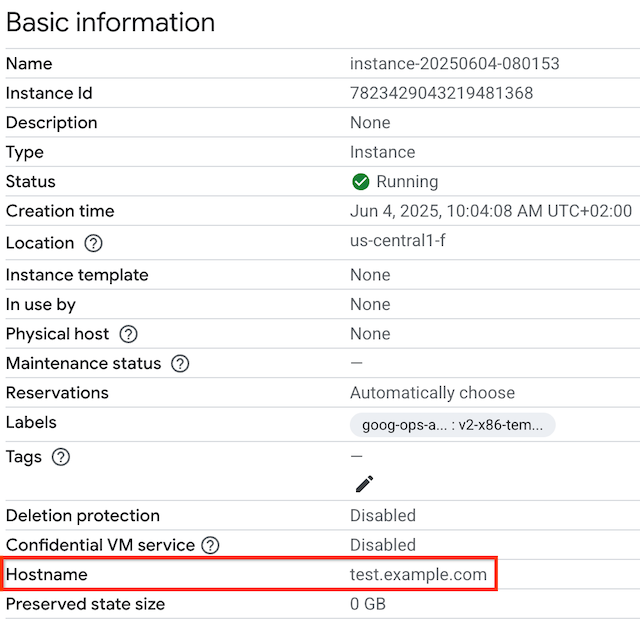
  1. Para ver o nome do anfitrião personalizado da sua VM, aceda à página Instâncias de VM.

    Aceder às instâncias de VM

  2. Clique no nome da instância para abrir a página Detalhes da instância de VM.

  3. Reveja a secção Nome do anfitrião. O campo Nome do anfitrião só é visível se tiver sido definido um nome do anfitrião personalizado.

    Página de instâncias de VM a mostrar o nome de anfitrião.

gcloud

Para ver o nome de anfitrião personalizado da sua VM com gcloud compute, use o subcomando instances describe com uma flag --format para filtrar o resultado. Substitua VM_NAME pelo nome da VM.

gcloud compute instances describe VM_NAME \
    --format='get(hostname)'

Por exemplo, para ver o nome do anfitrião personalizado de uma VM denominada myinstance, execute o seguinte comando.

gcloud compute instances describe myinstance \
    --format='get(hostname)'

O resultado pode ser semelhante ao seguinte:

test.example.com

Se não estiver definido um nome de anfitrião personalizado, o resultado deste comando fica em branco.

O que se segue?