Membuat instance VM dengan nama host kustom


Saat Anda membuat instance mesin virtual (VM), Google Cloud akan membuat nama DNS internal dari nama VM. Kecuali Anda menentukan nama host kustom, Google Cloud menggunakan nama DNS internal yang dibuat otomatis sebagai nama host yang diberikan ke VM.

Anda dapat membuat VM menggunakan nama host kustom dengan menentukan nama DNS yang sepenuhnya memenuhi syarat. Nama host kustom berguna untuk mempertahankan konvensi atau mendukung persyaratan untuk aplikasi yang mengharapkan nama host tertentu.

Meskipun Anda menentukan nama host kustom, Google Cloud akan membuat nama DNS internal Compute Engine. Anda dapat terhubung ke VM menggunakan data DNS internal yang dibuat otomatis ini. Data DNS internal me-resolve ke nama DNS internal dan bukan nama host kustom. Dengan nama host kustom, Anda tetap harus membuat data DNS yang sesuai di zona yang sesuai, misalnya, menggunakan Cloud DNS.

Sebelum memulai

  • Siapkan autentikasi, jika Anda belum melakukannya. Autentikasi adalah proses verifikasi identitas Anda untuk akses ke layanan dan API Google Cloud. Untuk menjalankan kode atau contoh dari lingkungan pengembangan lokal, Anda dapat melakukan autentikasi ke Compute Engine sebagai berikut.

    Pilih tab untuk melihat bagaimana Anda berencana menggunakan contoh di halaman ini:

    Konsol

    Saat menggunakan Konsol Google Cloud untuk mengakses API dan layanan Google Cloud, Anda tidak perlu menyiapkan autentikasi.

    gcloud

    1. Instal Google Cloud CLI, lalu initialize dengan menjalankan perintah berikut:

      gcloud init
    2. Menetapkan region dan zona default.

    Terraform

    Untuk menggunakan contoh Terraform di halaman ini dari lingkungan pengembangan lokal, instal dan lakukan inisialisasi gcloud CLI, lalu siapkan Kredensial Default Aplikasi dengan kredensial pengguna Anda.

    1. Menginstal Google Cloud CLI.
    2. Untuk initialize gcloud CLI, jalankan perintah berikut:

      gcloud init
    3. Buat kredensial autentikasi lokal untuk Akun Google Anda:

      gcloud auth application-default login

    Untuk informasi selengkapnya, lihat Siapkan autentikasi untuk lingkungan pengembangan lokal.

    Go

    Untuk menggunakan contoh Go di halaman ini dari lingkungan pengembangan lokal, instal dan lakukan inisialisasi gcloud CLI, lalu siapkan Kredensial Default Aplikasi dengan kredensial pengguna Anda.

    1. Menginstal Google Cloud CLI.
    2. Untuk initialize gcloud CLI, jalankan perintah berikut:

      gcloud init
    3. Buat kredensial autentikasi lokal untuk Akun Google Anda:

      gcloud auth application-default login

    Untuk informasi selengkapnya, lihat Siapkan autentikasi untuk lingkungan pengembangan lokal.

    Java

    Untuk menggunakan contoh Java di halaman ini dari lingkungan pengembangan lokal, instal dan lakukan inisialisasi gcloud CLI, lalu siapkan Kredensial Default Aplikasi dengan kredensial pengguna Anda.

    1. Menginstal Google Cloud CLI.
    2. Untuk initialize gcloud CLI, jalankan perintah berikut:

      gcloud init
    3. Buat kredensial autentikasi lokal untuk Akun Google Anda:

      gcloud auth application-default login

    Untuk informasi selengkapnya, lihat Siapkan autentikasi untuk lingkungan pengembangan lokal.

    Node.js

    Untuk menggunakan contoh Node.js di halaman ini dari lingkungan pengembangan lokal, instal dan lakukan inisialisasi gcloud CLI, lalu siapkan Kredensial Default Aplikasi dengan kredensial pengguna Anda.

    1. Menginstal Google Cloud CLI.
    2. Untuk initialize gcloud CLI, jalankan perintah berikut:

      gcloud init
    3. Buat kredensial autentikasi lokal untuk Akun Google Anda:

      gcloud auth application-default login

    Untuk informasi selengkapnya, lihat Siapkan autentikasi untuk lingkungan pengembangan lokal.

    Python

    Untuk menggunakan contoh Python di halaman ini dari lingkungan pengembangan lokal, instal dan lakukan inisialisasi gcloud CLI, lalu siapkan Kredensial Default Aplikasi dengan kredensial pengguna Anda.

    1. Menginstal Google Cloud CLI.
    2. Untuk initialize gcloud CLI, jalankan perintah berikut:

      gcloud init
    3. Buat kredensial autentikasi lokal untuk Akun Google Anda:

      gcloud auth application-default login

    Untuk informasi selengkapnya, lihat Siapkan autentikasi untuk lingkungan pengembangan lokal.

    REST

    Untuk menggunakan contoh REST API di halaman ini dalam lingkungan pengembangan lokal, gunakan kredensial yang Anda berikan ke gcloud CLI.

      Instal Google Cloud CLI, lalu initialize dengan menjalankan perintah berikut:

      gcloud init

Peran yang diperlukan

Untuk mendapatkan izin yang Anda perlukan untuk membuat VM dengan nama host kustom, minta administrator untuk memberi Anda peran IAM Compute Instance Admin (v1) (roles/compute.instanceAdmin.v1) di project. Untuk mengetahui informasi selengkapnya tentang cara memberikan peran, lihat Mengelola akses.

Peran yang telah ditetapkan ini berisi izin yang diperlukan untuk membuat VM dengan nama host kustom. Untuk melihat izin yang benar-benar diperlukan, perluas bagian Izin yang diperlukan:

Izin yang diperlukan

Izin berikut diperlukan untuk membuat VM dengan nama host kustom:

  • compute.instances.create pada project
  • Untuk menggunakan image kustom guna membuat VM: compute.images.useReadOnly pada image
  • Untuk menggunakan snapshot guna membuat VM: compute.snapshots.useReadOnly di snapshot
  • Untuk menggunakan template instance untuk membuat VM: compute.instanceTemplates.useReadOnly di template instance
  • Untuk menetapkan jaringan lama ke VM: compute.networks.use pada project
  • Untuk menentukan alamat IP statis untuk VM: compute.addresses.use di project
  • Untuk menetapkan alamat IP eksternal ke VM saat menggunakan jaringan lama: compute.networks.useExternalIp di project
  • Untuk menentukan subnet untuk VM Anda: compute.subnetworks.use pada project atau subnet yang dipilih
  • Untuk menetapkan alamat IP eksternal ke VM saat menggunakan jaringan VPC: compute.subnetworks.useExternalIp pada project atau di subnet yang dipilih
  • Untuk menetapkan metadata instance VM untuk VM: compute.instances.setMetadata di project
  • Untuk menetapkan tag untuk VM: compute.instances.setTags di VM
  • Untuk menetapkan label VM: compute.instances.setLabels di VM
  • Untuk menetapkan akun layanan yang akan digunakan VM: compute.instances.setServiceAccount di VM
  • Untuk membuat disk baru bagi VM: compute.disks.create di project
  • Untuk memasang disk yang ada dalam mode hanya baca atau baca-tulis: compute.disks.use pada disk
  • Untuk memasang disk yang ada dalam mode hanya baca: compute.disks.useReadOnly pada disk

Anda mung juga bisa mendapatkan izin ini dengan peran khusus atau peran bawaanlainnya.

Batasan

  • Anda harus mengonfigurasi data DNS secara manual untuk nama host kustom. Nama host kustom tidak ditangani berdasarkan data yang dibuat secara otomatis yang disediakan oleh DNS internal Compute Engine. Anda dapat menggunakan salah satu opsi berikut untuk menghosting data DNS untuk nama host kustom:

  • Anda tidak dapat mengubah nama host kustom setelah membuat VM.

Konvensi penamaan

Nama host kustom harus sesuai dengan persyaratan RFC 1035 untuk nama host yang valid. Untuk memenuhi persyaratan ini, nama host kustom harus memenuhi spesifikasi format berikut:

  • Nama host berisi setidaknya dua label yang dijelaskan sebagai berikut:
    • Setiap label berisi ekspresi reguler yang hanya menyertakan karakter berikut: [a-z]([-a-z0-9]*[a-z0-9])?.
    • Label digabungkan dengan sebuah titik.
    • Panjang setiap label adalah 1-63 karakter.
  • Nama host tidak lebih dari 253 karakter.

Tidak valid: berisi satu label

my-host1234

Valid: berisi tiga label yang digabungkan dengan titik

my-host1234.example.com

Membuat VM dengan nama host kustom

Konsol

  1. Di konsol Google Cloud, buka halaman Create an instance.

    Buka Buat instance

  2. Tentukan Name untuk VM Anda. Untuk informasi selengkapnya, lihat Konvensi penamaan resource.

  3. Luaskan bagian Opsi lanjutan, lalu lakukan hal berikut:

    1. Luaskan bagian Networking.
    2. Di kolom Nama host, tentukan nama host kustom.
  4. Buat penyesuaian VM tambahan, sesuai kebutuhan.

  5. Untuk membuat dan meluncurkan VM, klik Buat.

Langkah berikutnya: Konfigurasikan data DNS Anda. Untuk informasi selengkapnya, lihat Mengelola kumpulan data.

gcloud

Dengan menggunakan Google Cloud CLI, ikuti petunjuk untuk membuat instance dari image atau snapshot, tambahkan --hostname, dan gunakan perintah gcloud compute instances create sebagai berikut:

gcloud compute instances create VM_NAME \
    --hostname=HOST_NAME

Ganti kode berikut:

  • VM_NAME: nama VM
  • HOST_NAME: nama host domain yang sepenuhnya memenuhi syarat yang ingin Anda tetapkan

Misalnya, untuk membuat VM myinstance dengan nama host kustom test.example.com, jalankan perintah berikut:

gcloud compute instances create myinstance \
    --hostname=test.example.com

Langkah berikutnya: Konfigurasikan data DNS Anda. Untuk informasi selengkapnya, lihat Mengelola kumpulan data.

Terraform

Anda dapat menggunakan resource Terraform untuk membuat instance dengan nama host kustom menggunakan argumen hostname.


resource "google_compute_instance" "custom_hostname_instance" {
  name         = "custom-hostname-instance-name"
  machine_type = "f1-micro"
  zone         = "us-central1-c"

  # Set a custom hostname below
  hostname = "hashicorptest.com"

  boot_disk {
    initialize_params {
      image = "debian-cloud/debian-11"
    }
  }
  network_interface {
    # A default network is created for all GCP projects
    network = "default"
    access_config {
    }
  }
}
Untuk membuat kode Terraform, Anda dapat menggunakan komponen Kode yang setara di konsol Google Cloud.
  1. Di Konsol Google Cloud, buka halaman Instance VM.

    Buka Instance VM

  2. Klik Create instance.
  3. Tentukan parameter yang Anda inginkan.
  4. Di bagian atas atau bawah halaman, klik Equivalent code, lalu klik tab Terraform untuk melihat kode Terraform.

Langkah berikutnya: Konfigurasikan data DNS Anda. Untuk informasi selengkapnya, lihat Mengelola kumpulan data.

Go

import (
	"context"
	"fmt"
	"io"

	compute "cloud.google.com/go/compute/apiv1"
	computepb "cloud.google.com/go/compute/apiv1/computepb"
	"google.golang.org/protobuf/proto"
)

// createInstanceWithCustomHostname creates an instance with custom hostname.
func createInstanceWithCustomHostname(w io.Writer, projectID, zone, instanceName, hostname, machineType, sourceImage, networkName string) error {
	// projectID := "your_project_id"
	// zone := "europe-central2-b"
	// instanceName := "your_instance_name"
	// hostname := "host.example.com" // Custom hostnames must conform to RFC 1035 requirements for valid hostnames.
	// machineType := "n1-standard-1"
	// sourceImage := "projects/debian-cloud/global/images/family/debian-10"
	// networkName := "global/networks/default"

	ctx := context.Background()
	instancesClient, err := compute.NewInstancesRESTClient(ctx)
	if err != nil {
		return fmt.Errorf("NewInstancesRESTClient: %w", err)
	}
	defer instancesClient.Close()

	req := &computepb.InsertInstanceRequest{
		Project: projectID,
		Zone:    zone,
		InstanceResource: &computepb.Instance{
			Name: proto.String(instanceName),
			// Custom hostnames are not resolved by the automatically created records
			// provided by Compute Engine internal DNS.
			// You must manually configure the DNS record for your custom hostname.
			Hostname: proto.String(hostname),
			Disks: []*computepb.AttachedDisk{
				{
					// Describe the size and source image of the boot disk to attach to the instance.
					InitializeParams: &computepb.AttachedDiskInitializeParams{
						DiskSizeGb:  proto.Int64(10),
						SourceImage: proto.String(sourceImage),
					},
					AutoDelete: proto.Bool(true),
					Boot:       proto.Bool(true),
					Type:       proto.String(computepb.AttachedDisk_PERSISTENT.String()),
				},
			},
			MachineType: proto.String(fmt.Sprintf("zones/%s/machineTypes/%s", zone, machineType)),
			NetworkInterfaces: []*computepb.NetworkInterface{
				{
					// Use the network interface provided in the networkName argument.
					Name: proto.String(networkName),
				},
			},
		},
	}

	op, err := instancesClient.Insert(ctx, req)
	if err != nil {
		return fmt.Errorf("unable to create instance: %w", err)
	}

	if err = op.Wait(ctx); err != nil {
		return fmt.Errorf("unable to wait for the operation: %w", err)
	}

	fmt.Fprintf(w, "Instance created\n")

	return nil
}

Java


import com.google.cloud.compute.v1.AttachedDisk;
import com.google.cloud.compute.v1.AttachedDiskInitializeParams;
import com.google.cloud.compute.v1.InsertInstanceRequest;
import com.google.cloud.compute.v1.Instance;
import com.google.cloud.compute.v1.InstancesClient;
import com.google.cloud.compute.v1.NetworkInterface;
import com.google.cloud.compute.v1.Operation;
import java.io.IOException;
import java.util.concurrent.ExecutionException;
import java.util.concurrent.TimeUnit;
import java.util.concurrent.TimeoutException;

public class CreateInstanceWithCustomHostname {

  public static void main(String[] args)
      throws IOException, ExecutionException, InterruptedException, TimeoutException {
    // TODO(developer): Replace these variables before running the sample.
    // hostName: Custom hostname of the new VM instance.
    // *    Custom hostnames must conform to RFC 1035 requirements for valid hostnames.
    String project = "your-project-id";
    String zone = "zone-name"; // eg: "us-central1-a"
    String instanceName = "instance-name";
    String hostName = "host.example.com";
    createInstanceWithCustomHostname(project, zone, instanceName, hostName);
  }

  // Creates an instance with custom hostname.
  public static void createInstanceWithCustomHostname(String projectId, String zone,
      String instanceName, String hostName)
      throws IOException, ExecutionException, InterruptedException, TimeoutException {
    //  machineType - Machine type for the VM instance specified in the following format:
    //  *    "zones/{zone}/machineTypes/{type_name}". For example:
    //  *    "zones/europe-west3-c/machineTypes/f1-micro"
    //  *    You can find the list of available machine types by using this gcloud command:
    //  *    $ gcloud compute machine-types list
    //  sourceImage - Path of the disk image you want to use for your boot
    //  *    disk. This image can be one of the public images
    //  *    eg: "projects/...
    //  *    or a private image you have access to.
    //  *    You can check the list of available public images using:
    //  *    $ gcloud compute images list
    //  networkName - Name of the network you want the new instance to use.
    //  *    For example: global/networks/default - if you want to use the default network.
    String machineType = "n1-standard-1";
    String sourceImage = String.format("projects/%s/global/images/family/%s", "debian-cloud",
        "debian-11");
    String networkName = "global/networks/default";

    try (InstancesClient instancesClient = InstancesClient.create()) {
      System.out.printf("Creating the %s instance in %s with hostname %s...", instanceName, zone,
          hostName);

      AttachedDisk disk =
          AttachedDisk.newBuilder()
              .setBoot(true)
              .setAutoDelete(true)
              .setType(AttachedDisk.Type.PERSISTENT.toString())
              .setInitializeParams(
                  // Describe the size and source image of the boot disk to attach to the instance.
                  AttachedDiskInitializeParams.newBuilder()
                      .setSourceImage(sourceImage)
                      .setDiskSizeGb(10).build())
              .build();

      // Use the network interface provided in the networkName argument.
      NetworkInterface networkInterface = NetworkInterface.newBuilder()
          .setName(networkName)
          .build();

      Instance instanceResource = Instance.newBuilder()
          // Custom hostnames are not resolved by the automatically created records
          // provided by Compute Engine internal DNS.
          // You must manually configure the DNS record for your custom hostname.
          .setName(instanceName)
          .setHostname(hostName)
          .addDisks(disk)
          .setMachineType(String.format("zones/%s/machineTypes/%s", zone, machineType))
          .addNetworkInterfaces(networkInterface).build();

      InsertInstanceRequest request = InsertInstanceRequest.newBuilder()
          .setProject(projectId)
          .setZone(zone)
          .setInstanceResource(instanceResource).build();

      // Wait for the create operation to complete.
      Operation response = instancesClient.insertAsync(request).get(3, TimeUnit.MINUTES);
      ;

      if (response.hasError()) {
        System.out.printf("Instance creation failed for instance: %s ; Response: %s ! ! ",
            instanceName, response);
        return;
      }
      System.out.printf("Instance created : %s", instanceName);
      System.out.printf("Operation Status for instance %s is %s: ", instanceName,
          response.getStatus());
    }

  }

}

Node.js

/**
 * TODO(developer): Uncomment and replace these variables before running the sample.
 */
// const projectId = 'YOUR_PROJECT_ID';
// const zone = 'europe-central2-b'
// const instanceName = 'YOUR_INSTANCE_NAME'
// const hostname = 'host.example.com'
// const machineType = 'n1-standard-1';
// const sourceImage = 'projects/debian-cloud/global/images/family/debian-10';
// const networkName = 'global/networks/default';

const compute = require('@google-cloud/compute');

// Create a new instance with the values provided above in the specified project and zone.
async function createInstanceWithCustomHostname() {
  const instancesClient = new compute.InstancesClient();

  console.log(
    `Creating the ${instanceName} instance in ${zone} with hostname ${hostname}...`
  );

  const [response] = await instancesClient.insert({
    instanceResource: {
      name: instanceName,
      // Custom hostnames are not resolved by the automatically created records
      // provided by Compute Engine internal DNS.
      // You must manually configure the DNS record for your custom hostname.
      hostname,
      disks: [
        {
          // Describe the size and source image of the boot disk to attach to the instance.
          initializeParams: {
            diskSizeGb: '10',
            sourceImage,
          },
          autoDelete: true,
          boot: true,
          type: 'PERSISTENT',
        },
      ],
      machineType: `zones/${zone}/machineTypes/${machineType}`,
      networkInterfaces: [
        {
          // Use the network interface provided in the networkName argument.
          name: networkName,
        },
      ],
    },
    project: projectId,
    zone,
  });
  let operation = response.latestResponse;
  const operationsClient = new compute.ZoneOperationsClient();

  // Wait for the create operation to complete.
  while (operation.status !== 'DONE') {
    [operation] = await operationsClient.wait({
      operation: operation.name,
      project: projectId,
      zone: operation.zone.split('/').pop(),
    });
  }

  console.log('Instance created.');
}

createInstanceWithCustomHostname();

Python

from __future__ import annotations

import re
import sys
from typing import Any
import warnings

from google.api_core.extended_operation import ExtendedOperation
from google.cloud import compute_v1

def get_image_from_family(project: str, family: str) -> compute_v1.Image:
    """
    Retrieve the newest image that is part of a given family in a project.

    Args:
        project: project ID or project number of the Cloud project you want to get image from.
        family: name of the image family you want to get image from.

    Returns:
        An Image object.
    """
    image_client = compute_v1.ImagesClient()
    # List of public operating system (OS) images: https://cloud.google.com/compute/docs/images/os-details
    newest_image = image_client.get_from_family(project=project, family=family)
    return newest_image

def disk_from_image(
    disk_type: str,
    disk_size_gb: int,
    boot: bool,
    source_image: str,
    auto_delete: bool = True,
) -> compute_v1.AttachedDisk:
    """
    Create an AttachedDisk object to be used in VM instance creation. Uses an image as the
    source for the new disk.

    Args:
         disk_type: the type of disk you want to create. This value uses the following format:
            "zones/{zone}/diskTypes/(pd-standard|pd-ssd|pd-balanced|pd-extreme)".
            For example: "zones/us-west3-b/diskTypes/pd-ssd"
        disk_size_gb: size of the new disk in gigabytes
        boot: boolean flag indicating whether this disk should be used as a boot disk of an instance
        source_image: source image to use when creating this disk. You must have read access to this disk. This can be one
            of the publicly available images or an image from one of your projects.
            This value uses the following format: "projects/{project_name}/global/images/{image_name}"
        auto_delete: boolean flag indicating whether this disk should be deleted with the VM that uses it

    Returns:
        AttachedDisk object configured to be created using the specified image.
    """
    boot_disk = compute_v1.AttachedDisk()
    initialize_params = compute_v1.AttachedDiskInitializeParams()
    initialize_params.source_image = source_image
    initialize_params.disk_size_gb = disk_size_gb
    initialize_params.disk_type = disk_type
    boot_disk.initialize_params = initialize_params
    # Remember to set auto_delete to True if you want the disk to be deleted when you delete
    # your VM instance.
    boot_disk.auto_delete = auto_delete
    boot_disk.boot = boot
    return boot_disk

def wait_for_extended_operation(
    operation: ExtendedOperation, verbose_name: str = "operation", timeout: int = 300
) -> Any:
    """
    Waits for the extended (long-running) operation to complete.

    If the operation is successful, it will return its result.
    If the operation ends with an error, an exception will be raised.
    If there were any warnings during the execution of the operation
    they will be printed to sys.stderr.

    Args:
        operation: a long-running operation you want to wait on.
        verbose_name: (optional) a more verbose name of the operation,
            used only during error and warning reporting.
        timeout: how long (in seconds) to wait for operation to finish.
            If None, wait indefinitely.

    Returns:
        Whatever the operation.result() returns.

    Raises:
        This method will raise the exception received from `operation.exception()`
        or RuntimeError if there is no exception set, but there is an `error_code`
        set for the `operation`.

        In case of an operation taking longer than `timeout` seconds to complete,
        a `concurrent.futures.TimeoutError` will be raised.
    """
    result = operation.result(timeout=timeout)

    if operation.error_code:
        print(
            f"Error during {verbose_name}: [Code: {operation.error_code}]: {operation.error_message}",
            file=sys.stderr,
            flush=True,
        )
        print(f"Operation ID: {operation.name}", file=sys.stderr, flush=True)
        raise operation.exception() or RuntimeError(operation.error_message)

    if operation.warnings:
        print(f"Warnings during {verbose_name}:\n", file=sys.stderr, flush=True)
        for warning in operation.warnings:
            print(f" - {warning.code}: {warning.message}", file=sys.stderr, flush=True)

    return result

def create_instance(
    project_id: str,
    zone: str,
    instance_name: str,
    disks: list[compute_v1.AttachedDisk],
    machine_type: str = "n1-standard-1",
    network_link: str = "global/networks/default",
    subnetwork_link: str = None,
    internal_ip: str = None,
    external_access: bool = False,
    external_ipv4: str = None,
    accelerators: list[compute_v1.AcceleratorConfig] = None,
    preemptible: bool = False,
    spot: bool = False,
    instance_termination_action: str = "STOP",
    custom_hostname: str = None,
    delete_protection: bool = False,
) -> compute_v1.Instance:
    """
    Send an instance creation request to the Compute Engine API and wait for it to complete.

    Args:
        project_id: project ID or project number of the Cloud project you want to use.
        zone: name of the zone to create the instance in. For example: "us-west3-b"
        instance_name: name of the new virtual machine (VM) instance.
        disks: a list of compute_v1.AttachedDisk objects describing the disks
            you want to attach to your new instance.
        machine_type: machine type of the VM being created. This value uses the
            following format: "zones/{zone}/machineTypes/{type_name}".
            For example: "zones/europe-west3-c/machineTypes/f1-micro"
        network_link: name of the network you want the new instance to use.
            For example: "global/networks/default" represents the network
            named "default", which is created automatically for each project.
        subnetwork_link: name of the subnetwork you want the new instance to use.
            This value uses the following format:
            "regions/{region}/subnetworks/{subnetwork_name}"
        internal_ip: internal IP address you want to assign to the new instance.
            By default, a free address from the pool of available internal IP addresses of
            used subnet will be used.
        external_access: boolean flag indicating if the instance should have an external IPv4
            address assigned.
        external_ipv4: external IPv4 address to be assigned to this instance. If you specify
            an external IP address, it must live in the same region as the zone of the instance.
            This setting requires `external_access` to be set to True to work.
        accelerators: a list of AcceleratorConfig objects describing the accelerators that will
            be attached to the new instance.
        preemptible: boolean value indicating if the new instance should be preemptible
            or not. Preemptible VMs have been deprecated and you should now use Spot VMs.
        spot: boolean value indicating if the new instance should be a Spot VM or not.
        instance_termination_action: What action should be taken once a Spot VM is terminated.
            Possible values: "STOP", "DELETE"
        custom_hostname: Custom hostname of the new VM instance.
            Custom hostnames must conform to RFC 1035 requirements for valid hostnames.
        delete_protection: boolean value indicating if the new virtual machine should be
            protected against deletion or not.
    Returns:
        Instance object.
    """
    instance_client = compute_v1.InstancesClient()

    # Use the network interface provided in the network_link argument.
    network_interface = compute_v1.NetworkInterface()
    network_interface.network = network_link
    if subnetwork_link:
        network_interface.subnetwork = subnetwork_link

    if internal_ip:
        network_interface.network_i_p = internal_ip

    if external_access:
        access = compute_v1.AccessConfig()
        access.type_ = compute_v1.AccessConfig.Type.ONE_TO_ONE_NAT.name
        access.name = "External NAT"
        access.network_tier = access.NetworkTier.PREMIUM.name
        if external_ipv4:
            access.nat_i_p = external_ipv4
        network_interface.access_configs = [access]

    # Collect information into the Instance object.
    instance = compute_v1.Instance()
    instance.network_interfaces = [network_interface]
    instance.name = instance_name
    instance.disks = disks
    if re.match(r"^zones/[a-z\d\-]+/machineTypes/[a-z\d\-]+$", machine_type):
        instance.machine_type = machine_type
    else:
        instance.machine_type = f"zones/{zone}/machineTypes/{machine_type}"

    instance.scheduling = compute_v1.Scheduling()
    if accelerators:
        instance.guest_accelerators = accelerators
        instance.scheduling.on_host_maintenance = (
            compute_v1.Scheduling.OnHostMaintenance.TERMINATE.name
        )

    if preemptible:
        # Set the preemptible setting
        warnings.warn(
            "Preemptible VMs are being replaced by Spot VMs.", DeprecationWarning
        )
        instance.scheduling = compute_v1.Scheduling()
        instance.scheduling.preemptible = True

    if spot:
        # Set the Spot VM setting
        instance.scheduling.provisioning_model = (
            compute_v1.Scheduling.ProvisioningModel.SPOT.name
        )
        instance.scheduling.instance_termination_action = instance_termination_action

    if custom_hostname is not None:
        # Set the custom hostname for the instance
        instance.hostname = custom_hostname

    if delete_protection:
        # Set the delete protection bit
        instance.deletion_protection = True

    # Prepare the request to insert an instance.
    request = compute_v1.InsertInstanceRequest()
    request.zone = zone
    request.project = project_id
    request.instance_resource = instance

    # Wait for the create operation to complete.
    print(f"Creating the {instance_name} instance in {zone}...")

    operation = instance_client.insert(request=request)

    wait_for_extended_operation(operation, "instance creation")

    print(f"Instance {instance_name} created.")
    return instance_client.get(project=project_id, zone=zone, instance=instance_name)

def create_instance_custom_hostname(
    project_id: str, zone: str, instance_name: str, hostname: str
) -> compute_v1.Instance:
    """
    Create a new VM instance with Debian 10 operating system and a custom hostname.

    Args:
        project_id: project ID or project number of the Cloud project you want to use.
        zone: name of the zone to create the instance in. For example: "us-west3-b"
        instance_name: name of the new virtual machine (VM) instance.
        hostname: the hostname you want to use for the new instance.

    Returns:
        Instance object.
    """
    newest_debian = get_image_from_family(project="debian-cloud", family="debian-11")
    disk_type = f"zones/{zone}/diskTypes/pd-standard"
    disks = [disk_from_image(disk_type, 10, True, newest_debian.self_link)]
    instance = create_instance(
        project_id, zone, instance_name, disks, custom_hostname=hostname
    )
    return instance

REST

Ikuti petunjuk API untuk membuat instance dari image atau snapshot, dan menentukan kolom hostname di isi permintaan.

POST https://compute.googleapis.com/compute/v1/projects/PROJECT_ID/zones/ZONE/instances

{
 "name": "VM_NAME",
 "hostname": "HOST_NAME",
 ...
}

Ganti kode berikut:

  • PROJECT_ID: project ID Anda.
  • ZONE: zona tempat Anda ingin membuat VM
  • VM_NAME: nama VM
  • HOST_NAME: nama host domain yang sepenuhnya memenuhi syarat yang ingin Anda tetapkan

Memverifikasi nama host kustom

Untuk VM Linux, Anda dapat memverifikasi nama host dengan menjalankan perintah hostname -f pada VM.

Anda juga dapat memverifikasi nama host kustom menggunakan Konsol Google Cloud atau Google Cloud CLI.

Konsol

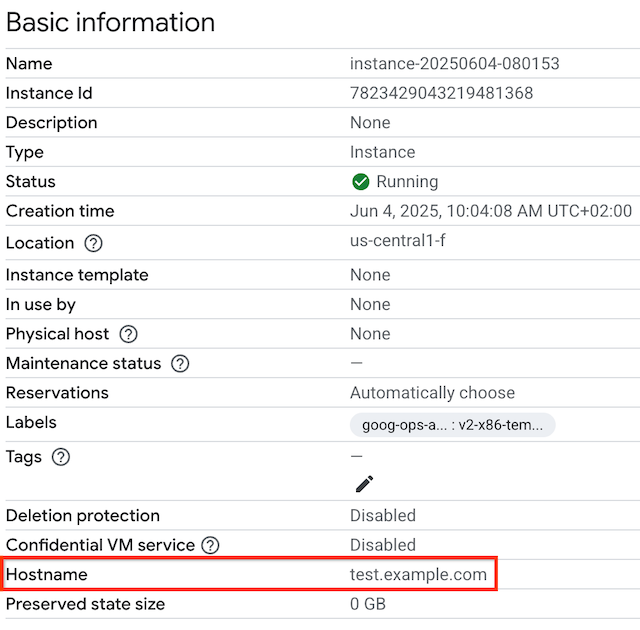
  1. Untuk melihat nama host kustom VM Anda, buka halaman Instance VM.

    Buka instance VM

  2. Klik nama instance untuk membuka halaman Detail instance VM.

  3. Tinjau bagian Nama host. Kolom Nama host hanya terlihat jika nama host kustom ditetapkan.

    Halaman instance VM yang menampilkan nama host.

gcloud

Agar dapat melihat nama host kustom untuk VM Anda menggunakan gcloud compute, gunakan sub-perintah instances describe dengan tanda --format untuk memfilter output singkat ini. Ganti VM_NAME dengan nama VM.

gcloud compute instances describe VM_NAME \
    --format='get(hostname)'

Misalnya, guna melihat nama host kustom untuk VM yang bernama myinstance, jalankan perintah berikut.

gcloud compute instances describe myinstance \
    --format='get(hostname)'

Output-nya mungkin terlihat seperti berikut:

test.example.com

Jika nama host kustom tidak ditetapkan, output untuk perintah ini akan kosong.

Langkah selanjutnya