Memformat dan memasang non-boot disk di VM Windows
Tetap teratur dengan koleksi
Simpan dan kategorikan konten berdasarkan preferensi Anda.
Windows
Jika Anda memasang disk kosong baru ke VM, Anda harus memformat dan memasang disk tersebut sebelum dapat menggunakannya. Jika Anda memasang disk yang sudah berisi data, Anda harus memasang disk sebelum dapat menggunakannya.
Sebelum memulai
Siapkan autentikasi, jika Anda belum melakukannya.
Autentikasi memverifikasi identitas Anda untuk mengakses Google Cloud layanan dan API. Untuk menjalankan
kode atau sampel dari lingkungan pengembangan lokal, Anda dapat melakukan autentikasi ke
Compute Engine dengan memilih salah satu opsi berikut:
Select the tab for how you plan to use the samples on this page:
Console
When you use the Google Cloud console to access Google Cloud services and
APIs, you don't need to set up authentication.
gcloud
Menginstal Google Cloud CLI.
Setelah penginstalan,
lakukan inisialisasi Google Cloud CLI dengan menjalankan perintah berikut:
Klik kanan tombol Start di Windows dan pilih Disk Management.
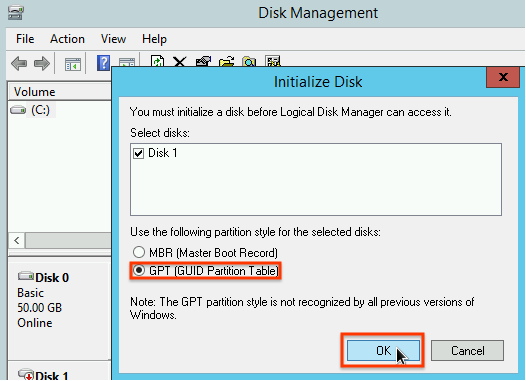
Disk Management meminta Anda memilih skema partisi untuk disk baru.
Pilih GPT, lalu klik OK.
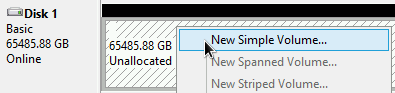
Setelah disk diinisialisasi, klik kanan kapasitas disk yang belum dialokasikan, lalu pilih New Simple Volume.
Ikuti petunjuk di Wizard New Simple Volume untuk mengonfigurasi volume baru. Anda dapat menggunakan format partisi apa pun yang disukai, tetapi untuk contoh ini, pilih NTFS. Selain itu, centang Perform a quick format untuk mempercepat proses pemformatan. Atau, tetapkan ukuran cluster di kolom Allocation unit size. Ukuran cluster membatasi ukuran maksimum partisi.
Ingatlah hal ini jika Anda mencoba mengubah ukuran persistent disk zona dan partisi ini nanti.
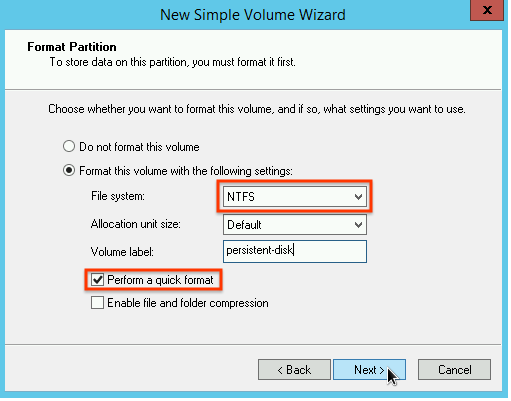
Setelah Anda menyelesaikan wizard dan volume sudah diformat, periksa kolom Status pada daftar disk yang terpasang untuk memastikan bahwa disk baru memiliki status Healthy.
[[["Mudah dipahami","easyToUnderstand","thumb-up"],["Memecahkan masalah saya","solvedMyProblem","thumb-up"],["Lainnya","otherUp","thumb-up"]],[["Sulit dipahami","hardToUnderstand","thumb-down"],["Informasi atau kode contoh salah","incorrectInformationOrSampleCode","thumb-down"],["Informasi/contoh yang saya butuhkan tidak ada","missingTheInformationSamplesINeed","thumb-down"],["Masalah terjemahan","translationIssue","thumb-down"],["Lainnya","otherDown","thumb-down"]],["Terakhir diperbarui pada 2025-09-04 UTC."],[[["\u003cp\u003eNew blank disks attached to a Windows VM must be formatted and mounted before use, while disks with existing data only need to be mounted.\u003c/p\u003e\n"],["\u003cp\u003eAuthentication is required to access Google Cloud services and APIs, with options for Console, gcloud CLI, and REST API access.\u003c/p\u003e\n"],["\u003cp\u003eTo connect to the VM, navigate to the VM instances page and use the RDP button.\u003c/p\u003e\n"],["\u003cp\u003eFormatting and mounting a new disk on a Windows VM is done using the Windows Disk Management utility, typically involving selecting GPT partitioning and creating a new simple volume with an \u003ccode\u003eNTFS\u003c/code\u003e format.\u003c/p\u003e\n"],["\u003cp\u003eAfter formatting, ensure the disk status in Disk Management is \u003ccode\u003eHealthy\u003c/code\u003e to confirm it is ready for use.\u003c/p\u003e\n"]]],[],null,["# Format and mount a non-boot disk on a Windows VM\n\nWindows\n\n*** ** * ** ***\n\nIf you attached a new, blank disk to your VM, before you can use it you must\nformat and mount the disk. If you attached a disk that already contains data,\nthen you must mount the disk before you can use it.\n\nBefore you begin\n----------------\n\n- If you haven't already, set up [authentication](/compute/docs/authentication). Authentication verifies your identity for access to Google Cloud services and APIs. To run code or samples from a local development environment, you can authenticate to Compute Engine by selecting one of the following options:\n\n Select the tab for how you plan to use the samples on this page: \n\n ### Console\n\n\n When you use the Google Cloud console to access Google Cloud services and\n APIs, you don't need to set up authentication.\n\n ### gcloud\n\n 1.\n [Install](/sdk/docs/install) the Google Cloud CLI.\n\n After installation,\n [initialize](/sdk/docs/initializing) the Google Cloud CLI by running the following command:\n\n ```bash\n gcloud init\n ```\n\n\n If you're using an external identity provider (IdP), you must first\n [sign in to the gcloud CLI with your federated identity](/iam/docs/workforce-log-in-gcloud).\n | **Note:** If you installed the gcloud CLI previously, make sure you have the latest version by running `gcloud components update`.\n 2. [Set a default region and zone](/compute/docs/gcloud-compute#set_default_zone_and_region_in_your_local_client).\n\n ### REST\n\n\n To use the REST API samples on this page in a local development environment, you use the\n credentials you provide to the gcloud CLI.\n 1. [Install](/sdk/docs/install) the Google Cloud CLI. After installation, [initialize](/sdk/docs/initializing) the Google Cloud CLI by running the following command: \n\n ```bash\n gcloud init\n ```\n 2. If you're using an external identity provider (IdP), you must first [sign in to the gcloud CLI with your federated identity](/iam/docs/workforce-log-in-gcloud).\n\n\n For more information, see\n [Authenticate for using REST](/docs/authentication/rest)\n in the Google Cloud authentication documentation.\n\nConnect to the VM\n-----------------\n\n1. Go to the **VM instances** page.\n\n [Go to the VM instances page](https://console.cloud.google.com/compute/instances)\n2. Click the **RDP** button next to the VM that has the new blank disk attached.\n The browser opens an RDP connection to the instance.\n\nFormat and mount a non-boot disk on a Windows VM\n------------------------------------------------\n\nUse the [Windows Disk Management utility](https://learn.microsoft.com/windows-server/storage/disk-management/initialize-new-disks)\nto format and mount the new disk on a Windows VM.\n\n1. Right-click the Windows Start button and select **Disk Management**.\n\n2. Disk Management prompts you to select a partitioning scheme for the new disk.\n Select **GPT** and click **OK**.\n\n3. After the disk initializes, right-click the unallocated disk space\n and select **New Simple Volume**.\n\n4. Follow the instructions in the **New Simple Volume Wizard** to configure\n the new volume. You can use any partition format that you like, but for\n this example select `NTFS`. Also, check **Perform a quick format**\n to speed up the formatting process. Optionally, set the cluster size\n in the **Allocation unit size** field. The cluster size\n [limits the maximum size of the partition](https://learn.microsoft.com/windows-server/storage/file-server/ntfs-overview).\n Keep this in mind if you try to resize the zonal persistent disk and this\n partition later.\n\n5. After you complete the wizard and the volume is formatted, check\n the `Status` column on the list of attached disks to ensure that the\n new disk has a `Healthy` status.\n\nYou can now write files to the disk.\n\nWhat's next\n-----------\n\n- Learn how to [resize your persistent disks](/compute/docs/disks/resize-persistent-disk).\n- Learn how to regularly [back up your disks using snapshots](/compute/docs/disks/create-snapshots) to prevent unintended data loss."]]