새로운 빈 디스크를 VM에 연결한 경우 이를 사용하려면 먼저 디스크를 포맷하고 마운트해야 합니다. 이미 데이터가 포함된 디스크를 연결한 경우 사용하려면 먼저 디스크를 마운트해야 합니다.
시작하기 전에
-
아직 인증을 설정하지 않았다면 설정합니다.
인증은 Google Cloud 서비스 및 API에 액세스하기 위해 ID를 확인합니다. 로컬 개발 환경에서 코드 또는 샘플을 실행하려면 다음 옵션 중 하나를 선택하여 Compute Engine에 인증하면 됩니다.
Select the tab for how you plan to use the samples on this page:
Console
When you use the Google Cloud console to access Google Cloud services and APIs, you don't need to set up authentication.
gcloud
-
Google Cloud CLI를 설치합니다. 설치 후 다음 명령어를 실행하여 Google Cloud CLI를 초기화합니다.
gcloud init외부 ID 공급업체(IdP)를 사용하는 경우 먼저 제휴 ID로 gcloud CLI에 로그인해야 합니다.
- Set a default region and zone.
REST
로컬 개발 환경에서 이 페이지의 REST API 샘플을 사용하려면 gcloud CLI에 제공한 사용자 인증 정보를 사용합니다.
Google Cloud CLI를 설치합니다. 설치 후 다음 명령어를 실행하여 Google Cloud CLI를 초기화합니다.
gcloud init외부 ID 공급업체(IdP)를 사용하는 경우 먼저 제휴 ID로 gcloud CLI에 로그인해야 합니다.
자세한 내용은 Google Cloud 인증 문서의 REST 사용을 위한 인증을 참조하세요.
VM에 연결
VM 인스턴스 페이지로 이동합니다.
새 빈 디스크가 연결된 VM 옆에 있는 RDP 버튼을 클릭합니다. 브라우저에서 인스턴스로의 RDP 연결이 열립니다.
Windows VM에서 비부팅 디스크 포맷 및 마운트
Windows 디스크 관리 유틸리티를 사용하여 Windows VM에서 새 디스크를 포맷하고 마운트합니다.
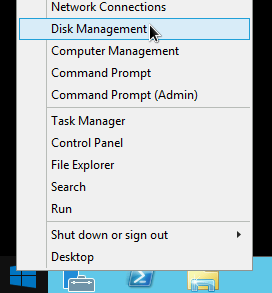
Windows 시작 버튼을 마우스 오른쪽 버튼으로 클릭하고 디스크 관리를 선택합니다.
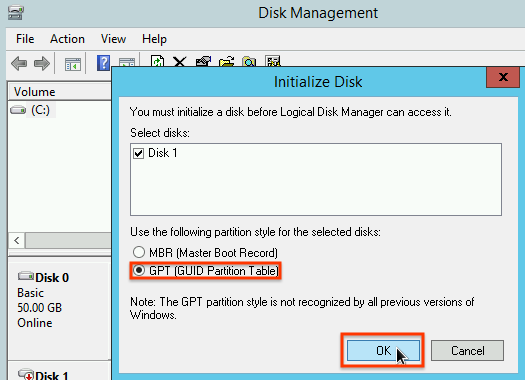
디스크 관리에 새 디스크의 파티션 나누기 스키마를 선택하라는 메시지가 표시됩니다. GPT를 선택하고 확인을 클릭합니다.
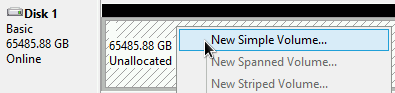
디스크가 초기화된 후 할당되지 않은 디스크 공간을 마우스 오른쪽 버튼으로 클릭하고 새 단순 볼륨을 선택합니다.
단순 볼륨 만들기 마법사의 안내에 따라 새 볼륨을 구성합니다. 파티션 형식은 원하는 것을 사용하면 되지만 이 예시에서는
NTFS를 선택합니다. 또한 빠른 포맷 실행을 선택해 포맷 프로세스 속도를 높입니다. 필요한 경우 할당 단위 크기 필드에서 클러스터 크기를 설정합니다. 클러스터 크기는 파티션의 최대 크기를 제한합니다. 나중에 영역 영구 디스크와 이 파티션의 크기를 조절하려고 시도할 경우 이 점을 염두에 두어야 합니다.
마법사를 완료하고 볼륨 포맷을 마친 후에는 연결된 디스크 목록의
Status열에서 새 디스크의 상태가Healthy인지 확인합니다.
이제 디스크에 파일을 작성할 수 있습니다.
다음 단계
- 영구 디스크 크기를 조절하는 방법을 알아봅니다.
- 의도치 않은 데이터 손실을 방지하기 위해 정기적으로 스냅샷을 사용하여 디스크를 백업하는 방법을 알아봅니다.
달리 명시되지 않는 한 이 페이지의 콘텐츠에는 Creative Commons Attribution 4.0 라이선스에 따라 라이선스가 부여되며, 코드 샘플에는 Apache 2.0 라이선스에 따라 라이선스가 부여됩니다. 자세한 내용은 Google Developers 사이트 정책을 참조하세요. 자바는 Oracle 및/또는 Oracle 계열사의 등록 상표입니다.
최종 업데이트: 2025-10-19(UTC)
-