如果您將新的空白磁碟連接至 VM,必須先格式化並掛接磁碟,才能使用。如果附加的磁碟已包含資料,您必須先掛接磁碟才能使用。
事前準備
-
如果尚未設定驗證,請先完成設定。
驗證可確認您的身分,以便存取 Google Cloud 服務和 API。如要從本機開發環境執行程式碼或範例,可以選取下列任一選項,向 Compute Engine 進行驗證:
Select the tab for how you plan to use the samples on this page:
Console
When you use the Google Cloud console to access Google Cloud services and APIs, you don't need to set up authentication.
gcloud
-
安裝 Google Cloud CLI。 安裝完成後,執行下列指令初始化 Google Cloud CLI:
gcloud init如果您使用外部識別資訊提供者 (IdP),請先 使用聯合身分登入 gcloud CLI。
- Set a default region and zone.
REST
如要在本機開發環境中使用本頁的 REST API 範例,請使用您提供給 gcloud CLI 的憑證。
安裝 Google Cloud CLI。 安裝完成後,執行下列指令初始化 Google Cloud CLI:
gcloud init如果您使用外部識別資訊提供者 (IdP),請先 使用聯合身分登入 gcloud CLI。
詳情請參閱 Google Cloud 驗證說明文件中的「Authenticate for using REST」。
連線至 VM
前往「VM instances」(VM 執行個體) 頁面。
按一下已連結新空白磁碟的 VM 旁邊的「RDP」RDP按鈕。瀏覽器會開啟對於執行個體的遠端桌面協定連線。
在 Windows VM 上格式化及掛接非開機磁碟
使用 Windows 磁碟管理公用程式,在 Windows VM 上格式化及掛接新磁碟。
在 Windows [Start] (開始) 按鈕上按一下滑鼠右鍵,然後選取 [Disk Management] (磁碟管理)。
![於 Windows [Start] (開始) 按鈕的右鍵功能表,選取 [磁碟管理]。](https://cloud.google.com/static/compute/images/start_disk_manager_windows.png?authuser=1&hl=zh-tw)
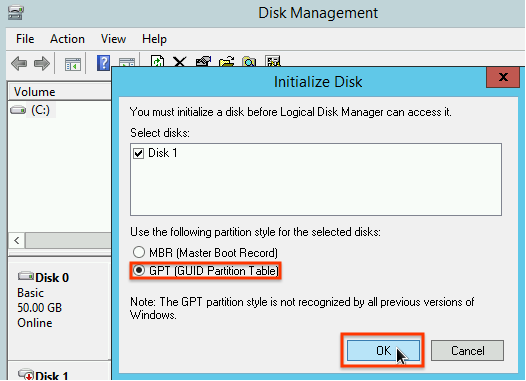
「磁碟管理」會提示您選取新磁碟的分區配置。選取「GPT」,然後按一下「OK」。
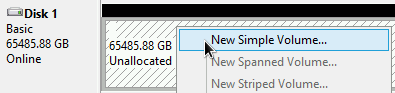
磁碟初始化後,請在未配置的磁碟空間上按一下滑鼠右鍵,然後選取 [New Simple Volume] (新增簡單磁碟區)。
請按照「New Simple Volume Wizard」(新增簡單磁碟區精靈) 中的操作說明,設定新的磁碟區。您可以使用任何想要的磁碟分區格式,但在此範例中請選取
NTFS。此外,也請勾選 [Perform a quick format] (執行快速格式化),以加速執行格式化程序。或者,在「Allocation unit size」(配置單位大小) 欄位中設定叢集大小。叢集大小會限制分區的大小上限。如果您日後想要嘗試調整區域永久磁碟與此分區的大小,請記住這點。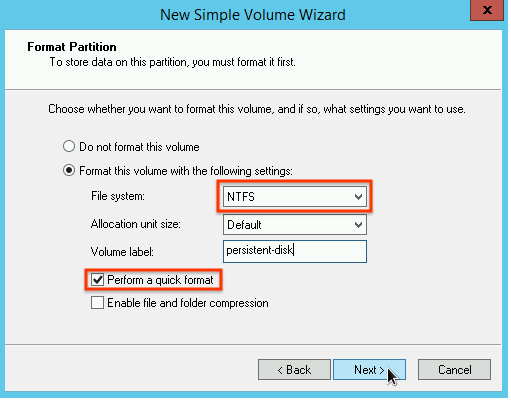
結束精靈並完成磁碟區格式化作業後,請查看連接磁碟清單中的
Status資料欄,確認新磁碟的狀態為Healthy。
您現在可以將檔案寫入磁碟。
後續步驟
- 瞭解如何調整永久磁碟的大小。
- 瞭解如何使用快照定期備份磁碟,以免不慎遺失資料。
除非另有註明,否則本頁面中的內容是採用創用 CC 姓名標示 4.0 授權,程式碼範例則為阿帕契 2.0 授權。詳情請參閱《Google Developers 網站政策》。Java 是 Oracle 和/或其關聯企業的註冊商標。
上次更新時間:2025-10-02 (世界標準時間)。
-