Nicht-Bootlaufwerk auf einer Windows-VM formatieren und bereitstellen
Mit Sammlungen den Überblick behalten
Sie können Inhalte basierend auf Ihren Einstellungen speichern und kategorisieren.
Windows
Wenn Sie an Ihre VM ein neues, leeres Laufwerk angehängt haben, müssen Sie das Laufwerk formatieren und bereitstellen, bevor Sie es verwenden können. Wenn Sie ein Laufwerk angehängt haben, das bereits Daten enthält, müssen Sie es bereitstellen, bevor Sie es verwenden können.
Hinweise
Richten Sie die Authentifizierung ein, falls Sie dies noch nicht getan haben.
Bei der Authentifizierung wird Ihre Identität für den Zugriff auf Google Cloud -Dienste und APIs überprüft. Zum Ausführen von Code oder Beispielen aus einer lokalen Entwicklungsumgebung können Sie sich so bei Compute Engine authentifizieren:
Select the tab for how you plan to use the samples on this page:
Console
When you use the Google Cloud console to access Google Cloud services and
APIs, you don't need to set up authentication.
gcloud
Installieren Sie die Google Cloud CLI.
Initialisieren Sie die Google Cloud CLI nach der Installation mit dem folgenden Befehl:
Wenn Sie die REST API-Beispiele auf dieser Seite in einer lokalen Entwicklungsumgebung verwenden möchten, nutzen Sie die Anmeldedaten, die Sie der gcloud CLI bereitstellen.
Installieren Sie die Google Cloud CLI.
Initialisieren Sie die Google Cloud CLI nach der Installation mit dem folgenden Befehl:
Klicken Sie auf die Schaltfläche RDP neben der VM, an die das neue leere Laufwerk angehängt ist.
Der Browser öffnet eine RDP-Verbindung zur Instanz.
Nicht-Bootlaufwerk auf einer Windows-VM formatieren und bereitstellen
Verwenden Sie das Dienstprogramm Windows-Datenträgerverwaltung, um das neue Laufwerk in einer Windows-VM zu formatieren und bereitzustellen.
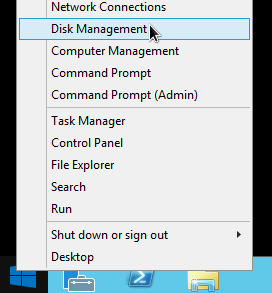
Klicken Sie mit der rechten Maustaste auf das Windows-Startmenü und wählen Sie Disk Management (Datenträgerverwaltung) aus.
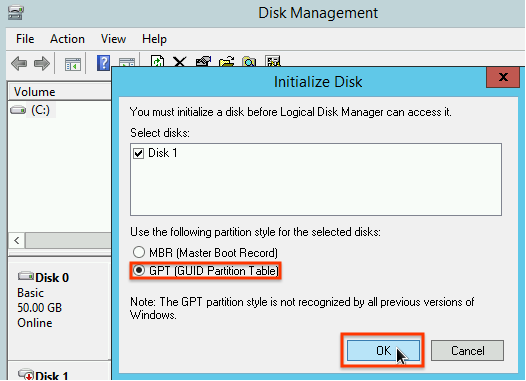
Bei der Datenträgerverwaltung werden Sie aufgefordert, ein Partitionierungsschema für das neue Laufwerk auszuwählen.
Wählen Sie GPT aus und klicken Sie auf OK.
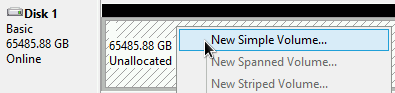
Klicken Sie nach der Initialisierung des Laufwerks mit der rechten Maustaste auf den nicht zugewiesenen Speicherplatz und wählen Sie New Simple Volume aus.
Befolgen Sie die Anleitung im New Simple Volume Wizard (Assistent zum Erstellen neuer einfacher Volumes), um das neue Volume zu konfigurieren. Sie können ein beliebiges Partitionsformat verwenden. Wählen Sie für dieses Beispiel NTFS aus. Aktivieren Sie außerdem Perform a quick format, um die Formatierung zu beschleunigen. Optional können Sie auch die Clustergröße im Feld Allocation unit size festlegen. Die Clustergröße begrenzt die maximale Größe der Partition.
Damit können Sie später die Größe des zonalen nichtflüchtigen Speichers und dieser Partition anpassen.
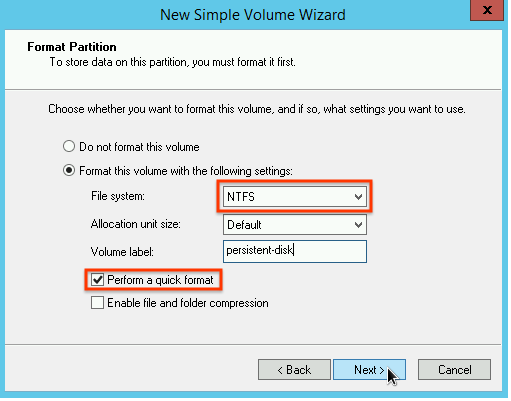
Prüfen Sie nach Abschluss des Assistenten und der Formatierung des Volumes die Spalte Status in der Liste der angehängten Laufwerke. Hier muss der Status Healthy für das neue Laufwerk angezeigt werden.
Jetzt können Sie Dateien auf das Laufwerk schreiben.
[[["Leicht verständlich","easyToUnderstand","thumb-up"],["Mein Problem wurde gelöst","solvedMyProblem","thumb-up"],["Sonstiges","otherUp","thumb-up"]],[["Schwer verständlich","hardToUnderstand","thumb-down"],["Informationen oder Beispielcode falsch","incorrectInformationOrSampleCode","thumb-down"],["Benötigte Informationen/Beispiele nicht gefunden","missingTheInformationSamplesINeed","thumb-down"],["Problem mit der Übersetzung","translationIssue","thumb-down"],["Sonstiges","otherDown","thumb-down"]],["Zuletzt aktualisiert: 2025-09-04 (UTC)."],[[["\u003cp\u003eNew blank disks attached to a Windows VM must be formatted and mounted before use, while disks with existing data only need to be mounted.\u003c/p\u003e\n"],["\u003cp\u003eAuthentication is required to access Google Cloud services and APIs, with options for Console, gcloud CLI, and REST API access.\u003c/p\u003e\n"],["\u003cp\u003eTo connect to the VM, navigate to the VM instances page and use the RDP button.\u003c/p\u003e\n"],["\u003cp\u003eFormatting and mounting a new disk on a Windows VM is done using the Windows Disk Management utility, typically involving selecting GPT partitioning and creating a new simple volume with an \u003ccode\u003eNTFS\u003c/code\u003e format.\u003c/p\u003e\n"],["\u003cp\u003eAfter formatting, ensure the disk status in Disk Management is \u003ccode\u003eHealthy\u003c/code\u003e to confirm it is ready for use.\u003c/p\u003e\n"]]],[],null,["# Format and mount a non-boot disk on a Windows VM\n\nWindows\n\n*** ** * ** ***\n\nIf you attached a new, blank disk to your VM, before you can use it you must\nformat and mount the disk. If you attached a disk that already contains data,\nthen you must mount the disk before you can use it.\n\nBefore you begin\n----------------\n\n- If you haven't already, set up [authentication](/compute/docs/authentication). Authentication verifies your identity for access to Google Cloud services and APIs. To run code or samples from a local development environment, you can authenticate to Compute Engine by selecting one of the following options:\n\n Select the tab for how you plan to use the samples on this page: \n\n ### Console\n\n\n When you use the Google Cloud console to access Google Cloud services and\n APIs, you don't need to set up authentication.\n\n ### gcloud\n\n 1.\n [Install](/sdk/docs/install) the Google Cloud CLI.\n\n After installation,\n [initialize](/sdk/docs/initializing) the Google Cloud CLI by running the following command:\n\n ```bash\n gcloud init\n ```\n\n\n If you're using an external identity provider (IdP), you must first\n [sign in to the gcloud CLI with your federated identity](/iam/docs/workforce-log-in-gcloud).\n | **Note:** If you installed the gcloud CLI previously, make sure you have the latest version by running `gcloud components update`.\n 2. [Set a default region and zone](/compute/docs/gcloud-compute#set_default_zone_and_region_in_your_local_client).\n\n ### REST\n\n\n To use the REST API samples on this page in a local development environment, you use the\n credentials you provide to the gcloud CLI.\n 1. [Install](/sdk/docs/install) the Google Cloud CLI. After installation, [initialize](/sdk/docs/initializing) the Google Cloud CLI by running the following command: \n\n ```bash\n gcloud init\n ```\n 2. If you're using an external identity provider (IdP), you must first [sign in to the gcloud CLI with your federated identity](/iam/docs/workforce-log-in-gcloud).\n\n\n For more information, see\n [Authenticate for using REST](/docs/authentication/rest)\n in the Google Cloud authentication documentation.\n\nConnect to the VM\n-----------------\n\n1. Go to the **VM instances** page.\n\n [Go to the VM instances page](https://console.cloud.google.com/compute/instances)\n2. Click the **RDP** button next to the VM that has the new blank disk attached.\n The browser opens an RDP connection to the instance.\n\nFormat and mount a non-boot disk on a Windows VM\n------------------------------------------------\n\nUse the [Windows Disk Management utility](https://learn.microsoft.com/windows-server/storage/disk-management/initialize-new-disks)\nto format and mount the new disk on a Windows VM.\n\n1. Right-click the Windows Start button and select **Disk Management**.\n\n2. Disk Management prompts you to select a partitioning scheme for the new disk.\n Select **GPT** and click **OK**.\n\n3. After the disk initializes, right-click the unallocated disk space\n and select **New Simple Volume**.\n\n4. Follow the instructions in the **New Simple Volume Wizard** to configure\n the new volume. You can use any partition format that you like, but for\n this example select `NTFS`. Also, check **Perform a quick format**\n to speed up the formatting process. Optionally, set the cluster size\n in the **Allocation unit size** field. The cluster size\n [limits the maximum size of the partition](https://learn.microsoft.com/windows-server/storage/file-server/ntfs-overview).\n Keep this in mind if you try to resize the zonal persistent disk and this\n partition later.\n\n5. After you complete the wizard and the volume is formatted, check\n the `Status` column on the list of attached disks to ensure that the\n new disk has a `Healthy` status.\n\nYou can now write files to the disk.\n\nWhat's next\n-----------\n\n- Learn how to [resize your persistent disks](/compute/docs/disks/resize-persistent-disk).\n- Learn how to regularly [back up your disks using snapshots](/compute/docs/disks/create-snapshots) to prevent unintended data loss."]]