Formater et installer un disque non amorçable sur une VM Windows
Restez organisé à l'aide des collections
Enregistrez et classez les contenus selon vos préférences.
Windows
Si vous avez associé un nouveau disque vide à votre VM, vous devez le formater et l'installer avant de pouvoir l'utiliser. Si vous avez associé un disque contenant déjà des données, vous devez l'installer avant de pouvoir l'utiliser.
Avant de commencer
Si ce n'est pas déjà fait, configurez l'authentification.
L'authentification est le processus permettant de valider votre identité pour accéder aux services et aux API Google Cloud .
Pour exécuter du code ou des exemples depuis un environnement de développement local, vous pouvez vous authentifier auprès de Compute Engine en sélectionnant l'une des options suivantes :
Select the tab for how you plan to use the samples on this page:
Console
When you use the Google Cloud console to access Google Cloud services and
APIs, you don't need to set up authentication.
gcloud
Installez Google Cloud CLI.
Après l'installation,
initialisez Google Cloud CLI en exécutant la commande suivante :
Pour utiliser les exemples d'API REST de cette page dans un environnement de développement local, vous devez utiliser les identifiants que vous fournissez à gcloud CLI.
Installez Google Cloud CLI.
Après l'installation,
initialisez Google Cloud CLI en exécutant la commande suivante :
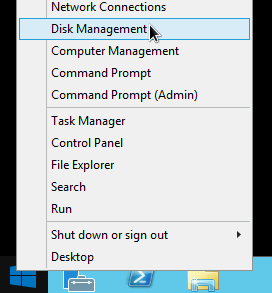
Faites un clic droit sur le bouton "Démarrer" de Windows, puis sélectionnez Disk Management (Gestion du disque).
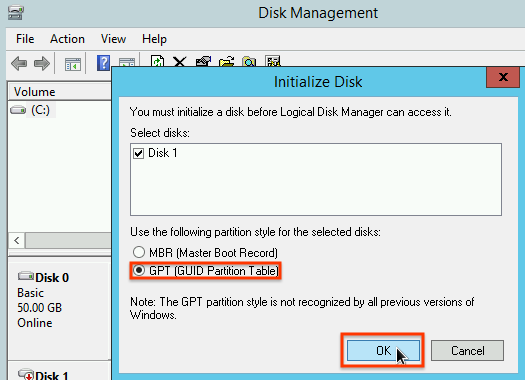
La gestion du disque vous invite à sélectionner un schéma de partitionnement pour le nouveau disque.
Sélectionnez GPT, puis cliquez sur OK.
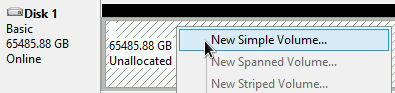
Une fois que le disque est initialisé, faites un clic droit sur l'espace disque non alloué, puis sélectionnez New Simple Volume (Nouveau volume simple).
Suivez les instructions de l'écran New Simple Volume Wizard (Assistant Création d'un volume simple) pour configurer le nouveau volume. Vous pouvez utiliser le format de partition de votre choix. Toutefois, dans l'exemple ci-dessous, nous allons sélectionner NTFS. Cochez la case Perform a quick format (Effectuer un formatage rapide) pour accélérer le processus de formatage. Vous pouvez également définir la taille du cluster dans le champ Allocation unit size (Taille d'unité d'allocation). La taille du cluster limite la taille maximale de la partition.
Gardez cela à l'esprit si vous essayez de redimensionner le disque persistant zonal et cette partition ultérieurement.
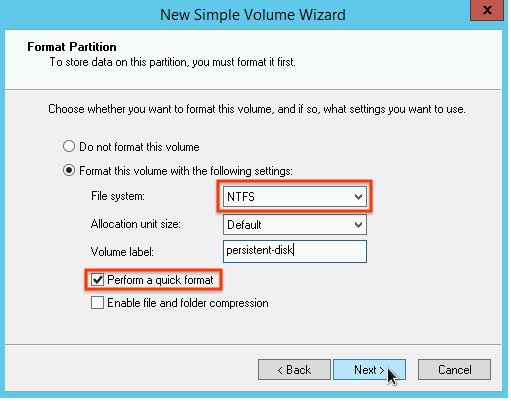
Une fois que vous avez achevé les étapes de l'assistant et que le formatage du volume est terminé, vérifiez dans la colonne Status (Statut) de la liste des disques associés que l'état du nouveau disque est défini sur Healthy (Sain).
Vous pouvez maintenant écrire des fichiers sur le disque.
Sauf indication contraire, le contenu de cette page est régi par une licence Creative Commons Attribution 4.0, et les échantillons de code sont régis par une licence Apache 2.0. Pour en savoir plus, consultez les Règles du site Google Developers. Java est une marque déposée d'Oracle et/ou de ses sociétés affiliées.
Dernière mise à jour le 2025/08/19 (UTC).
[[["Facile à comprendre","easyToUnderstand","thumb-up"],["J'ai pu résoudre mon problème","solvedMyProblem","thumb-up"],["Autre","otherUp","thumb-up"]],[["Difficile à comprendre","hardToUnderstand","thumb-down"],["Informations ou exemple de code incorrects","incorrectInformationOrSampleCode","thumb-down"],["Il n'y a pas l'information/les exemples dont j'ai besoin","missingTheInformationSamplesINeed","thumb-down"],["Problème de traduction","translationIssue","thumb-down"],["Autre","otherDown","thumb-down"]],["Dernière mise à jour le 2025/08/19 (UTC)."],[[["\u003cp\u003eNew blank disks attached to a Windows VM must be formatted and mounted before use, while disks with existing data only need to be mounted.\u003c/p\u003e\n"],["\u003cp\u003eAuthentication is required to access Google Cloud services and APIs, with options for Console, gcloud CLI, and REST API access.\u003c/p\u003e\n"],["\u003cp\u003eTo connect to the VM, navigate to the VM instances page and use the RDP button.\u003c/p\u003e\n"],["\u003cp\u003eFormatting and mounting a new disk on a Windows VM is done using the Windows Disk Management utility, typically involving selecting GPT partitioning and creating a new simple volume with an \u003ccode\u003eNTFS\u003c/code\u003e format.\u003c/p\u003e\n"],["\u003cp\u003eAfter formatting, ensure the disk status in Disk Management is \u003ccode\u003eHealthy\u003c/code\u003e to confirm it is ready for use.\u003c/p\u003e\n"]]],[],null,["# Format and mount a non-boot disk on a Windows VM\n\nWindows\n\n*** ** * ** ***\n\nIf you attached a new, blank disk to your VM, before you can use it you must\nformat and mount the disk. If you attached a disk that already contains data,\nthen you must mount the disk before you can use it.\n\nBefore you begin\n----------------\n\n- If you haven't already, set up [authentication](/compute/docs/authentication). Authentication verifies your identity for access to Google Cloud services and APIs. To run code or samples from a local development environment, you can authenticate to Compute Engine by selecting one of the following options:\n\n Select the tab for how you plan to use the samples on this page: \n\n ### Console\n\n\n When you use the Google Cloud console to access Google Cloud services and\n APIs, you don't need to set up authentication.\n\n ### gcloud\n\n 1.\n [Install](/sdk/docs/install) the Google Cloud CLI.\n\n After installation,\n [initialize](/sdk/docs/initializing) the Google Cloud CLI by running the following command:\n\n ```bash\n gcloud init\n ```\n\n\n If you're using an external identity provider (IdP), you must first\n [sign in to the gcloud CLI with your federated identity](/iam/docs/workforce-log-in-gcloud).\n | **Note:** If you installed the gcloud CLI previously, make sure you have the latest version by running `gcloud components update`.\n 2. [Set a default region and zone](/compute/docs/gcloud-compute#set_default_zone_and_region_in_your_local_client).\n\n ### REST\n\n\n To use the REST API samples on this page in a local development environment, you use the\n credentials you provide to the gcloud CLI.\n 1. [Install](/sdk/docs/install) the Google Cloud CLI. After installation, [initialize](/sdk/docs/initializing) the Google Cloud CLI by running the following command: \n\n ```bash\n gcloud init\n ```\n 2. If you're using an external identity provider (IdP), you must first [sign in to the gcloud CLI with your federated identity](/iam/docs/workforce-log-in-gcloud).\n\n\n For more information, see\n [Authenticate for using REST](/docs/authentication/rest)\n in the Google Cloud authentication documentation.\n\nConnect to the VM\n-----------------\n\n1. Go to the **VM instances** page.\n\n [Go to the VM instances page](https://console.cloud.google.com/compute/instances)\n2. Click the **RDP** button next to the VM that has the new blank disk attached.\n The browser opens an RDP connection to the instance.\n\nFormat and mount a non-boot disk on a Windows VM\n------------------------------------------------\n\nUse the [Windows Disk Management utility](https://learn.microsoft.com/windows-server/storage/disk-management/initialize-new-disks)\nto format and mount the new disk on a Windows VM.\n\n1. Right-click the Windows Start button and select **Disk Management**.\n\n2. Disk Management prompts you to select a partitioning scheme for the new disk.\n Select **GPT** and click **OK**.\n\n3. After the disk initializes, right-click the unallocated disk space\n and select **New Simple Volume**.\n\n4. Follow the instructions in the **New Simple Volume Wizard** to configure\n the new volume. You can use any partition format that you like, but for\n this example select `NTFS`. Also, check **Perform a quick format**\n to speed up the formatting process. Optionally, set the cluster size\n in the **Allocation unit size** field. The cluster size\n [limits the maximum size of the partition](https://learn.microsoft.com/windows-server/storage/file-server/ntfs-overview).\n Keep this in mind if you try to resize the zonal persistent disk and this\n partition later.\n\n5. After you complete the wizard and the volume is formatted, check\n the `Status` column on the list of attached disks to ensure that the\n new disk has a `Healthy` status.\n\nYou can now write files to the disk.\n\nWhat's next\n-----------\n\n- Learn how to [resize your persistent disks](/compute/docs/disks/resize-persistent-disk).\n- Learn how to regularly [back up your disks using snapshots](/compute/docs/disks/create-snapshots) to prevent unintended data loss."]]