本地 SSD 专为临时存储使用场景(例如用作缓存或临时处理空间)而设计。由于本地 SSD 位于虚拟机运行所在的物理机器上,因此您只能在创建虚拟机期间创建这些 SSD。本地 SSD 不能用作启动设备。
对于第三代机器系列及更高版本,当您创建虚拟机时,系统会向虚拟机添加一组本地 SSD 磁盘。向这些虚拟机添加本地 SSD 存储的唯一方法是:
- 对于 C4、C4D、C3 和 C3D,本地 SSD 存储空间仅适用于某些机器类型,例如
c3-standard-88-lssd。 - 对于 Z3、A4、A4X、A3 和 A2 Ultra 机器系列,每种机器类型都附带了本地 SSD 存储空间。
对于 M3 以及第一代和第二代机器类型,您必须在创建虚拟机时指定本地 SSD 磁盘。
创建本地 SSD 磁盘后,必须先格式化并装载设备,然后才能使用它。
如需了解各种机器类型可用的本地 SSD 存储空间数量以及可以挂接到虚拟机的本地 SSD 磁盘数量,请参阅选择有效的本地 SSD 数量。
准备工作
- 在使用本地 SSD 之前,请先查看本地 SSD 限制。
- 查看本地 SSD 磁盘的数据持久化场景。
- 如果您要将本地 SSD 添加到挂接了 GPU 的虚拟机实例,请参阅 GPU 区域和可用区的本地 SSD 可用性。
-
如果您尚未设置身份验证,请进行设置。身份验证用于验证您的身份,以便访问 Google Cloud 服务和 API。如需从本地开发环境运行代码或示例,您可以通过选择以下选项之一向 Compute Engine 进行身份验证:
Select the tab for how you plan to use the samples on this page:
Console
When you use the Google Cloud console to access Google Cloud services and APIs, you don't need to set up authentication.
gcloud
-
安装 Google Cloud CLI。 安装完成后,运行以下命令来初始化 Google Cloud CLI:
gcloud init如果您使用的是外部身份提供方 (IdP),则必须先使用联合身份登录 gcloud CLI。
- Set a default region and zone.
Terraform
如需在本地开发环境中使用本页面上的 Terraform 示例,请安装并初始化 gcloud CLI,然后使用您的用户凭证设置应用默认凭证。
安装 Google Cloud CLI。
如果您使用的是外部身份提供方 (IdP),则必须先使用联合身份登录 gcloud CLI。
If you're using a local shell, then create local authentication credentials for your user account:
gcloud auth application-default login
You don't need to do this if you're using Cloud Shell.
If an authentication error is returned, and you are using an external identity provider (IdP), confirm that you have signed in to the gcloud CLI with your federated identity.
如需了解详情,请参阅 Set up authentication for a local development environment。
Go
如需在本地开发环境中使用本页面上的 Go 示例,请安装并初始化 gcloud CLI,然后使用您的用户凭证设置应用默认凭证。
安装 Google Cloud CLI。
如果您使用的是外部身份提供方 (IdP),则必须先使用联合身份登录 gcloud CLI。
If you're using a local shell, then create local authentication credentials for your user account:
gcloud auth application-default login
You don't need to do this if you're using Cloud Shell.
If an authentication error is returned, and you are using an external identity provider (IdP), confirm that you have signed in to the gcloud CLI with your federated identity.
如需了解详情,请参阅 Set up authentication for a local development environment。 如需了解详情,请参阅身份验证文档中的为本地开发环境设置 ADC。
Java
如需在本地开发环境中使用本页面上的 Java 示例,请安装并初始化 gcloud CLI,然后使用您的用户凭证设置应用默认凭证。
安装 Google Cloud CLI。
如果您使用的是外部身份提供方 (IdP),则必须先使用联合身份登录 gcloud CLI。
If you're using a local shell, then create local authentication credentials for your user account:
gcloud auth application-default login
You don't need to do this if you're using Cloud Shell.
If an authentication error is returned, and you are using an external identity provider (IdP), confirm that you have signed in to the gcloud CLI with your federated identity.
如需了解详情,请参阅 Set up authentication for a local development environment。 如需了解详情,请参阅身份验证文档中的为本地开发环境设置 ADC。
Python
如需在本地开发环境中使用本页面上的 Python 示例,请安装并初始化 gcloud CLI,然后使用您的用户凭证设置应用默认凭证。
安装 Google Cloud CLI。
如果您使用的是外部身份提供方 (IdP),则必须先使用联合身份登录 gcloud CLI。
If you're using a local shell, then create local authentication credentials for your user account:
gcloud auth application-default login
You don't need to do this if you're using Cloud Shell.
If an authentication error is returned, and you are using an external identity provider (IdP), confirm that you have signed in to the gcloud CLI with your federated identity.
如需了解详情,请参阅 Set up authentication for a local development environment。 如需了解详情,请参阅身份验证文档中的为本地开发环境设置 ADC。
REST
如需在本地开发环境中使用本页面上的 REST API 示例,请使用您提供给 gcloud CLI 的凭证。
安装 Google Cloud CLI。
如果您使用的是外部身份提供方 (IdP),则必须先使用联合身份登录 gcloud CLI。
如需了解详情,请参阅 Google Cloud 身份验证文档中的使用 REST 时进行身份验证。
创建具有本地 SSD 的虚拟机
您可以使用 Google Cloud console、gcloud CLI 或 Compute Engine API 创建具有本地 SSD 磁盘存储空间的虚拟机。
控制台
转到创建实例页面。
为该虚拟机指定名称、区域和可用区。您可酌情添加标记或标签。
在机器配置部分中,选择包含目标机器类型的机器家族。
从系列列表中选择一个系列,然后选择机器类型。
- 对于 C4、C4D、C3 和 C3D,请选择以
-lssd结尾的机器类型。 - 对于 Z3、A4、A4X、A3 和 A2 Ultra,每种机器类型都附带本地 SSD 存储空间。
- 对于 M3 或第一代和第二代机器系列,在选择机器类型后,请执行以下操作:
- 展开高级选项部分。
- 展开磁盘,点击添加本地 SSD,然后执行以下操作:
- 在配置本地 SSD 页面上,选择磁盘接口类型。
- 从磁盘容量列表中选择所需的磁盘数量。
- 点击保存。
- 对于 C4、C4D、C3 和 C3D,请选择以
继续虚拟机创建过程。
创建具有本地 SSD 磁盘的虚拟机后,必须先格式化并装载每个设备,然后才能使用磁盘。
gcloud
对于 Z3、A4、A4X、A3 和 A2 Ultra 机器系列,如需创建挂接了本地 SSD 磁盘的虚拟机,请按照创建实例说明创建使用该系列的任何可用机器类型的虚拟机。
对于 C4、C4D、C3 和 C3D 机器系列,如需创建挂接了本地 SSD 磁盘的虚拟机,请按照相关说明创建实例,但要指定包含本地 SSD 磁盘 (
-lssd) 的实例类型。例如,您可以创建一个具有两个本地 SSD 分区的 C3 虚拟机,这些分区使用 NVMe 磁盘接口,如下所示:
gcloud compute instances create example-c3-instance \
   --zone ZONE \
   --machine-type c3-standard-8-lssd \
   --image-project IMAGE_PROJECT \
   --image-family IMAGE_FAMILY
对于 M3 以及第一代和第二代机器系列,如需创建挂接了本地 SSD 磁盘的虚拟机,请按照相关说明创建实例,但要使用
--local-ssd标志来创建并挂接本地 SSD 磁盘。如需创建多个本地 SSD 磁盘,请添加多个--local-ssd标志。或者,您也可以为每个--local-ssd标志设置接口值和设备名称。例如,您可以创建一个具有四个本地 SSD 磁盘的 M3 虚拟机,并指定磁盘接口类型,如下所示:
gcloud compute instances create VM_NAME \
   --machine-type m3-ultramem-64 \
   --zone ZONE \
   --local-ssd interface=INTERFACE_TYPE,device-name=DEVICE-NAME \
   --local-ssd interface=INTERFACE_TYPE,device-name=DEVICE-NAME \
   --local-ssd interface=INTERFACE_TYPE,device-name=DEVICE-NAME \
   --local-ssd interface=INTERFACE_TYPE \
   --image-project IMAGE_PROJECT \
   --image-family IMAGE_FAMILY
替换以下内容:
- VM_NAME:新虚拟机的名称
- ZONE:要在其中创建虚拟机的可用区。如果您已配置 gcloud CLI
compute/zone属性或环境变量CLOUDSDK_COMPUTE_ZONE,则此标志为可选标志。 - INTERFACE_TYPE:要用于本地 SSD 设备的磁盘接口类型。如果是创建 M3 虚拟机或者您的启动磁盘映像具有优化的 NVMe 驱动程序,请指定
nvme。请为其他映像指定scsi。 - DEVICE-NAME(可选):该名称指示要在客机操作系统符号链接中使用的磁盘名称。
- IMAGE_FAMILY:您要在启动磁盘上安装的可用映像系列之一
- IMAGE_PROJECT:映像系列所属的映像项目
如有必要,您可以使用
nvme和scsi的组合将本地 SSD 挂接到第一代或第二代虚拟机,以用于不同分区。nvme设备的性能取决于实例的启动磁盘映像。第三代虚拟机仅支持 NVMe 磁盘接口。创建具有本地 SSD 的虚拟机后,必须先格式化并装载每个设备,然后才能使用。
Terraform
如需创建挂接了本地 SSD 磁盘的虚拟机,您可以使用
google_compute_instance资源。如需了解如何应用或移除 Terraform 配置,请参阅基本 Terraform 命令。
如需生成 Terraform 代码,您可以使用 Google Cloud 控制台中的等效代码组件。- 在 Google Cloud 控制台中,前往虚拟机实例页面。
- 点击创建实例。
- 指定所需的参数。
- 在页面顶部或底部,点击等效代码,然后点击 Terraform 标签页以查看 Terraform 代码。
Go
Go
试用此示例之前,请按照《Compute Engine 快速入门:使用客户端库》中的 Go 设置说明进行操作。 如需了解详情,请参阅 Compute Engine Go API 参考文档。
如需向 Compute Engine 进行身份验证,请设置应用默认凭证。如需了解详情,请参阅为本地开发环境设置身份验证。
Java
Java
试用此示例之前,请按照《Compute Engine 快速入门:使用客户端库》中的 Java 设置说明进行操作。 如需了解详情,请参阅 Compute Engine Java API 参考文档。
如需向 Compute Engine 进行身份验证,请设置应用默认凭证。如需了解详情,请参阅为本地开发环境设置身份验证。
Python
Python
试用此示例之前,请按照《Compute Engine 快速入门:使用客户端库》中的 Python 设置说明进行操作。 如需了解详情,请参阅 Compute Engine Python API 参考文档。
如需向 Compute Engine 进行身份验证,请设置应用默认凭证。如需了解详情,请参阅为本地开发环境设置身份验证。
REST
使用
instances.insert method根据映像系列或操作系统映像的特定版本创建虚拟机。- 对于 Z3、A4、A4X、A3 和 A2 Ultra 机器系列,如需创建挂接了本地 SSD 磁盘的虚拟机,请创建一个使用该系列任何可用机器类型的虚拟机。
对于 C4、C4D、C3 和 C3D 机器系列,如需创建挂接本地 SSD 磁盘的虚拟机,请指定包含本地 SSD 磁盘 (
-lssd) 的实例类型。以下示例请求载荷会创建具有 Ubuntu 启动磁盘和两个本地 SSD 磁盘的 C3 虚拟机:
{
 "machineType":"zones/us-central1-c/machineTypes/c3-standard-8-lssd",
 "name":"c3-with-local-ssd",
 "disks":[
    {
       "type":"PERSISTENT",
       "initializeParams":{
          "sourceImage":"projects/ubuntu-os-cloud/global/images/family/ubuntu-2204-lts"
       },
       "boot":true
    }
 ],
 "networkInterfaces":[
    {
       "network":"global/networks/default"
}
 ]
}
对于 M3 以及第一代和第二代机器系列,如需创建挂接了本地 SSD 磁盘的虚拟机,您可以在创建虚拟机期间使用
initializeParams属性添加本地 SSD 设备。您还必须提供以下属性:diskType:设置为本地 SSDautoDelete:设置为 truetype:设置为SCRATCH
以下属性不能与本地 SSD 设备搭配使用:
diskNamesourceImage属性diskSizeGb
以下示例请求载荷会创建一个具有启动磁盘和四个本地 SSD 磁盘的 M3 虚拟机:
{
 "machineType":"zones/us-central1-f/machineTypes/m3-ultramem-64",
 "name":"local-ssd-instance",
 "disks":[
    {
     "type":"PERSISTENT",
     "initializeParams":{
        "sourceImage":"projects/ubuntu-os-cloud/global/images/family/ubuntu-2204-lts"
     },
     "boot":true
    },
    {
       "type":"SCRATCH",
       "initializeParams":{
          "diskType":"zones/us-central1-f/diskTypes/local-ssd"
       },
       "autoDelete":true,
       "interface": "NVME"
    },
    {
       "type":"SCRATCH",
       "initializeParams":{
          "diskType":"zones/us-central1-f/diskTypes/local-ssd"
       },
       "autoDelete":true,
       "interface": "NVME"
    },
    {
       "type":"SCRATCH",
       "initializeParams":{
          "diskType":"zones/us-central1-f/diskTypes/local-ssd"
       },
       "autoDelete":true,
       "interface": "NVME"
    },
    {
       "type":"SCRATCH",
       "initializeParams":{
          "diskType":"zones/us-central1-f/diskTypes/local-ssd"
       },
       "autoDelete":true,
       "interface": "NVME"
    },
 ],
 "networkInterfaces":[
    {
       "network":"global/networks/default"
    }
 ]
}
创建本地 SSD 磁盘后,必须先格式化并装载设备,然后才能使用它。
如需详细了解如何使用 REST 创建实例,请参阅 Compute Engine API。
格式化并装载本地 SSD 设备
您可以单独格式化和装载每个本地 SSD 磁盘,也可以将多个本地 SSD 磁盘合并到一个逻辑卷中。
格式化并装载各个本地 SSD 分区
将本地 SSD 连接到实例,最简单的方式是使用单个分区格式化和装载每个设备。或者,您可以将多个分区合并到单个逻辑卷中。
Linux 实例
在 Linux 实例上格式化并装载新的本地 SSD。您可以使用任何所需的分区格式和配置。对于本示例,请创建单个
ext4分区。转到“虚拟机实例”页面。
点击附加了新的本地 SSD 的实例旁边的 SSH 按钮。浏览器会建立连到该实例的终端连接。
在终端中,使用
find命令标识要装载的本地 SSD。$ find /dev/ | grep google-local-nvme-ssdSCSI 模式下的本地 SSD 具有类似
google-local-ssd-0的标准名称。NVMe 模式下的本地 SSD 具有与google-local-nvme-ssd-0类似的名称,如以下输出所示:$ find /dev/ | grep google-local-nvme-ssd /dev/disk/by-id/google-local-nvme-ssd-0
使用 ext4 文件系统格式化本地 SSD。此命令将删除本地 SSD 中的所有现有数据。
$ sudo mkfs.ext4 -F /dev/disk/by-id/[SSD_NAME]将
[SSD_NAME]替换为您要设置格式的本地 SSD 的 ID。例如,指定google-local-nvme-ssd-0以格式化实例上的第一个 NVMe 本地 SSD。使用
mkdir命令创建用于装载设备的目录。$ sudo mkdir -p /mnt/disks/[MNT_DIR]将
[MNT_DIR]替换为要装载本地 SSD 磁盘的目录路径。将本地 SSD 装载到虚拟机。
$ sudo mount /dev/disk/by-id/[SSD_NAME] /mnt/disks/[MNT_DIR]替换以下内容:
[SSD_NAME]:要装载的本地 SSD 的 ID。[MNT_DIR]:您要装载本地 SSD 的目录。
配置对该设备的读写权限。对于本示例,为所有用户授予对设备的写入访问权限。
$ sudo chmod a+w /mnt/disks/[MNT_DIR]将
[MNT_DIR]替换为装载本地 SSD 的目录。
或者,您可以将本地 SSD 添加到
/etc/fstab文件,以便在实例重启时设备会自动重新装载。如果实例停止,此条目不会起到保留本地 SSD 上的数据的作用。如需了解完整详情,请参阅本地 SSD 数据持久性。指定
/etc/fstab条目文件时,请务必添加nofail选项,这样,即使本地 SSD 不存在,实例也能继续启动。例如,如果您截取了启动磁盘的快照,并创建了一个没有挂接任何本地 SSD 磁盘的新实例,那么该实例可以继续完成启动过程,而不会无限期地暂停。创建
/etc/fstab条目。使用blkid命令查找该设备上文件系统的 UUID,并修改/etc/fstab文件以将该 UUID 添加到装载选项中。您可以使用单个命令完成此步骤。例如,对于 NVMe 模式的本地 SSD,请使用以下命令:
$ echo UUID=`sudo blkid -s UUID -o value /dev/disk/by-id/google-local-nvme-ssd-0` /mnt/disks/[MNT_DIR] ext4 discard,defaults,nofail 0 2 | sudo tee -a /etc/fstab对于非 NVMe 模式的本地 SSD(例如 SCSI),请使用以下命令:
$ echo UUID=`sudo blkid -s UUID -o value /dev/disk/by-id/google-local-ssd-0` /mnt/disks/[MNT_DIR] ext4 discard,defaults,nofail 0 2 | sudo tee -a /etc/fstab将
[MNT_DIR]替换为装载本地 SSD 的目录。使用
cat命令验证您的/etc/fstab条目内容正确:$ cat /etc/fstab
如果从此实例的启动磁盘创建快照并使用它创建没有本地 SSD 的单独实例,请修改
/etc/fstab文件并移除此本地 SSD 的条目。即使配置了nofail选项,您也应该使/etc/fstab文件与挂接到该实例的分区保持同步,并在创建启动磁盘快照之前移除这些条目。Windows 实例
使用 Windows 磁盘管理工具在 Windows 实例上格式化和装载本地 SSD。
通过 RDP 连接到实例。对于本示例,前往“虚拟机实例”页面,点击挂接本地 SSD 的实例旁边的 RDP 按钮。输入用户名和密码后,将打开一个窗口,其中包含服务器的桌面界面。
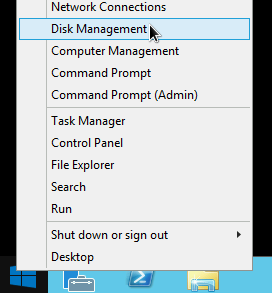
右键点击 Windows“开始”按钮并选择磁盘管理。
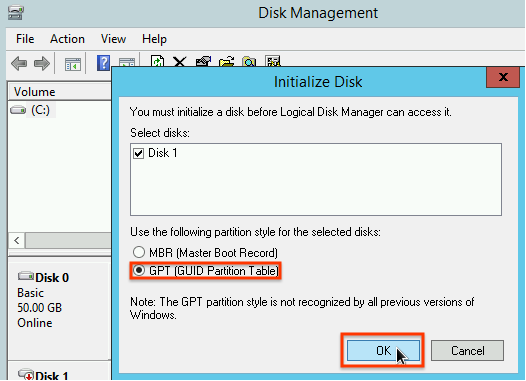
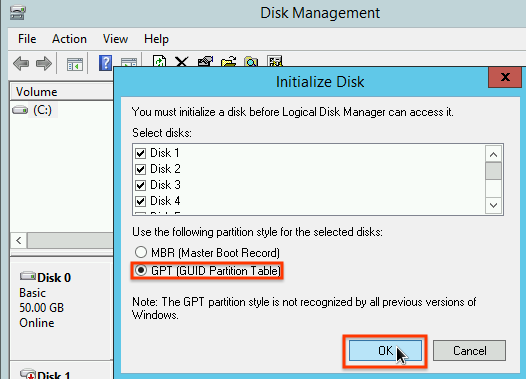
如果您之前尚未初始化本地 SSD,则该工具会提示您为新分区选择分区方案。选择 GPT,然后点击确定。
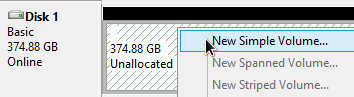
本地 SSD 初始化后,右键点击未分配的磁盘可用空间,然后选择新建简单卷。
按照新建简单卷向导中的说明配置新卷。您可以使用任何想要的分区格式,但对于本示例,请选择
NTFS。另外,请勾选执行快速格式化以加快格式化过程。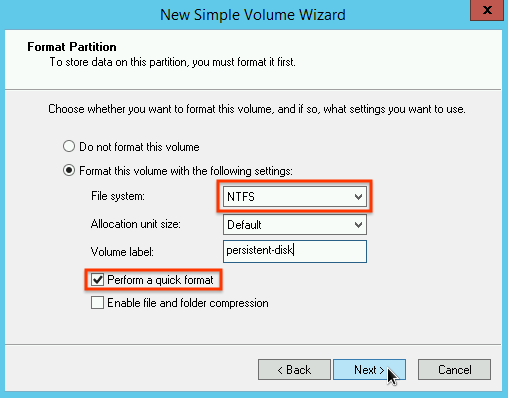
完成向导步骤并且完成卷格式化后,请检查新的本地 SSD 以确保其处于
Healthy状态。
大功告成!现在可以将文件写入本地 SSD 了。
将多个本地 SSD 分区格式化并装载到单个逻辑卷中
不同于持久性 SSD,附加到实例的每个本地 SSD 设备具有固定的 375 GB 容量。如果要将多个本地 SSD 分区合并到单个逻辑卷中,则必须自行定义跨这些分区的卷管理。
Linux 实例
使用
mdadm创建 RAID 0 阵列。此示例使用单个ext4文件系统格式化阵列,但您可以应用您想要的任何文件系统。转到“虚拟机实例”页面。
点击附加了新的本地 SSD 的实例旁边的 SSH 按钮。浏览器会建立连到该实例的终端连接。
在终端中安装
mdadm工具。mdadm的安装过程包括暂停脚本的用户提示,因此请手动运行此过程。Debian 和 Ubuntu:
$ sudo apt update && sudo apt install mdadm --no-install-recommendsCentOS 和 RHEL:
$ sudo yum install mdadm -ySLES 和 openSUSE:
$ sudo zypper install -y mdadm使用
find命令标识要一起装载的所有本地 SSD。在本示例中,实例装载了 8 个 NVMe 模式的本地 SSD 分区:
$  find /dev/ | grep google-local-nvme-ssd

 /dev/disk/by-id/google-local-nvme-ssd-7
 /dev/disk/by-id/google-local-nvme-ssd-6
 /dev/disk/by-id/google-local-nvme-ssd-5
 /dev/disk/by-id/google-local-nvme-ssd-4
 /dev/disk/by-id/google-local-nvme-ssd-3
 /dev/disk/by-id/google-local-nvme-ssd-2
 /dev/disk/by-id/google-local-nvme-ssd-1
 /dev/disk/by-id/google-local-nvme-ssd-0
find不保证排序。只要输出行数与预期的 SSD 分区数量一致,设备按不同的顺序列出也可以。SCSI 模式下的本地 SSD 具有类似google-local-ssd的标准名称。NVMe 模式下的本地 SSD 具有类型google-local-nvme-ssd的名称。使用
mdadm将多个本地 SSD 设备合并到一个名为/dev/md0的阵列中。本示例合并 NVMe 模式下的 8 个本地 SSD 设备。对于 SCSI 模式下的本地 SSD 设备,请指定从find命令获取的名称:$ sudo mdadm --create /dev/md0 --level=0 --raid-devices=8 \ /dev/disk/by-id/google-local-nvme-ssd-0 \ /dev/disk/by-id/google-local-nvme-ssd-1 \ /dev/disk/by-id/google-local-nvme-ssd-2 \ /dev/disk/by-id/google-local-nvme-ssd-3 \ /dev/disk/by-id/google-local-nvme-ssd-4 \ /dev/disk/by-id/google-local-nvme-ssd-5 \ /dev/disk/by-id/google-local-nvme-ssd-6 \ /dev/disk/by-id/google-local-nvme-ssd-7 mdadm: Defaulting to version 1.2 metadata mdadm: array /dev/md0 started.
您可以使用
mdadm --detail确认阵列的详细信息。通过添加--prefer=by-id标志,系统将使用/dev/disk/by-id路径列出设备。sudo mdadm --detail --prefer=by-id /dev/md0
对于数组中的每个设备,输出应类似如下所示。
 ...
 Number   Major   Minor   RaidDevice State
    0      259      0         0      active sync   /dev/disk/by-id/google-local-nvme-ssd-0
 ...
使用 ext4 文件系统格式化完整的
/dev/md0阵列。$ sudo mkfs.ext4 -F /dev/md0创建一个用于装载
/dev/md0的目录。对于本示例,请创建/mnt/disks/ssd-array目录:$ sudo mkdir -p /mnt/disks/[MNT_DIR]将
[MNT_DIR]替换为要装载本地 SSD 阵列的目录。将
/dev/md0阵列装载到/mnt/disks/ssd-array目录:$ sudo mount /dev/md0 /mnt/disks/[MNT_DIR]将
[MNT_DIR]替换为要装载本地 SSD 阵列的目录。配置对该设备的读写权限。对于本示例,为所有用户授予对设备的写入访问权限。
$ sudo chmod a+w /mnt/disks/[MNT_DIR]将
[MNT_DIR]替换为装载本地 SSD 阵列的目录。
或者,您可以将本地 SSD 添加到
/etc/fstab文件,以便在实例重启时设备会自动重新装载。如果实例停止,此条目不会起到保留本地 SSD 上的数据的作用。如需了解详情,请参阅本地 SSD 数据持久性。指定
/etc/fstab条目文件时,请务必添加nofail选项,这样,即使本地 SSD 不存在,实例也能继续启动。例如,如果您截取启动磁盘的快照并创建没有附加任何本地 SSD 的新实例,则该实例可以继续启动流程,而不是无限期地暂停。创建
/etc/fstab条目。使用blkid命令查找该设备上文件系统的 UUID,并修改/etc/fstab文件以将该 UUID 添加到装载选项中。指定nofail选项,以使系统在本地 SSD 不可用的情况下也能启动。您可以使用单个命令完成此步骤。例如:$ echo UUID=`sudo blkid -s UUID -o value /dev/md0` /mnt/disks/[MNT_DIR] ext4 discard,defaults,nofail 0 2 | sudo tee -a /etc/fstab将
[MNT_DIR]替换为装载本地 SSD 阵列的目录。如果您在
/etc/fstab文件中使用类似于/dev/md0的设备名称,而不是 UUID,则需要修改文件/etc/mdadm/mdadm.conf,确保阵列在启动时会自动重新组合。为此,请完成以下两个步骤:- 确保磁盘阵列在启动时自动扫描并重新组合。
$ sudo mdadm --detail --scan | sudo tee -a /etc/mdadm/mdadm.conf - 更新
initramfs,以使该阵列在前期启动过程中可用。$ sudo update-initramfs -u
- 确保磁盘阵列在启动时自动扫描并重新组合。
使用
cat命令验证您的/etc/fstab条目内容正确:$ cat /etc/fstab
如果从此实例的启动磁盘创建快照并使用它创建没有本地 SSD 的单独实例,请修改
/etc/fstab文件并移除此本地 SSD 阵列的条目。即使配置了nofail选项,您也应该使/etc/fstab文件与挂接到该实例的分区保持同步,并在创建启动磁盘快照之前移除这些条目。Windows 实例
使用 Windows 磁盘管理工具在 Windows 实例上格式化和装载本地 SSD 阵列。
通过 RDP 连接到实例。对于本示例,前往“虚拟机实例”页面,点击挂接本地 SSD 的实例旁边的 RDP 按钮。输入用户名和密码后,将打开一个窗口,其中包含服务器的桌面界面。
右键点击 Windows“开始”按钮并选择磁盘管理。
如果您之前尚未初始化本地 SSD,则该工具会提示您为新分区选择分区方案。选择 GPT,然后点击确定。
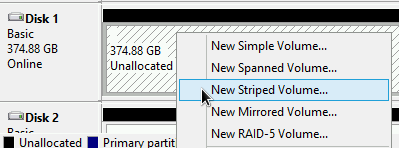
本地 SSD 初始化后,右键点击未分配的磁盘可用空间,然后选择新建带区卷。
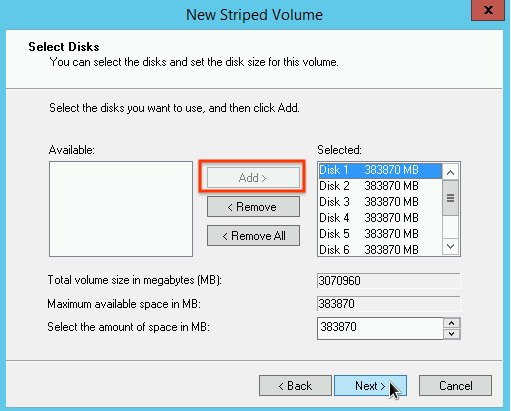
选择要加入带区阵列中的本地 SSD 分区。在本示例中,请选择所有分区,然后将它们合并到单个本地 SSD 设备中。
按照新建带区卷向导中的说明配置新卷。您可以使用任何想要的分区格式,但对于本示例,请选择
NTFS。另外,请勾选执行快速格式化以加快格式化过程。 完成向导步骤并且完成卷格式化后,请检查新的本地 SSD 以确保其处于
Healthy状态。
现在可以将文件写入本地 SSD 了。
后续步骤
- 详细了解虚拟机的设备名称。
- 了解如何对本地 SSD 磁盘的性能进行基准化分析
如未另行说明,那么本页面中的内容已根据知识共享署名 4.0 许可获得了许可,并且代码示例已根据 Apache 2.0 许可获得了许可。有关详情,请参阅 Google 开发者网站政策。Java 是 Oracle 和/或其关联公司的注册商标。
最后更新时间 (UTC):2025-10-19。
-