이 튜토리얼에서는 scikit-learn으로 학습된 Open Neural Network Exchange(ONNX) 모델을 가져오는 방법을 보여줍니다. 모델을 BigQuery 데이터 세트로 가져와 SQL 쿼리를 사용하여 예측하는 데 사용합니다.
ONNX는 모든 머신러닝(ML) 프레임워크를 나타내도록 설계된 균일한 형식을 제공합니다. ONNX에 대한 BigQuery ML 지원을 통해 다음을 수행할 수 있습니다.
- 원하는 프레임워크를 사용하여 모델을 학습시키기
- ONNX 모델 형식으로 모델 변환
- ONNX 모델을 BigQuery로 가져와 BigQuery ML을 사용하여 예측 수행
목표
- scikit-learn을 사용하여 모델 생성 및 학습
- sklearn-onnx를 사용하여 ONNX 형식으로 모델 변환
CREATE MODEL문을 사용하여 BigQuery로 ONNX 모델 가져오기ML.PREDICT함수를 사용하여 가져온 ONNX 모델로 예측 수행
비용
이 문서에서는 비용이 청구될 수 있는 Google Cloud구성요소( )를 사용합니다.
프로젝트 사용량을 기준으로 예상 비용을 산출하려면 가격 계산기를 사용합니다.
이 문서에 설명된 태스크를 완료했으면 만든 리소스를 삭제하여 청구가 계속되는 것을 방지할 수 있습니다. 자세한 내용은 삭제를 참조하세요.
시작하기 전에
- Sign in to your Google Cloud account. If you're new to Google Cloud, create an account to evaluate how our products perform in real-world scenarios. New customers also get $300 in free credits to run, test, and deploy workloads.
-
In the Google Cloud console, on the project selector page, select or create a Google Cloud project.
-
In the Google Cloud console, on the project selector page, select or create a Google Cloud project.
-
Verify that billing is enabled for your Google Cloud project.
-
Enable the BigQuery and Cloud Storage APIs.
- 이 문서의 태스크를 수행하는 데 필요한 권한이 있는지 확인합니다.
-
Make sure that you have the following role or roles on the project:
- BigQuery Studio Admin (
roles/bigquery.studioAdmin) - Storage Object Creator (
roles/storage.objectCreator)
Check for the roles
-
In the Google Cloud console, go to the IAM page.
Go to IAM - Select the project.
-
In the Principal column, find all rows that identify you or a group that you're included in. To learn which groups you're included in, contact your administrator.
- For all rows that specify or include you, check the Role column to see whether the list of roles includes the required roles.
Grant the roles
-
In the Google Cloud console, go to the IAM page.
IAM으로 이동 - 프로젝트를 선택합니다.
- 액세스 권한 부여를 클릭합니다.
-
새 주 구성원 필드에 사용자 식별자를 입력합니다. 일반적으로 Google 계정의 이메일 주소입니다.
- 역할 선택 목록에서 역할을 선택합니다.
- 역할을 추가로 부여하려면 다른 역할 추가를 클릭하고 각 역할을 추가합니다.
- 저장을 클릭합니다.
Google Cloud 콘솔에서 BigQuery 페이지로 이동합니다.
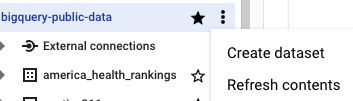
탐색기 창에서 프로젝트 이름을 클릭합니다.
작업 보기 > 데이터 세트 만들기를 클릭합니다.
데이터 세트 만들기 페이지에서 다음을 수행합니다.
데이터 세트 ID에
bqml_tutorial를 입력합니다.위치 유형에 대해 멀티 리전을 선택한 다음 US(미국 내 여러 리전)를 선택합니다.
나머지 기본 설정은 그대로 두고 데이터 세트 만들기를 클릭합니다.
데이터 위치가
US로 설정되고 설명이BigQuery ML tutorial dataset인bqml_tutorial데이터 세트를 만듭니다.bq --location=US mk -d \ --description "BigQuery ML tutorial dataset." \ bqml_tutorial
--dataset플래그를 사용하는 대신 이 명령어는-d단축키를 사용합니다.-d와--dataset를 생략하면 이 명령어는 기본적으로 데이터 세트를 만듭니다.데이터 세트가 생성되었는지 확인합니다.
bq lsGoogle Cloud 콘솔에서 BigQuery Studio 페이지로 이동합니다.
쿼리 편집기에서 다음
CREATE MODEL문을 입력합니다.CREATE OR REPLACE MODEL `bqml_tutorial.imported_onnx_model` OPTIONS (MODEL_TYPE='ONNX', MODEL_PATH='BUCKET_PATH')
BUCKET_PATH를 Cloud Storage에 업로드한 모델의 경로로 바꿉니다. 샘플 모델을 사용하는 경우BUCKET_PATH를gs://cloud-samples-data/bigquery/ml/onnx/pipeline_rf.onnx로 바꿉니다.작업이 완료되면
Successfully created model named imported_onnx_model과 유사한 메시지가 표시됩니다.새 모델이 리소스 패널에 표시됩니다. 모델은 모델 아이콘(
 )으로 표시됩니다. 리소스 패널에서 새 모델을 선택하면 모델에 대한 정보가 쿼리 편집기 옆에 표시됩니다.
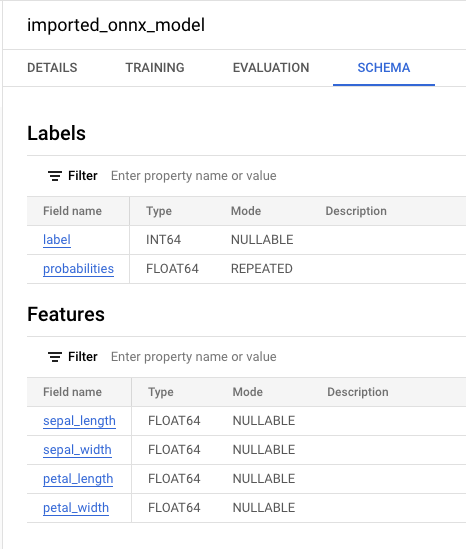
다음
CREATE MODEL문을 입력하여 Cloud Storage에서 ONNX 모델을 가져옵니다.bq query --use_legacy_sql=false \ "CREATE OR REPLACE MODEL `bqml_tutorial.imported_onnx_model` OPTIONS (MODEL_TYPE='ONNX', MODEL_PATH='BUCKET_PATH')"
BUCKET_PATH를 Cloud Storage에 업로드한 모델의 경로로 바꿉니다. 샘플 모델을 사용하는 경우BUCKET_PATH를gs://cloud-samples-data/bigquery/ml/onnx/pipeline_rf.onnx로 바꿉니다.작업이 완료되면
Successfully created model named imported_onnx_model과 유사한 메시지가 표시됩니다.모델을 가져온 후 모델이 데이터 세트에 표시되는지 확인합니다.
bq ls bqml_tutorial
출력은 다음과 비슷합니다.
tableId Type --------------------- ------- imported_onnx_model MODEL
sepal_lengthsepal_widthpetal_lengthpetal_widthBigQuery Studio 페이지로 이동합니다.
쿼리 편집기에서
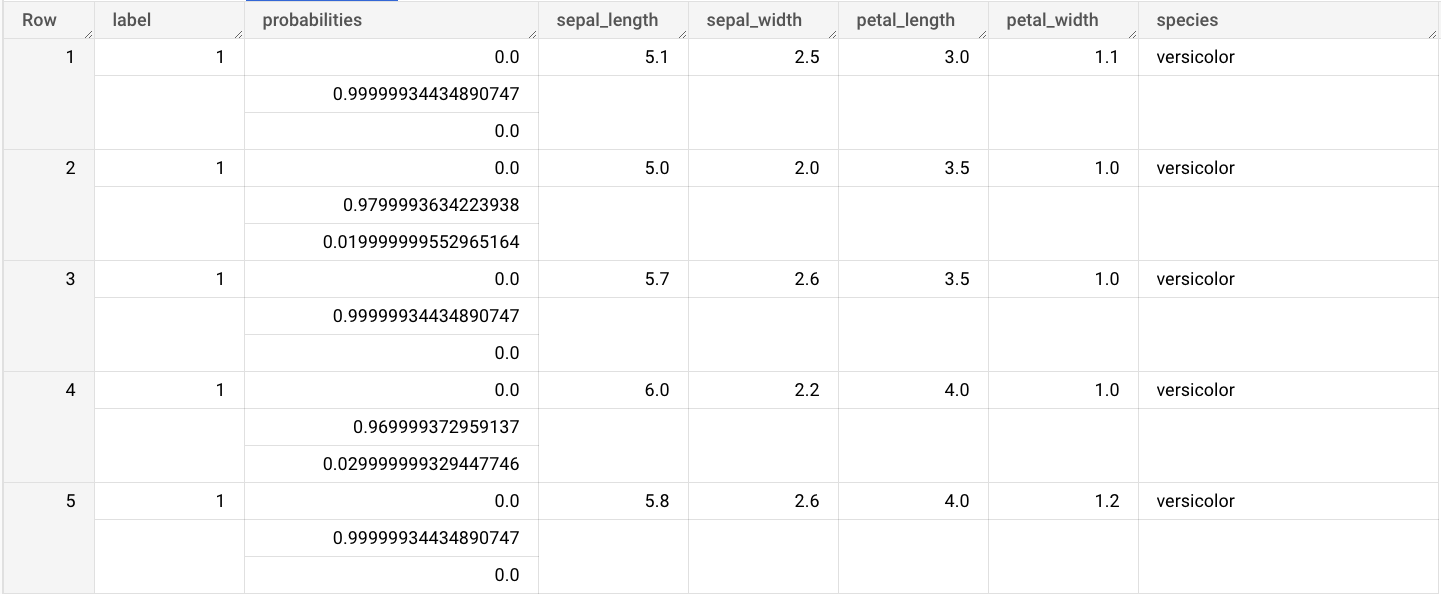
ML.PREDICT함수를 사용하는 쿼리를 입력합니다.SELECT * FROM ML.PREDICT(MODEL `bqml_tutorial.imported_onnx_model`, ( SELECT * FROM `bigquery-public-data.ml_datasets.iris` ) )
쿼리 결과는 다음과 유사합니다.
- In the Google Cloud console, go to the Manage resources page.
- In the project list, select the project that you want to delete, and then click Delete.
- In the dialog, type the project ID, and then click Shut down to delete the project.
- In the Google Cloud console, go to the Manage resources page.
- In the project list, select the project that you want to delete, and then click Delete.
- In the dialog, type the project ID, and then click Shut down to delete the project.
선택사항: 데이터 세트를 삭제합니다.
- ONNX 모델 가져오기에 대한 자세한 내용은 ONNX 모델의
CREATE MODEL문 참조하기 - 사용 가능한 ONNX 변환기 및 튜토리얼에 대한 자세한 내용은 ONNX 형식으로 변환 참조하기
- BigQuery ML 개요는 BigQuery ML 소개 참조하기
- BigQuery ML을 시작하려면 BigQuery ML에서 머신러닝 모델 만들기 참조하기
BigQuery의 IAM 권한에 대한 자세한 내용은 IAM 권한을 참조하세요.
선택사항: 모델 학습 및 ONNX 형식으로 변환
다음 코드 샘플에서는 scikit-learn으로 분류 모델을 학습하는 방법과 결과 파이프라인을 ONNX 형식으로 변환하는 방법을 보여줍니다. 이 튜토리얼에서는
gs://cloud-samples-data/bigquery/ml/onnx/pipeline_rf.onnx에 저장되어 있는 사전 빌드된 예시 모델을 사용합니다. 샘플 모델을 사용하는 경우에는 다음 단계를 완료하지 않아도 됩니다.scikit-learn으로 분류 모델 학습
다음 샘플 코드를 사용하여 Iris 데이터 세트에 scikit-learn 파이프라인을 만들고 학습시킵니다. scikit-learn 설치 및 사용 방법에 대한 안내는 scikit-learn 설치 가이드를 참조하세요.
import numpy from sklearn.datasets import load_iris from sklearn.pipeline import Pipeline from sklearn.preprocessing import StandardScaler from sklearn.ensemble import RandomForestClassifier data = load_iris() X = data.data[:, :4] y = data.target ind = numpy.arange(X.shape[0]) numpy.random.shuffle(ind) X = X[ind, :].copy() y = y[ind].copy() pipe = Pipeline([('scaler', StandardScaler()), ('clr', RandomForestClassifier())]) pipe.fit(X, y)ONNX 모델로 파이프라인 변환
sklearn-onnx에서 다음 샘플 코드를 사용하여 scikit-learn 파이프라인을
pipeline_rf.onnx라는 ONNX 모델로 변환합니다.from skl2onnx import convert_sklearn from skl2onnx.common.data_types import FloatTensorType # Disable zipmap as it is not supported in BigQuery ML. options = {id(pipe): {'zipmap': False}} # Define input features. scikit-learn does not store information about the # training dataset. It is not always possible to retrieve the number of features # or their types. That's why the function needs another argument called initial_types. initial_types = [ ('sepal_length', FloatTensorType([None, 1])), ('sepal_width', FloatTensorType([None, 1])), ('petal_length', FloatTensorType([None, 1])), ('petal_width', FloatTensorType([None, 1])), ] # Convert the model. model_onnx = convert_sklearn( pipe, 'pipeline_rf', initial_types=initial_types, options=options ) # And save. with open('pipeline_rf.onnx', 'wb') as f: f.write(model_onnx.SerializeToString())Cloud Storage에 ONNX 모델 업로드
모델을 저장한 후 다음을 수행합니다.
데이터 세트 만들기
ML 모델을 저장할 BigQuery 데이터 세트를 만듭니다.
콘솔
bq
새 데이터 세트를 만들려면
--location플래그와 함께bq mk명령어를 실행합니다. 사용할 수 있는 전체 파라미터 목록은bq mk --dataset명령어 참조를 확인하세요.API
데이터 세트 리소스가 정의된
datasets.insert메서드를 호출합니다.{ "datasetReference": { "datasetId": "bqml_tutorial" } }
BigQuery DataFrames
이 샘플을 사용해 보기 전에 BigQuery DataFrames를 사용하여 BigQuery 빠른 시작의 BigQuery DataFrames 설정 안내를 따르세요. 자세한 내용은 BigQuery DataFrames 참고 문서를 확인하세요.
BigQuery에 인증하려면 애플리케이션 기본 사용자 인증 정보를 설정합니다. 자세한 내용은 로컬 개발 환경의 ADC 설정을 참조하세요.
ONNX 모델을 BigQuery로 가져오기
다음 단계에서는
CREATE MODEL문을 사용하여 Cloud Storage에서 샘플 ONNX 모델을 가져오는 방법을 보여줍니다.ONNX 모델을 데이터 세트로 가져오려면 다음 옵션 중 하나를 선택합니다.
콘솔
bq
BigQuery DataFrames
이 샘플을 사용해 보기 전에 BigQuery DataFrames를 사용하여 BigQuery 빠른 시작의 BigQuery DataFrames 설정 안내를 따르세요. 자세한 내용은 BigQuery DataFrames 참고 문서를 확인하세요.
BigQuery에 인증하려면 애플리케이션 기본 사용자 인증 정보를 설정합니다. 자세한 내용은 로컬 개발 환경의 ADC 설정을 참조하세요.
ONNXModel객체를 사용하여 모델을 가져옵니다.형식 및 스토리지 요구사항을 포함하여 BigQuery로 ONNX 모델을 가져오는 방법에 대한 자세한 내용은 ONNX 모델을 가져오기 위한
CREATE MODEL문을 참조하세요.가져온 ONNX 모델로 예측 수행
ONNX 모델을 가져온 후
ML.PREDICT함수를 사용하여 모델로 예측을 수행합니다.다음 단계의 쿼리는
imported_onnx_model을 사용하여ml_datasets공개 데이터 세트에 있는iris테이블의 입력 데이터를 사용해 예측을 수행합니다. ONNX 모델은FLOAT값 4개를 입력으로 예상합니다.이러한 입력은 모델을 ONNX 형식으로 변환할 때 정의된
initial_types와 일치합니다.출력에는
label및probabilities열과 입력 테이블의 열이 포함됩니다.label은 예측된 클래스 라벨을 나타냅니다.probabilities는 각 클래스의 확률을 나타내는 확률 배열입니다.가져온 TensorFlow 모델로 예측을 수행하려면 다음 옵션 중 하나를 선택합니다.
콘솔
bq
ML.PREDICT를 사용하는 쿼리를 실행합니다.bq query --use_legacy_sql=false \ 'SELECT * FROM ML.PREDICT( MODEL `example_dataset.imported_onnx_model`, (SELECT * FROM `bigquery-public-data.ml_datasets.iris`))'
BigQuery DataFrames
이 샘플을 사용해 보기 전에 BigQuery DataFrames를 사용하여 BigQuery 빠른 시작의 BigQuery DataFrames 설정 안내를 따르세요. 자세한 내용은 BigQuery DataFrames 참고 문서를 확인하세요.
BigQuery에 인증하려면 애플리케이션 기본 사용자 인증 정보를 설정합니다. 자세한 내용은 로컬 개발 환경의 ADC 설정을 참조하세요.
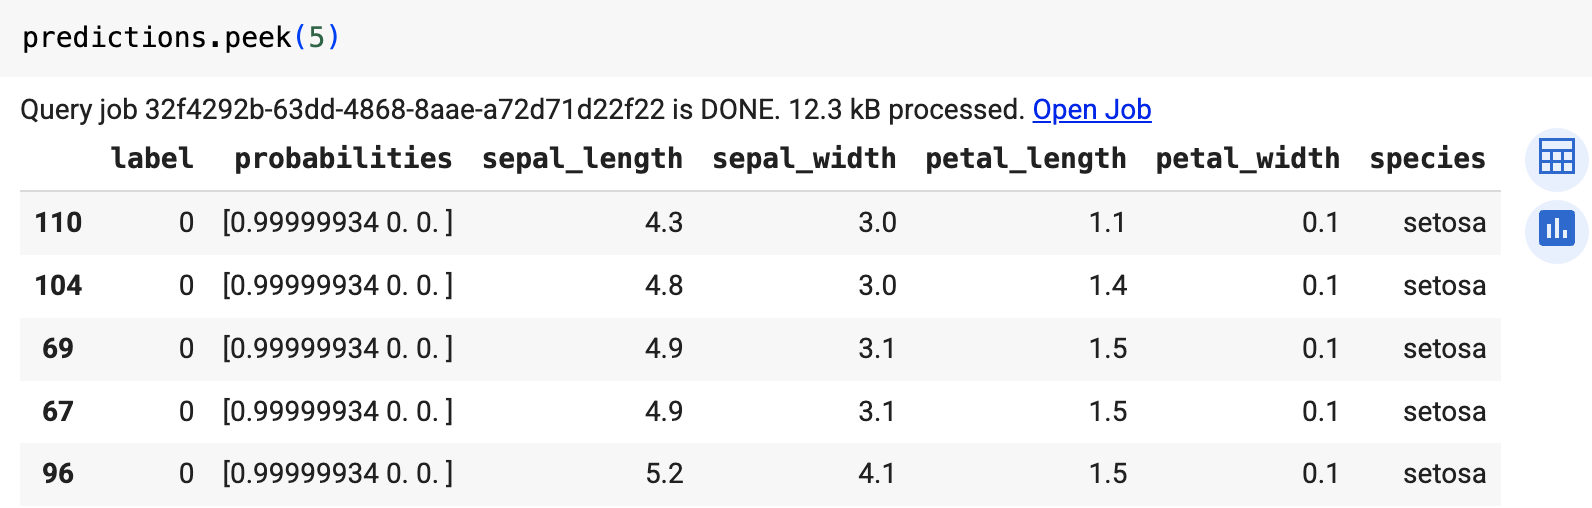
predict함수를 사용하여 원격 모델을 실행합니다.결과는 다음과 비슷합니다.
삭제
이 튜토리얼에서 사용된 리소스 비용이 Google Cloud 계정에 청구되지 않도록 하려면 리소스가 포함된 프로젝트를 삭제하거나 프로젝트를 유지하고 개별 리소스를 삭제하세요.
프로젝트 삭제
콘솔
gcloud
개별 리소스 삭제
또는 이 튜토리얼에서 사용된 개별 리소스를 삭제하려면 다음을 수행합니다.
다음 단계
- BigQuery Studio Admin (
필요한 역할
새 프로젝트를 만드는 경우 개발자가 프로젝트 소유자이고 이 튜토리얼을 완료하는 데 필요한 모든 Identity and Access Management(IAM) 권한이 개발자에게 부여됩니다.
기존 프로젝트를 사용하는 경우 다음을 수행합니다.