Este documento mostra como instalar e usar a API
O plug-in do JupyterLab faz o seguinte:
Explorar seus dados do BigQuery.
Usar a API DataFrames do BigQuery.
Implantar um notebook do DataFrames do BigQuery no Cloud Composer.
O plug-in do JupyterLab do BigQuery inclui todos os
da função
Plug-in Dataproc JupyterLab,
como criar um modelo de ambiente de execução sem servidor do Dataproc,
iniciar e gerenciar notebooks, desenvolver com o Apache Spark, implantar seu código,
e gerenciar seus recursos.
Instalar o plug-in do JupyterLab do BigQuery
Para instalar e usar o plug-in BigQuery JupyterLab, siga estas
etapas:
No seu terminal local, verifique se você tem o Python 3.8 ou mais recente.
instalados em seu sistema:
Por padrão, sua sessão é executada no projeto e na região que você definiu quando
executou gcloud init. Para mudar as configurações de projeto e região do
faça o seguinte:
No menu do JupyterLab, clique em
Configurações > Configurações do Google BigQuery.
É necessário reiniciar o plug-in para que as mudanças entrem em vigor.
Explorar dados
Para trabalhar com os dados do BigQuery no JupyterLab, faça o seguinte:
Na barra lateral do JupyterLab, abra o painel Explorador de conjunto de dados: clique no
ícone dos conjuntos de dados.
Para expandir um projeto, no painel Dataset Explorer, clique em
arrow_right seta de expansão ao lado do
nome do projeto.
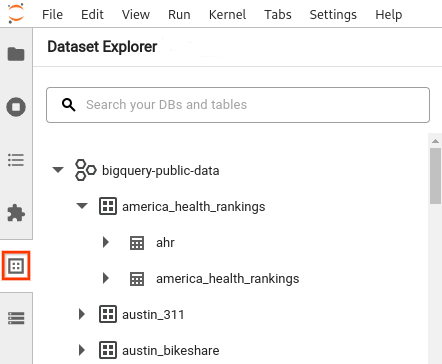
O painel Explorador de conjunto de dados mostra todos os conjuntos de dados em um projeto que
ficam na região do BigQuery que você configurou
a sessão. É possível interagir com um projeto e um conjunto de dados de várias maneiras:
Para exibir informações sobre um conjunto de dados, clique no nome dele.
Para exibir todas as tabelas em um conjunto de dados, clique no
arrow_right seta de expansão ao lado de
conjunto de dados.
Para visualizar informações sobre uma tabela, clique no nome dela.
Para consultar os dados do BigQuery no JupyterLab, faça o seguinte:
Para abrir a página de acesso rápido, clique em Arquivo > Nova tela de início.
Na seção Notebooks do BigQuery, clique em DataFrames do BigQuery
cartão de crédito. Um novo notebook é aberto, mostrando como começar a usar o
DataFrames do BigQuery.
Os notebooks do DataFrames do BigQuery oferecem suporte ao desenvolvimento em Python em um ambiente
kernel do Python. As operações do DataFrames do BigQuery são executadas remotamente
o BigQuery, mas o restante do código é executado localmente
máquina local. Quando uma operação é executada no BigQuery, um job de consulta
O ID e o link para o job aparecem abaixo da célula de código.
Para abrir o job no console do Google Cloud, clique em Abrir job.
[[["Fácil de entender","easyToUnderstand","thumb-up"],["Meu problema foi resolvido","solvedMyProblem","thumb-up"],["Outro","otherUp","thumb-up"]],[["Difícil de entender","hardToUnderstand","thumb-down"],["Informações incorretas ou exemplo de código","incorrectInformationOrSampleCode","thumb-down"],["Não contém as informações/amostras de que eu preciso","missingTheInformationSamplesINeed","thumb-down"],["Problema na tradução","translationIssue","thumb-down"],["Outro","otherDown","thumb-down"]],["Última atualização 2025-09-04 UTC."],[[["\u003cp\u003eThe BigQuery JupyterLab plugin allows users to explore BigQuery data, utilize the BigQuery DataFrames API, and deploy notebooks to Cloud Composer.\u003c/p\u003e\n"],["\u003cp\u003eInstallation of the plugin requires Python 3.8 or later, the gcloud CLI, Pipenv, and JupyterLab, with specific commands provided for each step.\u003c/p\u003e\n"],["\u003cp\u003eThe plugin's Dataset Explorer pane enables browsing project datasets, tables, and allows modification of project and region settings within JupyterLab.\u003c/p\u003e\n"],["\u003cp\u003eBigQuery DataFrames notebooks support local Python development with remote execution of operations on BigQuery, and provide job details and links within the notebook interface.\u003c/p\u003e\n"],["\u003cp\u003eUsers can deploy BigQuery DataFrames notebooks to Cloud Composer by creating scheduled jobs, specifying the Cloud Composer environment, setting job parameters, and configuring notifications.\u003c/p\u003e\n"]]],[],null,["# Use the BigQuery JupyterLab plugin\n==================================\n\n|\n| **Preview**\n|\n|\n| This product or feature is subject to the \"Pre-GA Offerings Terms\" in the General Service Terms section\n| of the [Service Specific Terms](/terms/service-terms#1).\n|\n| Pre-GA products and features are available \"as is\" and might have limited support.\n|\n| For more information, see the\n| [launch stage descriptions](/products#product-launch-stages).\n\nTo request feedback or support for this feature, send an email to\n[bigquery-ide-plugin@google.com](mailto:bigquery-ide-plugin@google.com).\n\nThis document shows you how to install and use the BigQuery\nJupyterLab plugin to do the following:\n\n- Explore your BigQuery data.\n- Use the BigQuery DataFrames API.\n- Deploy a BigQuery DataFrames notebook to [Cloud Composer](/composer/docs/concepts/overview).\n\nThe BigQuery JupyterLab plugin includes all the\nfunctionality of the\n[Dataproc JupyterLab plugin](/dataproc-serverless/docs/quickstarts/jupyterlab-sessions),\nsuch as creating a Dataproc Serverless runtime template,\nlaunching and managing notebooks, developing with Apache Spark, deploying your code,\nand managing your resources.\n\nInstall the BigQuery JupyterLab plugin\n--------------------------------------\n\nTo install and use the BigQuery JupyterLab plugin, follow these\nsteps:\n\n1. In your local terminal, check to make sure you have Python 3.8 or later\n installed on your system:\n\n python3 --version\n\n2. [Install the gcloud CLI.](/sdk/docs/install)\n\n3. In your local terminal,\n [initialize the gcloud CLI](/sdk/docs/initializing):\n\n gcloud init\n\n4. Install Pipenv, a Python virtual environment tool:\n\n pip3 install pipenv\n\n5. Create a new virtual environment:\n\n pipenv shell\n\n6. Install JupyterLab in the new virtual environment:\n\n pipenv install jupyterlab\n\n7. Install the BigQuery JupyterLab plugin:\n\n pipenv install bigquery-jupyter-plugin\n\n8. If your installed version of JupyterLab is earlier\n than 4.0.0, then enable the plugin extension:\n\n jupyter server extension enable bigquery_jupyter_plugin\n\n9. Launch JupyterLab:\n\n jupyter lab\n\n JupyterLab opens in your browser.\n\n| **Note:** On macOS, if you receive an `SSL: CERTIFICATE_VERIFY_FAILED` error in your terminal when you launch JupyterLab, update your Python SSL certificate by executing `/Applications/Python 3.11/Install Certificates.command`. This file is located in the Python home directory.\n\nUpdate your project and region settings\n---------------------------------------\n\nBy default, your session runs in the project and region that you set when you\nran `gcloud init`. To change the project and region settings for your\nsession, do the following:\n\n- In the JupyterLab menu, click **Settings \\\u003e Google BigQuery Settings**.\n\nYou must restart the plugin for the changes to take effect.\n\nExplore data\n------------\n\nTo work with your BigQuery data in JupyterLab, do the following:\n\n1. In the JupyterLab sidebar, open the **Dataset Explorer** pane: click the datasets icon.\n2. To expand a project, in the **Dataset Explorer** pane, click the\n arrow_right expander arrow next to the\n project name.\n\n The **Dataset Explorer** pane shows all of the datasets in a project that\n are located in the BigQuery region that you configured for\n the session. You can interact with a project and dataset in various ways:\n - To view information about a dataset, click the name of the dataset.\n - To display all of the tables in a dataset, click the arrow_right expander arrow next to the dataset.\n - To view information about a table, click the name of the table.\n - To change the project or BigQuery region, [update your settings](#configure).\n\nExecute notebooks\n-----------------\n\nTo query your BigQuery data from JupyterLab, do the following:\n\n1. To open the launcher page, click **File \\\u003e New Launcher**.\n2. In the **BigQuery Notebooks** section, click the **BigQuery DataFrames** card. A new notebook opens that shows you how to get started with BigQuery DataFrames.\n\nBigQuery DataFrames notebooks support Python development in a local\nPython kernel. BigQuery DataFrames operations are executed remotely on\nBigQuery, but the rest of code is executed locally on your\nmachine. When an operation is executed in BigQuery, a query job\nID and link to the job appear below the code cell.\n\n- To view the job in the Google Cloud console, click **Open Job**.\n\nDeploy a BigQuery DataFrames notebook\n-------------------------------------\n\nYou can deploy a BigQuery DataFrames notebook to Cloud Composer\nby using a [Dataproc Serverless runtime template](/dataproc-serverless/docs/quickstarts/jupyterlab-sessions#create_a_serverless_runtime_template). You must use\nruntime version 2.1 or later.\n\n1. In your JupyterLab notebook, click calendar_month**Job Scheduler**.\n2. For **Job name**, enter a unique name for your job.\n3. For **Environment**, enter the name of the Cloud Composer environment to which you want to deploy the job.\n4. If your notebook is parameterized, add parameters.\n5. Enter the name of the [Serverless runtime template](/dataproc-serverless/docs/quickstarts/jupyterlab-sessions#create_a_serverless_runtime_template).\n6. To handle notebook execution failures, enter an integer for **Retry count** and a value (in minutes) for **Retry delay**.\n7. Select which execution notifications to send, and then enter the recipients.\n\n Notifications are sent using the Airflow SMTP configuration.\n8. Select a schedule for the notebook.\n\n9. Click **Create**.\n\nWhen you successfully schedule your notebook, it appears on the list of\nscheduled jobs in your selected Cloud Composer environment.\n\nWhat's next\n-----------\n\n- Try the [BigQuery DataFrames quickstart](/bigquery/docs/dataframes-quickstart).\n- Learn more about the [BigQuery DataFrames Python API](/bigquery/docs/reference/bigquery-dataframes).\n- Use the JupyterLab for [serverless batch and notebook sessions](/dataproc-serverless/docs/quickstarts/jupyterlab-sessions) with Dataproc."]]