從 Snowflake 遷移至 BigQuery:總覽
本文說明如何將資料從 Snowflake 遷移至 BigQuery。
如需從其他資料倉儲遷移至 BigQuery 的一般架構,請參閱「總覽:將資料倉儲遷移至 BigQuery」。
從 Snowflake 遷移至 BigQuery 的簡介
如果是 Snowflake 遷移作業,建議您設定對現有作業影響最小的遷移架構。以下範例顯示的架構可讓您重複使用現有工具和程序,同時將其他工作負載卸載至 BigQuery。
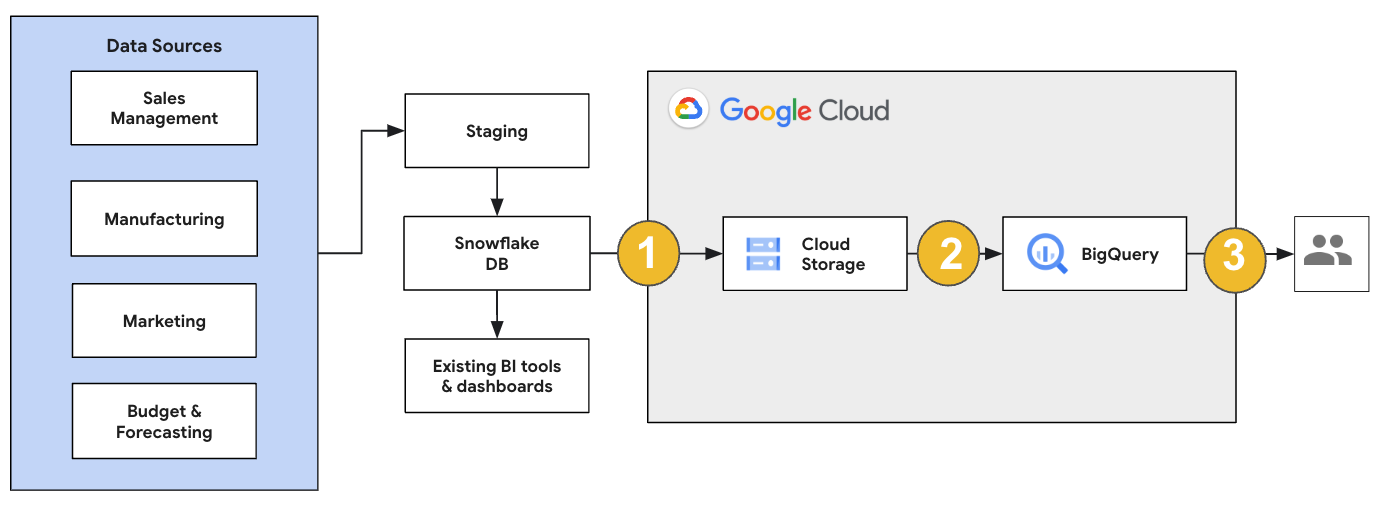
您也可以根據舊版驗證報表和資訊主頁。詳情請參閱「將資料倉儲遷移至 BigQuery:驗證」。
遷移個別工作負載
規劃 Snowflake 遷移作業時,建議您依序個別遷移下列工作負載:
遷移結構定義
首先,請將 Snowflake 環境中的必要結構定義複製到 BigQuery。建議使用 BigQuery 遷移服務遷移結構定義。BigQuery 遷移服務支援各種資料模型設計模式,例如星狀結構定義或雪花狀結構定義,因此您不必為新的結構定義更新上游資料管道。BigQuery 遷移服務也提供自動結構定義遷移功能,包括結構定義擷取和翻譯功能,可簡化遷移程序。
遷移 SQL 查詢
如要遷移 SQL 查詢,BigQuery 遷移服務提供各種 SQL 翻譯功能,可自動將 Snowflake SQL 查詢轉換為 GoogleSQL SQL,例如批次 SQL 翻譯器 (可大量翻譯查詢)、互動式 SQL 翻譯器 (可翻譯個別查詢) 和 SQL 翻譯 API。這些翻譯服務也包含 Gemini 強化功能,可進一步簡化 SQL 查詢遷移程序。
翻譯 SQL 查詢時,請仔細檢查翻譯後的查詢,確認資料型別和表格結構處理正確。為此,我們建議建立各種情境和資料的測試案例。接著在 BigQuery 中執行這些測試案例,比較結果與原始 Snowflake 結果。如有任何差異,請分析並修正轉換後的查詢。
遷移資料
您可以透過多種方式設定資料遷移管道,將資料轉移至 BigQuery。一般來說,這些管道遵循的模式相同:
從來源擷取資料:將擷取的檔案從來源複製到內部部署環境的暫存儲存空間。詳情請參閱將資料倉儲遷移至 BigQuery:擷取來源資料。
將資料轉移到暫存 Cloud Storage 值區:從來源擷取資料後,請將資料轉移到 Cloud Storage 中的臨時值區。根據轉移的資料量和可用的網路頻寬,您有幾種選項。
請務必確認 BigQuery 資料集、外部資料來源或 Cloud Storage 值區位於相同區域。
將資料從 Cloud Storage 值區載入 BigQuery:資料現在位於 Cloud Storage 值區中。將資料上傳至 BigQuery 的方式有幾種。這些選項取決於資料的轉換量。或者,您也可以按照 ELT 方法,在 BigQuery 中轉換資料。
從 JSON、Avro 或 CSV 檔案大量匯入資料時,BigQuery 會自動偵測結構定義,因此您不需要預先定義。如要詳細瞭解 EDW 工作負載的結構定義遷移程序,請參閱「結構定義和資料遷移程序」。
如需支援 Snowflake 資料遷移的工具清單,請參閱「遷移工具」。
如需設定 Snowflake 資料遷移管道的端對端範例,請參閱「Snowflake 遷移管道範例」。
最佳化結構定義和查詢
結構定義遷移完成後,您可以測試成效,並根據結果進行最佳化。舉例來說,您可以導入分區功能,提高資料的管理和查詢效率。您可以依擷取時間、時間戳記或整數範圍將資料表分區,藉此提高查詢效能並控管費用。詳情請參閱分區資料表簡介一文。
叢集資料表是另一種結構定義最佳化方式。您可以建立資料表叢集,根據資料表結構定義中的內容整理資料表資料,進而提升使用篩選子句的查詢或匯總資料的查詢效能。詳情請參閱叢集資料表簡介。
支援的資料類型、屬性和檔案格式
Snowflake 和 BigQuery 支援大部分相同的資料類型,但有時會使用不同的名稱。如需 Snowflake 和 BigQuery 支援的完整資料類型清單,請參閱「資料類型」。您也可以使用 SQL 翻譯工具 (例如互動式 SQL 翻譯器、SQL 翻譯 API 或批次 SQL 翻譯器),將不同的 SQL 方言翻譯成 GoogleSQL。
如要進一步瞭解 BigQuery 支援的資料類型,請參閱「GoogleSQL 資料類型」。
Snowflake 可以匯出下列檔案格式的資料。您可以將下列格式的資料直接載入 BigQuery:
- 從 Cloud Storage 載入 CSV 資料。
- 從 Cloud Storage 載入 Parquet 資料。
- 從 Cloud Storage 載入 JSON 資料。
- 查詢 Apache Iceberg 中的資料。
遷移工具
下表列出可將資料從 Snowflake 遷移至 BigQuery 的工具。如需瞭解如何在 Snowflake 遷移管道中一併使用這些工具,請參閱 Snowflake 遷移管道範例。
COPY INTO <location>指令: 在 Snowflake 中使用這項指令,將資料從 Snowflake 資料表直接擷取至指定的 Cloud Storage bucket。如需端對端範例,請參閱 GitHub 上的「Snowflake to BigQuery (snowflake2bq)」。- Apache Sqoop: 如要將資料從 Snowflake 擷取至 HDFS 或 Cloud Storage,請使用 Sqoop 和 Snowflake 的 JDBC 驅動程式提交 Hadoop 工作。Sqoop 會在 Dataproc 環境中執行。
- Snowflake JDBC: 搭配支援 JDBC 的大多數用戶端工具或應用程式使用這個驅動程式。
您可以使用下列一般工具,將資料從 Snowflake 遷移至 BigQuery:
- Snowflake 連接器的 BigQuery 資料移轉服務 搶先版: 自動將 Cloud Storage 資料批次移轉至 BigQuery。
- Google Cloud CLI: 使用這個指令列工具,將下載的 Snowflake 檔案複製到 Cloud Storage。
- bq 指令列工具:使用這個指令列工具與 BigQuery 互動。 常見用途包括建立 BigQuery 資料表結構定義、將 Cloud Storage 資料載入資料表,以及執行查詢。
- Cloud Storage 用戶端程式庫: 使用自訂工具 (採用 Cloud Storage 用戶端程式庫),將下載的 Snowflake 檔案複製到 Cloud Storage。
- BigQuery 用戶端程式庫: 使用以 BigQuery 用戶端程式庫為基礎建構的自訂工具,與 BigQuery 互動。
- BigQuery 查詢排程器: 使用這項內建的 BigQuery 功能,排定週期性 SQL 查詢。
- Cloud Composer: 使用這個全代管的 Apache Airflow 環境,自動化調度管理 BigQuery 載入作業和轉換。
如要進一步瞭解如何將資料載入 BigQuery,請參閱將資料載入 BigQuery。
Snowflake 遷移管道範例
以下各節提供範例,說明如何使用三種不同的程序 (ELT、ETL 和合作夥伴工具),將資料從 Snowflake 遷移至 BigQuery。
擷取、載入及轉換
您可以透過下列兩種方式設定擷取、載入及轉換 (ELT) 程序:
- 使用管道從 Snowflake 擷取資料,並將資料載入至 BigQuery
- 使用其他 Google Cloud 產品從 Snowflake 擷取資料。
使用管道從 Snowflake 擷取資料
如要從 Snowflake 擷取資料並直接載入 Cloud Storage,請使用 snowflake2bq 工具。
然後,您可以使用下列其中一種工具,將資料從 Cloud Storage 載入至 BigQuery:
- Cloud Storage 連接器的 BigQuery 資料移轉服務
- 使用 bq 指令列工具的
LOAD指令 - BigQuery API 用戶端程式庫
從 Snowflake 擷取資料的其他工具
您也可以使用下列工具從 Snowflake 擷取資料:
- Dataflow
- Cloud Data Fusion
- Dataproc
- Apache Spark BigQuery 連接器
- Apache Spark 的 Snowflake 連接器
- Hadoop BigQuery 連接器
- 使用 Snowflake 和 Sqoop 的 JDBC 驅動程式,將資料從 Snowflake 擷取至 Cloud Storage:
其他將資料載入 BigQuery 的工具
您也可以使用下列工具將資料載入 BigQuery:
- Dataflow
- Cloud Data Fusion
- Dataproc
- Dataprep by Trifacta
擷取、轉換及載入
如要在將資料載入 BigQuery 前轉換資料,請考慮使用下列工具:
- Dataflow
- 複製 JDBC 到 BigQuery 範本程式碼,並修改範本以新增 Apache Beam 轉換。
- Cloud Data Fusion
- 建立可重複使用的管道,並使用 CDAP 外掛程式轉換資料。
- Dataproc
- 使用 Spark SQL 或任何支援的 Spark 語言 (例如 Scala、Java、Python 或 R) 中的自訂程式碼轉換資料。
合作夥伴適用的遷移工具
有多家供應商專門提供企業資料倉儲遷移服務。如需主要合作夥伴及其提供的解決方案清單,請參閱 BigQuery 合作夥伴。
Snowflake 匯出教學課程
下列教學課程說明如何使用 COPY INTO <location> Snowflake 指令,將範例資料從 Snowflake 匯出至 BigQuery。如需詳細的逐步程序 (包括程式碼範例),請參閱Google Cloud 專業服務的 Snowflake 至 BigQuery 工具
準備匯出
如要準備匯出 Snowflake 資料,請按照下列步驟將 Snowflake 資料擷取至 Cloud Storage 或 Amazon Simple Storage Service (Amazon S3) 值區:
Cloud Storage
本教學課程會準備 PARQUET 格式的檔案。
使用 Snowflake SQL 陳述式建立具名檔案格式規格。
create or replace file format NAMED_FILE_FORMAT
    type = 'PARQUET'
將
NAMED_FILE_FORMAT替換為檔案格式的名稱。例如:my_parquet_unload_format。使用
CREATE STORAGE INTEGRATION指令建立整合項目。create storage integration INTEGRATION_NAME type = external_stage storage_provider = gcs enabled = true storage_allowed_locations = ('BUCKET_NAME')
更改下列內容:
INTEGRATION_NAME:儲存空間整合的名稱。例如:gcs_intBUCKET_NAME:Cloud Storage bucket 的路徑。例如:gcs://mybucket/extract/
使用
DESCRIBE INTEGRATION指令擷取 Snowflake 的 Cloud Storage 服務帳戶。desc storage integration INTEGRATION_NAME;
輸出結果會與下列內容相似:
+-----------------------------+---------------+-----------------------------------------------------------------------------+------------------+
| property                    | property_type | property_value                                                              | property_default |
+-----------------------------+---------------+-----------------------------------------------------------------------------+------------------|
| ENABLED                     | Boolean       | true                                                                        | false            |
| STORAGE_ALLOWED_LOCATIONS   | List          | gcs://mybucket1/path1/,gcs://mybucket2/path2/                               | []               |
| STORAGE_BLOCKED_LOCATIONS   | List          | gcs://mybucket1/path1/sensitivedata/,gcs://mybucket2/path2/sensitivedata/   | []               |
| STORAGE_GCP_SERVICE_ACCOUNT | String        | service-account-id@iam.gserviceaccount.com                 |                  |
+-----------------------------+---------------+-----------------------------------------------------------------------------+------------------+
授予列為
STORAGE_GCP_SERVICE_ACCOUNT的服務帳戶讀取和寫入權限,存取儲存空間整合指令中指定的值區。在本範例中,請授予service-account-id@服務帳戶<var>UNLOAD_BUCKET</var>bucket 的讀取和寫入權限。建立外部 Cloud Storage 階段,參照先前建立的整合。
create or replace stage STAGE_NAME
    url='UNLOAD_BUCKET'
    storage_integration = INTEGRATION_NAME
    file_format = NAMED_FILE_FORMAT;
更改下列內容:
STAGE_NAME:Cloud Storage 階段物件的名稱。 例如:my_ext_unload_stage
Amazon S3
下列範例說明如何將資料從 Snowflake 資料表移至 Amazon S3 值區:
在 Snowflake 中,設定儲存空間整合物件,允許 Snowflake 寫入外部 Cloud Storage 階段中參照的 Amazon S3 值區。
這個步驟包括設定 Amazon S3 值區的存取權限、建立 Amazon Web Services (AWS) IAM 角色,以及使用
CREATE STORAGE INTEGRATION指令在 Snowflake 中建立儲存空間整合:create storage integration INTEGRATION_NAME type = external_stage storage_provider = s3 enabled = true storage_aws_role_arn = 'arn:aws:iam::001234567890:role/myrole' storage_allowed_locations = ('BUCKET_NAME')
更改下列內容:
INTEGRATION_NAME:儲存空間整合的名稱。例如:s3_intBUCKET_NAME:要載入檔案的 Amazon S3 儲存空間路徑。例如:s3://unload/files/
使用
DESCRIBE INTEGRATION指令擷取 AWS IAM 使用者。desc integration INTEGRATION_NAME;
輸出結果會與下列內容相似:
+---------------------------+---------------+================================================================================+------------------+
| property                  | property_type | property_value                                                                 | property_default |
+---------------------------+---------------+================================================================================+------------------|
| ENABLED                   | Boolean       | true                                                                           | false            |
| STORAGE_ALLOWED_LOCATIONS | List          | s3://mybucket1/mypath1/,s3://mybucket2/mypath2/                                | []               |
| STORAGE_BLOCKED_LOCATIONS | List          | s3://mybucket1/mypath1/sensitivedata/,s3://mybucket2/mypath2/sensitivedata/    | []               |
| STORAGE_AWS_IAM_USER_ARN  | String        | arn:aws:iam::123456789001:user/abc1-b-self1234                                 |                  |
| STORAGE_AWS_ROLE_ARN      | String        | arn:aws:iam::001234567890:role/myrole                                          |                  |
| STORAGE_AWS_EXTERNAL_ID   | String        | MYACCOUNT_SFCRole=                                                   |                  |
+---------------------------+---------------+================================================================================+------------------+
建立具備結構定義
CREATE STAGE權限和儲存空間整合USAGE權限的角色:CREATE role ROLE_NAME; GRANT CREATE STAGE ON SCHEMA public TO ROLE ROLE_NAME; GRANT USAGE ON INTEGRATION s3_int TO ROLE ROLE_NAME;
將
ROLE_NAME替換為角色的名稱。例如:myrole。授予 AWS IAM 使用者存取 Amazon S3 值區的權限,並使用
CREATE STAGE指令建立外部階段:USE SCHEMA mydb.public; create or replace stage STAGE_NAME url='BUCKET_NAME' storage_integration = INTEGRATION_NAMEt file_format = NAMED_FILE_FORMAT;
更改下列內容:
STAGE_NAME:Cloud Storage 階段物件的名稱。 例如:my_ext_unload_stage
匯出 Snowflake 資料
準備好資料後,即可將資料移至 Google Cloud。
使用 COPY INTO 指令,指定外部階段物件 STAGE_NAME,將資料從 Snowflake 資料庫資料表複製到 Cloud Storage 或 Amazon S3 值區。
    copy into @STAGE_NAME/d1
    from TABLE_NAME;
將 TABLE_NAME 替換為 Snowflake 資料庫資料表的名稱。
執行這項指令後,資料表資料會複製到與 Cloud Storage 或 Amazon S3 值區連結的暫存物件。檔案包含 d1 前置字串。
其他匯出方法
如要使用 Azure Blob 儲存體匯出資料,請按照「卸載至 Microsoft Azure」一文中的詳細步驟操作。然後使用 Storage 移轉服務,將匯出的檔案移轉至 Cloud Storage。
定價
規劃 Snowflake 遷移作業時,請考量在 BigQuery 中轉移資料、儲存資料及使用服務的成本。詳情請參閱「定價」。
將資料移出 Snowflake 或 AWS 時,可能會產生輸出費用。跨區域移轉資料或跨不同雲端供應商移轉資料時,也可能產生額外費用。
後續步驟
- 遷移後成效和最佳化 。