はじめに
この初心者向けガイドでは、AutoML について紹介します。AutoML とカスタム トレーニングの主な違いについては、トレーニング方法の選択をご覧ください。
以下を想像してみてください。
- デジタル小売業者のマーケティング部門に所属している。
- 建築様式を調べる建築プロジェクトに携わっている。
- 自社のウェブサイトに問い合わせフォームがある。
画像や表を手動でキュレートする作業は面倒で、時間もかかります。コンテンツを自動的に識別してフラグを立てるよう、コンピュータに学習させます。
画像
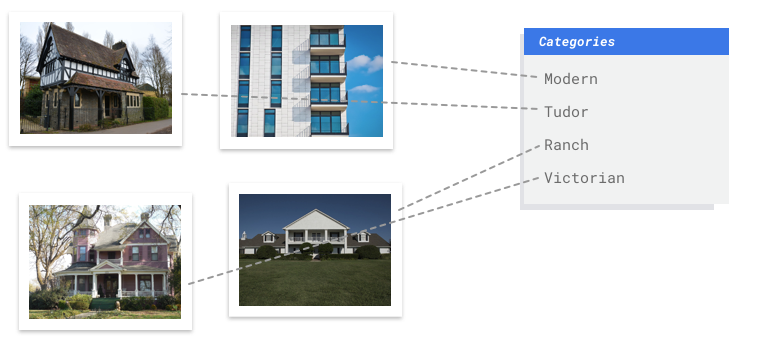
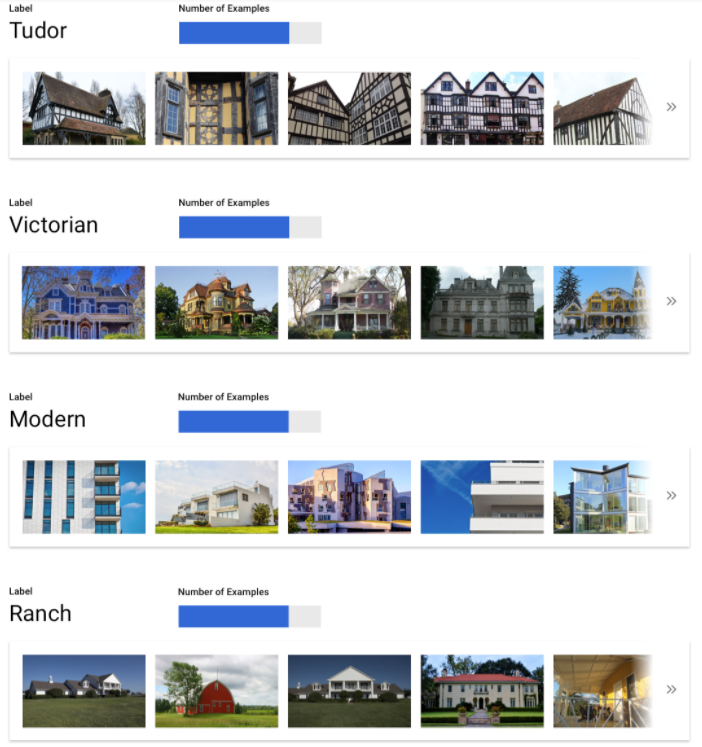
あなたは建築管理協会に所属し、一貫した建築様式が維持されている地域を特定しようとしています。何十万件もの住宅のスナップショットをふるいにかける必要があります。それらすべての画像を手作業で分類しようとすると、手間がかかりミスも起こりやすくなります。数か月前にインターンが数百枚の画像にラベルを付けましたが、それ以降は誰もデータを確認していません。この作業を代行する方法をコンピュータに教えられるとしたら、とても便利でしょう。
表形式
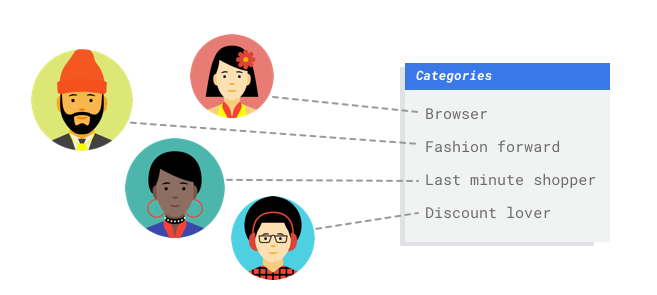
デジタル小売店のマーケティング部門で働いているとします。あなたとチームメンバーは、顧客のペルソナに基づいてカスタマイズされたメール プログラムを作成しています。ペルソナとマーケティング関連メールの作成が終わり、送信できるようになりました。次は、顧客を小売の好みや消費行動に基づいて各ペルソナに振り分けるシステムを作成する必要があります。このシステムは新しい顧客も対象にします。また、顧客エンゲージメントを最大化するには、メールの送信タイミングを最適化できるように、顧客の消費習慣を予測することも必要になります。
デジタル小売店であれば、顧客とその購入情報に関するデータを持っています。しかし、新しい顧客についてはどうでしょうか。従来の方法では、購入履歴が長い既存顧客であればこうした値を計算できますが、履歴データが少ない顧客の場合はうまくいきません。これらの値を予測するシステムを作ることができ、個人の好みに合ったマーケティング プログラムをすべての顧客に迅速に提供できるとしたらどうでしょうか。
こうした問題の解決にうってつけなのが ML と Vertex AI です。
このガイドでは、AutoML のデータセットとモデルに対して Vertex AI がどのように機能するかと、Vertex AI でどのような問題を解決できるかについて説明します。
公平性に関する注記
Google は、責任ある AI への取り組みの進歩に取り組んでいます。そのため、AutoML を含む ML プロダクトは、公平性や人間中心の ML などの主要な原則を中心に設計されています。独自の ML システムを構築する際のバイアスを軽減するためのベスト プラクティスについては、インクルーシブ ML ガイド - AutoML をご覧ください。
Vertex AI がこの問題に適したツールである理由
従来型のプログラミングでは、コンピュータで扱う手順をプログラマが 1 つずつ指示する必要があります。色、視点、解像度、照明など、考慮すべき要素は多岐にわたるため、コーディングによってマシンに正しい判断を指示するには、ルールの数が多すぎます。どこから手を付ければよいか想像もつかないほどです。また、お客様のコメントは語彙や構造が幅広く多様で、簡単なルールセットではとても対応しきれません。手動でフィルタを作成しようとしても、お客様のコメントの大部分を分類できないことがすぐにわかります。ここで必要になるのが、多様なコメントに対して汎用化できるシステムです。一連の特定のルールが指数関数的に拡大することが想定される状況では、サンプルから学習できるシステムも必要です。
幸いなことに、機械学習はこうした問題を解決します。
Vertex AI の仕組み
Vertex AI では、目的の結果を得るために教師あり学習タスクが利用されます。使うアルゴリズムやトレーニング方法の詳細は、データの種類やユースケースによって変わります。機械学習にはさまざまなサブカテゴリがあり、それぞれが異なる課題を解決し、異なる問題を解決し、異なる制約条件のもとで動作します。
画像
分類のためにラベルでアノテーションされたサンプル画像や、オブジェクト検出のためにラベルと境界ボックスの両方でアノテーションされたサンプル画像を使用して、ML モデルのトレーニング、テスト、検証を行います。教師あり学習を使用することで、関心のあるパターンやコンテンツを画像で認識するようモデルをトレーニングできます。
表形式
サンプルデータを使用して機械学習モデルをトレーニングします。Vertex AI は表形式の(構造化された)データを使用して ML モデルをトレーニングし、新しいデータに対する推論を行います。データセット内の列の 1 つはターゲットと呼ばれ、モデルはそれを学習して予測します。他のデータ列の一部は入力(特徴と呼ばれる)であり、モデルはそこからパターンを学習します。同じ入力特徴量を使用しても、ターゲット列やトレーニング オプションを変更するだけで、複数の種類のモデルを作成できます。メール マーケティングの例でいえば、同じ入力特徴量を使っても、予測するターゲットを変えることで別のモデルを構築できます。あるモデルではお客様のペルソナ(カテゴリ型のターゲット)を予測し、別のモデルでは毎月の支出(数値型のターゲット)を予測します。さらに別のモデルでは、今後 3 か月間の商品の日々の需要(一連の数値型ターゲット)を予測します。
Vertex AI ワークフロー
Vertex AI は、次の標準的な ML ワークフローに従います。
- データの収集: 達成したい結果に向けて、モデルのトレーニング用データとテスト用データを選定します。
- データの準備: データを適切にフォーマットし、ラベルを付けます。
- トレーニング: パラメータを設定してモデルを構築します。
- 評価: モデルの指標を確認します。
- デプロイと予測: モデルを利用できるようにします。
データ準備
データを集め始める前に、まず自分が解決しようとしている問題について考えましょう。そうすることで、どのようなデータが必要かが見えてきます。
ユースケースを検討する
まずは自分の課題について考えます。どのような成果を達成したいのですか?
画像
データセットを用意するときは、常にユースケースの検討から始めます。まずは以下の点を考慮します。
- どのような結果を得ようとしているか。
- その結果を得るために、どのようなカテゴリまたはオブジェクトを認識する必要があるか。
- 人間がそれらのカテゴリを認識することは可能か。Vertex AI は人間が一度に覚えて割り当てるよりも多くのカテゴリを処理できますが、人間が認識できないカテゴリについては、Vertex AI にとっても認識するのが困難です。
- システムに分類させようとしているデータの種類と範囲を最もよく反映するサンプルはどのようなものか。
表形式
ターゲット列はどのような種類のデータですか。アクセスできるデータはどのくらいありますか。ユーザーが目的とする結果に基づいて、Vertex AI はユースケースを解決するために必要なモデルを作成します。
- バイナリ分類モデルは、2 択の結果(2 つのクラスのうちのいずれか)を予測します。これは、お客様がサブスクリプションを購入するかしないかの予測など、「はい」または「いいえ」の質問に使用します。他の条件がすべて同じ場合、バイナリ分類の問題は他のモデルタイプより必要とするデータが少なくなります。
- 多クラス分類モデルは、1 つのクラスを 3 つ以上の別個のクラスから予測します。これは、ものごとを分類するために使用します。前述の小売店の例では、顧客をさまざまなペルソナに分割するための多クラス分類モデルを構築できます。
- 予測モデルでは、一連の値が予測されます。たとえば、小売店では、商品の在庫を前もって適切に確保できるように、今後 3 か月にわたる商品の日々の需要を予測することが考えられます。
- 回帰モデルは連続値を予測します。小売店の例では、お客様が来月支払う金額を予測する回帰モデルを構築する必要があるでしょう。
データの収集
ユースケースを決めたら、目的のモデルを作成するために必要なデータを集めます。
画像
 必要なデータが決まったら、次にデータの調達方法を見つける必要があります。まずは、組織で現在収集しているあらゆるデータを考慮に入れるところから始めます。モデルのトレーニングに必要なデータがすでに収集されている場合もあります。そのようなデータがない場合、自力で収集することも、サードパーティ プロバイダにデータの収集を委託することもできます。
十分な数のラベル付きサンプルを各カテゴリに含める
 Vertex AI Training では、分類のために、カテゴリまたはラベルごとに最低でも 100 個の画像サンプルが必要になります。各ラベルに対応する高品質なサンプルを数多く用意すれば、ラベルがうまく認識される可能性もそれだけ高まります。一般的には、トレーニング プロセスに取り込むラベル付きデータが多いほど、モデル品質は向上します。1 ラベルあたり 1,000 件以上のサンプルを目標にしてください。
カテゴリごとに均等にサンプルを分布させる
カテゴリごとにほぼ同じ数量のトレーニング サンプルを取り込むことが重要です。1 つのラベルに対して豊富なデータがある場合でも、各ラベルの分布を均等にするのがベストです。たとえば、モデルの構築に使用する画像の 80% がモダン様式の一戸建て住宅の写真だとします。このようにラベルの分布が不均等な場合、モデルはあえて危険を冒して一般的でないラベルを予測するよりも、常にモダン様式の一戸建て住宅の写真だと報告する方が安全だと学習する可能性がかなり高くなります。これは、多肢選択式テストを作るときにほとんどすべての正解を「C」にするようなものです。抜け目のない受験生なら、質問を見なくても毎回「C」と答えればよいことにすぐに気付くでしょう。
もちろん各ラベルにほぼ同数のサンプルを調達することは、常に可能であるとは限りません。カテゴリによっては、高品質でバイアスのないサンプルを調達することが困難な場合もあります。そのような状況では、だいたいの目安として、最もサンプル数の少ないラベルが、最もサンプル数の多いラベルの 10% 以上になるようにします。したがって、最もサンプル数の多いラベルに 10,000 個のサンプルがある場合、最もサンプル数の少ないラベルには少なくとも 1,000 個のサンプルが必要になります。
問題空間内のバリエーションを収集する
同様の理由で、問題空間内の多種多様なデータを集めるようにしてください。モデルのトレーニング プロセスで体験する種類が多ければ多いほど、新しいサンプルを一般化しやすくなります。たとえば、家電製品の写真をカテゴリに分類しようとしている場合、トレーニングでモデルに使用する家電製品の種類が多ければ多いほど、見たことのない新機種のタブレット、スマートフォン、ノートパソコンなどを区別できる可能性が高まります。

モデルの意図する出力にデータを合わせる

予測の対象になるものと視覚的に似ている画像を探します。たとえば、冬の雪の日に撮影されたさまざまな家の画像を分類する場合、晴れた日に撮影された家の画像だけでトレーニングされたモデルを使うと、明暗と風景があまりに違いすぎるため、関心のある分類であらかじめタグ付けしたとしても、おそらく良いパフォーマンスは得られないでしょう。トレーニングのサンプルは、そのモデルを使用して分類する予定のものと同じデータセットから作成された実世界のデータにするのが理想的です。
表形式
ユースケースを確立したら、モデルをトレーニングするためのデータを収集する必要があります。データの調達と準備は、ML モデルを構築するうえで重要なステップです。利用できるデータによって、解決できる問題の種類が定まります。使用可能なデータ量はどれくらいですか。それらのデータは、答えを得ようとしている質問の内容と関連があるものですか。データを収集する際には、次の点に注意してください。
関連する特徴を選択する
特徴量とは、モデルのトレーニングに使用される入力属性です。モデルはこれらの特徴量からパターンを見つけて推論を行うので、特徴量は解決したい問題に関連している必要があります。たとえば、クレジット カード取引が不正であるかどうかを予測するモデルを構築するには、購入者、販売者、金額、日時、購入した商品などの取引詳細を含むデータセットを構築する必要があります。その他に役立つ特徴として、購入者と販売者に関する過去の情報、購入された商品がどのくらいの頻度で不正行為に関係していたかなどが挙げられます。他にはどのような特徴が関連している可能性があるでしょうか。
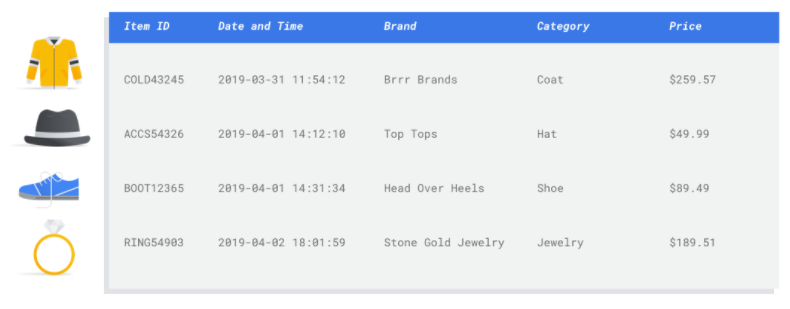
冒頭の小売店のメール マーケティングのユースケースを考えてみます。必要となる特徴の列の例を以下に示します。
- 購入された商品のリスト(ブランド、カテゴリ、価格、割引など)
- 購入された商品の数(最終日、週、月、年)
- 消費された金額(最終日、週、月、年)
- 商品ごとに、毎日の合計販売数
- 商品ごとに、毎日の合計在庫数
- 特定の日に販促を実施するかどうか
- 既知の買い物客層
十分なデータを含める
一般的に、トレーニング サンプルが多ければ多いほど、成果は上がります。必要なサンプルデータの量は、解決しようとしている問題の複雑さにも比例します。バイナリ分類モデルの場合、正確なモデルを取得するために必要なデータは、マルチクラス モデルと比較するとそれほど多くはありません。なぜなら、1 つのクラスを 2 つのクラスから予測するのは、多数から予測するほど複雑でないからです。
完璧な数式はありませんが、推奨されるサンプルデータの最低数量は次のとおりです。
- 分類問題: 50 行 × 特徴数
- 予測問題:
- 5,000 行 × 特徴数
- 時系列 ID 列に一意の値 10 個 × 特徴数
- 回帰問題: 特徴数 × 200
バリエーションを考慮する
データセットには、問題空間に多様性を持たせてください。モデルのトレーニングで使用するサンプルが多様であればあるほど、目新しいサンプルや一般的ではないサンプルにも対応できる汎用化されたモデルが実現されます。小売店のモデルが、冬季の購入データだけを使ってトレーニングされた場合を想像してみましょう。夏服の嗜好や購入行動をうまく予測することができるでしょうか。
データの準備
画像
 正しい方法(手動またはデフォルト分割)を決定したら、次のいずれかの方法で Vertex AI にデータを追加できます。
- パソコンまたは Cloud Storage から、ラベル(必要な場合は境界ボックスも)を埋め込んだ CSV または JSON Lines 形式のデータをインポートできます。インポート ファイル形式の詳細については、トレーニング データの準備をご覧ください。データセットを手動で分割する場合は、CSV または JSON Lines インポート ファイルで分割を指定できます。
- データにアノテーションが付いていない場合は、ラベルの付いていない画像をアップロードし、 Google Cloud コンソールを使用してアノテーションを適用できます。これらのアノテーションは、同じ画像セットに対して複数のアノテーション セットで管理できます。たとえば、単一の画像セットに対して、境界ボックスとラベル情報を含む 1 つのアノテーションを用意してオブジェクト検出を行い、ラベル アノテーションのみを含む別のアノテーション セットを用意して分類を行うことができます。
表形式
利用可能なデータが見つかったら、トレーニングの準備ができていることを確認する必要があります。データに偏りがある場合、または欠損値やエラー値が含まれている場合は、モデルの品質に影響します。モデルのトレーニングを始める前に、次のことを考慮してください。詳細については、こちらをご覧ください。
データの漏出とトレーニング / サービング スキューを防ぐ
データの漏出とは、トレーニング時に入力特徴を使用した際に、予測しようとしているターゲットに関する情報、つまり実際にモデルを使用する際には把握できない情報を「漏出」させることです。これは、ターゲット列との相関性が高い特徴が入力特徴の 1 つとして含まれているときに検出できます。たとえば、顧客が来月にかけてサブスクリプションに申し込むかどうかを予測するモデルを構築しているとします。そして入力特徴の 1 つが、その顧客からの将来のサブスクリプションの支払いであったとします。この場合、テスト時のモデル パフォーマンスは強力になるかもしれませんが、本番環境でデプロイされたときはそうなりません。なぜなら将来のサブスクリプションの支払い情報はサービス提供時に存在しないからです。
トレーニング / サービング スキューとは、トレーニング時に使用される入力特徴が、サービス提供時にモデルに提供される特徴と異なるため、本番環境でモデル品質低下が生じる状態を指します。たとえば、毎時の気温を予測するモデルを構築する際に、一週間ごとの気温のみが含まれるデータを使ってトレーニングした場合です。別の例としては、学生の落第を予測する際に、トレーニング データには学生の成績が常に提供されているが、サービス提供時にはこの情報が提供されない場合です。
トレーニング データを把握することは、データの漏出やトレーニング / サービング スキューを防ぐために重要です。
- データを使用する前に、そのデータが何を意味するか、そのデータを特徴として使用するべきかどうかを必ず把握しておいてください。
- 相関関係を [トレーニング] タブで確認します。相関関係が高い場合は、フラグを付けて見直せるようにしてください。
- トレーニング / サービング スキュー: サービス提供時にまったく同じ形式で使用できる入力特徴だけをモデルに提供するようにしてください。
欠損データ、不完全データ、矛盾するデータをクリーンアップする
サンプルデータの値が欠損していることや正確でないことがよくあります。トレーニングに使用する前に時間をとって見直し、可能であればデータ品質を向上させてください。欠損値が多いほど、データが ML モデルのトレーニングに役立つ度合いが減ってしまいます。
- データに欠損値がないか確認し、可能であれば修正するか、列が null 可能に設定されている場合は、値を空白にします。Vertex AI は欠損値を処理できますが、すべての値を使用できる場合は最適な結果が得られる可能性が高くなります。
- 予測を行うには、トレーニングする行の間隔にばらつきがないことを確認します。Vertex AI は欠損値に代入法で対応できますが、すべての行が使用可能であれば、最適な結果が得られる可能性が高くなります。
- データのエラーやノイズを修正または削除して、データをクリーニングします。一貫性のあるデータにするために、スペル、略語、形式を確認します。
データをインポート後に分析する
Vertex AI には、データセットのインポート後の概要が表示されます。インポートしたデータセットをレビューして、各列の変数型が正しいことを確認してください。Vertex AI は列の値に基づいて変数型を自動的に検出しますが、それぞれを手動で確認することをおすすめします。さらに、null 値許容も確認する必要があります。これによって、列で値の欠落が許容されるか、null 値が必要かが決まります。
モデルのトレーニング
画像
カスタムモデルの作成時に Vertex AI がどのようにデータセットを使用するかを考慮する
データセットには、トレーニング セット、検証セット、テストセットが含まれます。データセットの分割を指定しない場合(データの準備を参照)、Vertex AI は自動的に画像の 80% をトレーニングに、10% を検証に、10% をテストに使用します。
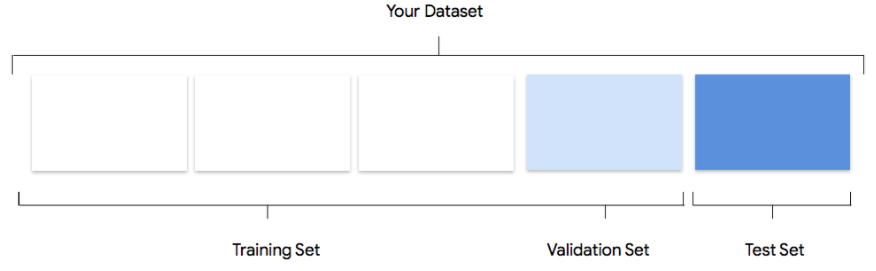
トレーニング セット
 データの大部分をトレーニング セットに含めるようにします。これはトレーニング中にモデルが「見る」データであり、モデルのパラメータ、つまりニューラル ネットワークのノード間の接続の重みを学習するために使用されます。
検証セット
 検証セットは「dev」セットとも呼ばれ、やはりトレーニング プロセス中に使用されます。モデルの学習フレームワークは、トレーニング プロセスの各イテレーションでトレーニング データを取り込んだ後、検証セットに対するモデルのパフォーマンスに基づき、そのハイパーパラメータ(モデルの構造を指定する変数)を調整します。トレーニング セットを使用してハイパーパラメータを調整しようとすると、モデルがトレーニング データに過度に適合してしまい、正確に一致しないサンプルを一般化するのが困難になる可能性が高いです。多少違ったデータセットを使ってモデル構造を細かく調整することで、モデルがより適切に一般化されます。
テストセット
 テストセットはトレーニング プロセスにはまったく使用されません。モデルのトレーニングが完了したら、モデル向けのまったく新しい課題としてテストセットを使用します。テストセットに対するモデルのパフォーマンスを知ることで、モデルが実世界のデータに対してどのように機能するかをおおよそ理解できます。
手動分割
 自分でデータセットを分割することもできます。手動でのデータ分割は、プロセスをより詳細に制御したい場合や、モデルのトレーニング ライフサイクルの特定の部分に特定のサンプルを確実に含めたい場合に適しています。
表形式
データセットをインポートしたら、次のステップはモデルをトレーニングすることです。Vertex AI は、トレーニングのデフォルトを使用して信頼性の高い ML モデルを生成しますが、ユースケースに基づいて一部のパラメータを調整することもできます。
できるだけ多くの特徴列をトレーニングで選択するようにしてください。ただし、それぞれをレビューして、トレーニングに適していることを確認してください。特徴の選択に関しては、以下の事項に留意してください。
- 各行に一意の値を持つランダムに割り当てられた ID 列のように、ノイズを発生させる特徴列を選択しないでください。
- 各特徴量の列とその値をよく把握しておいてください。
- 1 つのデータセットから複数のモデルを作成する場合、作ろうとしているモデルの予測対象に関係ない列は削除してください。
- 公平性の原則を思い出してください。モデルをトレーニングする際に、特定の主流ではないグループに対して偏った、あるいは不公平な判断を導く可能性のある特徴量を使っていませんか?
Vertex AI がデータセットを使用する方法
データセットは、トレーニング セット、検証セット、テストセットに分割されます。デフォルトで Vertex AI が適用する分割は、トレーニングするモデルのタイプによって変わります。また、必要に応じて、分割を指定する(手動分割)こともできます。詳細については、AutoML モデルのデータ分割についてをご覧ください。
トレーニング セット
データの大部分をトレーニング セットに含めるようにします。これはトレーニング中にモデルが「見る」データであり、モデルのパラメータ、つまりニューラル ネットワークのノード間の接続の重みを学習するために使用されます。
検証セット
検証セットは「dev」セットとも呼ばれ、やはりトレーニング プロセス中に使用されます。モデルの学習フレームワークは、トレーニング プロセスの各イテレーションでトレーニング データを取り込んだ後、検証セットに対するモデルのパフォーマンスに基づき、そのハイパーパラメータ(モデルの構造を指定する変数)を調整します。トレーニング セットを使用してハイパーパラメータを調整しようとすると、モデルがトレーニング データに過度に適合してしまい、正確に一致しないサンプルを一般化するのが困難になる可能性が高いです。多少違ったデータセットを使ってモデル構造を細かく調整することで、モデルがより適切に一般化されます。
テストセット
テストセットはトレーニング プロセスにはまったく使用されません。モデルのトレーニングが完了したら、Vertex AI はモデル向けのまったく新しい課題としてテストセットを使用します。テストセットに対するモデルのパフォーマンスを知ることで、モデルが実世界のデータに対してどのように機能するかをおおよそ理解できます。
モデルの評価、テスト、デプロイ
モデルを評価する
画像
モデルのトレーニングが完了すると、モデルのパフォーマンスの概要が表示されます。詳細な分析を表示するには、[評価] または [評価全体を見る] をクリックします。
 モデルのデバッグは、モデル自体よりもデータを対象とするものです。本番環境への移行前や移行後にパフォーマンスを評価しているとき、モデルが予期しない動作をするようになった場合は、立ち戻ってデータを確認し、改善の余地がある箇所を見つける必要があります。
Vertex AI で実施可能な分析
Vertex AI の評価セクションでは、テストサンプルに対するモデルの出力と一般的な ML の指標を使用してカスタムモデルのパフォーマンスを評価できます。このセクションでは、以下の各コンセプトの意味について説明します。
- モデルの出力
- スコアしきい値
- 真陽性、真陰性、偽陽性、偽陰性
- 適合率と再現率
- 適合率 / 再現率曲線
- 平均適合率
モデルの出力の解釈方法
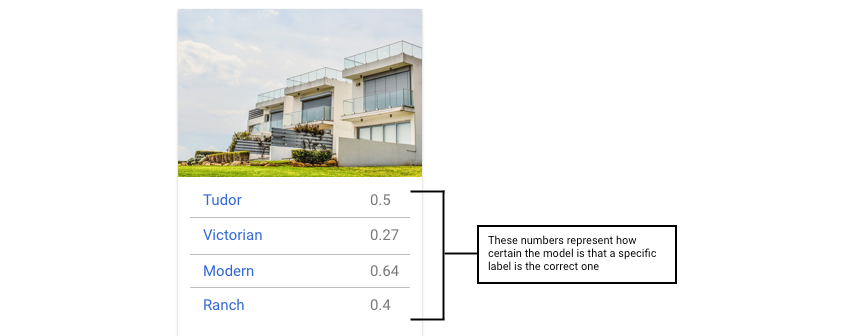
Vertex AI はテストデータからサンプルを取り出し、モデルに対してまったく新しい課題を提示します。モデルはそれぞれのサンプルについて、各ラベルがそのサンプルにどれくらい強く関連付けられているかを示す一連の数値を出力します。数値が高い場合、高い信頼度でそのラベルをドキュメントに適用できるとモデルが判断したことを示します。
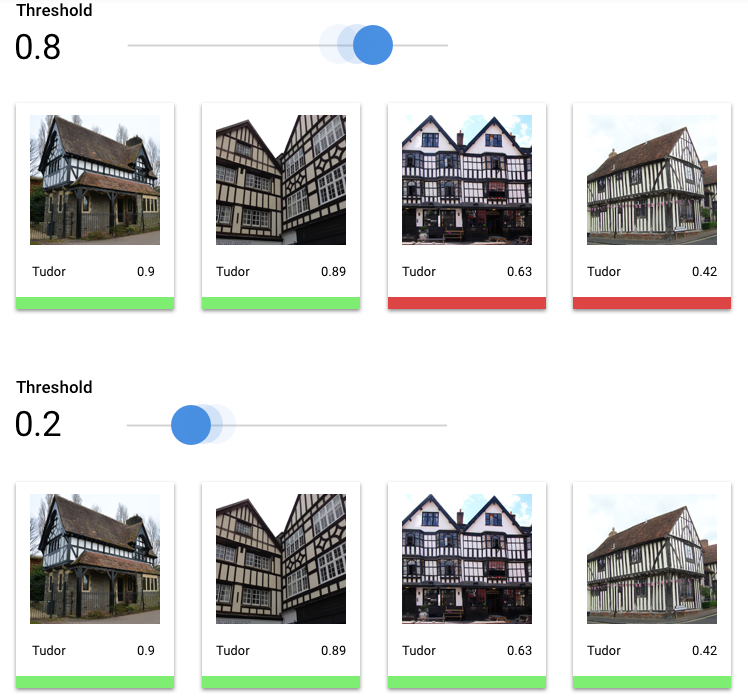
スコアしきい値とは
スコアしきい値を設定することにより、上述の確率をオン / オフの値に変換できます。スコアしきい値とは、モデルで特定のテスト項目にカテゴリを割り当てるために必要な信頼度です。 Google Cloud コンソールのスコアしきい値スライダーは、データセット内のすべてのカテゴリと個々のカテゴリのさまざまなしきい値の効果をテストするための視覚的なツールです。スコアしきい値が低い場合、モデルはより多くの画像を分類しますが、いくつかの画像を誤分類するリスクがあります。スコアしきい値が高い場合、モデルが分類する画像は少なくなりますが、誤分類のリスクは低くなります。各カテゴリごとのしきい値は、 Google Cloud コンソール上で調整して実験することができます。ただし、本番環境でモデルを使用するときは、ご自身が最適と判断したしきい値を適用する必要があります。
真陽性、真陰性、偽陽性、偽陰性とは
スコアしきい値を適用した後、モデルが出した推論は、次の 4 つのカテゴリのいずれかに分類されます。
ご自身が最適だと判断したしきい値。

これらのカテゴリを使用して、モデルの有効性の評価に役立つ指標である適合率と再現率を計算できます。
適合率、再現率とは
適合率と再現率は、モデルがどの程度適切に情報を取得しているか、そしてどれだけの情報を除外しているかを把握するのに役立ちます。適合率は、ラベルが割り当てられたすべてのテストサンプルのうち、実際にそのラベルに分類される必要のあるものの数を示します。再現率は、ラベルが割り当てられる必要のあるすべてのテストサンプルのうち、実際にラベルが割り当てられたものの数を示します。
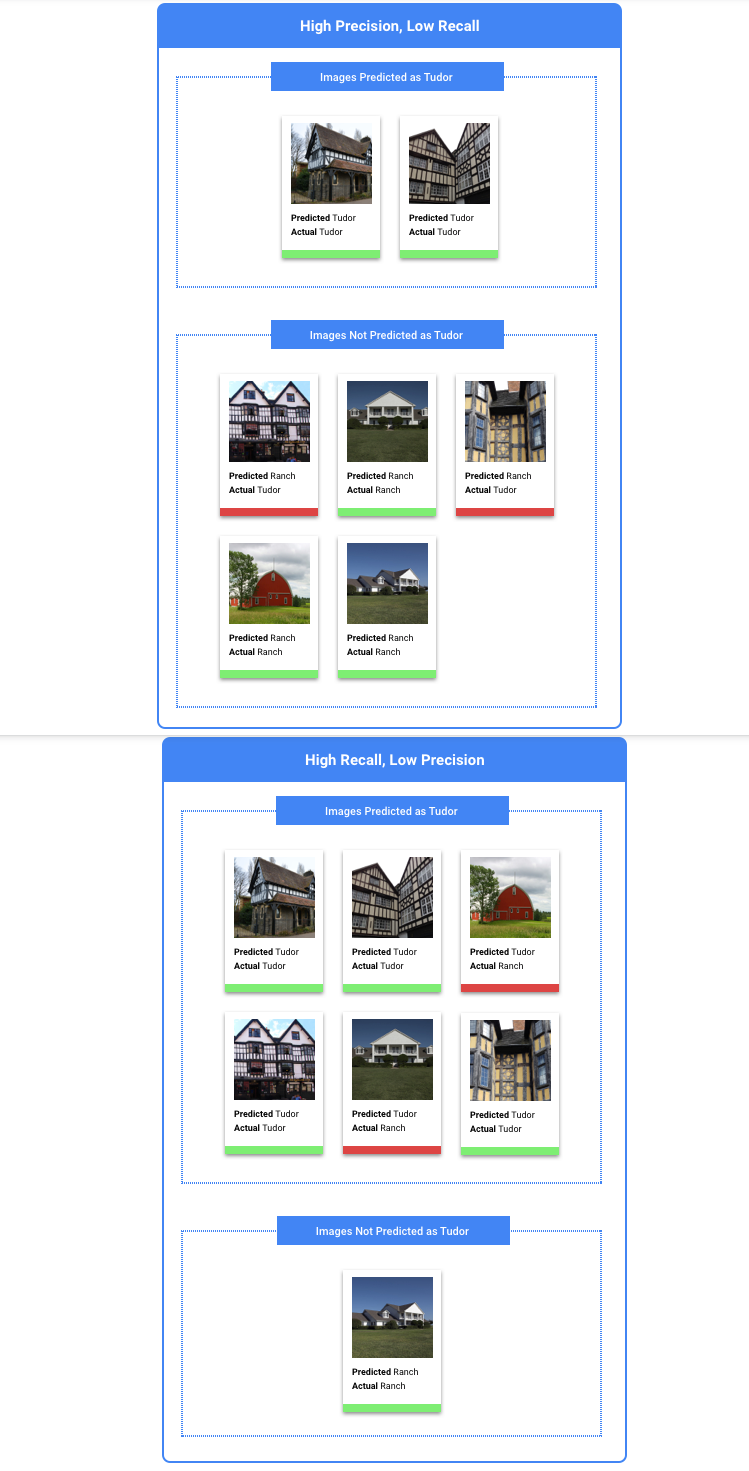
適合率や再現率を高めるために最適化する必要があるか
ユースケースによっては、適合率または再現率を高めるために最適化した方がよい場合もあります。どちらのアプローチが最善かを判断する場合、次の 2 つのユースケースを考慮してください。
ユースケース: 画像のプライバシー
機密情報を自動的に検出し、それをぼかすシステムを作成するとします。

この場合の偽陽性とは、ぼかす必要のないものまでぼかしてしまうことを指します。これは煩わしいことはありますが、大きな害はありません。

この場合の偽陰性とは、ぼかす必要のあるものがぼかされないことを指します。たとえばクレジット カードの情報がぼかされない場合などで、個人情報の盗難につながるおそれがあります。
この場合は、再現率を高めるように最適化することをおすすめします。この指標は、行われたすべての推論のうち、どれだけの対象が取りこぼされているかを測定します。再現率の高いモデルは、関連性が低めの例までラベル付けする傾向があるため、カテゴリのトレーニング データが少ない場合に役立ちます。
ユースケース: ストックフォトの検索
特定のキーワードに対応する最適なストックフォトを見つけるシステムを作成するとします。

この場合の偽陽性は、無関係な写真を検出してしまうことです。最も適した画像だけを返すことを謳った検索機能であるため、これは大きな失敗です。

この場合の偽陰性は、キーワード検索に該当する画像を返すのに失敗することです。多くの検索語では、一致する可能性の高い写真が何千枚もあるため、これは問題になりません。
この場合、適合率を高めるように最適化することをおすすめします。この指標は、行われたすべての推論がどの程度正しいかを測定します。適合率の高いモデルでは、最も関連性の高いサンプルのみにラベルが付けられる可能性が高くなるため、目的のクラスがトレーニング データ内によく見られるケースに有用です。
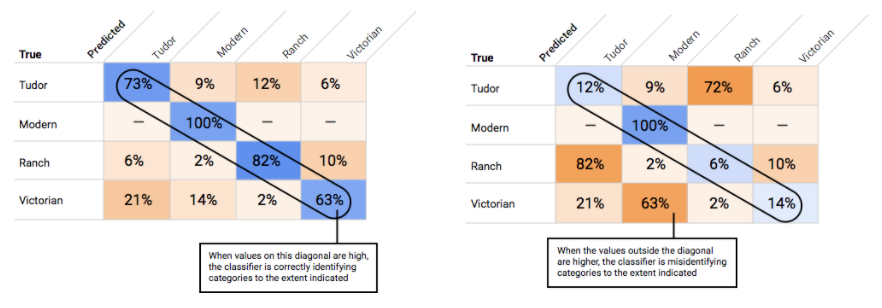
混同行列の使用
適合率 / 再現率曲線の解釈
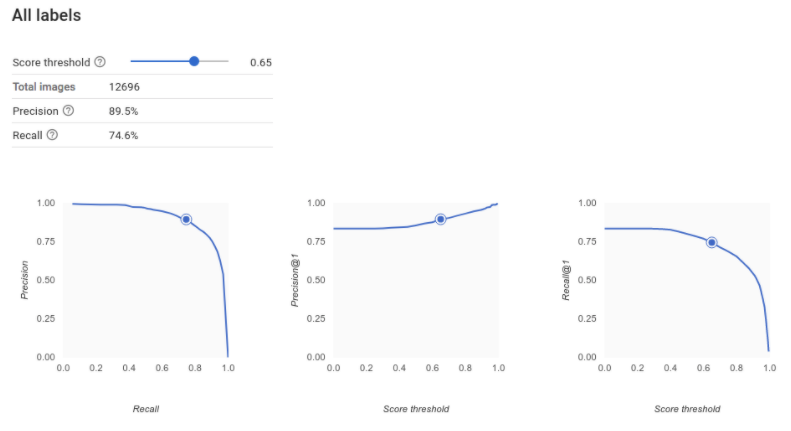
スコアしきい値ツールを使用すると、選択したスコアしきい値が適合率と再現率にどう影響するかを調べることができます。スコアしきい値バーのスライダーをドラッグすると、そのしきい値が適合率と再現率のトレードオフ曲線のどこに位置するのか、またそのしきい値が適合率と再現率のそれぞれにどう影響するのかを見ることができます(多分類モデルの場合、これらのグラフの適合率と再現率は、適合率と再現率の指標の計算に使用される唯一のラベルが、返されるラベルのセットの中で最も高いスコアを持つラベルであることを意味します)。これは偽陽性と偽陰性のバランスを取るのに有効です。
モデル全体として許容できると思われるしきい値を選択したら、個々のラベルをクリックし、そのしきい値が各ラベルの適合率 / 再現率曲線のどこに位置するかを確認します。場合によっては、一部のラベルに対して多くの誤った推論が出ることがあります。このような状況は、そのラベルに合わせてクラスごとのしきい値をカスタマイズするかどうか判断するのに役立つかもしれません。たとえば、住宅のデータセットを見た際に、しきい値が 0.5 の場合に、すべての画像タイプに対して合理的な適合率と再現率が得られることに気づいたとします。ただし画像タイプが「Tudor」の場合は例外的にこの傾向が見られませんでした。おそらくこれは「Tudor」が非常に一般的なカテゴリであるためです。このカテゴリでは、偽陽性が数多く見られます。この場合、推論のための分類器を呼び出すときに、「Tudor」のしきい値だけを 0.8 にできます。
平均適合率とは
モデル精度については、適合率 / 再現率曲線の下の領域が有用な指標となります。これは、モデルがすべてのスコアしきい値でどの程度適切に機能するかを測定します。Vertex AI では、この指標を「平均適合率」と呼びます。このスコアが 1.0 に近ければ近いほど、モデルはテストセットに対して適切に機能しています。各ラベルについてランダムに推測するモデルの場合に得られる平均適合率はおよそ 0.5 です。
表形式
モデルのトレーニングが完了すると、モデルのパフォーマンスの概要が表示されます。モデルの評価指標は、データセット(テスト データセット)のスライスに対するモデルのパフォーマンスに基づきます。モデルが実際のデータで使用できる状態になっているかどうかを判断する際には、検討すべき主な指標とコンセプトがあります。
分類指標
スコアしきい値
顧客が来年にジャケットを購入するかどうかを予測する ML モデルを考えてみましょう。特定の顧客がジャケットを購入することを予測する前に、このモデルにはどの程度の確実性が必要でしょうか。分類モデルでは、各推論に信頼スコア(予測クラスが正しいというモデルの確実性の数値的評価)が割り当てられます。スコアしきい値は、特定のスコアがはい / いいえの決定に変換されるときを決定する数値です。つまり、モデルが「はい、この信頼度スコアは、この顧客が来年中にコートを購入すると結論づけるのに十分な高さです」と知らせる値です。
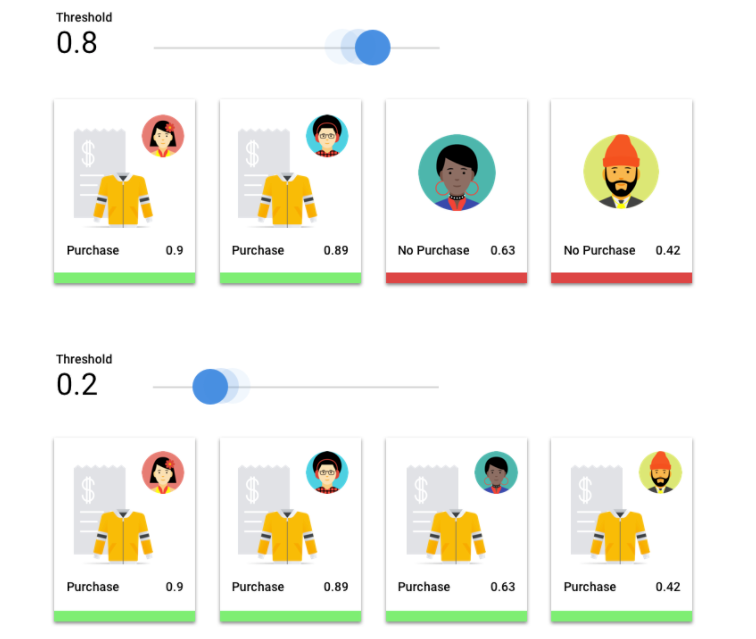
スコアしきい値が低いと、モデルが誤った分類を行うリスクがあります。このため、スコアしきい値は特定のユースケースに基づいて設定しなければなりません。
推論の結果
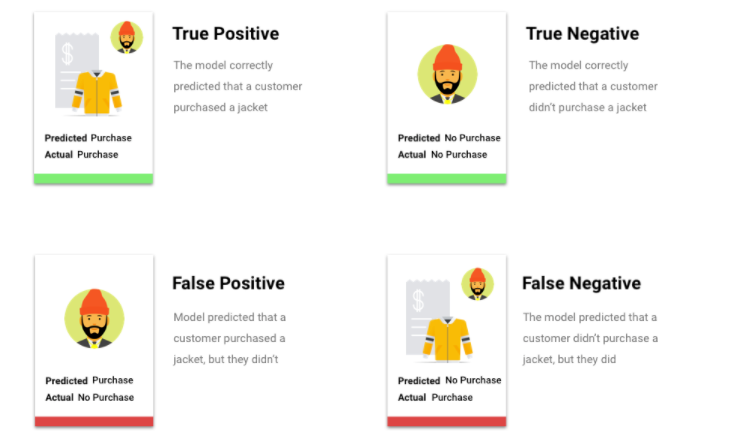
スコアしきい値を適用した後のモデルによる推論は、4 つのカテゴリのうちの 1 つに分類されます。これらのカテゴリを理解するために、もう一度ジャケットのバイナリ分類モデルを考えてみましょう。この例では、陽性のクラス(モデルが予測しようとしていること)は、顧客がジャケットを来年に購入するということです。
- 真陽性: モデルは陽性のクラスを正しく予測している。モデルは顧客がジャケットを購入することを正しく予測しました。
- 偽陽性: モデルは陽性のクラスを誤って予測している。モデルは顧客がジャケットを購入すると予測しましたが、顧客は購入しませんでした。
- 真陰性: モデルは陰性のクラスを正しく予測している。モデルは顧客がジャケットを購入しないことを正しく予測しました。
- 偽陰性: モデルは陰性のクラスを誤って予測している。モデルは顧客がジャケットを購入しないと予測しましたが、顧客は購入しました。
適合率と再現率
適合率と再現率の指標は、モデルがどの程度適切に情報を取得しているか、そしてどれだけの情報を除外しているかを把握するのに役立ちます。適合率と再現率の詳細。
- 適合率は、陽性推論のうち、正しかった推論の割合です。顧客が購入するであろうというすべての推論のうち、実際に購入した割合です。
- 再現率は、モデルによって正しく予測された、このラベルが付けられた行の割合です。つまり、識別できるはずの顧客の購入のうち、実際に識別された割合を示します。
ユースケースに応じて、適合率または再現率の最適化が必要になる場合があります。
その他の分類指標
- AUC PR: 適合率 / 再現率(PR)曲線の下の面積。この値は範囲が 0~1 で、値が高いほど高品質のモデルであることを示します。
- AUC ROC: 受信者操作特性(ROC)曲線の下の面積。この範囲は 0~1 で、値が高いほど高品質のモデルであることを示します。
- 精度: モデルによって生成された分類推論のうち正しい推論であった割合。
- ログ損失: モデル推論とターゲット値の間のクロス エントロピー。この範囲はゼロから無限大までで、値が小さいほど高品質のモデルであることを示します。
- F1 スコア: 適合率と再現率の調和平均。適合率と再現率のバランスを求めていて、クラス分布が不均一な場合、F1 は有用な指標となります。
予測と回帰の指標
モデルを構築すると、Vertex AI から提供されるさまざまな標準指標を使ってそのモデルを評価できます。モデルを評価する方法について完全な答えはありません。問題の種類や、モデルで達成したいことを合わせて評価指標を検討します。Vertex AI で利用できる指標の一部の概要を次に示します。
平均絶対誤差(MAE)
MAE は、ターゲットと予測値の平均絶対差です。一連の推論における誤差(目標値と予測値の差)の平均の大きさを測定します。MAE では、絶対値を使用するため、関係の方向性を考慮せず、過少パフォーマンスや過剰パフォーマンスが示されることもありません。MAE を評価するとき、値が小さいほど品質の高いモデルを示します(0 は完全な予測因子を表します)。
二乗平均平方根誤差(RMSE)
RMSE は、ターゲットと予測値の平均二乗差の平方根です。RMSE は MAE よりも外れ値の影響を受けやすいため、大きな誤差が心配な場合は RMSE のほうがより有用な評価指標といえます。MAE と同様、値が小さいほど品質の高いモデルを示します(0 は完全な予測因子を表します)。
二乗平均対数平方誤差(RMSLE)
RMSLE は対数目盛りの RMSE です。RMSLE は絶対誤差よりも相対誤差に対して敏感であり、過剰パフォーマンスよりも過小パフォーマンスを重視します。
観測された分位値(予測のみ)
特定のターゲット分位値の場合、観測された分位値では、指定された分位推論値の下に観測された値の実際の割合が示されます。観測された分位値は、モデルがターゲット分位値とどれくらい離れているかを示します。2 つの値の差が小さいほど、高品質なモデルであることを示します。
スケールされたピンボールロス(予測のみ)
指定されたターゲット分位値でのモデルの品質を測定します。数値が小さいほど、高品質のモデルであることを示します。さまざまな分位値のスケールされたピンボールロス指標を比較することで、そうした分位値間のモデルの相対精度を判断できます。
モデルのテスト
画像
Vertex AI は、自動的にデータの 10%(ただしデータ分割を自分で行った場合は、選択したパーセント)を使ってモデルをテストします。テストデータに対するモデルのパフォーマンスは [評価] ページに表示されます。モデルの信頼度をチェックしたい場合は、いくつかの方法があります。最も簡単な方法は、[デプロイとテスト] ページにいくつかの画像をアップロードし、サンプルに対してモデルが選択するラベルを確認することです。モデルの性能が良ければ、これで期待に沿った結果が得られるはずです。受け取ると予想される各種画像のサンプルをいくつか試してみてください。
モデルを独自の自動テストで使用する場合、[デプロイとテスト] ページでは、モデルをプログラムで呼び出す方法も示されています。
表形式
モデル指標の評価とは主として、モデルをデプロイする準備ができているかどうかを判断する方法ですが、新しいデータでテストすることもできます。新しいデータをアップロードして、モデルの推論が自分の予想と一致するかどうかを確認してください。評価指標や新しいデータによるテストに基づいて、モデルのパフォーマンスを引き続き向上させる必要があることがあります。
モデルをデプロイする
画像
モデルのパフォーマンスが満足のいくものになったら、モデルの使用を開始します。本番環境で使用することになることも、一回限りの推論リクエストになることもあります。ユースケースに応じて、モデルをさまざまな方法で使用できます。
バッチ推論
バッチ推論は、多数の推論リクエストを一度に行う場合に便利です。バッチ推論は非同期の処理です。つまり、モデルはすべての推論リクエストの処理が完了するのを待ってから、推論値を含む JSON Lines ファイルを返します。
オンライン推論
REST API を使用してモデルに対する推論リクエストを行えるようにモデルをデプロイします。オンライン推論は同期処理(リアルタイム)です。つまり、推論結果はすぐに返されますが、1 回の API 呼び出しで受け付けられる推論リクエストは 1 件だけです。オンライン推論は、モデルがアプリケーションの一部であり、システムの一部が迅速な推論結果に依存している場合に便利です。
表形式
モデルのパフォーマンスが満足のいくものになったら、モデルの使用を開始します。本番環境の規模で使うこともあれば、1 回だけの推論リクエストになることもあります。ユースケースに応じて、モデルをさまざまな方法で使用できます。
バッチ推論
バッチ推論は、多数の推論リクエストを一度に行う場合に便利です。バッチ推論は非同期です。つまり、モデルはすべての推論リクエストを処理してから、推論値を格納した CSV ファイルまたは BigQuery テーブルを返します。
オンライン推論
REST API を使用してモデルに対する推論リクエストを行えるようにモデルをデプロイします。オンライン推論は同期処理(リアルタイム)です。つまり、推論はすぐに返されますが、1 回の API 呼び出しで受け付けられる推論リクエストは 1 件だけです。オンライン推論は、モデルがアプリケーションの一部であり、システムの一部が迅速な推論結果に依存している場合に便利です。
クリーンアップ
不要な料金が発生しないようにするため、モデルを使用していないときはモデルをデプロイ解除してください。
モデルの使用が終了したら、アカウントに不要な料金が発生しないように、作成したリソースを削除します。